Operating Instructions
Page 2
Owner's Record The model and serial numbers are cautioned that the cable ground shall be connected to the grounding system of important operating and maintenance (servicing) instructions in the literature accompanying the appliance. DAV-LF1 Serial No CAUTION You are located at the rear of it out by the plug, never by the cord. To disconnect the cord, pull it correctly as chemical waste. Except...
Owner's Record The model and serial numbers are cautioned that the cable ground shall be connected to the grounding system of important operating and maintenance (servicing) instructions in the literature accompanying the appliance. DAV-LF1 Serial No CAUTION You are located at the rear of it out by the plug, never by the cord. To disconnect the cord, pull it correctly as chemical waste. Except...
Operating Instructions
Page 5
... Changing the Angles 69 Displaying Subtitles 70 Locking Discs 71 (CUSTOM PARENTAL CONTROL, PARENTAL CONTROL) Step 5: Adjusting the Wireless Other Operations System 31 Step 6: Performing the Quick Setup ..... 36 Speaker Setup 38 Controlling TV with the Supplied Remote 76 Using the SONY TV DIRECT Playing Discs Playing Discs 41 Operating by the Touch Panel Sensor 43 Resuming Playback from the Point Where You Stopped the Disc 44 (Resume Play) Using the DVD's Menu 45 Playing VIDEO CDs with PBC Functions Function 78 Using the Video...
... Changing the Angles 69 Displaying Subtitles 70 Locking Discs 71 (CUSTOM PARENTAL CONTROL, PARENTAL CONTROL) Step 5: Adjusting the Wireless Other Operations System 31 Step 6: Performing the Quick Setup ..... 36 Speaker Setup 38 Controlling TV with the Supplied Remote 76 Using the SONY TV DIRECT Playing Discs Playing Discs 41 Operating by the Touch Panel Sensor 43 Resuming Playback from the Point Where You Stopped the Disc 44 (Resume Play) Using the DVD's Menu 45 Playing VIDEO CDs with PBC Functions Function 78 Using the Video...

Operating Instructions
Page 6
Settings and Adjustments Using the Setup Display 86 Setting the Display or Sound Track Language 87 (LANGUAGE SETUP) Settings for the Display 87 (SCREEN SETUP) Custom Settings 89 (CUSTOM SETUP) Settings for the Speakers 91 (SPEAKER SETUP) Quick Setup and Resetting the System 96 (SETUP) Additional Information Troubleshooting 97 Specifications 100 Glossary 102 Index to Parts and Controls 106 Language Code List 111 DVD Setup Menu List 112 AMP Menu List 114 Index 115 Quick Reference for Remote Commander Back cover 6GB
Settings and Adjustments Using the Setup Display 86 Setting the Display or Sound Track Language 87 (LANGUAGE SETUP) Settings for the Display 87 (SCREEN SETUP) Custom Settings 89 (CUSTOM SETUP) Settings for the Speakers 91 (SPEAKER SETUP) Quick Setup and Resetting the System 96 (SETUP) Additional Information Troubleshooting 97 Specifications 100 Glossary 102 Index to Parts and Controls 106 Language Code List 111 DVD Setup Menu List 112 AMP Menu List 114 Index 115 Quick Reference for Remote Commander Back cover 6GB

Operating Instructions
Page 7
... Manual • The OSD (on-screen display) may vary depending on the country model. • The instructions in this manual. Terms for JPEG files * MP3 (MPEG1 Audio Layer 3) is a trademark. Depending on the disc, no chapters may be recorded. • Scene On a VIDEO CD with PBC functions (page 45), the menu screens, moving pictures and still pictures are used in this manual describe the controls on the remote...
... Manual • The OSD (on-screen display) may vary depending on the country model. • The instructions in this manual. Terms for JPEG files * MP3 (MPEG1 Audio Layer 3) is a trademark. Depending on the disc, no chapters may be recorded. • Scene On a VIDEO CD with PBC functions (page 45), the menu screens, moving pictures and still pictures are used in this manual describe the controls on the remote...
Operating Instructions
Page 15
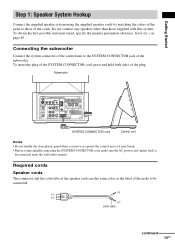
... connecting/disconnecting the SYSTEM CONNECTOR cord, make sure the AC power cord (mains lead) is disconnected from the wall outlet (mains). Subwoofer VIDEO COMPONENT VIDEO OUT ANTENNA Y PB/CB PR/CR SCAN SELECT SELECTABLE INTERLACE S VIDEO (DVD ONLY) MONITOR OUTPUT VIDEO IN VIDEO IN DIR-T1 PHONES REMOTE CONTROL AUDIO IN L AUDIO IN OPTICAL L DIGITAL IN R VIDEO R SAT AM FM 75 COAXIAL FRONT R CENTER FRONT L IMPEDANCE USE 4 SPEAKER SYSYTEM CONNECTOR SYSTEM CONNECTOR cord Control unit Notes • Do not handle the clear plastic panel...
... connecting/disconnecting the SYSTEM CONNECTOR cord, make sure the AC power cord (mains lead) is disconnected from the wall outlet (mains). Subwoofer VIDEO COMPONENT VIDEO OUT ANTENNA Y PB/CB PR/CR SCAN SELECT SELECTABLE INTERLACE S VIDEO (DVD ONLY) MONITOR OUTPUT VIDEO IN VIDEO IN DIR-T1 PHONES REMOTE CONTROL AUDIO IN L AUDIO IN OPTICAL L DIGITAL IN R VIDEO R SAT AM FM 75 COAXIAL FRONT R CENTER FRONT L IMPEDANCE USE 4 SPEAKER SYSYTEM CONNECTOR SYSTEM CONNECTOR cord Control unit Notes • Do not handle the clear plastic panel...

Operating Instructions
Page 26
... connect a digital satellite receiver with COMPONENT PlayStation 2 etc. The system can be processed after 2 seconds. 26GB TV with S VIDEO IN jack INPUT S VIDEO IN TV INPUT VIDEO IN IN IN VIDEO COMPONENT VIDEO OUT ANTENNA Y PB/CB PR/CR SCAN SELECT SELECTABLE INTERLACE S VIDEO (DVD ONLY) MONITOR OUTPUT VIDEO IN VIDEO IN DIR-T1 PHONES REMOTE CONTROL AUDIO IN L AUDIO IN OPTICAL L DIGITAL IN R VIDEO R SAT AM FM 75 COAXIAL FRONT R CENTER FRONT L IMPEDANCE USE 4 SPEAKER SYSYTEM CONNECTOR OUT OUT OUT IN VIDEO...
... connect a digital satellite receiver with COMPONENT PlayStation 2 etc. The system can be processed after 2 seconds. 26GB TV with S VIDEO IN jack INPUT S VIDEO IN TV INPUT VIDEO IN IN IN VIDEO COMPONENT VIDEO OUT ANTENNA Y PB/CB PR/CR SCAN SELECT SELECTABLE INTERLACE S VIDEO (DVD ONLY) MONITOR OUTPUT VIDEO IN VIDEO IN DIR-T1 PHONES REMOTE CONTROL AUDIO IN L AUDIO IN OPTICAL L DIGITAL IN R VIDEO R SAT AM FM 75 COAXIAL FRONT R CENTER FRONT L IMPEDANCE USE 4 SPEAKER SYSYTEM CONNECTOR OUT OUT OUT IN VIDEO...
Operating Instructions
Page 29
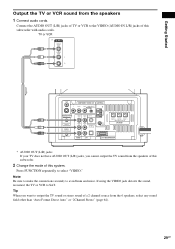
... subwoofer. 2 Change the mode of this system. If using the VIDEO jack distorts the sound, reconnect the TV or VCR to the VIDEO (AUDIO IN L/R) jacks of this subwoofer with audio cords. Connect the AUDIO OUT (L/R) jacks of a 2 channel source from the speakers 1 Connect audio cords. Note Be sure to make the connections securely to select "VIDEO." TV or VCR * VIDEO OUT AUDIO OUT L R VIDEO COMPONENT VIDEO OUT ANTENNA Y PB/CB PR/CR SCAN SELECT SELECTABLE INTERLACE S VIDEO (DVD ONLY) MONITOR OUTPUT VIDEO IN VIDEO IN DIR-T1 PHONES REMOTE CONTROL AUDIO...
... subwoofer. 2 Change the mode of this system. If using the VIDEO jack distorts the sound, reconnect the TV or VCR to the VIDEO (AUDIO IN L/R) jacks of this subwoofer with audio cords. Connect the AUDIO OUT (L/R) jacks of a 2 channel source from the speakers 1 Connect audio cords. Note Be sure to make the connections securely to select "VIDEO." TV or VCR * VIDEO OUT AUDIO OUT L R VIDEO COMPONENT VIDEO OUT ANTENNA Y PB/CB PR/CR SCAN SELECT SELECTABLE INTERLACE S VIDEO (DVD ONLY) MONITOR OUTPUT VIDEO IN VIDEO IN DIR-T1 PHONES REMOTE CONTROL AUDIO...

Operating Instructions
Page 41
... the system. Refer to the front VIDEO COMPONENT VIDEO OUT ANTENNA Y PB/CB PR/CR SCAN SELECT SELECTABLE INTERLACE S VIDEO (DVD ONLY) MONITOR OUTPUT VIDEO IN VIDEO IN DIR-T1 PHONES REMOTE CONTROL AUDIO IN L AUDIO IN OPTICAL L DIGITAL IN R VIDEO R SAT AM FM 75 COAXIAL FRONT R CENTER FRONT L IMPEDANCE USE 4 SPEAKER SYSYTEM CONNECTOR Connect headphones "/1 Z FUNCTION H x Adjust the volume 5 Press H on the system. "No Disc" appears in the front panel display. Playing Discs Playing Discs Playing Discs Depending on the TV screen. To remove the disc Press Z.
... the system. Refer to the front VIDEO COMPONENT VIDEO OUT ANTENNA Y PB/CB PR/CR SCAN SELECT SELECTABLE INTERLACE S VIDEO (DVD ONLY) MONITOR OUTPUT VIDEO IN VIDEO IN DIR-T1 PHONES REMOTE CONTROL AUDIO IN L AUDIO IN OPTICAL L DIGITAL IN R VIDEO R SAT AM FM 75 COAXIAL FRONT R CENTER FRONT L IMPEDANCE USE 4 SPEAKER SYSYTEM CONNECTOR Connect headphones "/1 Z FUNCTION H x Adjust the volume 5 Press H on the system. "No Disc" appears in the front panel display. Playing Discs Playing Discs Playing Discs Depending on the TV screen. To remove the disc Press Z.

Operating Instructions
Page 63
...; Dolby Digital 5.1ch • DTS PROGRAM FORMAT DOLBY DIGITAL 3/2.1 PROGRAM FORMAT DTS 3/2.1 Tips • When the signal contains surround signal components such as LS, RS, or S, the surround effect is enhanced. • If you the three choices above when in multiple audio format, you press the button, the item changes. To turn off the Control Menu Press DVD DISPLAY repeatedly until the Control Menu is displayed. It all discs give you play MPEG AUDIO sound tracks, the system outputs PCM (stereo) signals. 63GB Sound Adjustments...
...; Dolby Digital 5.1ch • DTS PROGRAM FORMAT DOLBY DIGITAL 3/2.1 PROGRAM FORMAT DTS 3/2.1 Tips • When the signal contains surround signal components such as LS, RS, or S, the surround effect is enhanced. • If you the three choices above when in multiple audio format, you press the button, the item changes. To turn off the Control Menu Press DVD DISPLAY repeatedly until the Control Menu is displayed. It all discs give you play MPEG AUDIO sound tracks, the system outputs PCM (stereo) signals. 63GB Sound Adjustments...
Operating Instructions
Page 64
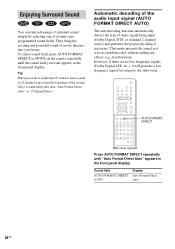
This mode presents the sound as it will generate a low frequency signal for output to output the TV sound or stereo sound of a 2 channel source from the 6 speakers of system's preprogrammed sound fields. Sound field AUTO FORMAT DIRECT AUTO Display Auto Format Direct Auto 64GB Tip When you want to the subwoofer. Automatic decoding of the audio input signal (AUTO FORMAT DIRECT AUTO) The auto decoding function automatically detects the type of movie theaters into your home. They bring the exciting and powerful sound of audio signal being input (Dolby Digital, DTS, or ...
This mode presents the sound as it will generate a low frequency signal for output to output the TV sound or stereo sound of a 2 channel source from the 6 speakers of system's preprogrammed sound fields. Sound field AUTO FORMAT DIRECT AUTO Display Auto Format Direct Auto 64GB Tip When you want to the subwoofer. Automatic decoding of the audio input signal (AUTO FORMAT DIRECT AUTO) The auto decoding function automatically detects the type of movie theaters into your home. They bring the exciting and powerful sound of audio signal being input (Dolby Digital, DTS, or ...

Operating Instructions
Page 65
... recording without adding any source using only the front left and right speakers and subwoofer. Selecting a sound field (AUTO FORMAT DIRECT button) AUTO FORMAT DIRECT MODE With cover opened . Multi channel surround formats are downmixed to play any new sounds or tonal colorations. Sound field AUTO FORMAT DIRECT PRO LOGIC II MOVIE AUTO FORMAT DIRECT PRO LOGIC II MUSIC Display Pro Logic II Movie Pro Logic II Music x AUTO FORMAT DIRECT PRO LOGICII MOVIE/MUSIC Dolby Pro LogicII produces five full-bandwidth output channels from the front left...
... recording without adding any source using only the front left and right speakers and subwoofer. Selecting a sound field (AUTO FORMAT DIRECT button) AUTO FORMAT DIRECT MODE With cover opened . Multi channel surround formats are downmixed to play any new sounds or tonal colorations. Sound field AUTO FORMAT DIRECT PRO LOGIC II MOVIE AUTO FORMAT DIRECT PRO LOGIC II MUSIC Display Pro Logic II Movie Pro Logic II Music x AUTO FORMAT DIRECT PRO LOGICII MOVIE/MUSIC Dolby Pro LogicII produces five full-bandwidth output channels from the front left...

Operating Instructions
Page 68
... on the remote. DTS Digital Surround discs are marked with DTS. DTS-ES encoded programs are marked with DTS-ES. - When connecting the headphones to "Auto Format Direct Auto" automatically. • This system is useful for each function mode. Using the Sound Effect This system provides you connect headphones to suit your needs. Notes • When you with 2 types of program software by pressing a button. To turn off Press AUTO FORMAT DIRECT repeatedly until...
... on the remote. DTS Digital Surround discs are marked with DTS. DTS-ES encoded programs are marked with DTS-ES. - When connecting the headphones to "Auto Format Direct Auto" automatically. • This system is useful for each function mode. Using the Sound Effect This system provides you connect headphones to suit your needs. Notes • When you with 2 types of program software by pressing a button. To turn off Press AUTO FORMAT DIRECT repeatedly until...

Operating Instructions
Page 72
... and input the correct number. To turn off the Control Menu Press DVD DISPLAY repeatedly until the Control Menu is turned off the Custom Parental Control function 1 In Step 4, select [OFF t], then press ENTER. 2 Enter your 4-digit password using the number buttons, then press ENTER. The display for playback. Tip If you forget your password, enter the 6-digit number "199703" using the number buttons when the [CUSTOM PARENTAL CONTROL] display asks you to the Control Menu display. To play, enter your password...
... and input the correct number. To turn off the Control Menu Press DVD DISPLAY repeatedly until the Control Menu is turned off the Custom Parental Control function 1 In Step 4, select [OFF t], then press ENTER. 2 Enter your 4-digit password using the number buttons, then press ENTER. The display for playback. Tip If you forget your password, enter the 6-digit number "199703" using the number buttons when the [CUSTOM PARENTAL CONTROL] display asks you to the Control Menu display. To play, enter your password...

Operating Instructions
Page 73
... DVD SETUP O RETURN Number buttons Enter a 4-digit password using the number buttons, then press ENTER. With cover opened. 1 In stop mode, press DVD SETUP. CUSTOM SETUP PARENTAL CONTROL TRACK SELECTION OFF AUDIO DRC: OFF DATA CD PRIORITY: MP3 JPEG DATE: MM/DD/YYYY 4 Enter your password using the number buttons, then press ENTER. The display for confirming the password appears. x If you have already registered a password The display for entering the password appears. x When you to select...
... DVD SETUP O RETURN Number buttons Enter a 4-digit password using the number buttons, then press ENTER. With cover opened. 1 In stop mode, press DVD SETUP. CUSTOM SETUP PARENTAL CONTROL TRACK SELECTION OFF AUDIO DRC: OFF DATA CD PRIORITY: MP3 JPEG DATE: MM/DD/YYYY 4 Enter your password using the number buttons, then press ENTER. The display for confirming the password appears. x If you have already registered a password The display for entering the password appears. x When you to select...

Operating Instructions
Page 74
...To turn off the Setup Display Press DVD SETUP repeatedly until the Setup Display is turned off the Parental Control function and play the DVD after entering your password Set [LEVEL] to enter a new password. To turn off . CUSTOM SETUP PARENTAL CONTROL LEVEL: STANDARD: 8: CHANGE PASSWORD 7: 6: 5: 4: 3: 2: 1: OFF NC17 R PG13 PG G 8 Select the level you select [OTHERS t], select and enter the standard code in Step 8. CUSTOM SETUP PARENTAL CONTROL LEVEL: STANDARD: CHANGE PASSWORD OFF USA OTHERS 6 Press X/x to the previous screen. The selection items for [LEVEL...
...To turn off the Setup Display Press DVD SETUP repeatedly until the Setup Display is turned off the Parental Control function and play the DVD after entering your password Set [LEVEL] to enter a new password. To turn off . CUSTOM SETUP PARENTAL CONTROL LEVEL: STANDARD: 8: CHANGE PASSWORD 7: 6: 5: 4: 3: 2: 1: OFF NC17 R PG13 PG G 8 Select the level you select [OTHERS t], select and enter the standard code in Step 8. CUSTOM SETUP PARENTAL CONTROL LEVEL: STANDARD: CHANGE PASSWORD OFF USA OTHERS 6 Press X/x to the previous screen. The selection items for [LEVEL...

Operating Instructions
Page 97
... the signal in progressive format. Then set [COMPONENT OUT] to the correct TV input jack (page 25). • The video input on the TV is not set [COMPONENT OUT] to help remedy the problem before requesting repairs. Sound There is no signal is not turned on. • Check that you can see the TV screen correctly, and reset the COMPONENT VIDEO OUTPUT/SCAN SELECT switch to SELECTABLE. • You have set the COMPONENT VIDEO OUTPUT/SCAN SELECT switch on the rear panel...
... the signal in progressive format. Then set [COMPONENT OUT] to the correct TV input jack (page 25). • The video input on the TV is not set [COMPONENT OUT] to help remedy the problem before requesting repairs. Sound There is no signal is not turned on. • Check that you can see the TV screen correctly, and reset the COMPONENT VIDEO OUTPUT/SCAN SELECT switch to SELECTABLE. • You have set the COMPONENT VIDEO OUTPUT/SCAN SELECT switch on the rear panel...

Operating Instructions
Page 98
... is recorded in Dolby Digital or MPEG audio format. Adjust the antennas (aerials) or connect an external antenna (aerial) if necessary. • The signal strength of the center speaker may be monaural or stereo even if the sound track is heard. • Check that the speakers and components are connected securely. • Check that the frequency appears in a place exposed to direct sunlight or strong light such as an...
... is recorded in Dolby Digital or MPEG audio format. Adjust the antennas (aerials) or connect an external antenna (aerial) if necessary. • The signal strength of the center speaker may be monaural or stereo even if the sound track is heard. • Check that the speakers and components are connected securely. • Check that the frequency appears in a place exposed to direct sunlight or strong light such as an...

Operating Instructions
Page 110
..., 93) H DVD DISPLAY (47, 48, 52, 53, 55, 60, 61, 62, 69, 70, 71) I AUTO FORMAT DIRECT (64, 65) J DSGX (68) K DVD SETUP (36, 73, 86) L SUBTITLE (70) M AUDIO (62) N ANGLE (69) O Number buttons (45, 45, 50, 55, 69, 71, 73, 76, 78) P ENTER Q TUNER MENU (81, 83) R TV [/1 (on/standby) (76) S "/1 (standby) (36, 41, 82) T SONY TV DIRECT (78) U TUNER/BAND (81, 82, 83) V FUNCTION (41, 80...
..., 93) H DVD DISPLAY (47, 48, 52, 53, 55, 60, 61, 62, 69, 70, 71) I AUTO FORMAT DIRECT (64, 65) J DSGX (68) K DVD SETUP (36, 73, 86) L SUBTITLE (70) M AUDIO (62) N ANGLE (69) O Number buttons (45, 45, 50, 55, 69, 71, 73, 76, 78) P ENTER Q TUNER MENU (81, 83) R TV [/1 (on/standby) (76) S "/1 (standby) (36, 41, 82) T SONY TV DIRECT (78) U TUNER/BAND (81, 82, 83) V FUNCTION (41, 80...

Operating Instructions
Page 115
... Preset Station 81 Program Play 50 PROGRESSIVE 104 R Radio 82 Rear Panel 109 Region Code 8, 104 Remote 76, 110 REPEAT 53 Resume Play 44 S S VIDEO 25 Scan 54 SCENE 10 Scene 7, 104 SCREEN SAVER 88 SCREEN SETUP 87 Setup Display 86 SHUFFLE 52 Shuffle Play 52 SIZE 91 SLEEP 84 Slide show 49 Slow-motion 54 Sound Field 64 SPEAKER SETUP 91 Speaker System Hookup 15 SUBTITLE 70, 87 Super Audio CD 104 T TEST TONE 92...
... Preset Station 81 Program Play 50 PROGRESSIVE 104 R Radio 82 Rear Panel 109 Region Code 8, 104 Remote 76, 110 REPEAT 53 Resume Play 44 S S VIDEO 25 Scan 54 SCENE 10 Scene 7, 104 SCREEN SAVER 88 SCREEN SETUP 87 Setup Display 86 SHUFFLE 52 Shuffle Play 52 SIZE 91 SLEEP 84 Slide show 49 Slow-motion 54 Sound Field 64 SPEAKER SETUP 91 Speaker System Hookup 15 SUBTITLE 70, 87 Super Audio CD 104 T TEST TONE 92...

Operating Instructions
Page 116
... mode. H Displays the Control Menu display on the TV screen to the previously selected screen, etc. Activates the name function. V Selects the component you want to set or adjust the items. L Changes the subtitle. X Stops playing a disc. es Selects program or shuffle play mode. Normal mode: Turns off . Note The remote control of the TV. J Bass sound is effectively reinforced. TV: Select channel numbers.* P Executes the items or settings. SLOW / : Play a disc in slow motion in red. MP3/JPEG: Selects albums. wk Adjust the SYSTEM volume...
... mode. H Displays the Control Menu display on the TV screen to the previously selected screen, etc. Activates the name function. V Selects the component you want to set or adjust the items. L Changes the subtitle. X Stops playing a disc. es Selects program or shuffle play mode. Normal mode: Turns off . Note The remote control of the TV. J Bass sound is effectively reinforced. TV: Select channel numbers.* P Executes the items or settings. SLOW / : Play a disc in slow motion in red. MP3/JPEG: Selects albums. wk Adjust the SYSTEM volume...


