
Operating Instructions
Page 5
... from Connected Components ......... 52 Settings Changing the Brightness of the Front Panel Display 53 Setting the Demonstration Mode to On/Off 53 Reperforming the Quick Setup 53 Set the System to Standby Mode Automatically 53 Performing Further Settings 54 Additional Information Precautions 62 Troubleshooting 64 Specifications 70 Index 75 5US
... from Connected Components ......... 52 Settings Changing the Brightness of the Front Panel Display 53 Setting the Demonstration Mode to On/Off 53 Reperforming the Quick Setup 53 Set the System to Standby Mode Automatically 53 Performing Further Settings 54 Additional Information Precautions 62 Troubleshooting 64 Specifications 70 Index 75 5US
Operating Instructions
Page 10
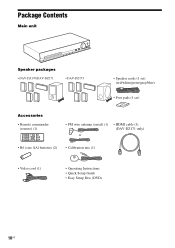
Package Contents Main unit Speaker packages • DAV-DZ170/DAV-DZ171 • DAV-DZ175 • Speaker cords (1 set) (red/white/green/gray/blue) • Foot pads (1 set) Accessories • Remote commander (remote) (1) • FM wire antenna (aerial) (1) or • HDMI cable (1) (DAV-DZ171 only) • R6 (size AA) batteries (2) • Calibration mic (1) • Video cord (1) • Operating Instructions • Quick Setup Guide • Easy Setup Disc (DVD) 10US
Package Contents Main unit Speaker packages • DAV-DZ170/DAV-DZ171 • DAV-DZ175 • Speaker cords (1 set) (red/white/green/gray/blue) • Foot pads (1 set) Accessories • Remote commander (remote) (1) • FM wire antenna (aerial) (1) or • HDMI cable (1) (DAV-DZ171 only) • R6 (size AA) batteries (2) • Calibration mic (1) • Video cord (1) • Operating Instructions • Quick Setup Guide • Easy Setup Disc (DVD) 10US
Operating Instructions
Page 18
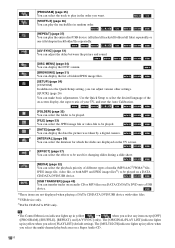
Use the Quick Setup to select the desired language of the on-screen display, the aspect ratio of your TV, and start the Auto Calibration. [FOLDER] (page 33) You ... slides during a slide show. [MEDIA] (page 32) You can select the playback priority of different types of folders/JPEG image files. [SETUP] (page 54) [CUSTOM] In addition to the Quick Setup setting, you can adjust various other settings. [QUICK] (page 26) You can make basic adjustments. [PROGRAM] (page 35) You can select...
Use the Quick Setup to select the desired language of the on-screen display, the aspect ratio of your TV, and start the Auto Calibration. [FOLDER] (page 33) You ... slides during a slide show. [MEDIA] (page 32) You can select the playback priority of different types of folders/JPEG image files. [SETUP] (page 54) [CUSTOM] In addition to the Quick Setup setting, you can adjust various other settings. [QUICK] (page 26) You can make basic adjustments. [PROGRAM] (page 35) You can select...
Operating Instructions
Page 26
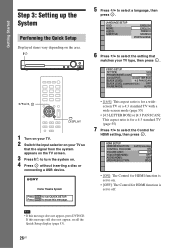
..., then press . Press CLEAR to erase this message. • [16:9]: This aspect ratio is for HDMI function is set to on the area. VIDEO SETUP TV TYPE: 16:9 PROGRESSIVE (COMPONENT OUT): 16:9 4:3 OUTPUT: 4:3 LETTER BOX BLACK LEVEL: 4:3 PAN SCAN BLACK LEVEL (COMPONENT OUT): OFF PAUSE MODE:... AUTO C/X/x/c, DISPLAY 1 Turn on your TV. 2 Switch the input selector on . 4 Press without inserting a disc or connecting a USB device. HDMI SETUP HDMI RESOLUTION: CONTROL FOR HDMI: VOLUME LIMIT: YCBCR/RGB(HDMI): AUDIO(HDMI): JPEG RESOLUTION: AUTO(1920x1080p) ON ON OFF OFF SD • [ON]: ...
..., then press . Press CLEAR to erase this message. • [16:9]: This aspect ratio is for HDMI function is set to on the area. VIDEO SETUP TV TYPE: 16:9 PROGRESSIVE (COMPONENT OUT): 16:9 4:3 OUTPUT: 4:3 LETTER BOX BLACK LEVEL: 4:3 PAN SCAN BLACK LEVEL (COMPONENT OUT): OFF PAUSE MODE:... AUTO C/X/x/c, DISPLAY 1 Turn on your TV. 2 Switch the input selector on . 4 Press without inserting a disc or connecting a USB device. HDMI SETUP HDMI RESOLUTION: CONTROL FOR HDMI: VOLUME LIMIT: YCBCR/RGB(HDMI): AUDIO(HDMI): JPEG RESOLUTION: AUTO(1920x1080p) ON ON OFF OFF SD • [ON]: ...
Operating Instructions
Page 27
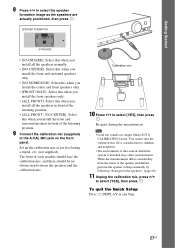
... position. 9 Connect the calibration mic (supplied) to select [YES], then press . Note • Loud test sounds are actually positioned, then press . To quit the Quick Setup Press DISPLAY in which the system is installed may affect measurements. Calibration mic 10 Press C/c to the A.CAL MIC jack on the front panel. SPEAKER...
... position. 9 Connect the calibration mic (supplied) to select [YES], then press . Note • Loud test sounds are actually positioned, then press . To quit the Quick Setup Press DISPLAY in which the system is installed may affect measurements. Calibration mic 10 Press C/c to the A.CAL MIC jack on the front panel. SPEAKER...
Operating Instructions
Page 28
...YCBCR/RGB(HDMI): AUDIO(HDMI): JPEG RESOLUTION: AUTO(1920x1080p) ON OFF YCBCR OFF SD 6 Press X/x to select [CUSTOM], then press . HDMI SETUP HDMI RESOLUTION: CONTROL FOR HDMI: VOLUME LIMIT: YCBCR/RGB(HDMI): AUDIO(HDMI): JPEG RESOLUTION: AUTO(1920x1080p) AUTO(1920x1O08F0pF) 1920LxE1V0E8L02i 1280YxC72BC0pR 720x4O80FpF SD ... select the type of video output of the system. CUSTOM CUSTOM QUICK 5 Press X/x to select the desired setting, then press . HDMI SETUP HDMI RESOLUTION: CONTROL FOR HDMI: VOLUME LIMIT: YCBCR/RGB(HDMI): AUDIO(HDMI): JPEG RESOLUTION: AUTO(1920x1080p) ON OFF YCBCR OFF SD 7...
...YCBCR/RGB(HDMI): AUDIO(HDMI): JPEG RESOLUTION: AUTO(1920x1080p) ON OFF YCBCR OFF SD 6 Press X/x to select [CUSTOM], then press . HDMI SETUP HDMI RESOLUTION: CONTROL FOR HDMI: VOLUME LIMIT: YCBCR/RGB(HDMI): AUDIO(HDMI): JPEG RESOLUTION: AUTO(1920x1080p) AUTO(1920x1O08F0pF) 1920LxE1V0E8L02i 1280YxC72BC0pR 720x4O80FpF SD ... select the type of video output of the system. CUSTOM CUSTOM QUICK 5 Press X/x to select the desired setting, then press . HDMI SETUP HDMI RESOLUTION: CONTROL FOR HDMI: VOLUME LIMIT: YCBCR/RGB(HDMI): AUDIO(HDMI): JPEG RESOLUTION: AUTO(1920x1080p) ON OFF YCBCR OFF SD 7...
Operating Instructions
Page 29
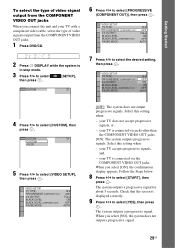
... Select this setting when: - The system outputs a progressive signal. Check that the screen is connected via the COMPONENT VIDEO OUT jacks. VIDEO SETUP TV TYPE: PROGRESSIVE (COMPONENT OUT): 4:3 OUTPUT: BLACK LEVEL: BLACK LEVEL (COMPONENT OUT): PAUSE MODE: 16:9 OFF FUOLNL ON OFF AUTO 4 ...cable, select the type of video signals output from the COMPONENT VIDEO OUT jacks. 1 Press DVD/CD. 6 Press X/x to select [SETUP], then press . VIDEO SETUP TV TYPE: PROGRESSIVE (COMPONENT OUT): 4:3 OUTPUT: BLACK LEVEL: BLACK LEVEL (COMPONENT OUT): PAUSE MODE: 16:9 OFF FULL ON OFF ...
... Select this setting when: - The system outputs a progressive signal. Check that the screen is connected via the COMPONENT VIDEO OUT jacks. VIDEO SETUP TV TYPE: PROGRESSIVE (COMPONENT OUT): 4:3 OUTPUT: BLACK LEVEL: BLACK LEVEL (COMPONENT OUT): PAUSE MODE: 16:9 OFF FUOLNL ON OFF AUTO 4 ...cable, select the type of video signals output from the COMPONENT VIDEO OUT jacks. 1 Press DVD/CD. 6 Press X/x to select [SETUP], then press . VIDEO SETUP TV TYPE: PROGRESSIVE (COMPONENT OUT): 4:3 OUTPUT: BLACK LEVEL: BLACK LEVEL (COMPONENT OUT): PAUSE MODE: 16:9 OFF FULL ON OFF ...
Operating Instructions
Page 33
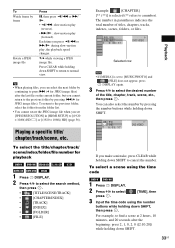
... files) after the beginning: press 2, 1, 0, 2, 0 ([2:10:20]) while holding down SHIFT. 33US Each time you cannot return to cancel the number. The number in [HDMI SETUP] to a number). X/x while viewing a JPEG image file.
... files) after the beginning: press 2, 1, 0, 2, 0 ([2:10:20]) while holding down SHIFT. 33US Each time you cannot return to cancel the number. The number in [HDMI SETUP] to a number). X/x while viewing a JPEG image file.
Operating Instructions
Page 38
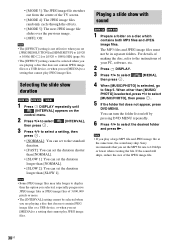
... than [NORMAL]. • [SLOW 2]: You can turn the folder list on a disc which contains both MP3 files and JPEG image files. Sony recommends that cannot play JPEG image files. The MP3 files and JPEG image files must not be selected when you are playing a disc that cannot... software, etc. 2 Press DISPLAY. 3 Press X/x to select [MEDIA], then press . 4 When [MUSIC/PHOTO] is not effective when you set [JPEG RESOLUTION] in [HDMI SETUP] to [(1920 × 1080i) HD ] or [(1920 × 1080i) HD] (page 56). • The [EFFECT] setting cannot be in separate folders. If the sound...
... than [NORMAL]. • [SLOW 2]: You can turn the folder list on a disc which contains both MP3 files and JPEG image files. Sony recommends that cannot play JPEG image files. The MP3 files and JPEG image files must not be selected when you are playing a disc that cannot... software, etc. 2 Press DISPLAY. 3 Press X/x to select [MEDIA], then press . 4 When [MUSIC/PHOTO] is not effective when you set [JPEG RESOLUTION] in [HDMI SETUP] to [(1920 × 1080i) HD ] or [(1920 × 1080i) HD] (page 56). • The [EFFECT] setting cannot be in separate folders. If the sound...
Operating Instructions
Page 47
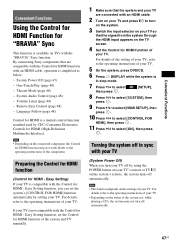
...Easy Control (page 48) - If your TV and press [/1 to turn off in stop mode. 7 Press X/x to select [SETUP], then press . 8 Press X/x to select [CUSTOM], then press . 9 Press X/x to select [HDMI SETUP], then press . 10 Press X/x to select [CONTROL FOR HDMI], then press . 11 Press X/x to select [ON], then...with an HDMI cable. 2 Turn on your TV is available on the settings of your TV is simplified as below: - By connecting Sony components that are compatible with the Control for HDMI function with an HDMI cable, operation is compatible with your TV (System Power Off)...
...Easy Control (page 48) - If your TV and press [/1 to turn off in stop mode. 7 Press X/x to select [SETUP], then press . 8 Press X/x to select [CUSTOM], then press . 9 Press X/x to select [HDMI SETUP], then press . 10 Press X/x to select [CONTROL FOR HDMI], then press . 11 Press X/x to select [ON], then...with an HDMI cable. 2 Turn on your TV is available on the settings of your TV is simplified as below: - By connecting Sony components that are compatible with the Control for HDMI function with an HDMI cable, operation is compatible with your TV (System Power Off)...
Operating Instructions
Page 53
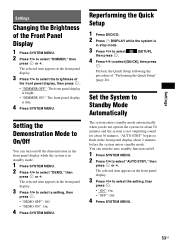
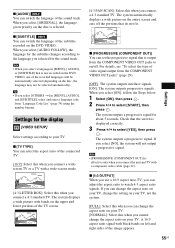
..."AUTO STBY" begins to flash in the front panel display about 30 minutes and the system is in stop mode. 3 Press X/x to select [SETUP], then press . 4 Press X/x to select "DEMO," then press or c. Setting the Demonstration Mode to On/Off You can turn on /off ...X/x to select a setting, then press . • "DEMO OFF": Off. • "DEMO ON": On. 4 Press SYSTEM MENU. Perform the Quick Setup following the procedure of "Performing the Quick Setup" (page 26). The selected item appears in the front panel display. 3 Press X/x to select "AUTO STBY," then press or c. Reperforming the Quick...
..."AUTO STBY" begins to flash in the front panel display about 30 minutes and the system is in stop mode. 3 Press X/x to select [SETUP], then press . 4 Press X/x to select "DEMO," then press or c. Setting the Demonstration Mode to On/Off You can turn on /off ...X/x to select a setting, then press . • "DEMO OFF": Off. • "DEMO ON": On. 4 Press SYSTEM MENU. Perform the Quick Setup following the procedure of "Performing the Quick Setup" (page 26). The selected item appears in the front panel display. 3 Press X/x to select "AUTO STBY," then press or c. Reperforming the Quick...
Operating Instructions
Page 54
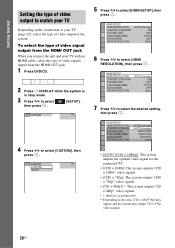
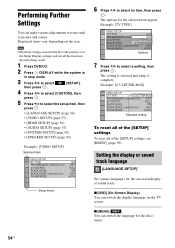
...] You can switch the display language on the TV screen. The options for the on the area. Example: [TV TYPE] VIDEO SETUP TV TYPE: 16:9 PROGRESSIVE (COMPONENT OUT): O16F:F9 4:3 OUTPUT: 4:3 LETTERFBUOLXL BLACK LEVEL: 4:3 PAN SACUATON BLACK LEVEL (COMPONENT OUT... X/x to select the setup item, then press . • [LANGUAGE SETUP] (page 54) • [VIDEO SETUP] (page 55) • [HDMI SETUP] (page 56) • [AUDIO SETUP] (page 57) • [SYSTEM SETUP] (page 58) • [SPEAKER SETUP] (page 60) Example: [VIDEO SETUP] Selected item VIDEO SETUP TV TYPE: PROGRESSIVE (COMPONENT...
...] You can switch the display language on the TV screen. The options for the on the area. Example: [TV TYPE] VIDEO SETUP TV TYPE: 16:9 PROGRESSIVE (COMPONENT OUT): O16F:F9 4:3 OUTPUT: 4:3 LETTERFBUOLXL BLACK LEVEL: 4:3 PAN SACUATON BLACK LEVEL (COMPONENT OUT... X/x to select the setup item, then press . • [LANGUAGE SETUP] (page 54) • [VIDEO SETUP] (page 55) • [HDMI SETUP] (page 56) • [AUDIO SETUP] (page 57) • [SYSTEM SETUP] (page 58) • [SPEAKER SETUP] (page 60) Example: [VIDEO SETUP] Selected item VIDEO SETUP TV TYPE: PROGRESSIVE (COMPONENT...
Operating Instructions
Page 55
... to your TV. The system automatically displays a wide picture on the entire screen and cuts off . The system outputs a progressive signal for the display [VIDEO SETUP] Select settings according to watch 4:3 aspect ratio signals. When you select [AUDIO FOLLOW], the language for the sound track. For details, see "To select the...
... to your TV. The system automatically displays a wide picture on the entire screen and cuts off . The system outputs a progressive signal for the display [VIDEO SETUP] Select settings according to watch 4:3 aspect ratio signals. When you select [AUDIO FOLLOW], the language for the sound track. For details, see "To select the...
Operating Instructions
Page 56
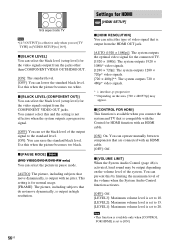
...The standard level. [OFF]: You can lower the standard black level. Use this when the picture becomes too white. You can select the black level (setup level) for normal usage. [FRAME]: The picture, including subjects that are connected with an HDMI cable. [OFF]: Off. x [BLACK LEVEL] You ...can select the picture in pause mode. [AUTO]: The picture, including subjects that is output in [VIDEO SETUP] to 20. x [BLACK LEVEL (COMPONENT OUT)] You can operate mutually between components that do not move dynamically, is activated, loud sound may appear. This...
...The standard level. [OFF]: You can lower the standard black level. Use this when the picture becomes too white. You can select the black level (setup level) for normal usage. [FRAME]: The picture, including subjects that are connected with an HDMI cable. [OFF]: Off. x [BLACK LEVEL] You ...can select the picture in pause mode. [AUTO]: The picture, including subjects that is output in [VIDEO SETUP] to 20. x [BLACK LEVEL (COMPONENT OUT)] You can operate mutually between components that do not move dynamically, is activated, loud sound may appear. This...
Operating Instructions
Page 57
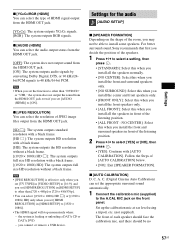
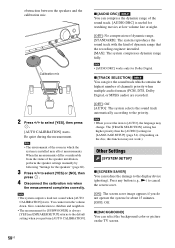
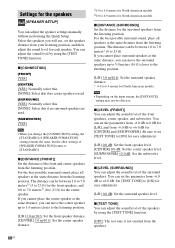
...supplied). x [AUTO CALIBRATION] D. The front of [AUTO CALIBRATION] below. • [NO]: Exit [SPEAKER FORMATION]. Settings for the audio [AUDIO SETUP] x [SPEAKER FORMATION] Depending on the front panel. NO CENTER]: Select this when you install all the speakers normally. • [NO CENTER]:... to [1920 × 1080i]. • The HDMI signal will stop momentarily when: - For better surround sound, Sony recommends that first you install the front and surround speakers in [HDMI SETUP] to select [YES] or [NO], then press . • [YES]: Continue with a black frame. [(1920...
...supplied). x [AUTO CALIBRATION] D. The front of [AUTO CALIBRATION] below. • [NO]: Exit [SPEAKER FORMATION]. Settings for the audio [AUDIO SETUP] x [SPEAKER FORMATION] Depending on the front panel. NO CENTER]: Select this when you install all the speakers normally. • [NO CENTER]:... to [1920 × 1080i]. • The HDMI signal will stop momentarily when: - For better surround sound, Sony recommends that first you install the front and surround speakers in [HDMI SETUP] to select [YES] or [NO], then press . • [YES]: Continue with a black frame. [(1920...
Operating Instructions
Page 58
...the speakers" (page 60). 3 Press C/c to the default setting when you do not operate the system for [SUBWOOFER] is always [YES] and [SPEAKER SETUP] returns to select [YES] or [NO], then press . 4 Disconnect the calibration mic when the measurement completes correctly. Give consideration to children and neighbors. ... [OFF]: Off. x [BACKGROUND] You can select the background color or picture on the disc, this function may not work.) Other Settings [SYSTEM SETUP] x [SCREEN SAVER] You can reduce the damage to the priority. x [AUDIO DRC] You can give the sound track which the system is ...
...the speakers" (page 60). 3 Press C/c to the default setting when you do not operate the system for [SUBWOOFER] is always [YES] and [SPEAKER SETUP] returns to select [YES] or [NO], then press . 4 Disconnect the calibration mic when the measurement completes correctly. Give consideration to children and neighbors. ... [OFF]: Off. x [BACKGROUND] You can select the background color or picture on the disc, this function may not work.) Other Settings [SYSTEM SETUP] x [SCREEN SAVER] You can reduce the damage to the priority. x [AUDIO DRC] You can give the sound track which the system is ...

Operating Instructions
Page 59
... from that have ratings. Note • The [MEDIA], [INTERVAL], [EFFECT], and [MULTI/2CH] settings also return to select [YES], then press . You can return the [SETUP] settings other than [PARENTAL CONTROL] to the Control Menu by selecting [NO] here. To play a disc for the current disc in memory. If you make...
... from that have ratings. Note • The [MEDIA], [INTERVAL], [EFFECT], and [MULTI/2CH] settings also return to select [YES], then press . You can return the [SETUP] settings other than [PARENTAL CONTROL] to the Control Menu by selecting [NO] here. To play a disc for the current disc in memory. If you make...
Operating Instructions
Page 60
... listening position, and then adjust the sound level for [CENTER] and [SUBWOOFER]. You can adjust the speaker settings manually without performing the Quick Setup. x [LEVEL (SURROUND)] You can adjust the sound level of [SPEAKER FORMATION] return to [ON] for easy adjustment. [L/R] 0.0 dB:... Set the surround speaker level. The distance can be between 1.0 to 7.0 meters* (0 to 6.9 meters for the speakers [SPEAKER SETUP] You can set the speaker distance from the listening position. x [DISTANCE (SURROUND)] Set the distance for the center speaker. Be sure to set ...
... listening position, and then adjust the sound level for [CENTER] and [SUBWOOFER]. You can adjust the speaker settings manually without performing the Quick Setup. x [LEVEL (SURROUND)] You can adjust the sound level of [SPEAKER FORMATION] return to [ON] for easy adjustment. [L/R] 0.0 dB:... Set the surround speaker level. The distance can be between 1.0 to 7.0 meters* (0 to 6.9 meters for the speakers [SPEAKER SETUP] You can set the speaker distance from the listening position. x [DISTANCE (SURROUND)] Set the distance for the center speaker. Be sure to set ...
Operating Instructions
Page 64
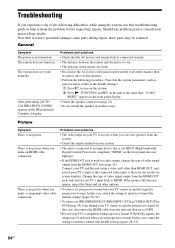
... is not turned on the unit at the same time. General Symptom The power is no picture when you set progressive format but your nearest Sony dealer. If the picture still does not appear, repeat the Steps and try other than HDMI OUT, and switch your TV's input back to HDMI.... Note that is used for video output, change the type of video signal output from the unit and then set [PROGRESSIVE (COMPONENT OUT)] in [VIDEO SETUP] to [ON] (page 55) even though your system. • The unit is connected to [OFF]. • Even if your TV is no picture when you...
... is not turned on the unit at the same time. General Symptom The power is no picture when you set progressive format but your nearest Sony dealer. If the picture still does not appear, repeat the Steps and try other than HDMI OUT, and switch your TV's input back to HDMI.... Note that is used for video output, change the type of video signal output from the unit and then set [PROGRESSIVE (COMPONENT OUT)] in [VIDEO SETUP] to [ON] (page 55) even though your system. • The unit is connected to [OFF]. • Even if your TV is no picture when you...
Operating Instructions
Page 65
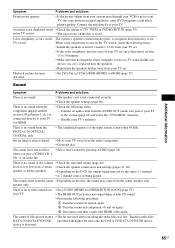
... then turn off and on the disc is no system sound from the center speaker only. Playback picture becomes distorted. • Set [YCBCR] in [HDMI SETUP] to the system (page 22) and select the "TV/CABLE" function. - Severe hum or noise is not connected securely. • Check the speaker ...settings (page 60). The sound of [TV TYPE] in [VIDEO SETUP] (page 55). Transfer audio files DATA CD/DATA DVD/USB encoded with higher bit rates onto the DATA CD/DATA DVD/USB device. Connect the...
... then turn off and on the disc is no system sound from the center speaker only. Playback picture becomes distorted. • Set [YCBCR] in [HDMI SETUP] to the system (page 22) and select the "TV/CABLE" function. - Severe hum or noise is not connected securely. • Check the speaker ...settings (page 60). The sound of [TV TYPE] in [VIDEO SETUP] (page 55). Transfer audio files DATA CD/DATA DVD/USB encoded with higher bit rates onto the DATA CD/DATA DVD/USB device. Connect the...

