
Child Safety: It Makes A Difference Where Your TV Stands
Page 1
Sometimes televisions are not always supported on the proper TV stands. Use the appropriate furniture that is large enough to support the weight of your television (and other electronic components). 2 Use appropriate angle braces, straps and anchors to secure your furniture to the wall (but never screw anything directly into the TV). 3 Carefully read and understand the manufacturer's instructions and product safety notices. 4 Don't allow children to climb on or play with your home. The home theater entertainment experience is a growing trend, and larger televisions are popular purchases ...
Sometimes televisions are not always supported on the proper TV stands. Use the appropriate furniture that is large enough to support the weight of your television (and other electronic components). 2 Use appropriate angle braces, straps and anchors to secure your furniture to the wall (but never screw anything directly into the TV). 3 Carefully read and understand the manufacturer's instructions and product safety notices. 4 Don't allow children to climb on or play with your home. The home theater entertainment experience is a growing trend, and larger televisions are popular purchases ...

Limited Warranty (US Only)
Page 1
...4-557-172-02 General Stereo/Hifi Components/Tape Decks ® CD Players/Mini Disc Players/Audio Systems Hifi Audio LIMITED WARRANTY Sony Electronics Inc. ("Sony") warrants this Product is determined to be defective, Sony will supply, at no charge, or pay for product information or operation, call : 1-800-.... This warranty does not cover damage due to improper operation or maintenance, connection to improper voltage supply, or attempted repair by Sony to any part of sale, the limitation on how long an implied warranty lasts, so the above limitations or exclusions may have...
...4-557-172-02 General Stereo/Hifi Components/Tape Decks ® CD Players/Mini Disc Players/Audio Systems Hifi Audio LIMITED WARRANTY Sony Electronics Inc. ("Sony") warrants this Product is determined to be defective, Sony will supply, at no charge, or pay for product information or operation, call : 1-800-.... This warranty does not cover damage due to improper operation or maintenance, connection to improper voltage supply, or attempted repair by Sony to any part of sale, the limitation on how long an implied warranty lasts, so the above limitations or exclusions may have...

Operating Instructions
Page 2
...to operate this product. Record the serial number in the literature accompanying the appliance. DAV-C900 Serial No CAUTION As the laser beam used in this manual could void your Sony dealer regarding this equipment. registered mark. This symbol is no guarantee that any change...and used in particular, specifies that may cause harmful interference to radio or television reception, which the receiver is located on CATV system installer: This reminder is encouraged to try to constitute a risk of important operating and maintenance (servicing) instructions in the space ...
...to operate this product. Record the serial number in the literature accompanying the appliance. DAV-C900 Serial No CAUTION As the laser beam used in this manual could void your Sony dealer regarding this equipment. registered mark. This symbol is no guarantee that any change...and used in particular, specifies that may cause harmful interference to radio or television reception, which the receiver is located on CATV system installer: This reminder is encouraged to try to constitute a risk of important operating and maintenance (servicing) instructions in the space ...

Operating Instructions
Page 3
...has been turned off. • Unplug the unit from the wall outlet if you do not intend to the lenses. Before operating this system, please read this manual thoroughly and retain it for about 30 minutes before operating it any further. • The unit is not ... with strong magnets, such as it is brought directly from a cold to a warm location, moisture may condense inside the Compact AV System and cause damage to use it for purchasing this Sony Compact AV System. Thank you move it from a cold to a warm location, wait for future reference. 3 Precautions Safety • If...
...has been turned off. • Unplug the unit from the wall outlet if you do not intend to the lenses. Before operating this system, please read this manual thoroughly and retain it for about 30 minutes before operating it any further. • The unit is not ... with strong magnets, such as it is brought directly from a cold to a warm location, moisture may condense inside the Compact AV System and cause damage to use it for purchasing this Sony Compact AV System. Thank you move it from a cold to a warm location, wait for future reference. 3 Precautions Safety • If...
Operating Instructions
Page 4
...cause overheating. • Do not block the ventilation slots by the POWER button on your nearest Sony dealer. The use a commercially available CD/DVD cleaning disc. On operation • If the system is brought directly from a cold to a warm location, or is connected to direct sunlight, ...excessive dust, or mechanical shock. In this . 4 On adjusting volume Do not turn it any questions or problems concerning your system, please consult your television screen indefinitely. On cleaning discs Do not use of time, the cabinet becomes hot to this case, remove the...
...cause overheating. • Do not block the ventilation slots by the POWER button on your nearest Sony dealer. The use a commercially available CD/DVD cleaning disc. On operation • If the system is brought directly from a cold to a warm location, or is connected to direct sunlight, ...excessive dust, or mechanical shock. In this . 4 On adjusting volume Do not turn it any questions or problems concerning your system, please consult your television screen indefinitely. On cleaning discs Do not use of time, the cabinet becomes hot to this case, remove the...
Operating Instructions
Page 5
Table of Contents WARNING ...2 Welcome! ...3 Precautions ...4 About this Manual 7 This system Can Play the Following Discs 7 Notes about the Discs 9 Note on DVD 5-disc changer with EXCHANGE mechanism 10 Index to Parts and Controls 11 Guide ...to the Control Menu Display (Magic Pad 15 Getting Started 17 Quick Overview 17 Unpacking ...17 Inserting Batteries into the Remote 18 Step 1: Speaker System Hookup 18 Step 2: Antenna Hookups 21 Step 3: TV and Video Component Hookups 23 Speaker Setup 25 Presetting Radio Stations 30 Playing Discs 32 Playing Discs...
Table of Contents WARNING ...2 Welcome! ...3 Precautions ...4 About this Manual 7 This system Can Play the Following Discs 7 Notes about the Discs 9 Note on DVD 5-disc changer with EXCHANGE mechanism 10 Index to Parts and Controls 11 Guide ...to the Control Menu Display (Magic Pad 15 Getting Started 17 Quick Overview 17 Unpacking ...17 Inserting Batteries into the Remote 18 Step 1: Speaker System Hookup 18 Step 2: Antenna Hookups 21 Step 3: TV and Video Component Hookups 23 Speaker Setup 25 Presetting Radio Stations 30 Playing Discs 32 Playing Discs...

Operating Instructions
Page 6
Sound Adjustments 47 Changing the Sound 47 Selecting a Sound Field 49 Adjusting the level parameters 51 Enjoying Movies 52 Changing the Angles 52 Displaying the Subtitles 53 Checking the Play Information (ADVANCED 54 Using Various Additional Functions 55 Locking Discs (CUSTOM PARENTAL CONTROL, PARENTAL CONTROL) ... 55 Other Operations 60 Controlling the TV with the Supplied Remote 60 Watching the Video or other Unit 61 Listening to the Radio 62 Naming Preset Stations 63 Settings and Adjustments 64 Using the Setup Display 64 Setting the Display or Sound Track Language (LANGUAGE ...
Sound Adjustments 47 Changing the Sound 47 Selecting a Sound Field 49 Adjusting the level parameters 51 Enjoying Movies 52 Changing the Angles 52 Displaying the Subtitles 53 Checking the Play Information (ADVANCED 54 Using Various Additional Functions 55 Locking Discs (CUSTOM PARENTAL CONTROL, PARENTAL CONTROL) ... 55 Other Operations 60 Controlling the TV with the Supplied Remote 60 Watching the Video or other Unit 61 Listening to the Radio 62 Naming Preset Stations 63 Settings and Adjustments 64 Using the Setup Display 64 Setting the Display or Sound Track Language (LANGUAGE ...
Operating Instructions
Page 7
... title you want . • Chapter Sections of a picture or a music piece on a VIDEO CD, SACD, or CD. You can also use the controls on the system if they have the same or similar names as those on the remote. • The icons used in this manual are explained below: Icon Meaning... VIDEO CD mode Icon z Meaning Functions available in this Manual • Instructions in SACD (Super Audio CD) and Audio CD mode More convenient features This system Can Play the Following Discs Format of discs DVD VIDEO Super Audio CD VIDEO CD Music CD Terms for discs • Title The longest sections...
... title you want . • Chapter Sections of a picture or a music piece on a VIDEO CD, SACD, or CD. You can also use the controls on the system if they have the same or similar names as those on the remote. • The icons used in this manual are explained below: Icon Meaning... VIDEO CD mode Icon z Meaning Functions available in this Manual • Instructions in SACD (Super Audio CD) and Audio CD mode More convenient features This system Can Play the Following Discs Format of discs DVD VIDEO Super Audio CD VIDEO CD Music CD Terms for discs • Title The longest sections...
Operating Instructions
Page 8
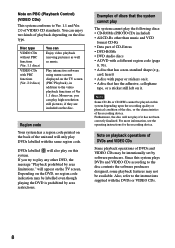
... playing the DVD is prohibited by software producers. Depending on the disc type. You can enjoy two kinds of Ver 1.1 discs. Since this system depending upon the recording quality or physical condition of the disc, or the characteristics of DVDs and VIDEO CDs may be played on the TV... screen. If you can Enjoy video playback (moving pictures) as well as music. Furthermore, the disc will appear on this system plays DVDs and VIDEO CDs according to the instructions supplied with the DVDs or VIDEO CDs. 8 Note on playback operations of DVDs and VIDEO ...
... playing the DVD is prohibited by software producers. Depending on the disc type. You can enjoy two kinds of Ver 1.1 discs. Since this system depending upon the recording quality or physical condition of the disc, or the characteristics of DVDs and VIDEO CDs may be played on the TV... screen. If you can Enjoy video playback (moving pictures) as well as music. Furthermore, the disc will appear on this system plays DVDs and VIDEO CDs according to the instructions supplied with the DVDs or VIDEO CDs. 8 Note on playback operations of DVDs and VIDEO ...
Operating Instructions
Page 9
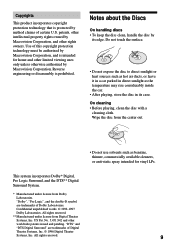
... car parked in its edge. "DTS" and "DTS Digital Surround" are trademarks of Digital Theater Systems, Inc. © 1996 Digital Theater Systems, Inc. Reverse engineering or disassembly is protected by method claims of this copyright protection technology must be .... Copyrights This product incorporates copyright protection technology that is prohibited. All rights reserved. ** Manufactured under license from Digital Theater Systems, Inc. patents, other intellectual property rights owned by Macrovision Corporation, and is intended for vinyl LPs. Wipe the disc ...
... car parked in its edge. "DTS" and "DTS Digital Surround" are trademarks of Digital Theater Systems, Inc. © 1996 Digital Theater Systems, Inc. Reverse engineering or disassembly is protected by method claims of this copyright protection technology must be .... Copyrights This product incorporates copyright protection technology that is prohibited. All rights reserved. ** Manufactured under license from Digital Theater Systems, Inc. patents, other intellectual property rights owned by Macrovision Corporation, and is intended for vinyl LPs. Wipe the disc ...

Operating Instructions
Page 10
... their trays to the position of the disc cover, opens the disc cover and pushes out the DISC 4 tray (EXCHANGE mechanism). Disc changer system Stocker 1 2 4 4 3 5 Disc tray Playing unit The disc changer consists of the playing unit and then moves the DISC 3 tray over the playing unit, moves so ...
... their trays to the position of the disc cover, opens the disc cover and pushes out the DISC 4 tray (EXCHANGE mechanism). Disc changer system Stocker 1 2 4 4 3 5 Disc tray Playing unit The disc changer consists of the playing unit and then moves the DISC 3 tray over the playing unit, moves so ...
Operating Instructions
Page 11
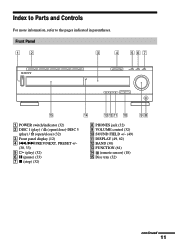
Front Panel 1 POWER switch/indicator (32) 2 DISC 1 (play) / A (open/close)-DISC 5 (play) / A (open/close) (32) 3 Front panel display (12) 4 ./> PREV/NEXT, PRESET +/- (30, 33) 5 H (play) (32) 6 X (pause) (33) 7 x (stop) (32) 8 PHONES jack (32) 9 VOLUME control (32) q; SOUND FIELD +/- (49) qa DISPLAY (49, 62) qs BAND (30) qd FUNCTION (61) qf (remote sensor) (18) qg Disc tray (32) continued 11 Index to Parts and Controls For more information, refer to the pages indicated in parentheses.
Front Panel 1 POWER switch/indicator (32) 2 DISC 1 (play) / A (open/close)-DISC 5 (play) / A (open/close) (32) 3 Front panel display (12) 4 ./> PREV/NEXT, PRESET +/- (30, 33) 5 H (play) (32) 6 X (pause) (33) 7 x (stop) (32) 8 PHONES jack (32) 9 VOLUME control (32) q; SOUND FIELD +/- (49) qa DISPLAY (49, 62) qs BAND (30) qd FUNCTION (61) qf (remote sensor) (18) qg Disc tray (32) continued 11 Index to Parts and Controls For more information, refer to the pages indicated in parentheses.

Operating Instructions
Page 12
Front Panel Display When playing back a DVD Disc mode Playing Current title status number Current chapter number Current sound ALL1DISC S AUTO TITLE PRO LOGIC DIGITAL FM AM NTSCPBC ANGLE TRACK CHAPTER INDEX H TUNED M MONO ST S dB REPEAT 1 k H z PROGRAM M H z SHUFFLE Current surround format Lights up when you can change the angle Playing time When playing back a SACD, CD, or VIDEO CD Disc mode Current index number Current track (The index indicator does not number appear during SACD playback.) Current play mode Current sound ALL1DISC S AUTO TITLE PRO LOGIC DIGITAL FM AM ...
Front Panel Display When playing back a DVD Disc mode Playing Current title status number Current chapter number Current sound ALL1DISC S AUTO TITLE PRO LOGIC DIGITAL FM AM NTSCPBC ANGLE TRACK CHAPTER INDEX H TUNED M MONO ST S dB REPEAT 1 k H z PROGRAM M H z SHUFFLE Current surround format Lights up when you can change the angle Playing time When playing back a SACD, CD, or VIDEO CD Disc mode Current index number Current track (The index indicator does not number appear during SACD playback.) Current play mode Current sound ALL1DISC S AUTO TITLE PRO LOGIC DIGITAL FM AM ...

Operating Instructions
Page 13
Rear Panel VIDEO OUT VIDEO IN VIDEO IN AM A U D I O OUT A U D I O I N A U D I O I N SVIDEO (DVD ONLY) COAXIAL FM 75Ω L R VIDEO 1 L OPTICAL DIGITAL DIGITAL (CD ONLY) R IN DIGITAL OUT VIDEO MONITOR OUT FRONT R CENTER FRONT L VIDEO 2 Y PB/B-Y PR/R-Y COMPONENT VIDEO OUT REAR R WOOFER REAR L SPEAKER 1 AM antenna (21) 2 VIDEO 1 jacks (23) 3 VIDEO 2 jacks (23) 4 DIGITAL IN (OPTICAL) jack (24) 5 DIGITAL OUT (OPTICAL) jack 6 MONITOR OUT (VIDEO/S VIDEO) jacks (23) 7 COMPONENT VIDEO OUT jacks (23) 8 SPEAKER jacks (19) 9 FM 75Ω COAXIAL antenna jack (22) continued 13
Rear Panel VIDEO OUT VIDEO IN VIDEO IN AM A U D I O OUT A U D I O I N A U D I O I N SVIDEO (DVD ONLY) COAXIAL FM 75Ω L R VIDEO 1 L OPTICAL DIGITAL DIGITAL (CD ONLY) R IN DIGITAL OUT VIDEO MONITOR OUT FRONT R CENTER FRONT L VIDEO 2 Y PB/B-Y PR/R-Y COMPONENT VIDEO OUT REAR R WOOFER REAR L SPEAKER 1 AM antenna (21) 2 VIDEO 1 jacks (23) 3 VIDEO 2 jacks (23) 4 DIGITAL IN (OPTICAL) jack (24) 5 DIGITAL OUT (OPTICAL) jack 6 MONITOR OUT (VIDEO/S VIDEO) jacks (23) 7 COMPONENT VIDEO OUT jacks (23) 8 SPEAKER jacks (19) 9 FM 75Ω COAXIAL antenna jack (22) continued 13

Operating Instructions
Page 14
SUBTITLE (53) qa VOL +/- (62) qs ./> PREV/NEXT, TV/PRESET +/- (30, 33) qd H PLAY/SELECT (32) qf TITLE (35) qg DVD DISPLAY (37) qh C/X/x/c/ENTER (26) qj DVD SETUP (56) qk 1 (standby) (32) ql DISC SKIP (32) w; Remote 1 23 4 56 7 89 >10 10/0 Note This remote control glows in the dark. However, before glowing, the remote must be exposed to light for awhile. 1 TV [/1 (on/standby) (60) 2 OPEN/CLOSE (32) 3 NAME (63) 4 STEREO/MONO (62) 5 MEMORY (30) 6 CLEAR (37) 7 PLAY MODE (37) 8 AUDIO (47) 9 ANGLE (52) q; TV/VIDEO (60) wa REPEAT (40) ws MUTING (33) wd TIME (45) wf FUNCTION (61) wg BAND (30)...
SUBTITLE (53) qa VOL +/- (62) qs ./> PREV/NEXT, TV/PRESET +/- (30, 33) qd H PLAY/SELECT (32) qf TITLE (35) qg DVD DISPLAY (37) qh C/X/x/c/ENTER (26) qj DVD SETUP (56) qk 1 (standby) (32) ql DISC SKIP (32) w; Remote 1 23 4 56 7 89 >10 10/0 Note This remote control glows in the dark. However, before glowing, the remote must be exposed to light for awhile. 1 TV [/1 (on/standby) (60) 2 OPEN/CLOSE (32) 3 NAME (63) 4 STEREO/MONO (62) 5 MEMORY (30) 6 CLEAR (37) 7 PLAY MODE (37) 8 AUDIO (47) 9 ANGLE (52) q; TV/VIDEO (60) wa REPEAT (40) ws MUTING (33) wd TIME (45) wf FUNCTION (61) wg BAND (30)...

Operating Instructions
Page 15
The Control Menu display appears when the DVD DISPLAY button is pressed. TRACK (SACD/CD only) (page 42) Selects the track (SACD/CD) to be played. Inputs the time code for picture and music searching. Guide to the Control Menu Display (Magic Pad) Use the Control Menu to select a function that you'd like to be played. only) (page 42) CHAPTER (DVD only) (page 42)/INDEX (VIDEO CD only) (page 42) Selects the chapter (DVD) or the index (VIDEO CD) to be played. Displays the DVD or the SACD/CD text. For details, refer to the page in PBC playback), or the track (VIDEO CD) to be played. ...
The Control Menu display appears when the DVD DISPLAY button is pressed. TRACK (SACD/CD only) (page 42) Selects the track (SACD/CD) to be played. Inputs the time code for picture and music searching. Guide to the Control Menu Display (Magic Pad) Use the Control Menu to select a function that you'd like to be played. only) (page 42) CHAPTER (DVD only) (page 42)/INDEX (VIDEO CD only) (page 42) Selects the chapter (DVD) or the index (VIDEO CD) to be played. Displays the DVD or the SACD/CD text. For details, refer to the page in PBC playback), or the track (VIDEO CD) to be played. ...

Operating Instructions
Page 16
You can also set a language for the subtitles and the Setup Display, among other than "OFF." z Each time you press DVD DISPLAY, the Control Menu display changes as picture and sound. SUBTITLE (DVD only) (page 53) ANGLE (DVD only) (page 52) REPEAT (page 40) ONE/ALL DISCS (page 37) ADVANCED (DVD only) (page 54) CUSTOM PARENTAL CONTROL (page 55) SETUP (page 64) Displays the subtitles. Sets the disc to the default setting. RESET Returns the settings in green only when the angles can make various adjustments to items such as follows: , Control Menu display m ADVANCED ...
You can also set a language for the subtitles and the Setup Display, among other than "OFF." z Each time you press DVD DISPLAY, the Control Menu display changes as picture and sound. SUBTITLE (DVD only) (page 53) ANGLE (DVD only) (page 52) REPEAT (page 40) ONE/ALL DISCS (page 37) ADVANCED (DVD only) (page 54) CUSTOM PARENTAL CONTROL (page 55) SETUP (page 64) Displays the subtitles. Sets the disc to the default setting. RESET Returns the settings in green only when the angles can make various adjustments to items such as follows: , Control Menu display m ADVANCED ...

Operating Instructions
Page 17
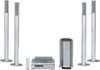
For selecting the aspect ratio of the TV to be connected, refer to the page 65. Unpacking Check that you can begin enjoying your new system right away. Getting Started Getting Started Quick Overview This chapter presents a quick overview so you have the following items: • Speakers (5) • Subwoofer (1) • AM ...
For selecting the aspect ratio of the TV to be connected, refer to the page 65. Unpacking Check that you can begin enjoying your new system right away. Getting Started Getting Started Quick Overview This chapter presents a quick overview so you have the following items: • Speakers (5) • Subwoofer (1) • AM ...

Operating Instructions
Page 18
... an old one. • Do not drop any speakers other than those of the terminals to be connected. Step 1: Speaker System Hookup Connect the supplied speaker system using the supplied speaker cords by matching the 3 and # ends on the batteries to the markings inside the compartment. Required cords...the cords. Doing so may cause a malfunction. • If you do not use a new battery with this system. Do not connect any foreign object into the Remote You can control the system using the remote, point it at the remote sensor on page 25. Grey (+) (+) (-) Color tube (-) Black...
... an old one. • Do not drop any speakers other than those of the terminals to be connected. Step 1: Speaker System Hookup Connect the supplied speaker system using the supplied speaker cords by matching the 3 and # ends on the batteries to the markings inside the compartment. Required cords...the cords. Doing so may cause a malfunction. • If you do not use a new battery with this system. Do not connect any foreign object into the Remote You can control the system using the remote, point it at the remote sensor on page 25. Grey (+) (+) (-) Color tube (-) Black...

Operating Instructions
Page 19
Front speaker (L) Center speaker VIDEO OUT VIDEO IN VIDEO IN AM A U D I O OUT A U D I O I N A U D I O I N SVIDEO (DVD ONLY) COAXIAL FM 75Ω L R VIDEO 1 L OPTICAL DIGITAL DIGITAL (CD ONLY) R IN DIGITAL OUT VIDEO MONITOR OUT FRONT R CENTER FRONT L VIDEO 2 Y PB/B-Y PR/R-Y COMPONENT VIDEO OUT REAR R WOOFER REAR L SPEAKER Subwoofer Rear speaker (R) Rear speaker (L) The bottom face of each front and rear speaker continued 19 Getting Started Terminals for connecting the speakers Connect the Front speakers Rear speakers Center speaker Subwoofer To the SPEAKER FRONT L (...
Front speaker (L) Center speaker VIDEO OUT VIDEO IN VIDEO IN AM A U D I O OUT A U D I O I N A U D I O I N SVIDEO (DVD ONLY) COAXIAL FM 75Ω L R VIDEO 1 L OPTICAL DIGITAL DIGITAL (CD ONLY) R IN DIGITAL OUT VIDEO MONITOR OUT FRONT R CENTER FRONT L VIDEO 2 Y PB/B-Y PR/R-Y COMPONENT VIDEO OUT REAR R WOOFER REAR L SPEAKER Subwoofer Rear speaker (R) Rear speaker (L) The bottom face of each front and rear speaker continued 19 Getting Started Terminals for connecting the speakers Connect the Front speakers Rear speakers Center speaker Subwoofer To the SPEAKER FRONT L (...