
Operating Instructions
Page 3
... provide reasonable protection against harmful interference in the EMC Directive for a Class B digital device, pursuant to Part 15 of the battery used to power this camera.
... provide reasonable protection against harmful interference in the EMC Directive for a Class B digital device, pursuant to Part 15 of the battery used to power this camera.
Operating Instructions
Page 4
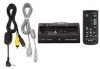
..., see the operating instructions supplied with the DSC-P100 digital still camera. However, these illustrations are mainly used with the camera. 4-GB In-camera charging while stationed. The CSS-FEB can be used with the DSC-F88 digital still camera. *The illustrations of the CSS-PHA are applied to PictBridge enabled printers and USB enabled computers. An...
..., see the operating instructions supplied with the DSC-P100 digital still camera. However, these illustrations are mainly used with the camera. 4-GB In-camera charging while stationed. The CSS-FEB can be used with the DSC-F88 digital still camera. *The illustrations of the CSS-PHA are applied to PictBridge enabled printers and USB enabled computers. An...

Operating Instructions
Page 5
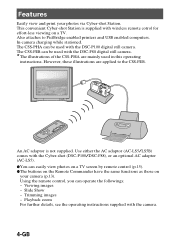
...6 Care and maintenance 6 Identifying the parts 7 Before using the Remote Commander 19 Troubleshooting 22 Specifications 25 Trademarks 25 5-GB zWhen the CSS-PHA or CSS-FEB is connected to a PictBridge enabled printer, you want to print one of the images in a Slide Show, cancel the Slide Show... compliant printer 16 Printing images using the Cyber-shot Station 8 Placing the camera on the Cyber-shot Station / Removing the camera from the Cyber-shot Station 8 Charging the battery pack 10 Connecting the camera to your computer via the Cyber-shot Station ..... 11 Using the Remote ...
...6 Care and maintenance 6 Identifying the parts 7 Before using the Remote Commander 19 Troubleshooting 22 Specifications 25 Trademarks 25 5-GB zWhen the CSS-PHA or CSS-FEB is connected to a PictBridge enabled printer, you want to print one of the images in a Slide Show, cancel the Slide Show... compliant printer 16 Printing images using the Cyber-shot Station 8 Placing the camera on the Cyber-shot Station / Removing the camera from the Cyber-shot Station 8 Charging the battery pack 10 Connecting the camera to your computer via the Cyber-shot Station ..... 11 Using the Remote ...
Operating Instructions
Page 6
... the Cyber-shot Station away from sand. Locations with extremes of temperature In closed automobiles during summer, the ambient temperature may cause a malfunction of the camera. The Cyber-shot Station that is covered with a dry cloth. Locations subject to vibration - Images may malfunction. • Do not use the Cyber-shot Station...
... the Cyber-shot Station away from sand. Locations with extremes of temperature In closed automobiles during summer, the ambient temperature may cause a malfunction of the camera. The Cyber-shot Station that is covered with a dry cloth. Locations subject to vibration - Images may malfunction. • Do not use the Cyber-shot Station...

Operating Instructions
Page 7
Identifying the parts 1 2 34 5 6 7 8 See "Using the Remote Commander" (p.13) to identify parts of your Remote Commander. 1 Multi connector 2 Blue illumination Lights up while the battery is connected. Goes off when the camera is placed on the Cyber-shot Station. 3 POWER lamp Lights up in green when the AC adaptor is connected. 4 CHARGE lamps Light up in blue when the AC adaptor is charging. 5 Remote sensor 6 DC IN jack 7 (USB) jack 8 A/V OUT (MONO) jack 7-GB
Identifying the parts 1 2 34 5 6 7 8 See "Using the Remote Commander" (p.13) to identify parts of your Remote Commander. 1 Multi connector 2 Blue illumination Lights up while the battery is connected. Goes off when the camera is placed on the Cyber-shot Station. 3 POWER lamp Lights up in green when the AC adaptor is connected. 4 CHARGE lamps Light up in blue when the AC adaptor is charging. 5 Remote sensor 6 DC IN jack 7 (USB) jack 8 A/V OUT (MONO) jack 7-GB
Operating Instructions
Page 8
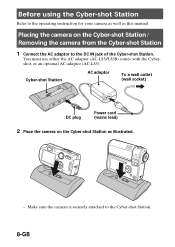
... the Cyber-shot Station as this manual. Make sure the camera is securely attached to the DC IN jack of the Cyber-shot Station. Before using the Cyber-shot Station Refer to the operating instruction for your camera as well as illustrated. - Cyber-shot Station AC adaptor To a wall ...outlet (wall socket) DC plug Power cord (mains lead) 2 Place the camera on the Cyber-shot Station / Removing the camera from the Cyber-shot Station 1 Connect the AC adaptor to the Cyber-shot Station. 8-GB You must use either the AC adaptor...
... the Cyber-shot Station as this manual. Make sure the camera is securely attached to the DC IN jack of the Cyber-shot Station. Before using the Cyber-shot Station Refer to the operating instruction for your camera as well as illustrated. - Cyber-shot Station AC adaptor To a wall ...outlet (wall socket) DC plug Power cord (mains lead) 2 Place the camera on the Cyber-shot Station / Removing the camera from the Cyber-shot Station 1 Connect the AC adaptor to the Cyber-shot Station. 8-GB You must use either the AC adaptor...
Operating Instructions
Page 9
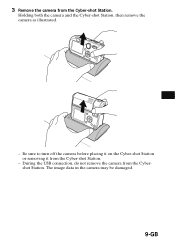
Be sure to turn off the camera before placing it on the Cyber-shot Station or removing it from the Cyber-shot Station. The image data in the camera may be damaged. 9-GB 3 Remove the camera from the Cyber-shot Station. - Holding both the camera and the Cyber-shot Station, then remove the camera as illustrated. - During the USB connection, do not remove the camera from the Cybershot Station.
Be sure to turn off the camera before placing it on the Cyber-shot Station or removing it from the Cyber-shot Station. The image data in the camera may be damaged. 9-GB 3 Remove the camera from the Cyber-shot Station. - Holding both the camera and the Cyber-shot Station, then remove the camera as illustrated. - During the USB connection, do not remove the camera from the Cybershot Station.

Operating Instructions
Page 10
... securely attached to the Cyber-shot Station. 10-GB Charging the battery pack 1 Open the battery/"Memory Stick" cover of the camera. 2 Install the battery pack into the camera, then close the battery/ "Memory Stick" cover. 3 Connect the AC adaptor to the DC IN jack of the battery. - Note: The CHARGE lamps... Cyber-shot Station light up one by one, from the left to a wall outlet (wall socket). - When charging is completed, the /CHG lamp of the camera and the CHARGE lamps of the AC adaptor with the Cyber-shot, or an optional AC adaptor (AC-LS5). - Connect the power cord (mains lead...
... securely attached to the Cyber-shot Station. 10-GB Charging the battery pack 1 Open the battery/"Memory Stick" cover of the camera. 2 Install the battery pack into the camera, then close the battery/ "Memory Stick" cover. 3 Connect the AC adaptor to the DC IN jack of the battery. - Note: The CHARGE lamps... Cyber-shot Station light up one by one, from the left to a wall outlet (wall socket). - When charging is completed, the /CHG lamp of the camera and the CHARGE lamps of the AC adaptor with the Cyber-shot, or an optional AC adaptor (AC-LS5). - Connect the power cord (mains lead...

Operating Instructions
Page 11
..." with the images you want to copy into a wall outlet (wall socket). - USB plug 4 Connect the USB cable to your computer. 4 11-GB Connecting the camera to your computer via the Cyber-shot Station 1 Turn on the "Memory Stick", see the operating instructions supplied with the... camera. 3 Connect the USB cable (supplied) to the USB jack of the Cyber-shot Station. You must use either the AC adaptor (AC-LS5/LS5B) comes ...
..." with the images you want to copy into a wall outlet (wall socket). - USB plug 4 Connect the USB cable to your computer. 4 11-GB Connecting the camera to your computer via the Cyber-shot Station 1 Turn on the "Memory Stick", see the operating instructions supplied with the... camera. 3 Connect the USB cable (supplied) to the USB jack of the Cyber-shot Station. You must use either the AC adaptor (AC-LS5/LS5B) comes ...
Operating Instructions
Page 12
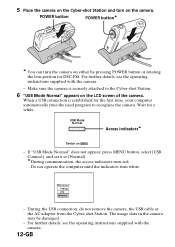
...-shot Station. For further details, see the operating instructions supplied with the camera. 12-GB USB Connect PictBridge PTP Normal - The image data in the camera may be damaged. - Make sure the camera is established for the first time, your computer automatically runs the used program... to [Normal]. *During communication, the access indicators turn red. USB Mode Normal Access indicators* Switch on the camera. 5 Place the camera on the Cyber-shot Station and turn on MENU - When a USB connection is securely attached to the Cyber-shot Station. 6 ...
...-shot Station. For further details, see the operating instructions supplied with the camera. 12-GB USB Connect PictBridge PTP Normal - The image data in the camera may be damaged. - Make sure the camera is established for the first time, your computer automatically runs the used program... to [Normal]. *During communication, the access indicators turn red. USB Mode Normal Access indicators* Switch on the camera. 5 Place the camera on the Cyber-shot Station and turn on MENU - When a USB connection is securely attached to the Cyber-shot Station. 6 ...

Operating Instructions
Page 13
Notes on your camera. Try adjusting the angle of in fire. Before using indoor). CAUTION Danger of the Cyber-shot Station. Discard used batteries according to the manufacturer's instructions. ...
Notes on your camera. Try adjusting the angle of in fire. Before using indoor). CAUTION Danger of the Cyber-shot Station. Discard used batteries according to the manufacturer's instructions. ...

Operating Instructions
Page 15
... the audio plug (black) of the TV. Turn off both NTSC and PAL TV systems. For further details, see the operating instructions supplied with the camera. 15-GB Press b/B on the Cyber-shot Station. - The Cyber-shot Station is securely attached to the Cyber-shot Station. 3 Turn on the TV... and set the TV/Video switch to "Video". 4 Set the mode dial of the camera to the left audio jack. - You can also operate the camera using the Remote Commander. - Viewing images on the power. Connect the A/V connecting cable (supplied) to the A/V OUT (MONO) ...
... the audio plug (black) of the TV. Turn off both NTSC and PAL TV systems. For further details, see the operating instructions supplied with the camera. 15-GB Press b/B on the Cyber-shot Station. - The Cyber-shot Station is securely attached to the Cyber-shot Station. 3 Turn on the TV... and set the TV/Video switch to "Video". 4 Set the mode dial of the camera to the left audio jack. - You can also operate the camera using the Remote Commander. - Viewing images on the power. Connect the A/V connecting cable (supplied) to the A/V OUT (MONO) ...

Operating Instructions
Page 16
... pressing POWER button or rotating the lens portion for DSC-F88. You must use either by connecting the camera directly or via Cyber-shot Station to a PictBridge compliant printer. • The available print functions may differ depending on the printer. &#...8226; Using the AC adaptor is recommended to copy into the camera. - Connecting to a PictBridge compliant printer Even if you do not have a computer, you want to prevent the power from turning off partway through printing...
... pressing POWER button or rotating the lens portion for DSC-F88. You must use either by connecting the camera directly or via Cyber-shot Station to a PictBridge compliant printer. • The available print functions may differ depending on the printer. &#...8226; Using the AC adaptor is recommended to copy into the camera. - Connecting to a PictBridge compliant printer Even if you do not have a computer, you want to prevent the power from turning off partway through printing...

Operating Instructions
Page 17
4 Set the USB mode on the camera to SET UP. 2 Select (Setup 2) with V, then select [USB Connect] with v/V/B. 2 3 Select [PictBridge] with B/v, then press z. Setup 2 File Number: USB Connect: Video Out: 1 Clock Set: PictBridge PTP Normal 2 The USB mode is set. 17-GB Mode dial Control button (v/V/b/B/z) Mode dial 1 Set the mode dial to PictBridge.
4 Set the USB mode on the camera to SET UP. 2 Select (Setup 2) with V, then select [USB Connect] with v/V/B. 2 3 Select [PictBridge] with B/v, then press z. Setup 2 File Number: USB Connect: Video Out: 1 Clock Set: PictBridge PTP Normal 2 The USB mode is set. 17-GB Mode dial Control button (v/V/b/B/z) Mode dial 1 Set the mode dial to PictBridge.

Operating Instructions
Page 18
... USB jack of the mode dial position and an image in the selected playback folder is displayed on the LCD screen. 18-GB When the camera is not set to [PictBridge] on the SET UP screen, you cannot use the PictBridge function even if you turn on , the... camera turns to [PictBridge]. Printer 1M 101 2/9 After the connection is made, the indicator appears on the LCD screen. 101-0002 2005 1 1 10:30AM BACK/NEXT ...
... USB jack of the mode dial position and an image in the selected playback folder is displayed on the LCD screen. 18-GB When the camera is not set to [PictBridge] on the SET UP screen, you cannot use the PictBridge function even if you turn on , the... camera turns to [PictBridge]. Printer 1M 101 2/9 After the connection is made, the indicator appears on the LCD screen. 101-0002 2005 1 1 10:30AM BACK/NEXT ...

Operating Instructions
Page 20
... b/B. x Printing still images using the Remote Commander (In index mode) PRINT button Control buttons 1 Select the image you want to the operating instructions for your camera. The image is completed, the screen returns to the previous screen. - Printing 1/3 Exit - To insert the date and time on the printer. • For details...
... b/B. x Printing still images using the Remote Commander (In index mode) PRINT button Control buttons 1 Select the image you want to the operating instructions for your camera. The image is completed, the screen returns to the previous screen. - Printing 1/3 Exit - To insert the date and time on the printer. • For details...

Operating Instructions
Page 21
... date format with b/B. indicator appears on images • Select [Date] in step 2 or 4. You can select the number up to the operating instructions for your camera. 21-GB The date of sheets with b/B. 2 Press PRINT. The print setting screen appears. 1M 101 2/9 Print Index Off Date Off Quantity 1 Exit OK - Printing...
... date format with b/B. indicator appears on images • Select [Date] in step 2 or 4. You can select the number up to the operating instructions for your camera. 21-GB The date of sheets with b/B. 2 Press PRINT. The print setting screen appears. 1M 101 2/9 Print Index Off Date Off Quantity 1 Exit OK - Printing...
Operating Instructions
Page 22
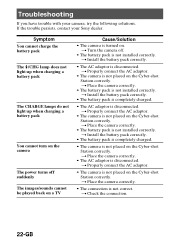
... the connection. 22-GB t Properly connect the AC adaptor. • The camera is not installed correctly. t Place the camera correctly. • The connection is disconnected. Troubleshooting If you have trouble with your Sony dealer. Symptom You cannot charge the battery pack The /CHG lamp does not ... battery pack correctly. • The battery pack is completely charged. • The AC adaptor is not correct. t Place the camera correctly. • The AC adaptor is disconnected. t Install the battery pack correctly. • The AC adaptor is disconnected. t Place the...
... the connection. 22-GB t Properly connect the AC adaptor. • The camera is not installed correctly. t Place the camera correctly. • The connection is disconnected. Troubleshooting If you have trouble with your Sony dealer. Symptom You cannot charge the battery pack The /CHG lamp does not ... battery pack correctly. • The battery pack is completely charged. • The AC adaptor is not correct. t Place the camera correctly. • The AC adaptor is disconnected. t Install the battery pack correctly. • The AC adaptor is disconnected. t Place the...

Operating Instructions
Page 23
... t Replace it again firmly. t Disconnect the USB cable from the USB connectors. • The camera is not placed on the Cyber-shot Station correctly. t Turn on your camera The camera does not work The connection between the printer and the Cyber-shot Station cannot be established Cause/Solution ...• The camera is not set to [PictBridge]. 23-GB t Place the camera correctly. • The USB connectors on the camera. • You are connected to other than the keyboard, the mouse, and the ...
... t Replace it again firmly. t Disconnect the USB cable from the USB connectors. • The camera is not placed on the Cyber-shot Station correctly. t Turn on your camera The camera does not work The connection between the printer and the Cyber-shot Station cannot be established Cause/Solution ...• The camera is not set to [PictBridge]. 23-GB t Place the camera correctly. • The USB connectors on the camera. • You are connected to other than the keyboard, the mouse, and the ...
Operating Instructions
Page 24
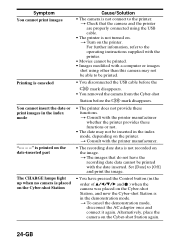
... the printer. • Movies cannot be printed. t Check that do not have pressed the Control button (in the order of v/b/V/B and ) when the camera was placed on the Cyber-shot Station, and now the Cyber-shot Station is in the index mode is printed on the image. You cannot... insert the date or print images in the demonstration mode. Symptom You cannot print images Cause/Solution • The camera is not connect to [Off] and print the image. For further infomation, refer to be printed. • Images modified with the printer manufacturer. •...
... the printer. • Movies cannot be printed. t Check that do not have pressed the Control button (in the order of v/b/V/B and ) when the camera was placed on the Cyber-shot Station, and now the Cyber-shot Station is in the index mode is printed on the image. You cannot... insert the date or print images in the demonstration mode. Symptom You cannot print images Cause/Solution • The camera is not connect to [Off] and print the image. For further infomation, refer to be printed. • Images modified with the printer manufacturer. •...
