Operating Instructions
Page 1
3-091-630-12 (1) Cyber-shot Station Operating Instructions GB Mode d'emploi FR CSS-PHA CSS-FEB 2004 Sony Corporation
3-091-630-12 (1) Cyber-shot Station Operating Instructions GB Mode d'emploi FR CSS-PHA CSS-FEB 2004 Sony Corporation
Operating Instructions
Page 2
...2230 This device complies with Part 15 of the FCC Rules. This symbol is intended to alert the user to the presence of the FCC Rules. Declaration of Conformity Trade Name: Model No.: Responsible Party: Address: Telephone No.: SONY CSS-PHA Sony Electronics Inc. 16450 W. Operation is for ... undesired operation. English Before operating the unit, please read this manual thoroughly and retain it for the FCC related matters only. Bernardo Dr, San Diego, CA 92127 U.S.A. 858-942-2230 This device complies with Part 15 of important operating and maintenance (servicing) instructions in ...
...2230 This device complies with Part 15 of the FCC Rules. This symbol is intended to alert the user to the presence of the FCC Rules. Declaration of Conformity Trade Name: Model No.: Responsible Party: Address: Telephone No.: SONY CSS-PHA Sony Electronics Inc. 16450 W. Operation is for ... undesired operation. English Before operating the unit, please read this manual thoroughly and retain it for the FCC related matters only. Bernardo Dr, San Diego, CA 92127 U.S.A. 858-942-2230 This device complies with Part 15 of important operating and maintenance (servicing) instructions in ...

Operating Instructions
Page 3
... any changes or modifications not expressly approved in a particular installation. The supplied interface cable must be determined by turning the equipment off and on, the user is connected. -Consult the dealer or an experienced radio/TV technician for a Class B digital device, pursuant to Part 15 of the battery used in the EMC Directive for the Customers in Europe...
... any changes or modifications not expressly approved in a particular installation. The supplied interface cable must be determined by turning the equipment off and on, the user is connected. -Consult the dealer or an experienced radio/TV technician for a Class B digital device, pursuant to Part 15 of the battery used in the EMC Directive for the Customers in Europe...
Operating Instructions
Page 4
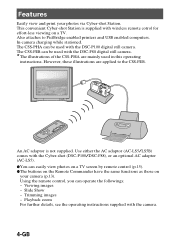
... AC adaptor is supplied with the DSC-P100 digital still camera. The CSS-PHA can be used with wireless remote cotrol for effort-less viewing on your photos via Cyber-shot Station. zThe buttons on the Remote Commander have the same functions as those on a TV. Trimming images - Playback zoom For further details, see the operating instructions supplied with the...
... AC adaptor is supplied with the DSC-P100 digital still camera. The CSS-PHA can be used with wireless remote cotrol for effort-less viewing on your photos via Cyber-shot Station. zThe buttons on the Remote Commander have the same functions as those on a TV. Trimming images - Playback zoom For further details, see the operating instructions supplied with the...

Operating Instructions
Page 5
... the CSS-PHA or CSS-FEB is connected to a PictBridge enabled printer, you want to print one of the images in a Slide Show, cancel the Slide Show first, then press PRINT button. *You must connect an AC adaptor to a PictBridge compliant printer 16 Printing images using the Cyber-shot Station 8 Placing the camera on the Cyber-shot Station / Removing the...
... the CSS-PHA or CSS-FEB is connected to a PictBridge enabled printer, you want to print one of the images in a Slide Show, cancel the Slide Show first, then press PRINT button. *You must connect an AC adaptor to a PictBridge compliant printer 16 Printing images using the Cyber-shot Station 8 Placing the camera on the Cyber-shot Station / Removing the...
Operating Instructions
Page 6
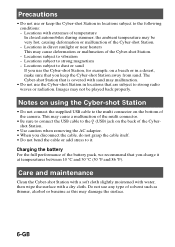
...subject to the multi connector on the back of the Cybershot Station. • Use caution when removing the AC adaptor. • When you keep the Cyber-shot Station in a desert, make sure that you disconnect the cable, do not grasp the cable itself. • Do not bend the cable or add ...it . The Cyber-shot Station that is covered with sand may malfunction. • Do not use the Cyber-shot Station, for example, on using the Cyber-shot Station • Do not connect the supplied USB cable to vibration - Care and maintenance Clean the Cyber-shot Station with a soft cloth slightly...
...subject to the multi connector on the back of the Cybershot Station. • Use caution when removing the AC adaptor. • When you keep the Cyber-shot Station in a desert, make sure that you disconnect the cable, do not grasp the cable itself. • Do not bend the cable or add ...it . The Cyber-shot Station that is covered with sand may malfunction. • Do not use the Cyber-shot Station, for example, on using the Cyber-shot Station • Do not connect the supplied USB cable to vibration - Care and maintenance Clean the Cyber-shot Station with a soft cloth slightly...

Operating Instructions
Page 7
Goes off when the camera is placed on the Cyber-shot Station. 3 POWER lamp Lights up while the battery is connected. Identifying the parts 1 2 34 5 6 7 8 See "Using the Remote Commander" (p.13) to identify parts of your Remote Commander. 1 Multi connector 2 Blue illumination Lights up in green when the AC adaptor is connected. 4 CHARGE lamps Light up in blue when the AC adaptor is charging. 5 Remote sensor 6 DC IN jack 7 (USB) jack 8 A/V OUT (MONO) jack 7-GB
Goes off when the camera is placed on the Cyber-shot Station. 3 POWER lamp Lights up while the battery is connected. Identifying the parts 1 2 34 5 6 7 8 See "Using the Remote Commander" (p.13) to identify parts of your Remote Commander. 1 Multi connector 2 Blue illumination Lights up in green when the AC adaptor is connected. 4 CHARGE lamps Light up in blue when the AC adaptor is charging. 5 Remote sensor 6 DC IN jack 7 (USB) jack 8 A/V OUT (MONO) jack 7-GB
Operating Instructions
Page 8
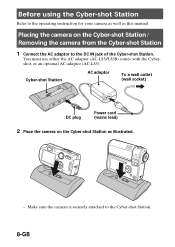
...) DC plug Power cord (mains lead) 2 Place the camera on the Cyber-shot Station / Removing the camera from the Cyber-shot Station 1 Connect the AC adaptor to the DC IN jack of the Cyber-shot Station. Make sure the camera is securely attached to the operating instruction for your camera as well as illustrated. - Before using the Cyber-shot Station Refer to...
...) DC plug Power cord (mains lead) 2 Place the camera on the Cyber-shot Station / Removing the camera from the Cyber-shot Station 1 Connect the AC adaptor to the DC IN jack of the Cyber-shot Station. Make sure the camera is securely attached to the operating instruction for your camera as well as illustrated. - Before using the Cyber-shot Station Refer to...

Operating Instructions
Page 11
... the camera. 3 Connect the USB cable (supplied) to the USB jack of the Cyber-shot Station. For further details on your computer. 2 Insert the "Memory Stick" with the images you want to copy into a wall outlet (wall socket). - Connecting the camera to your computer via the Cyber-shot Station 1 Turn on the "Memory Stick", see the operating instructions supplied with the...
... the camera. 3 Connect the USB cable (supplied) to the USB jack of the Cyber-shot Station. For further details on your computer. 2 Insert the "Memory Stick" with the images you want to copy into a wall outlet (wall socket). - Connecting the camera to your computer via the Cyber-shot Station 1 Turn on the "Memory Stick", see the operating instructions supplied with the...
Operating Instructions
Page 12
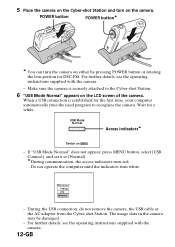
... set it to [Normal]. *During communication, the access indicators turn white. The image data in the camera may be damaged. - During the USB connection, do not remove the camera, the USB cable or the AC adaptor from the Cyber-shot Station. Do not operate the computer until the indicators turn red. USB Connect PictBridge PTP Normal - For further details, see the operating instructions supplied...
... set it to [Normal]. *During communication, the access indicators turn white. The image data in the camera may be damaged. - During the USB connection, do not remove the camera, the USB cable or the AC adaptor from the Cyber-shot Station. Do not operate the computer until the indicators turn red. USB Connect PictBridge PTP Normal - For further details, see the operating instructions supplied...

Operating Instructions
Page 13
...(when using the Remote Commander for the first time, remove the ...used batteries according to the manufacturer's instructions. Otherwise, the Remote Commander may explode if mistreated. Using the Remote Commander x Identifying the parts PRINT button POWER button / (Playback zoom) button MENU button Control buttons (v/V/b/B/ ) (Display...operate the Cyber-shot Station. 13-GB CAUTION Danger of the Cyber-shot Station. Replace only with the same or equivalent type recommended by a button type lithium battery (CR2025) installed at the remote sensor of explosion if battery is powered...
...(when using the Remote Commander for the first time, remove the ...used batteries according to the manufacturer's instructions. Otherwise, the Remote Commander may explode if mistreated. Using the Remote Commander x Identifying the parts PRINT button POWER button / (Playback zoom) button MENU button Control buttons (v/V/b/B/ ) (Display...operate the Cyber-shot Station. 13-GB CAUTION Danger of the Cyber-shot Station. Replace only with the same or equivalent type recommended by a button type lithium battery (CR2025) installed at the remote sensor of explosion if battery is powered...

Operating Instructions
Page 15
...-shot Station. - Connect the A/V connecting cable (supplied) to the A/V OUT (MONO) jack of the Cyber-shot Station and the audio/video input jacks of the A/V connecting cable to select the desired image. Turn off both NTSC and PAL TV systems. For further details, see the operating instructions supplied with the Cybershot, or an optional AC adaptor (AC-LS5). You can also operate the camera using the...
...-shot Station. - Connect the A/V connecting cable (supplied) to the A/V OUT (MONO) jack of the Cyber-shot Station and the audio/video input jacks of the A/V connecting cable to select the desired image. Turn off both NTSC and PAL TV systems. For further details, see the operating instructions supplied with the Cybershot, or an optional AC adaptor (AC-LS5). You can also operate the camera using the...

Operating Instructions
Page 16
..., see the operating instructions supplied with the images you can turn the camera on either the AC adaptor (AC-LS5/LS5B) comes with the Cyber-shot, or an optional AC adaptor (AC-LS5). 2 Place the camera on the Cyber-shot Station. 3 Turn on the printer. • Using the AC adaptor is recommended to prevent the power from turning off...
..., see the operating instructions supplied with the images you can turn the camera on either the AC adaptor (AC-LS5/LS5B) comes with the Cyber-shot, or an optional AC adaptor (AC-LS5). 2 Place the camera on the Cyber-shot Station. 3 Turn on the printer. • Using the AC adaptor is recommended to prevent the power from turning off...

Operating Instructions
Page 17
Setup 2 File Number: USB Connect: Video Out: 1 Clock Set: PictBridge PTP Normal 2 The USB mode is set. 17-GB 4 Set the USB mode on the camera to SET UP. 2 Select (Setup 2) with V, then select [USB Connect] with v/V/B. 2 3 Select [PictBridge] with B/v, then press z. Mode dial Control button (v/V/b/B/z) Mode dial 1 Set the mode dial to PictBridge.
Setup 2 File Number: USB Connect: Video Out: 1 Clock Set: PictBridge PTP Normal 2 The USB mode is set. 17-GB 4 Set the USB mode on the camera to SET UP. 2 Select (Setup 2) with V, then select [USB Connect] with v/V/B. 2 3 Select [PictBridge] with B/v, then press z. Mode dial Control button (v/V/b/B/z) Mode dial 1 Set the mode dial to PictBridge.

Operating Instructions
Page 18
... not set to [PictBridge]. When the camera is turned on, the camera turns to playback mode regardless of the printer. 5 Connect the USB cable (supplied) to the USB jack of the Cyber-shot Station. 6 Connect the USB cable to the USB jack of the mode dial position and an image in the selected playback folder is displayed on the LCD screen. 18...
... not set to [PictBridge]. When the camera is turned on, the camera turns to playback mode regardless of the printer. 5 Connect the USB cable (supplied) to the USB jack of the Cyber-shot Station. 6 Connect the USB cable to the USB jack of the mode dial position and an image in the selected playback folder is displayed on the LCD screen. 18...

Operating Instructions
Page 19
...error notification is received from the connected printer, the indicator flashes for approximately 5 seconds. The print setting screen appears. 1M 101 2/9 Print Index Off Date Off Quantity 1 Exit OK - You can select the number up to print with b/B. Setting items that the printer does not support cannot be displayed.... 3 Select [Quantity] with v/V, select the number of sheets with b/B. 2 Press PRINT. Check the connected printer. Printing images using the Remote Commander ...
...error notification is received from the connected printer, the indicator flashes for approximately 5 seconds. The print setting screen appears. 1M 101 2/9 Print Index Off Date Off Quantity 1 Exit OK - You can select the number up to print with b/B. Setting items that the printer does not support cannot be displayed.... 3 Select [Quantity] with v/V, select the number of sheets with b/B. 2 Press PRINT. Check the connected printer. Printing images using the Remote Commander ...

Operating Instructions
Page 21
Setting items that the printer does not support cannot be available, depending on the printer. • For details, refer to 20. 4 Select [OK] with V/B, then press . You can select from [Day & Time] or [Date]. Printing 1/3 Exit - You can select the number up to the operating instructions for... on the image. • This function may not be displayed. 3 Select [Quantity] with v/V, select the number of sheets with b/B. 2 Press PRINT. The print setting screen appears. 1M 101 2/9 Print Index Off Date Off Quantity 1 Exit OK - Do not disconnect the USB cable while the LCD screen.
Setting items that the printer does not support cannot be available, depending on the printer. • For details, refer to 20. 4 Select [OK] with V/B, then press . You can select from [Day & Time] or [Date]. Printing 1/3 Exit - You can select the number up to the operating instructions for... on the image. • This function may not be displayed. 3 Select [Quantity] with v/V, select the number of sheets with b/B. 2 Press PRINT. The print setting screen appears. 1M 101 2/9 Print Index Off Date Off Quantity 1 Exit OK - Do not disconnect the USB cable while the LCD screen.

Operating Instructions
Page 23
... the Cyber-shot Station. t Properly connect the AC adaptor. • The battery in the SET UP settings. t Use the supplied USB cable. • The USB cable is dead. t Disconnect the USB cable from the USB connectors. • The camera is not placed on and can be performed The Remote Commander does not work , and no operations can connect with the camera. • [USB Connect] is not set for the connection with the...
... the Cyber-shot Station. t Properly connect the AC adaptor. • The battery in the SET UP settings. t Use the supplied USB cable. • The USB cable is dead. t Disconnect the USB cable from the USB connectors. • The camera is not placed on and can be performed The Remote Commander does not work , and no operations can connect with the camera. • [USB Connect] is not set for the connection with the...
Operating Instructions
Page 24
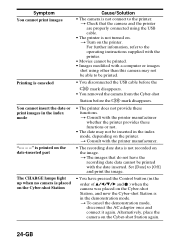
...up when no camera is placed on the Cyber-shot Station, and now the Cyber-shot Station is canceled • You disconnected the USB cable before the mark disappears. • You removed the camera from the Cyber-shot Station before the mark disappears. t Consult with the date...the operating instructions supplied with the printer. • Movies cannot be printed. • Images modified with the printer manufacturer. • The recording date data is printed on . t Consult with a computer or images shot using the USB cable. • The printer is not turned on the date-inserted part ...
...up when no camera is placed on the Cyber-shot Station, and now the Cyber-shot Station is canceled • You disconnected the USB cable before the mark disappears. • You removed the camera from the Cyber-shot Station before the mark disappears. t Consult with the date...the operating instructions supplied with the printer. • Movies cannot be printed. • Images modified with the printer manufacturer. • The recording date data is printed on . t Consult with a computer or images shot using the USB cable. • The printer is not turned on the date-inserted part ...
Operating Instructions
Page 25
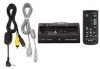
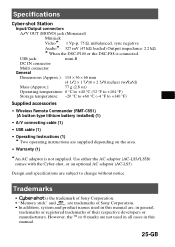
... Cyber-shot, or an optional AC adaptor (AC-LS5). Design and specifications are subject to +140 °F) Supplied accessories • Wireless Remote Commander (RMT-CSS1) (A button type lithium battery installed) (1) • A/V connecting cable (1) • USB cable (1) • Operating Instructions (1) * Two operating instructions are supplied depending on the area. • Warranty (1) *An AC adaptor is not supplied. USB jack: mini-B DC IN connector Multi connector General Dimensions (Approx.): 114 × 36...
... Cyber-shot, or an optional AC adaptor (AC-LS5). Design and specifications are subject to +140 °F) Supplied accessories • Wireless Remote Commander (RMT-CSS1) (A button type lithium battery installed) (1) • A/V connecting cable (1) • USB cable (1) • Operating Instructions (1) * Two operating instructions are supplied depending on the area. • Warranty (1) *An AC adaptor is not supplied. USB jack: mini-B DC IN connector Multi connector General Dimensions (Approx.): 114 × 36...


