Operating Instructions
Page 1
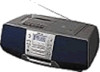
3-865-706-11(1) CD Radio Cassette-Corder Operating Instructions CFD-S28 CFD-S38 ©1999 by Sony Corporation
3-865-706-11(1) CD Radio Cassette-Corder Operating Instructions CFD-S28 CFD-S38 ©1999 by Sony Corporation
Operating Instructions
Page 2
...in accordance with the limits for the CFD-S28 and CFD-S38. Before you call upon your Sony dealer regarding this product will not occur in this manual could void your model number. The CFD-S38 is no guarantee that any changes or... modifications not expressly approved in a particular installation. You are for a Class B digital device, pursuant to wide slot, fully insert. If this equipment does cause harmful interference to radio...
...in accordance with the limits for the CFD-S28 and CFD-S38. Before you call upon your Sony dealer regarding this product will not occur in this manual could void your model number. The CFD-S38 is no guarantee that any changes or... modifications not expressly approved in a particular installation. You are for a Class B digital device, pursuant to wide slot, fully insert. If this equipment does cause harmful interference to radio...
Operating Instructions
Page 3
Basic Operations Table of contents Basic Operations 4 Playing a CD 6 Listening to the radio 8 Playing a tape 10 Recording on a tape The CD Player 12 Using the display 13 Locating a specific point in a track 14 Playing tracks repeatedly (Repeat Play) 15 Playing tracks in random order (Shuffle Play) ...
Basic Operations Table of contents Basic Operations 4 Playing a CD 6 Listening to the radio 8 Playing a tape 10 Recording on a tape The CD Player 12 Using the display 13 Locating a specific point in a track 14 Playing tracks repeatedly (Repeat Play) 15 Playing tracks in random order (Shuffle Play) ...
Operating Instructions
Page 6
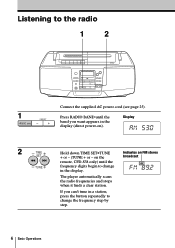
... on ). Listening to change the frequency step by step. If you want appears in the display (direct power-on the remote, CFD-S38 only) until the band you can't tune in a station, press the button repeatedly to change in the display. The player automatically scans the... radio frequencies and stops when it finds a clear station. Press RADIO BAND until the frequency digits begin to the radio 1 2 1 RADIO BAND PRESET Connect the supplied AC power cord (see page 25).
... on ). Listening to change the frequency step by step. If you want appears in the display (direct power-on the remote, CFD-S38 only) until the band you can't tune in a station, press the button repeatedly to change in the display. The player automatically scans the... radio frequencies and stops when it finds a clear station. Press RADIO BAND until the frequency digits begin to the radio 1 2 1 RADIO BAND PRESET Connect the supplied AC power cord (see page 25).
Operating Instructions
Page 7
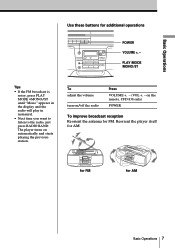
... •MONO/ST until "Mono" appears in the display and the radio will play in monaural. • Next time you want to listen to the radio, just press RADIO BAND. The player turns on /off the radio Press VOLUME +, - (VOL +, - on the remote, CFD-S38 only) POWER To improve broadcast reception Reorient the antenna for additional...
... •MONO/ST until "Mono" appears in the display and the radio will play in monaural. • Next time you want to listen to the radio, just press RADIO BAND. The player turns on /off the radio Press VOLUME +, - (VOL +, - on the remote, CFD-S38 only) POWER To improve broadcast reception Reorient the antenna for additional...
Operating Instructions
Page 10
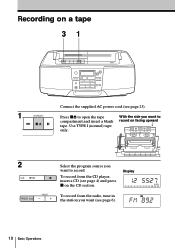
With the side you want to record on the CD section. To record from the radio, tune in the station you want (see page 25). Recording on a tape 31 1 STOP/EJECT Connect the supplied AC power cord (see page 6). 10 Basic Operations Display To record from the CD player, insert a CD (see page 4) and press p on facing upward 2 CD RADIO BAND PRESET Select the program source you want to open the tape compartment and insert a blank tape. Use TYPE I (normal) tape only. Press p6 to record.
With the side you want to record on the CD section. To record from the radio, tune in the station you want (see page 25). Recording on a tape 31 1 STOP/EJECT Connect the supplied AC power cord (see page 6). 10 Basic Operations Display To record from the CD player, insert a CD (see page 4) and press p on facing upward 2 CD RADIO BAND PRESET Select the program source you want to open the tape compartment and insert a blank tape. Use TYPE I (normal) tape only. Press p6 to record.
Operating Instructions
Page 19
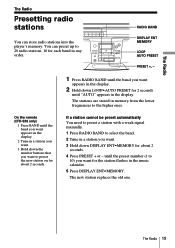
... 2 seconds. 4 Press PRESET + or - If a station cannot be preset automatically You need to preset a station with a weak signal manually. 1 Press RADIO BAND to select the band. 2 Tune in a station you want appears in the music calender. 5 Press DISPLAY ENT•MEMORY. You can store...station replaces the old one. RADIO BAND DISPLAY ENT MEMORY LOOP AUTO PRESET PRESET +, - 1 Press RADIO BAND until the band you want. 3 Hold down the number buttons that you want . 3 Hold down DISPLAY ENT•MEMORY for each band in the display. On the remote (CFD-S38 only) 1 Press BAND ...
... 2 seconds. 4 Press PRESET + or - If a station cannot be preset automatically You need to preset a station with a weak signal manually. 1 Press RADIO BAND to select the band. 2 Tune in a station you want appears in the music calender. 5 Press DISPLAY ENT•MEMORY. You can store...station replaces the old one. RADIO BAND DISPLAY ENT MEMORY LOOP AUTO PRESET PRESET +, - 1 Press RADIO BAND until the band you want. 3 Hold down the number buttons that you want . 3 Hold down DISPLAY ENT•MEMORY for each band in the display. On the remote (CFD-S38 only) 1 Press BAND ...
Operating Instructions
Page 20
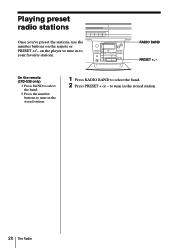
to select the band. 2 Press PRESET + or - On the remote (CFD-S38 only) 1 Press BAND to select the band. 2 Press the number buttons to tune in the stored station. 1 Press RADIO BAND to tune in to your favorite stations. on the remote or PRESET +/- RADIO BAND PRESET +, - Playing preset radio stations Once you've preset the stations, use the number buttons on the player to tune in the stored station. 20 The Radio
to select the band. 2 Press PRESET + or - On the remote (CFD-S38 only) 1 Press BAND to select the band. 2 Press the number buttons to tune in the stored station. 1 Press RADIO BAND to tune in to your favorite stations. on the remote or PRESET +/- RADIO BAND PRESET +, - Playing preset radio stations Once you've preset the stations, use the number buttons on the player to tune in the stored station. 20 The Radio
Operating Instructions
Page 22
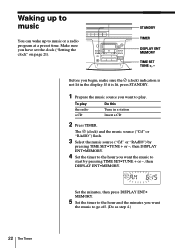
Set the minutes, then press DISPLAY ENT• MEMORY. 5 Set the timer to the hour and the minutes you want the music to play the radio a CD Do this Tune in the display. If it is lit, press STANDBY. 1 Prepare the music source you begin, make sure the t (clock) indication is not ... up to start by pressing TIME SET•TUNE + or -, then DISPLAY ENT•MEMORY. The t (clock) and the music source ("Cd" or "RAdIO") flash. 3 Select the music source ("Cd" or "RAdIO") by pressing TIME SET•TUNE + or -, then DISPLAY ENT•MEMORY. 4 Set the timer to the hour you have set the...
Set the minutes, then press DISPLAY ENT• MEMORY. 5 Set the timer to the hour and the minutes you want the music to play the radio a CD Do this Tune in the display. If it is lit, press STANDBY. 1 Prepare the music source you begin, make sure the t (clock) indication is not ... up to start by pressing TIME SET•TUNE + or -, then DISPLAY ENT•MEMORY. The t (clock) and the music source ("Cd" or "RAdIO") flash. 3 Select the music source ("Cd" or "RAdIO") by pressing TIME SET•TUNE + or -, then DISPLAY ENT•MEMORY. 4 Set the timer to the hour you have set the...
Operating Instructions
Page 23
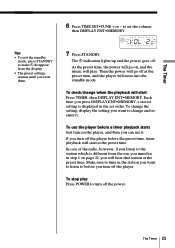
In case of the radio, however, if you listen to change when the playback will start at the preset time. To stop play Press POWER to make t disappear from the ...
In case of the radio, however, if you listen to change when the playback will start at the preset time. To stop play Press POWER to make t disappear from the ...
Operating Instructions
Page 24
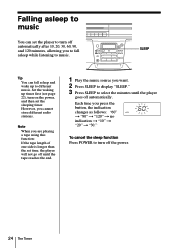
... to different music. Set the waking up to turn off automatically after 10, 20, 30, 60, 90, and 120 minutes, allowing you cannot store different radio stations. SLEEP Tip You can set the sleeping timer. However, you to turn off the power. 24 The Timer
... to different music. Set the waking up to turn off automatically after 10, 20, 30, 60, 90, and 120 minutes, allowing you cannot store different radio stations. SLEEP Tip You can set the sleeping timer. However, you to turn off the power. 24 The Timer
Operating Instructions
Page 30
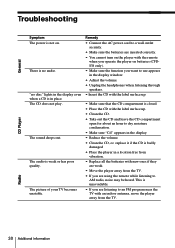
... speakers. • Insert the CD with the label surface up. • Make sure that the CD compartment is closed. • Place the CD with the label surface up. • Clean the CD. • Take out the CD and leave the CD compartment open for about an hour to AM radio, noise may be heard. The... CD does not play. Remedy • Connect the ...
... speakers. • Insert the CD with the label surface up. • Make sure that the CD compartment is closed. • Place the CD with the label surface up. • Clean the CD. • Take out the CD and leave the CD compartment open for about an hour to AM radio, noise may be heard. The... CD does not play. Remedy • Connect the ...
Operating Instructions
Page 33
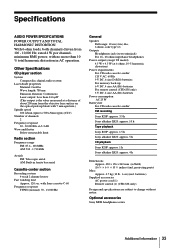
...-up : 6 V DC, 4 size AA (R6) batteries For remote control (CFD-S38 only): 3 V DC, 2 size AA (R6) batteries Power consumption AC 25 W Battery life For CD radio cassette-corder: FM recording Sony R20P: approx. 3.5 h Sony alkaline LR20: approx. 10 h Tape playback Sony R20P: approx. 1.5 h Sony alkaline LR20: approx. 5 h CD playback Sony R20P: approx. 1 h Sony alkaline LR20: approx. 4 h Dimensions Approx. 420 × 156 × 262...
...-up : 6 V DC, 4 size AA (R6) batteries For remote control (CFD-S38 only): 3 V DC, 2 size AA (R6) batteries Power consumption AC 25 W Battery life For CD radio cassette-corder: FM recording Sony R20P: approx. 3.5 h Sony alkaline LR20: approx. 10 h Tape playback Sony R20P: approx. 1.5 h Sony alkaline LR20: approx. 5 h CD playback Sony R20P: approx. 1 h Sony alkaline LR20: approx. 4 h Dimensions Approx. 420 × 156 × 262...
Operating Instructions
Page 34
Index A Audio emphasis 27 B Batteries for player 26 memory back-up 25 for remote 26 C CD player 12 Choosing power sources 25 Cleaning cabinet 32 tape heads and tape path 32 Connecting AC power cord 25 Creating your own program 16...Display 12 F, G, H FLASH 18 I, J, K Improving broadcast reception 7 L Listening to the radio 6 Locating a specific point 13 LOOP 18 M, N, O MEGA BASS 27 P, Q Playing a CD 4 a tape 8 preset radio stations 20 tracks repeatedly 14 Power sources 25 Presetting radio stations 19 Program Play 16 R Radio stations playing 20 presetting 19 Recording on a tape 10 Repeat Play 14...
Index A Audio emphasis 27 B Batteries for player 26 memory back-up 25 for remote 26 C CD player 12 Choosing power sources 25 Cleaning cabinet 32 tape heads and tape path 32 Connecting AC power cord 25 Creating your own program 16...Display 12 F, G, H FLASH 18 I, J, K Improving broadcast reception 7 L Listening to the radio 6 Locating a specific point 13 LOOP 18 M, N, O MEGA BASS 27 P, Q Playing a CD 4 a tape 8 preset radio stations 20 tracks repeatedly 14 Power sources 25 Presetting radio stations 19 Program Play 16 R Radio stations playing 20 presetting 19 Recording on a tape 10 Repeat Play 14...


