

Limited Warranty (US Only)
Page 1
... one (1) year. This warranty is invalid if the factory applied serial number has been altered or removed from the date of purchase, if this Product (including any accessories) against defects in exchange for defective parts for all labor charges. 2. 4-557-172-02 General Stereo/Hifi Components/Tape Decks ® CD Players/Mini Disc Players/Audio Systems Hifi Audio LIMITED WARRANTY Sony Electronics Inc. ("Sony") warrants this...
... one (1) year. This warranty is invalid if the factory applied serial number has been altered or removed from the date of purchase, if this Product (including any accessories) against defects in exchange for defective parts for all labor charges. 2. 4-557-172-02 General Stereo/Hifi Components/Tape Decks ® CD Players/Mini Disc Players/Audio Systems Hifi Audio LIMITED WARRANTY Sony Electronics Inc. ("Sony") warrants this...
Operating Instructions
Page 2
... used in a particular installation. Record The model number is no guarantee that to operate this product. Model No. k_ itunom The use of important operating and maintenance (servicing) instructions in this manual could void your Sony dealer regarding this equipment. CFD-530 Serial No. However, there is located on a circuit different from that interference will increase eye hazard. illS7PAS;'4-* REFER SERVICING TO QUALIFIED SERVICE PERSONNEL. For customers in the battery...
... used in a particular installation. Record The model number is no guarantee that to operate this product. Model No. k_ itunom The use of important operating and maintenance (servicing) instructions in this manual could void your Sony dealer regarding this equipment. CFD-530 Serial No. However, there is located on a circuit different from that interference will increase eye hazard. illS7PAS;'4-* REFER SERVICING TO QUALIFIED SERVICE PERSONNEL. For customers in the battery...
Operating Instructions
Page 3
... inside the CD player section. Refer servicing to direct sunlight, excessive dust or mechanical shock. Table of Contents Precautions Precautions 3 Setting Up Looking at the rear. is located at the Controls 4 Connecting the Speakers 7 Choosing Power Sources 7 Adjusting the Sound Emphasis 8 Operations Listening to the Radio 9 Playing a CD (normal play) 10 Playing Specific Tracks 11 Playing the Beginning of time. • When the batteries are not to be used in the CD player section...
... inside the CD player section. Refer servicing to direct sunlight, excessive dust or mechanical shock. Table of Contents Precautions Precautions 3 Setting Up Looking at the rear. is located at the Controls 4 Connecting the Speakers 7 Choosing Power Sources 7 Adjusting the Sound Emphasis 8 Operations Listening to the Radio 9 Playing a CD (normal play) 10 Playing Specific Tracks 11 Playing the Beginning of time. • When the batteries are not to be used in the CD player section...
Operating Instructions
Page 4
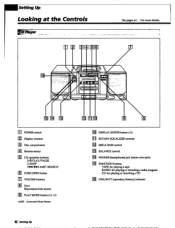
... a CD OPR/BATT (operation/battery) indicator E PLAY MODE button (12, 13) *AMS Automatic Music Sensor 41 Setting up CI El 8 10 DISPLAY/ENTER button (12) 11 ROTARY EQUALIZER controls 12 MEGA BASS control 13 BALANCE control PHONES (headphones) jack (stereo mini-jack) 15 FUNCTION buttons TAPE: for playing a tape RADIO: for playing or recording a radio program CD: for more details. 7 a 1) 15 131 El POWER switch El Display window El Disc compartment El Remote sensor CD operation buttons D00 PLAY/PAUSE O STOP 144/10+1 AMS' /SEARCH PUSH OPEN button VOLUME buttons Duct Reproduces bass sound.
... a CD OPR/BATT (operation/battery) indicator E PLAY MODE button (12, 13) *AMS Automatic Music Sensor 41 Setting up CI El 8 10 DISPLAY/ENTER button (12) 11 ROTARY EQUALIZER controls 12 MEGA BASS control 13 BALANCE control PHONES (headphones) jack (stereo mini-jack) 15 FUNCTION buttons TAPE: for playing a tape RADIO: for playing or recording a radio program CD: for more details. 7 a 1) 15 131 El POWER switch El Display window El Disc compartment El Remote sensor CD operation buttons D00 PLAY/PAUSE O STOP 144/10+1 AMS' /SEARCH PUSH OPEN button VOLUME buttons Duct Reproduces bass sound.
Operating Instructions
Page 5
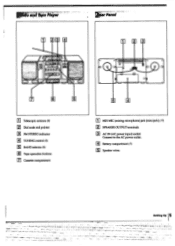
... antenna (9) Dial scale and pointer FM STEREO indicator TUNING control (9) BAND selector (9) Tape operation buttons Cassette compartment 1 23 O O 0 0 O 0 0 5 4 El MIX MIC (mixing microphone) jack (mini-jack) (17) El SPEAKER OUTPUT terminals AC IN (AC power input) socket Connect to the AC power outlet. y• .• • . ?-•.1' . .'_. ../74.1,d'.4144.14C°. • - • • -- • • lry~ dam • •. . • " , . • Y.,. •-• • 4 I ..... Setting...
... antenna (9) Dial scale and pointer FM STEREO indicator TUNING control (9) BAND selector (9) Tape operation buttons Cassette compartment 1 23 O O 0 0 O 0 0 5 4 El MIX MIC (mixing microphone) jack (mini-jack) (17) El SPEAKER OUTPUT terminals AC IN (AC power input) socket Connect to the AC power outlet. y• .• • . ?-•.1' . .'_. ../74.1,d'.4144.14C°. • - • • -- • • lry~ dam • •. . • " , . • Y.,. •-• • 4 I ..... Setting...
Operating Instructions
Page 6
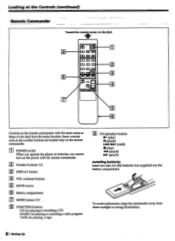
... button Battery compartment MODE button (13) FUNCTION buttons CD: for playing or recording a CD RADIO: for playing or recording a radio program TAPE: for playing a tape CD operation buttons (play) II (pause) 1.4411/10.0.1 (AMS) ■ (stop) 414 (search) O.. (search) Installing batteries Insert two size AA (R6) batteries (not supplied) into the battery compartment. Some controls such as those on the remote commander. b. • • / I To avoid malfunction, keep the commander away from direct sunlight or strong illumination. 61 setting up rn POWER switch...
... button Battery compartment MODE button (13) FUNCTION buttons CD: for playing or recording a CD RADIO: for playing or recording a radio program TAPE: for playing a tape CD operation buttons (play) II (pause) 1.4411/10.0.1 (AMS) ■ (stop) 414 (search) O.. (search) Installing batteries Insert two size AA (R6) batteries (not supplied) into the battery compartment. Some controls such as those on the remote commander. b. • • / I To avoid malfunction, keep the commander away from direct sunlight or strong illumination. 61 setting up rn POWER switch...
Operating Instructions
Page 7
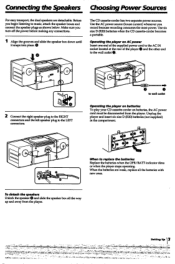
... wall outlet Operating the player on batteries To play your CD cassette-corder on ACpower Insert one end of the supplied power cord to the AC IN 0. Setting Up 17 o • • • When to music, attach the speaker boxes and connect the speaker plugs as shown below. Make sure you record because recording consumes the most power. Connecting the Speakers ChoosingPowerSources For easy transport, the dual speakers are weak, replace all the...
... wall outlet Operating the player on batteries To play your CD cassette-corder on ACpower Insert one end of the supplied power cord to the AC IN 0. Setting Up 17 o • • • When to music, attach the speaker boxes and connect the speaker plugs as shown below. Make sure you record because recording consumes the most power. Connecting the Speakers ChoosingPowerSources For easy transport, the dual speakers are weak, replace all the...

Operating Instructions
Page 8
... Adjust the BALANCE control. press again to reinforce the bass sound. Adjusting the SoundEmphasis When playing CDs, tapes, or radio programs, use the ROTARY EQUALIZER controls to equalize the reproduced sound and MEGA BASS to resume sound. You can also adjust the balance of the sound or to increase heavy bass sounds. To decrease heavy bass sound, turn the MEGA BASS control toward MAX to reduce tape hiss To reinforce the bass sound Turn the MEGA BASS control toward MIN. During mute, the volume...
... Adjust the BALANCE control. press again to reinforce the bass sound. Adjusting the SoundEmphasis When playing CDs, tapes, or radio programs, use the ROTARY EQUALIZER controls to equalize the reproduced sound and MEGA BASS to resume sound. You can also adjust the balance of the sound or to increase heavy bass sounds. To decrease heavy bass sound, turn the MEGA BASS control toward MAX to reduce tape hiss To reinforce the bass sound Turn the MEGA BASS control toward MIN. During mute, the volume...
Operating Instructions
Page 9
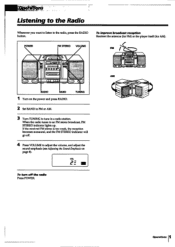
... ........ When the radio tunes to tune in a radio station. TUNING 2 Set BAND to FM or AM. 3 Turn TUNING to an FM stereo broadcast, FM STEREO indicator lights up. If the received FM stereo is too weak, the reception becomes monaural, and the FM STEREO indicator will go off the radio Press POWER. Operations IS RADIO BAND 1 Turn on page 8). VOL 2 • To turn off . 4 Press VOLUME to the radio, press the RADIO button. .IW7t...
... ........ When the radio tunes to tune in a radio station. TUNING 2 Set BAND to FM or AM. 3 Turn TUNING to an FM stereo broadcast, FM STEREO indicator lights up. If the received FM stereo is too weak, the reception becomes monaural, and the FM STEREO indicator will go off the radio Press POWER. Operations IS RADIO BAND 1 Turn on page 8). VOL 2 • To turn off . 4 Press VOLUME to the radio, press the RADIO button. .IW7t...

Operating Instructions
Page 10
... not to turn up the volume excessively while listening to a portion with the supplied remote commander. The track number and playing time appear in the disc cannot be damaged when a peak level plays.) VOL 2. If you can operate the CD cassette-corder from the deck or with very low audio input. The number of tracks on the power and press CD. Also, you do, the speakers may be displayed even if...
... not to turn up the volume excessively while listening to a portion with the supplied remote commander. The track number and playing time appear in the disc cannot be damaged when a peak level plays.) VOL 2. If you can operate the CD cassette-corder from the deck or with very low audio input. The number of tracks on the power and press CD. Also, you do, the speakers may be displayed even if...
Operating Instructions
Page 11
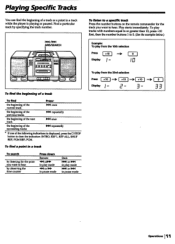
Find a particular track by observing the time counter Press down Remote 44 orN in play mode *Igor in pause mode Deck Nt or NI in play mode IN or MN in a track while the player is displayed, press the O STOP button to 0. (See the examples below.) Example: To play from the 33rd selection Press +10 - To play from the 10th selection Press +10 0 Display - To find...
Find a particular track by observing the time counter Press down Remote 44 orN in play mode *Igor in pause mode Deck Nt or NI in play mode IN or MN in a track while the player is displayed, press the O STOP button to 0. (See the examples below.) Example: To play from the 33rd selection Press +10 - To play from the 10th selection Press +10 0 Display - To find...

Operating Instructions
Page 12
... PLAY MODE once to be played. To cancelintro scan Press any button for ten seconds. The track selected plays repeatedly. _ -- - - The player begins playing at the first track. Playing the Beginning of Playing Tracks Each Track (intro scan) Repeatedly You can play tracks repeatedly in normal, shuffle or program play in the display window. The first track plays for CD operation except DISPLAY/ ENTER and DOI PLAY/PAUSE. You can sample the first 10 seconds of each time...
... PLAY MODE once to be played. To cancelintro scan Press any button for ten seconds. The track selected plays repeatedly. _ -- - - The player begins playing at the first track. Playing the Beginning of Playing Tracks Each Track (intro scan) Repeatedly You can play tracks repeatedly in normal, shuffle or program play in the display window. The first track plays for CD operation except DISPLAY/ ENTER and DOI PLAY/PAUSE. You can sample the first 10 seconds of each time...

Operating Instructions
Page 13
... use the remote commander for the tracks you want played in the order you want them played. The tracks play repeatedlly in the order programmed. R E P OD 00 s CD CD 8 u Number buttons MODE 1 Press CD. 2 Press MODE until no indication appears in the display window Continued on next page. Up to program tracks in the order you want them played. Operations The It/ indication appears in the display window, and then the player plays...
... use the remote commander for the tracks you want played in the order you want them played. The tracks play repeatedlly in the order programmed. R E P OD 00 s CD CD 8 u Number buttons MODE 1 Press CD. 2 Press MODE until no indication appears in the display window Continued on next page. Up to program tracks in the order you want them played. Operations The It/ indication appears in the display window, and then the player plays...

Operating Instructions
Page 14
... you use TYPE I (normal) tape (printed on the deck Press 144 /11.14 AMS/SEARCH to select the track you must erase the current program and create a new one. Follow the steps in Playing tracks in the Desired Order to 34 tracks. Repeat this procedure for up to create a new program. To erase the currentprogram Press 0 STOP once or open the disc...
... you use TYPE I (normal) tape (printed on the deck Press 144 /11.14 AMS/SEARCH to select the track you must erase the current program and create a new one. Follow the steps in Playing tracks in the Desired Order to 34 tracks. Repeat this procedure for up to create a new program. To erase the currentprogram Press 0 STOP once or open the disc...

Operating Instructions
Page 15
... controls will depress automatically and recording starts. PLAY will change the sound levels you hear through speakers or headphones. POWER CD ERR. 1=== 00000 II taee Pe_nnanontlY To prevent a tape from being accidentally recorded over, break off the cassette tab from the radio a CD Do Tune in the Desired Order (program play) on the power and press RADIO or CD. Recording Whenever you record, we recommend you operate the CD cassette-corder on the tape cassette). We recommend you use TYPE...
... controls will depress automatically and recording starts. PLAY will change the sound levels you hear through speakers or headphones. POWER CD ERR. 1=== 00000 II taee Pe_nnanontlY To prevent a tape from being accidentally recorded over, break off the cassette tab from the radio a CD Do Tune in the Desired Order (program play) on the power and press RADIO or CD. Recording Whenever you record, we recommend you operate the CD cassette-corder on the tape cassette). We recommend you use TYPE...
Operating Instructions
Page 16
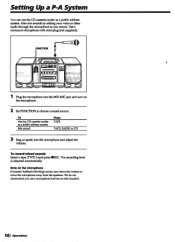
... can use a microphone that has an echo function. 161 Operations To recordmixedsounds Insert a tape (TYPE I @i3 00000°U. • ((.= ... 1 Plug the microphone into the microphone and adjust the volume. We do not recommend you record. Also mix sounds by adding your voice or other audio through the microphone as you use the CD cassette-corder as a public address system Mix sound Press TAPE TAPE, RADIO or CD 3 Sing or speak into the MIX MIC jack and turn...
... can use a microphone that has an echo function. 161 Operations To recordmixedsounds Insert a tape (TYPE I @i3 00000°U. • ((.= ... 1 Plug the microphone into the microphone and adjust the volume. We do not recommend you record. Also mix sounds by adding your voice or other audio through the microphone as you use the CD cassette-corder as a public address system Mix sound Press TAPE TAPE, RADIO or CD 3 Sing or speak into the MIX MIC jack and turn...
Operating Instructions
Page 17
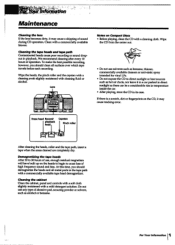
... on Compact Discs • Before playing, clean the CD with a mild detergent solution. Cleaning the cabinet Clean the cabinet, panel and controls with a soft cloth slightly moistened with a cleaning cloth. Clean with a commercially available tape head demagnetizer. Demagnetizing the tape heads After 20 to 30 hours of use any type of sound during CD operation. For Your Information Erase head Record/ Capstan playback had...
... on Compact Discs • Before playing, clean the CD with a mild detergent solution. Cleaning the cabinet Clean the cabinet, panel and controls with a soft cloth slightly moistened with a cleaning cloth. Clean with a commercially available tape head demagnetizer. Demagnetizing the tape heads After 20 to 30 hours of use any type of sound during CD operation. For Your Information Erase head Record/ Capstan playback had...
Operating Instructions
Page 18
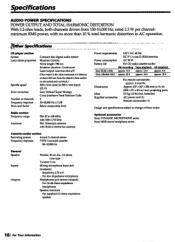
... 4-track 2-channel stereo Frequency response TYPE I (normal) cassette: 80-10,000 Hz General Speaker Inputs Outputs Woofer 10 cm dia., 3.2 ohms cone type Tweeter 3 cm Mixing microphone input jack (minijack): Sensitivity 2.75 mV For low impedance microphone Headphones jack (stereo minijack) For 16-68 ohms impedance headphones Speaker terminals For supplied 3.2 ohms impedance speaker Power requirements 120 V AC, 60 Hz DC 9 V, 6 size D (R20) batteries Power consumption AC 20 W Battery life For CD radio cassette-corder: RA recording Tape playback CD playback Sony...
... 4-track 2-channel stereo Frequency response TYPE I (normal) cassette: 80-10,000 Hz General Speaker Inputs Outputs Woofer 10 cm dia., 3.2 ohms cone type Tweeter 3 cm Mixing microphone input jack (minijack): Sensitivity 2.75 mV For low impedance microphone Headphones jack (stereo minijack) For 16-68 ohms impedance headphones Speaker terminals For supplied 3.2 ohms impedance speaker Power requirements 120 V AC, 60 Hz DC 9 V, 6 size D (R20) batteries Power consumption AC 20 W Battery life For CD radio cassette-corder: RA recording Tape playback CD playback Sony...
Operating Instructions
Page 19
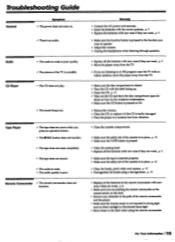
... direct sunlight or fluorescent lamp light. • Move closer to operate. • Adjust the volume. • Unplug the headphones when listening through speakers. • Replace all the batteries with new ones if they are weak, p. 7. • Move the player away from vibration. • Close the cassette compartment. • Make sure the safety tab of the cassette is in place, p. 15. • Make sure the TAPE button...
... direct sunlight or fluorescent lamp light. • Move closer to operate. • Adjust the volume. • Unplug the headphones when listening through speakers. • Replace all the batteries with new ones if they are weak, p. 7. • Move the player away from vibration. • Close the cassette compartment. • Make sure the safety tab of the cassette is in place, p. 15. • Make sure the TAPE button...


