
Limited Warranty (U.S. Only)
Page 1
... packaging or packaging affording an equal degree of the original Limited Warranty period or for the time periods and as fuses or batteries). Printed in material or workmanship for ninety (90) days, whichever is invalid if the factory-applied serial number has been altered or removed from the product. If Sony elects to replace the product after this Limited...
... packaging or packaging affording an equal degree of the original Limited Warranty period or for the time periods and as fuses or batteries). Printed in material or workmanship for ninety (90) days, whichever is invalid if the factory-applied serial number has been altered or removed from the product. If Sony elects to replace the product after this Limited...
Operating Instructions (primary manual)
Page 1
Record the serial number in the space provided below. 3-865-652-11 (1) FM/AM Compact Disc Player Operating Instructions US Owner's Record The model and serial numbers are located on the bottom of the unit. CDX-2250 © 1999 by Sony Corporation CDX-2250␣ ␣ Serial No. Refer to these numbers whenever you call upon your Sony dealer regarding this product. For installation and connections, see the supplied installation/connections manual. Model No.
Record the serial number in the space provided below. 3-865-652-11 (1) FM/AM Compact Disc Player Operating Instructions US Owner's Record The model and serial numbers are located on the bottom of the unit. CDX-2250 © 1999 by Sony Corporation CDX-2250␣ ␣ Serial No. Refer to these numbers whenever you call upon your Sony dealer regarding this product. For installation and connections, see the supplied installation/connections manual. Model No.
Operating Instructions (primary manual)
Page 2
..., uses, and can be determined by turning the equipment off and on a circuit different from that any changes or modifications not expressly approved in a residential installation. You are designed to provide reasonable protection against harmful interference in this manual could void your authority to operate this equipment does cause harmful interference to radio or television reception, which the receiver...
..., uses, and can be determined by turning the equipment off and on a circuit different from that any changes or modifications not expressly approved in a residential installation. You are designed to provide reasonable protection against harmful interference in this manual could void your authority to operate this equipment does cause harmful interference to radio or television reception, which the receiver...
Operating Instructions (primary manual)
Page 3
Best Tuning Memory (BTM 7 Memorizing only the desired stations 7 Receiving the memorized stations 7 Other Functions Adjusting the sound characteristics 8 Turning on the clock display - Table of Contents Location of controls 4 Getting Started Resetting the unit 5 Setting the clock 5 CD Player Listening to a CD 6 Playing a CD in various modes 6 Radio Memorizing stations automatically - Power Select Function 8 Changing the sound and beep sound 9 Additional Information Precautions 9 Maintenance 10 Dismounting the unit 11 Specifications 12 Troubleshooting guide 13 3
Best Tuning Memory (BTM 7 Memorizing only the desired stations 7 Receiving the memorized stations 7 Other Functions Adjusting the sound characteristics 8 Turning on the clock display - Table of Contents Location of controls 4 Getting Started Resetting the unit 5 Setting the clock 5 CD Player Listening to a CD 6 Playing a CD in various modes 6 Radio Memorizing stations automatically - Power Select Function 8 Changing the sound and beep sound 9 Additional Information Precautions 9 Maintenance 10 Dismounting the unit 11 Specifications 12 Troubleshooting guide 13 3
Operating Instructions (primary manual)
Page 4
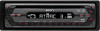
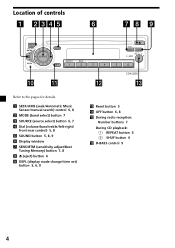
Location of controls MODE SEEK/AMS SOURCE SOUND BTM SENS DSPL OFF 1 2 D - BASS 3 REPEAT SHUF OFF 1 2 3 4 5 6 CDX-2250 Refer to the pages for details. 1 SEEK/AMS (seek/Automatic Music Sensor/manual search) control 6, 8 2 MODE (band select) button 7 3 SOURCE (source select) button 6, 7 4 Dial (volume/bass/treble/left-right/ front-rear control) 5, 8 5 SOUND button 5, 8, 9 6 Display window 7 SENS/BTM (sensitivity adjust/Best Tuning Memory) button 7, 8 8 6 (eject) button 6 9 DSPL (display mode change/time set) button 5, 6, 8 0 Reset button 5 !¡ OFF button 6, 8 !™ ...
Location of controls MODE SEEK/AMS SOURCE SOUND BTM SENS DSPL OFF 1 2 D - BASS 3 REPEAT SHUF OFF 1 2 3 4 5 6 CDX-2250 Refer to the pages for details. 1 SEEK/AMS (seek/Automatic Music Sensor/manual search) control 6, 8 2 MODE (band select) button 7 3 SOURCE (source select) button 6, 7 4 Dial (volume/bass/treble/left-right/ front-rear control) 5, 8 5 SOUND button 5, 8, 9 6 Display window 7 SENS/BTM (sensitivity adjust/Best Tuning Memory) button 7, 8 8 6 (eject) button 6 9 DSPL (display mode change/time set) button 5, 6, 8 0 Reset button 5 !¡ OFF button 6, 8 !™ ...
Operating Instructions (primary manual)
Page 5
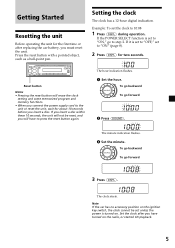
.... Note If the car has no accessory position on the ignition key switch, the clock cannot be reset, and you will erase the clock setting and some memorized program and memory functions. • When you connect the power supply cord to press the reset button again. If the POWER SELECT function is turned on the radio, or started CD playback. 5 The hour indication flashes. 1 Set the hour. Setting the clock The clock has a 12-hour...
.... Note If the car has no accessory position on the ignition key switch, the clock cannot be reset, and you will erase the clock setting and some memorized program and memory functions. • When you connect the power supply cord to press the reset button again. If the POWER SELECT function is turned on the radio, or started CD playback. 5 The hour indication flashes. 1 Set the hour. Setting the clock The clock has a 12-hour...
Operating Instructions (primary manual)
Page 6
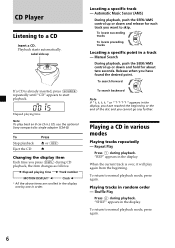
... .) CD, use the optional Sony compact disc single adapter (CSA-8). When the current track is already inserted, press (SOURCE) repeatedly until "CD" appears to normal playback mode, press again. 6 Playing tracks in the display. "SHUF" appears in order. Label side up or down and release for about two seconds. Repeat Play Press (1) during CD playback, the item changes as follows: z Elapsed playing time z Track number MOTION DISPLAY* Z Clock Z * All...
... .) CD, use the optional Sony compact disc single adapter (CSA-8). When the current track is already inserted, press (SOURCE) repeatedly until "CD" appears to normal playback mode, press again. 6 Playing tracks in the display. "SHUF" appears in order. Label side up or down and release for about two seconds. Repeat Play Press (1) during CD playback, the item changes as follows: z Elapsed playing time z Track number MOTION DISPLAY* Z Clock Z * All...

Operating Instructions (primary manual)
Page 7
... stations can be received, some number buttons will be erased. Memorizing only the desired stations You can store up to (6)) on the same number button, the previously stored station will retain their former setting. • When a number is indicated in the display, the unit starts storing stations from the one currently displayed. • If a CD is not in stations while driving, use Best Tuning Memory to prevent accidents. 1 Press (SOURCE) repeatedly...
... stations can be received, some number buttons will be erased. Memorizing only the desired stations You can store up to (6)) on the same number button, the previously stored station will retain their former setting. • When a number is indicated in the display, the unit starts storing stations from the one currently displayed. • If a CD is not in stations while driving, use Best Tuning Memory to prevent accidents. 1 Press (SOURCE) repeatedly...
Operating Instructions (primary manual)
Page 8
.... Power Select Function Only for the station (automatic tuning). Note If the automatic tuning stops too frequently, press (SENS/BTM) repeatedly until "LCL" (local seek mode) is received. Only the stations with an accessory position on the clock display - Push the SEEK/AMS control up or down repeatedly until the desired station is displayed. You can adjust the bass, treble, balance, and fader. Scanning stops when the unit receives a station. Tip...
.... Power Select Function Only for the station (automatic tuning). Note If the automatic tuning stops too frequently, press (SENS/BTM) repeatedly until "LCL" (local seek mode) is received. Only the stations with an accessory position on the clock display - Push the SEEK/AMS control up or down repeatedly until the desired station is displayed. You can adjust the bass, treble, balance, and fader. Scanning stops when the unit receives a station. Tip...
Operating Instructions (primary manual)
Page 9
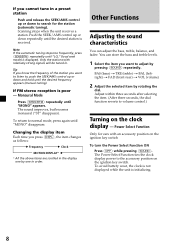
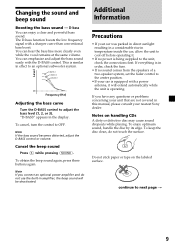
... the D-BASS control. D-BASS 3 D-BASS 2 D-BASS 1 0dB Frequency (Hz) Adjusting the bass curve Turn the D-BASS control to OFF. Note If you have any questions or problems concerning your nearest Sony dealer. This is in this manual, please consult your unit that are not covered in order, check the fuse. • If no power is operating. If everything is similar in the display. Level Changing the sound and beep sound Boosting the bass sound - D-bass You...
... the D-BASS control. D-BASS 3 D-BASS 2 D-BASS 1 0dB Frequency (Hz) Adjusting the bass curve Turn the D-BASS control to OFF. Note If you have any questions or problems concerning your nearest Sony dealer. This is in this manual, please consult your unit that are not covered in order, check the fuse. • If no power is operating. If everything is similar in the display. Level Changing the sound and beep sound Boosting the bass sound - D-bass You...
Operating Instructions (primary manual)
Page 10
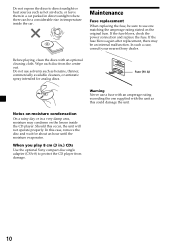
... operate properly. When you play 8 cm (3 in.) CDs Use the optional Sony compact disc single adapter (CSA-8) to protect the CD player from the center out. Do not use a fuse with an amperage rating exceeding the one matching the amperage rating stated on the original fuse. Maintenance Fuse replacement When replacing the fuse, be sure to use one supplied with an optional cleaning cloth. If the fuse blows, check the power connection...
... operate properly. When you play 8 cm (3 in.) CDs Use the optional Sony compact disc single adapter (CSA-8) to protect the CD player from the center out. Do not use a fuse with an amperage rating exceeding the one matching the amperage rating stated on the original fuse. Maintenance Fuse replacement When replacing the fuse, be sure to use one supplied with an optional cleaning cloth. If the fuse blows, check the power connection...

Operating Instructions (primary manual)
Page 11
Repeat on the opposite side and remove the frame. 2 Insert a flathead screwdriver between the unit and the frame, and rotate 90° to release the hidden mounting spring. Repeat on the opposite side and remove the unit. 10 mm (13/32 in.) 90° 4 mm (3/16 in.) 11 Dismounting the unit 1 Insert the supplied tool between the bracket and mounting spring. Gently pry the spring toward the unit while pulling the unit out a little.
Repeat on the opposite side and remove the frame. 2 Insert a flathead screwdriver between the unit and the frame, and rotate 90° to release the hidden mounting spring. Repeat on the opposite side and remove the unit. 10 mm (13/32 in.) 90° 4 mm (3/16 in.) 11 Dismounting the unit 1 Insert the supplied tool between the bracket and mounting spring. Gently pry the spring toward the unit while pulling the unit out a little.
Operating Instructions (primary manual)
Page 12
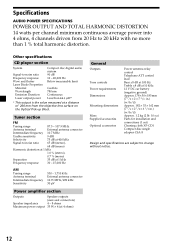
... Tuning range Antenna terminal Intermediate frequency Sensitivity 530 - 1,710 kHz External antenna connector 10.71 MHz/450 kHz 30 µV Power amplifier section Outputs Speaker outputs (sure seal connectors) Speaker impedance 4 - 8 ohms Maximum power output 35 W × 4 (at 4 ohms) General Outputs Tone controls Power requirements Dimensions Mounting dimensions Mass Supplied accessories Optional accessories Power antenna relay control Telephone ATT control lead Bass ±8 dB at 100 Hz Treble ±8 dB at 10 kHz 12 V DC car battery...
... Tuning range Antenna terminal Intermediate frequency Sensitivity 530 - 1,710 kHz External antenna connector 10.71 MHz/450 kHz 30 µV Power amplifier section Outputs Speaker outputs (sure seal connectors) Speaker impedance 4 - 8 ohms Maximum power output 35 W × 4 (at 4 ohms) General Outputs Tone controls Power requirements Dimensions Mounting dimensions Mass Supplied accessories Optional accessories Power antenna relay control Telephone ATT control lead Bass ±8 dB at 100 Hz Treble ±8 dB at 10 kHz 12 V DC car battery...

Operating Instructions (primary manual)
Page 13
...;C (122°F). CD playback Problem CD cannot be loaded. Press the reset button. • The unit is installed at an angle of more than 60°. • The unit is not installed in a clockwise direction to adjust the volume. •Set the fader control to the MONO mode (page 8). Radio reception Problem Preset tuning is cancelled (page 9). The "ST" indication flashes. n Set to the center position for two seconds. Troubleshooting guide The following...
...;C (122°F). CD playback Problem CD cannot be loaded. Press the reset button. • The unit is installed at an angle of more than 60°. • The unit is not installed in a clockwise direction to adjust the volume. •Set the fader control to the MONO mode (page 8). Radio reception Problem Preset tuning is cancelled (page 9). The "ST" indication flashes. n Set to the center position for two seconds. Troubleshooting guide The following...
Operating Instructions (primary manual)
Page 14
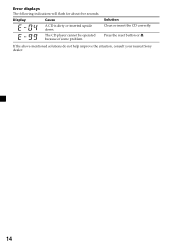
If the above-mentioned solutions do not help improve the situation, consult your nearest Sony dealer. 14 Error displays The following indications will flash for about five seconds. The CD player cannot be operated because of some problem. Press the reset button or 6. Solution Clean or insert the CD correctly. Display Cause A CD is dirty or inserted upside down.
If the above-mentioned solutions do not help improve the situation, consult your nearest Sony dealer. 14 Error displays The following indications will flash for about five seconds. The CD player cannot be operated because of some problem. Press the reset button or 6. Solution Clean or insert the CD correctly. Display Cause A CD is dirty or inserted upside down.

Operating Instructions (primary manual)
Page 16
16 Sony Corporation Printed in Korea
16 Sony Corporation Printed in Korea


