
Operating Instructions
Page 2
... of the unit. However, there is clearly indicated in a particular installation. Owner's Record The model and serial numbers are located at the rear of important operating and maintenance (servicing) instructions in this manual thoroughly and retain it for making the task easier. Model No. Before operating the unit, please read this manual describe the controls on a circuit different from that to correct the interference by one...
... of the unit. However, there is clearly indicated in a particular installation. Owner's Record The model and serial numbers are located at the rear of important operating and maintenance (servicing) instructions in this manual thoroughly and retain it for making the task easier. Model No. Before operating the unit, please read this manual describe the controls on a circuit different from that to correct the interference by one...

Operating Instructions
Page 3
... Using a keyboard 27 Storing Specific Tracks (Delete Bank 28 Grouping Discs (Group File 28 Storing Your Favorite Tracks (Hit List 30 Additional Information Precautions ...32 Notes on CDs ...32 Troubleshooting ...33 Specifications ...33 Index ...34 3 TABLE OF CONTENTS Getting Started Unpacking ...4 Hooking Up the System ...4 Connecting Another CD Player (CDP-CX300 only 6 Inserting CDs ...7 Playing a CD ...10 Playing CDs Using the Display ...12 Locating a Specific Disc 14 Specifying the Next Disc to Play 15 Playing the Disc...
... Using a keyboard 27 Storing Specific Tracks (Delete Bank 28 Grouping Discs (Group File 28 Storing Your Favorite Tracks (Hit List 30 Additional Information Precautions ...32 Notes on CDs ...32 Troubleshooting ...33 Specifications ...33 Index ...34 3 TABLE OF CONTENTS Getting Started Unpacking ...4 Hooking Up the System ...4 Connecting Another CD Player (CDP-CX300 only 6 Inserting CDs ...7 Playing a CD ...10 Playing CDs Using the Display ...12 Locating a Specific Disc 14 Specifying the Next Disc to Play 15 Playing the Disc...

Operating Instructions
Page 4
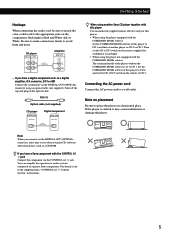
... connections. CONTROL A1 DIGITAL OUT (OPTICAL) CD player Inserting batteries into a pocket. Put two CD booklets facing back to back into the remote You can control the player using the remote, point it at the remote sensor g on the batteries to the diagram inside the battery compartment. When using the supplied remote. You can put the CD booklet (which comes with new ones. on the player. To an AC outlet To line output (L) To audio input COMMAND MODE To line output...
... connections. CONTROL A1 DIGITAL OUT (OPTICAL) CD player Inserting batteries into a pocket. Put two CD booklets facing back to back into the remote You can control the player using the remote, point it at the remote sensor g on the batteries to the diagram inside the battery compartment. When using the supplied remote. You can put the CD booklet (which comes with new ones. on the player. To an AC outlet To line output (L) To audio input COMMAND MODE To line output...
Operating Instructions
Page 5
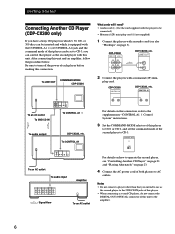
... player to CD 2, and set to CD 2 or CD 3. Take off the cap and plug in the optical cable. POC-15 Optical cable (not supplied) CD player DIGITAL OUT OPTICAL Digital component DIGITAL INPUT OPTICAL When using another player to CD 1. Set the COMMAND MODE selector of separate Sony components. CD player 2ND CD LINE IN OUT L L R R Amplifier INPUT CD L R • If you play CD software other than music, such as a digital amplifier, D/A converter, DAT or MD Connect the component via the CONTROL A1 jack. If you have a digital...
... player to CD 2, and set to CD 2 or CD 3. Take off the cap and plug in the optical cable. POC-15 Optical cable (not supplied) CD player DIGITAL OUT OPTICAL Digital component DIGITAL INPUT OPTICAL When using another player to CD 1. Set the COMMAND MODE selector of separate Sony components. CD player 2ND CD LINE IN OUT L L R R Amplifier INPUT CD L R • If you play CD software other than music, such as a digital amplifier, D/A converter, DAT or MD Connect the component via the CONTROL A1 jack. If you have a digital...
Operating Instructions
Page 6
... CONTROL A1 (or CONTROL A1) jack and the command mode of that player can be connected.) • Monaural (2P) mini-plug cord (1) (not supplied) 1 Connect the players with a monaural (2P) mini- To LINE OUT COMMAND MODE CDP-CX300 What cords will I need? • Audio cord (1) (Use the cord supplied with the player to be set the command mode of this unit. To CONTROL A1 For details on page 5). After connecting this connection. COMMAND MODE CD 123 To an AC outlet To audio input...
... CONTROL A1 (or CONTROL A1) jack and the command mode of that player can be connected.) • Monaural (2P) mini-plug cord (1) (not supplied) 1 Connect the players with a monaural (2P) mini- To LINE OUT COMMAND MODE CDP-CX300 What cords will I need? • Audio cord (1) (Use the cord supplied with the player to be set the command mode of this unit. To CONTROL A1 For details on page 5). After connecting this connection. COMMAND MODE CD 123 To an AC outlet To audio input...
Operating Instructions
Page 8
... the disc. • Make sure the rotary table comes to insert more discs. 6 Close the front cover by pressing OPEN/CLOSE. The front panel closes automatically when you insert or remove discs. 8 Always close the front cover except when you press ·. Be careful not to CDs. Insert a booklet and stick the number label on page 24) to the playing...
... the disc. • Make sure the rotary table comes to insert more discs. 6 Close the front cover by pressing OPEN/CLOSE. The front panel closes automatically when you insert or remove discs. 8 Always close the front cover except when you press ·. Be careful not to CDs. Insert a booklet and stick the number label on page 24) to the playing...

Operating Instructions
Page 10
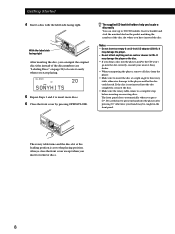
... player by pressing I/u on the remote Z 1 Turn on the amplifier and select the CD player position. 2 Press I / u TIMER OFF PLAY KEYBOARD CONTINUE SHUFFLE PROGRAM REPEAT TIME/TEXT GROUP 1 GROUP 2 GROUP 3 GROUP 4 HIT LIST GROUP 5 GROUP 6 GROUP 7 GROUP 8 GROUP FILE ≠ AMS ± +100 MENU/NO DISC/CHARACTER YES PUSH ENTER EASY PLAY MEMO SEARCH PUSH ENTER CHECK CLEAR MEGA CONTROL X-FADE NO DELAY FADER OPEN/ CLOSE DISC...
... player by pressing I/u on the remote Z 1 Turn on the amplifier and select the CD player position. 2 Press I / u TIMER OFF PLAY KEYBOARD CONTINUE SHUFFLE PROGRAM REPEAT TIME/TEXT GROUP 1 GROUP 2 GROUP 3 GROUP 4 HIT LIST GROUP 5 GROUP 6 GROUP 7 GROUP 8 GROUP FILE ≠ AMS ± +100 MENU/NO DISC/CHARACTER YES PUSH ENTER EASY PLAY MEMO SEARCH PUSH ENTER CHECK CLEAR MEGA CONTROL X-FADE NO DELAY FADER OPEN/ CLOSE DISC...

Operating Instructions
Page 11
...; dial clockwise by one click. Turn the ≠ AMS ± dial counterclockwise by one click. Adjust the volume on the player again, therefore, the player plays the same disc in the same play mode (Continuous, Shuffle, or Program (see pages 17 and 18)). Hold down the button to skip discs. To stop playback Press p. ≠ AMS ± JOG STANDBY I / u TIMER OFF PLAY KEYBOARD CONTINUE SHUFFLE PROGRAM REPEAT TIME/TEXT GROUP 1 GROUP 2 GROUP...
...; dial clockwise by one click. Turn the ≠ AMS ± dial counterclockwise by one click. Adjust the volume on the player again, therefore, the player plays the same disc in the same play mode (Continuous, Shuffle, or Program (see pages 17 and 18)). Hold down the button to skip discs. To stop playback Press p. ≠ AMS ± JOG STANDBY I / u TIMER OFF PLAY KEYBOARD CONTINUE SHUFFLE PROGRAM REPEAT TIME/TEXT GROUP 1 GROUP 2 GROUP...

Operating Instructions
Page 12
..., on page 13. Then the display shows the disc title again. Display information in stop mode to select the disc you want to check. Display information while playing a disc While playing a disc, the display shows the current disc number, track number, playing time of CD TEXT discs CD TEXT discs have information, such as the disc titles or artist names, memorized in the display. Playing CDs Using the Display You can check the current disc title, artist name and...
..., on page 13. Then the display shows the disc title again. Display information in stop mode to select the disc you want to check. Display information while playing a disc While playing a disc, the display shows the current disc number, track number, playing time of CD TEXT discs CD TEXT discs have information, such as the disc titles or artist names, memorized in the display. Playing CDs Using the Display You can check the current disc title, artist name and...

Operating Instructions
Page 13
... current language 1 Press MENU/NO while playing a CD TEXT disc. The current disc number, track number and playing time ALL DISCS CD TEXT DISC 12 CD1 TRACK 1 appear. ALL DISCS CD TEXT CD1 DISC SONYHITS 1 3 NEXT DISC Press TIME/TEXT. To play only the highlights of the discs. During stop mode. The current operating language flashes. "Show lang.?" flashes. 2 Push the JOG dial. ALL DISCS CD TEXT CD1 1 3 NEXT DISC TRACK HitechBlues This information also appears when...
... current language 1 Press MENU/NO while playing a CD TEXT disc. The current disc number, track number and playing time ALL DISCS CD TEXT DISC 12 CD1 TRACK 1 appear. ALL DISCS CD TEXT CD1 DISC SONYHITS 1 3 NEXT DISC Press TIME/TEXT. To play only the highlights of the discs. During stop mode. The current operating language flashes. "Show lang.?" flashes. 2 Push the JOG dial. ALL DISCS CD TEXT CD1 1 3 NEXT DISC TRACK HitechBlues This information also appears when...

Operating Instructions
Page 15
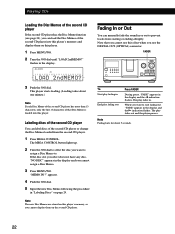
... the display, stop turning the JOG dial. In Program Play mode, the disc will be differentiated. 3 Push the JOG dial to the end of the Disc Memo (see page 24) changes as the first character. "NEXT DISC" appears in slot 1. To cancel the Easy Play function Press p. 15 Notes • When searching for and locate a desired disc by pressing OPEN/CLOSE. 2 Press EASY PLAY. Playing the Disc...
... the display, stop turning the JOG dial. In Program Play mode, the disc will be differentiated. 3 Push the JOG dial to the end of the Disc Memo (see page 24) changes as the first character. "NEXT DISC" appears in slot 1. To cancel the Easy Play function Press p. 15 Notes • When searching for and locate a desired disc by pressing OPEN/CLOSE. 2 Press EASY PLAY. Playing the Disc...

Operating Instructions
Page 17
... player "shuffle" the tracks and play mode. While the track you specify. SHUFFLE DISC Number buttons ENTER · Playing all tracks on all discs or on the disc you want is played in The player repeats ALL DISCS Continuous Play All tracks on all discs (page 10) 1 DISC Continuous Play (page 10) All tracks on the current disc ALL DISCS Shuffle Play (page 17) All tracks on all discs in random order 1 DISC Shuffle Play (page 18) All tracks on all discs in random order Program Play...
... player "shuffle" the tracks and play mode. While the track you specify. SHUFFLE DISC Number buttons ENTER · Playing all tracks on all discs or on the disc you want is played in The player repeats ALL DISCS Continuous Play All tracks on all discs (page 10) 1 DISC Continuous Play (page 10) All tracks on the current disc ALL DISCS Shuffle Play (page 17) All tracks on all discs in random order 1 DISC Shuffle Play (page 18) All tracks on all discs in random order Program Play...

Operating Instructions
Page 19
... the number button of the program is played in the player or on other discs Repeat Steps 2 and 4 3 and 4 2 to 4 6 Push the JOG dial or press · to start Program Play. However, the programmed disc and track numbers that are not found in the programmed order. PROGRAM1 CD1 DISC-[ 20 20] 4 To program a whole disc, press ENTER and go to 9. Press >10. Creating a program using the remote Z DISC >10 CHECK · PROGRAM Number buttons...
... the number button of the program is played in the player or on other discs Repeat Steps 2 and 4 3 and 4 2 to 4 6 Push the JOG dial or press · to start Program Play. However, the programmed disc and track numbers that are not found in the programmed order. PROGRAM1 CD1 DISC-[ 20 20] 4 To program a whole disc, press ENTER and go to 9. Press >10. Creating a program using the remote Z DISC >10 CHECK · PROGRAM Number buttons...
Operating Instructions
Page 20
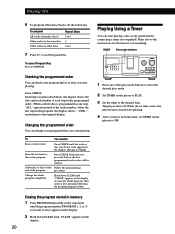
... have used the timer, set time comes, the player turns on and starts playing. 4 After you press this button, the display shows the disc and track number of each step in the programmed order. (When a whole disc is programmed as one of the play mode buttons to select the desired play mode. 2 Set TIMER on the player to PLAY. 3 Set the timer to the desired time. Press CHECK. Playing CDs 6 To program other discs Repeat Steps 2 to 4 5 2 to 5 7 Press · to start Program Play. The player turns...
... have used the timer, set time comes, the player turns on and starts playing. 4 After you press this button, the display shows the disc and track number of each step in the programmed order. (When a whole disc is programmed as one of the play mode buttons to select the desired play mode. 2 Set TIMER on the player to PLAY. 3 Set the timer to the desired time. Press CHECK. Playing CDs 6 To program other discs Repeat Steps 2 to 4 5 2 to 5 7 Press · to start Program Play. The player turns...
Operating Instructions
Page 21
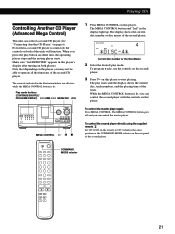
... second player directly using the supplied remote Z Set CD 1/2/3 on this player. ALL DISCS 4 CD1 2nd DISC *DISC-4* Current disc number or the Disc Memo 2 Select the desired play starts and the display shows the current disc, track numbers, and the playing time of the units will function. The play mode. To control the master player again Press MEGA CONTROL. To program tracks, use the controls on the second player. 3 Press · on the remote to start playing. The controls indicated in the display light up. Play mode buttons (CONTINUE/SHUFFLE/ PROGRAM/REPEAT...
... second player directly using the supplied remote Z Set CD 1/2/3 on this player. ALL DISCS 4 CD1 2nd DISC *DISC-4* Current disc number or the Disc Memo 2 Select the desired play starts and the display shows the current disc, track numbers, and the playing time of the units will function. The play mode. To control the master player again Press MEGA CONTROL. To program tracks, use the controls on the second player. 3 Press · on the remote to start playing. The controls indicated in the display light up. Play mode buttons (CONTINUE/SHUFFLE/ PROGRAM/REPEAT...
Operating Instructions
Page 22
.... 5 Input the new Disc Memo following the procedure in the display and the q indication flashes. The play fades in the display. Note Fading lasts for about one minute.) Note If each Disc Memo of the second CD player has more than 13 characters, only the first 13 characters of that you cannot use this effect when you use the DIGITAL OUT (OPTICAL) connector...
.... 5 Input the new Disc Memo following the procedure in the display and the q indication flashes. The play fades in the display. Note Fading lasts for about one minute.) Note If each Disc Memo of the second CD player has more than 13 characters, only the first 13 characters of that you cannot use this effect when you use the DIGITAL OUT (OPTICAL) connector...
Operating Instructions
Page 23
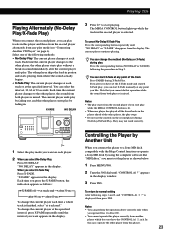
... set the player as follows: n X-FADE off n at track end." Controlling the Player by using the computer software like . GettPinlagyiSntgarCteDds Playing Alternately (No-Delay Play/X-Fade Play) When you connect the second player, you can play tracks in the display. Select one player has played all the discs/tracks in the player ahead of the other player starts play while the MEGA CONTROL button is mixed. Each time the current player changes to Disc 200. • You cannot operate...
... set the player as follows: n X-FADE off n at track end." Controlling the Player by using the computer software like . GettPinlagyiSntgarCteDds Playing Alternately (No-Delay Play/X-Fade Play) When you connect the second player, you can play tracks in the display. Select one player has played all the discs/tracks in the player ahead of the other player starts play while the MEGA CONTROL button is mixed. Each time the current player changes to Disc 200. • You cannot operate...
Operating Instructions
Page 32
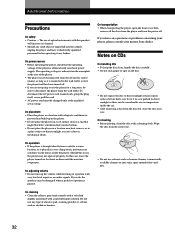
... - On power sources • Before operating the player, check that might block the ventilation holes on the lenses inside the car. • After removing a disc from a cold to direct sunlight, excessive dust or mechanical shock. Notes on CDs On handling CDs • To keep the disc clean, handle the disc carefully. • Do not stick paper or tape on for a long time, be...
... - On power sources • Before operating the player, check that might block the ventilation holes on the lenses inside the car. • After removing a disc from a cold to direct sunlight, excessive dust or mechanical shock. Notes on CDs On handling CDs • To keep the disc clean, handle the disc carefully. • Do not stick paper or tape on for a long time, be...
Operating Instructions
Page 33
... aperture. projecting parts 8.5 kg (18 lbs 12 oz) Supplied accessories See page 4. Specifications Compact disc player Laser Semiconductor laser (λ = 780 nm) Emission duration: continuous Laser output Max 44.6 µW* * This output is connected securely. /Make sure you remedy the problem. Design and specifications are weak. /Set the CD 1/2/3 switch on the Optical Pick-up block with the label side facing right. /Clean the CD (see page 5). The remote does not function. /Remove...
... aperture. projecting parts 8.5 kg (18 lbs 12 oz) Supplied accessories See page 4. Specifications Compact disc player Laser Semiconductor laser (λ = 780 nm) Emission duration: continuous Laser output Max 44.6 µW* * This output is connected securely. /Make sure you remedy the problem. Design and specifications are weak. /Set the CD 1/2/3 switch on the Optical Pick-up block with the label side facing right. /Clean the CD (see page 5). The remote does not function. /Remove...

Operating Instructions
Page 34
... p 11 =/+ 16 0/) 16 >10 16 +100 14 Switches CD 1/2/3 5 TIMER 20 I Inserting CDs 7 J, K JOG dial 7 L Labeling a disc 24 Locating a specific point 16 a specific track 16 by monitoring 16 directly 16 discs 14 using AMS 15 M Memo Scan 14 Memo Search 15 N, O No-Delay Play 23 P, Q Playback Continuous Play 10 Easy Play 15 Group Play 29 Program Play 18 Repeat Play 17 Shuffle Play 17 Program changing 20 checking 20 erasing 20 R Remote control 4 Repeating 17 Rotary table 7 S Searching.
... p 11 =/+ 16 0/) 16 >10 16 +100 14 Switches CD 1/2/3 5 TIMER 20 I Inserting CDs 7 J, K JOG dial 7 L Labeling a disc 24 Locating a specific point 16 a specific track 16 by monitoring 16 directly 16 discs 14 using AMS 15 M Memo Scan 14 Memo Search 15 N, O No-Delay Play 23 P, Q Playback Continuous Play 10 Easy Play 15 Group Play 29 Program Play 18 Repeat Play 17 Shuffle Play 17 Program changing 20 checking 20 erasing 20 R Remote control 4 Repeating 17 Rotary table 7 S Searching.


