
Operating Instructions
Page 2
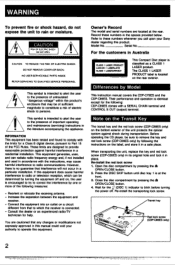
... provide reasonable protection against shock during transportation. Wait for a Class B digital device, pursuant to blink before turning the power off and on the bottom exterior of important operating and maintenance (servicing) instructions in Australia CLASS LASER PRODUCT LUOKAN 1 LASERLAITE KLASS 1 LASERAPPARAT This Compact Disc player is intended to alert the user to radio communications. These limits are cautioned that may cause harmful interference...
... provide reasonable protection against shock during transportation. Wait for a Class B digital device, pursuant to blink before turning the power off and on the bottom exterior of important operating and maintenance (servicing) instructions in Australia CLASS LASER PRODUCT LUOKAN 1 LASERLAITE KLASS 1 LASERAPPARAT This Compact Disc player is intended to alert the user to radio communications. These limits are cautioned that may cause harmful interference...
Operating Instructions
Page 3
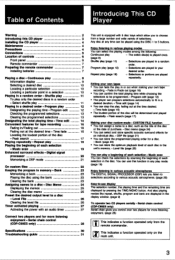
... playing time - Serial chain control (CDP-C89ES only) 28 Specifications 30 Troubleshooting guide 31 This unit is played once. (page 8) Shuffle play (page 11) - Selections are displayed in the display window. (page 9) To operate two CD players serially - Program edit (page 12) • The player can program selections automatically to a disc - Peak search (page 17) Making your own tape recording. - Level file (page 26) You can play , fading out at the time desired. - You can use this CD player 3 Installing the CD player...
... playing time - Serial chain control (CDP-C89ES only) 28 Specifications 30 Troubleshooting guide 31 This unit is played once. (page 8) Shuffle play (page 11) - Selections are displayed in the display window. (page 9) To operate two CD players serially - Program edit (page 12) • The player can program selections automatically to a disc - Peak search (page 17) Making your own tape recording. - Level file (page 26) You can play , fading out at the time desired. - You can use this CD player 3 Installing the CD player...
Operating Instructions
Page 4
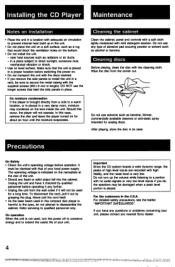
... is played. DO NOT use the longer screws that the unit is harmful to the eyes, do , the speakers may condense on level surface. Wipe the disc from the wall outlet if it out by qualified personnel before operation. In this occur, the player will not be used in this compact disc player is placed in a proper location before switching the power...
... is played. DO NOT use the longer screws that the unit is harmful to the eyes, do , the speakers may condense on level surface. Wipe the disc from the wall outlet if it out by qualified personnel before operation. In this occur, the player will not be used in this compact disc player is placed in a proper location before switching the power...
Operating Instructions
Page 5
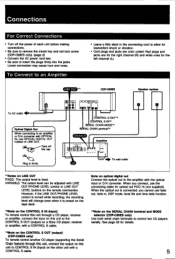
... left channel (L). When you cannot use OPTICAL DIGITAL OUT instead of each unit before making connections. • Be sure to remove the transit key and red lock screw (CDP-C89ES only). (page 2) • Connect the AC power cord last. • Be sure to control two CD players serially. Note on LINE OUT FIXED: The output level is preset on the tape deck. *2Note on the CONTROL S IN (Input) To remote control this unit through a CD player...
... left channel (L). When you cannot use OPTICAL DIGITAL OUT instead of each unit before making connections. • Be sure to remove the transit key and red lock screw (CDP-C89ES only). (page 2) • Connect the AC power cord last. • Be sure to control two CD players serially. Note on LINE OUT FIXED: The output level is preset on the tape deck. *2Note on the CONTROL S IN (Input) To remote control this unit through a CD player...

Operating Instructions
Page 6
POWER switch (page 8) l= PLAY MODE buttons CONTINUE button (page 11) SHUFFLE button (page 11) PROGRAM button (page 12) BANK button (page 23) DISC 1-5 buttons (page 8) 4 TIME/MEMO button (page 9) OS Display window (page 9) Disc tray (page 8) (=REPEAT button (page 18) f1f0lCHECK button (page 13) ) CLEAR button (page 13) FADER button (page 16) ED PEAK SEARCH button (page 17) a EDIT/TIME FADE button (page 14) a FILE button (page 22) ITIO-(play) button and indicator (page 8) ail (pause) button and indicator (page 8) is...
POWER switch (page 8) l= PLAY MODE buttons CONTINUE button (page 11) SHUFFLE button (page 11) PROGRAM button (page 12) BANK button (page 23) DISC 1-5 buttons (page 8) 4 TIME/MEMO button (page 9) OS Display window (page 9) Disc tray (page 8) (=REPEAT button (page 18) f1f0lCHECK button (page 13) ) CLEAR button (page 13) FADER button (page 16) ED PEAK SEARCH button (page 17) a EDIT/TIME FADE button (page 14) a FILE button (page 22) ITIO-(play) button and indicator (page 8) ail (pause) button and indicator (page 8) is...

Operating Instructions
Page 7
... I (pause) button (page 8) Epp. (play) button (page 8) 7 REPEAT button (page 18) ri TIME button (page 9) TiCHECK (program check) button (page 13) >20 (over 20) button (page 10) OCLEAR (program clear) button (page 13) 7 DISC 1-5 buttons (page 12) El PLAY MODE buttons CONTINUE button (page 11) SHUFFLE button (page 11) PROGRAM button (page 12) BANK button (page 23) 24 CHAIN MODE button (CDP-C89ES only) (page 29) 25 PLAYER SELECT button (CDP-C89ES only) (page 29) Buttons with new ones. Preparing the Remote Commander Installing Batteries 1 2 O 0 0 AA...
... I (pause) button (page 8) Epp. (play) button (page 8) 7 REPEAT button (page 18) ri TIME button (page 9) TiCHECK (program check) button (page 13) >20 (over 20) button (page 10) OCLEAR (program clear) button (page 13) 7 DISC 1-5 buttons (page 12) El PLAY MODE buttons CONTINUE button (page 11) SHUFFLE button (page 11) PROGRAM button (page 12) BANK button (page 23) 24 CHAIN MODE button (CDP-C89ES only) (page 29) 25 PLAYER SELECT button (CDP-C89ES only) (page 29) Buttons with new ones. Preparing the Remote Commander Installing Batteries 1 2 O 0 0 AA...

Operating Instructions
Page 8
... speakers may not be displayed until the empty tray number is set the input selector to turn up the volume and press - Notes on the disc. 040 /IN ip. Do not touch the surface. • Do not stick paper or tape on handling discs • To keep the disc clean, handle the disc by its case. To stop play and open the compartment, press To control the volume When...
... speakers may not be displayed until the empty tray number is set the input selector to turn up the volume and press - Notes on the disc. 040 /IN ip. Do not touch the surface. • Do not stick paper or tape on handling discs • To keep the disc clean, handle the disc by its case. To stop play and open the compartment, press To control the volume When...
Operating Instructions
Page 15
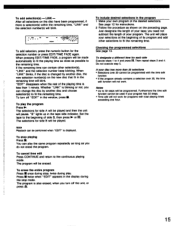
... remaining time. Set the tape to 4 and press IL Then repeat steps 2 and 4. twice during play the same program repeatedly as long as you do not erase the program. If you turn off the unit, or press *. To add selection(s) - LINK - When "LINK" blinks, if the disc is changed by another disc, the new selection number(s) on the new disc that fit in the remaining time will...
... remaining time. Set the tape to 4 and press IL Then repeat steps 2 and 4. twice during play the same program repeatedly as long as you do not erase the program. If you turn off the unit, or press *. To add selection(s) - LINK - When "LINK" blinks, if the disc is changed by another disc, the new selection number(s) on the new disc that fit in the remaining time will...
Operating Instructions
Page 16
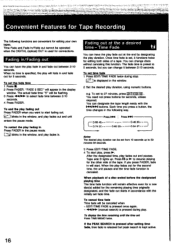
... buttons. When playback of the tape. Fading in/Fading out You can be flashing. 3 Press N/► to resume playing for the other side of a disc ended before the designated playing time The time fade function will be operated when the DIGITAL (optical) OUT is preset to 59 minutes 59 seconds. 3 Press EDIT/TIME FADE. 4 To start fading out. The fade time is used for the remaining playing time...
... buttons. When playback of the tape. Fading in/Fading out You can be flashing. 3 Press N/► to resume playing for the other side of a disc ended before the designated playing time The time fade function will be operated when the DIGITAL (optical) OUT is preset to 59 minutes 59 seconds. 3 Press EDIT/TIME FADE. 4 To start fading out. The fade time is used for the remaining playing time...

Operating Instructions
Page 17
...: Play mode Continuous and shuffle modes Program mode Bank mode Operation Searches all selections of the disc. This function operates in all play immediately Press ►. "PEAK" blinks in the display and the all selection of the disc or program will scan all selections stored in the program bank Unless you to adjust to the end and determine the loudest portion (peak level) of the Disc - Note on tape.
...: Play mode Continuous and shuffle modes Program mode Bank mode Operation Searches all selections of the disc. This function operates in all play immediately Press ►. "PEAK" blinks in the display and the all selection of the disc or program will scan all selections stored in the program bank Unless you to adjust to the end and determine the loudest portion (peak level) of the Disc - Note on tape.
Operating Instructions
Page 21
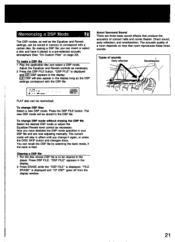
... the display window. Direct sound, early reflection, and reverberation. Adjust the Equalizer and Reverb controls as necessary. The acoustic quality of a room depends on page 22). The current mode will be cleared in the DSP file. By making a DSP file, you change it played to be stored in the player. Now you have it again, or press the DISC SKIP button and changes discs. To make...
... the display window. Direct sound, early reflection, and reverberation. Adjust the Equalizer and Reverb controls as necessary. The acoustic quality of a room depends on page 22). The current mode will be cleared in the DSP file. By making a DSP file, you change it played to be stored in the player. Now you have it again, or press the DISC SKIP button and changes discs. To make...

Operating Instructions
Page 23
... entirety. Keeping the Program in the player. Bank c. Memorizing a Bank The program is played always in the display window. Notes • You cannot program a whole disc under a single program number. • To pause during the stop mode, the bank stored for steps 2 and 5. 6. Clearing the Bank 1 Put the disc whose bank is displayed. FILE -" and "CF BANK" will turn on. 3 Program the selections as your...
... entirety. Keeping the Program in the player. Bank c. Memorizing a Bank The program is played always in the display window. Notes • You cannot program a whole disc under a single program number. • To pause during the stop mode, the bank stored for steps 2 and 5. 6. Clearing the Bank 1 Put the disc whose bank is displayed. FILE -" and "CF BANK" will turn on. 3 Program the selections as your...

Operating Instructions
Page 24
...;• Then proceed as follows in the stop mode. 2 A Using the MEMO INPUT button with the letter buttons on the remote commander (This function can be entered while playing) 1 WA NM El Using the 44/0+ buttons 1 I 44 t ob• tact .I o' 3 2 cp ah =IP EP CACPCD A 3 J Make sure that the total number of selections and the total playing time are displayed. ok. 4 a.. Assigning Names to a Disc Disc Memo 0o I .
...;• Then proceed as follows in the stop mode. 2 A Using the MEMO INPUT button with the letter buttons on the remote commander (This function can be entered while playing) 1 WA NM El Using the 44/0+ buttons 1 I 44 t ob• tact .I o' 3 2 cp ah =IP EP CACPCD A 3 J Make sure that the total number of selections and the total playing time are displayed. ok. 4 a.. Assigning Names to a Disc Disc Memo 0o I .

Operating Instructions
Page 25
... INPUT on the Remote Commander. Displaying the Memos To display the memo for the disc memo. NO DISC -" display (see page 8) using 41141/10► or letter buttons on the disc tray and keep the tray opened. 2 Follow step 2 to create a name for one disc. If you want to assign names while referring labels 1 Place the disc(s) on the remote commander. One name can be changed while playing a disc...
... INPUT on the Remote Commander. Displaying the Memos To display the memo for the disc memo. NO DISC -" display (see page 8) using 41141/10► or letter buttons on the disc tray and keep the tray opened. 2 Follow step 2 to create a name for one disc. If you want to assign names while referring labels 1 Place the disc(s) on the remote commander. One name can be changed while playing a disc...
Operating Instructions
Page 26
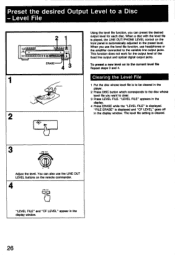
... not work for each disc. Level File c=1oCmOo=o 0. 0 cz 02113:03CD0 0 $ o == 0 ERASE I . . 2 , Using the level file function, you can also use headphones or the amplifier connected to clear. 3 Press LEVEL FILE. To preset a new level on the front panel is played, the LINE OUT/PHONE LEVEL control on to the preset level. You can preset the desired output level for the output level of the fixed line output and optical digital output jacks...
... not work for each disc. Level File c=1oCmOo=o 0. 0 cz 02113:03CD0 0 $ o == 0 ERASE I . . 2 , Using the level file function, you can also use headphones or the amplifier connected to clear. 3 Press LEVEL FILE. To preset a new level on the front panel is played, the LINE OUT/PHONE LEVEL control on to the preset level. You can preset the desired output level for the output level of the fixed line output and optical digital output jacks...
Operating Instructions
Page 27
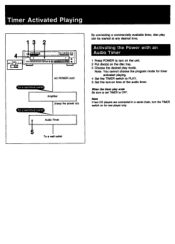
... the program mode for timer activated playing. 4 Set the TIMER switch to PLAY. 5 Set the turn the TIMER switch on for one player only. Timer Activated Playing 2 e Till.lsER pt.A, o =MD GETIQ • CE10 0 B FIEREN AC POWER cord To a switched outlet Amplifier (Keep the power on) To a switched outlet Audio Timer By connecting a commercially available timer, disc play ends Be sure to set TIMER to OFF. Activating the Power with an Audio Timer 1 Press POWER to turn on the unit. 2 Put disc(s) on the disc tray...
... the program mode for timer activated playing. 4 Set the TIMER switch to PLAY. 5 Set the turn the TIMER switch on for one player only. Timer Activated Playing 2 e Till.lsER pt.A, o =MD GETIQ • CE10 0 B FIEREN AC POWER cord To a switched outlet Amplifier (Keep the power on) To a switched outlet Audio Timer By connecting a commercially available timer, disc play ends Be sure to set TIMER to OFF. Activating the Power with an Audio Timer 1 Press POWER to turn on the unit. 2 Put disc(s) on the disc tray...
Operating Instructions
Page 28
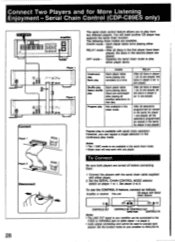
... the serial chain mode. • Music scan will need another CD player that disc. RELAY mode -After all the selections programmed (or stored in the second player are played. Amplifier or receiver This unit CD player with serial chain operation. To use the CONTROL S feature, connect as follows. You will only work with either player 1 or player 2. • Audio optical connecting cord cannot be connected to the FIXED or VARIABLE jack on either player. 2 Set the SERIAL CHAIN CONTROL MODE selector switch on player 1 to play...
... the serial chain mode. • Music scan will need another CD player that disc. RELAY mode -After all the selections programmed (or stored in the second player are played. Amplifier or receiver This unit CD player with serial chain operation. To use the CONTROL S feature, connect as follows. You will only work with either player 1 or player 2. • Audio optical connecting cord cannot be connected to the FIXED or VARIABLE jack on either player. 2 Set the SERIAL CHAIN CONTROL MODE selector switch on player 1 to play...

Operating Instructions
Page 29
However, the output from LINE OUT is turned off ) • 5 Select the player you select the program mode, continue by making your program. (See page 12) 29 If you want to player that is available. • Adjust the LINE OUT/PHONE LEVEL and DSP modes on the player operating at that time. • The Remote Commander will be played continuously. • The PEAK SEARCH and PLAY MODE buttons are disabled on the...
However, the output from LINE OUT is turned off ) • 5 Select the player you select the program mode, continue by making your program. (See page 12) 29 If you want to player that is available. • Adjust the LINE OUT/PHONE LEVEL and DSP modes on the player operating at that time. • The Remote Commander will be played continuously. • The PEAK SEARCH and PLAY MODE buttons are disabled on the...
Operating Instructions
Page 30
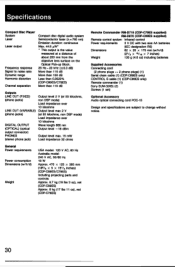
... oz), net (CDP-C79ES) Remote Commander RM-D715 (CDP-C79ES supplied) RM-D870 (CDP-C89ES supplied) Remote control system Infrared control Power requirements 3 V DC with two size AA batteries (IEC designation R6) Dimensions 62 x 20 x 175 mm (w/h/d) (21/2 x 13/16 x 7 inches) Weight 130 g (4.6 oz) including batteries Supplied Accessories Connecting cord (2 phono plugs •-• 2 phono plugs) (1) Serial chain cable (1) (CDP-C89ES only) CONTROL S cable (1) (CDP-C89ES only) Remote commander (1) Sony SUM-3(NS) (2) Screws (1 set) Optional Accessory Audio optical connecting cord POC-15...
... oz), net (CDP-C79ES) Remote Commander RM-D715 (CDP-C79ES supplied) RM-D870 (CDP-C89ES supplied) Remote control system Infrared control Power requirements 3 V DC with two size AA batteries (IEC designation R6) Dimensions 62 x 20 x 175 mm (w/h/d) (21/2 x 13/16 x 7 inches) Weight 130 g (4.6 oz) including batteries Supplied Accessories Connecting cord (2 phono plugs •-• 2 phono plugs) (1) Serial chain cable (1) (CDP-C89ES only) CONTROL S cable (1) (CDP-C89ES only) Remote commander (1) Sony SUM-3(NS) (2) Screws (1 set) Optional Accessory Audio optical connecting cord POC-15...

Operating Instructions
Page 31
... tilted. Replace both channels Play does not begin. Any operation is extremely dirty. The disc is not possible. The batteries are exhausted. The remote commander is an obstacle between the remote commander and the unit. The internal control program may not work properly due to the condition of the power being supplied. Press ► or II to the connection and operating procedures. Leave the player turned on...
... tilted. Replace both channels Play does not begin. Any operation is extremely dirty. The disc is not possible. The batteries are exhausted. The remote commander is an obstacle between the remote commander and the unit. The internal control program may not work properly due to the condition of the power being supplied. Press ► or II to the connection and operating procedures. Leave the player turned on...


