

Limited Warranty (US Only)
Page 1
.... This warranty gives you specific legal rights, and you may not apply to any Sony authorized service facility. 4-557-172-02 General Stereo/Hifi Components/Tape Decks ® CD Players/Mini Disc Players/Audio Systems Hifi Audio LIMITED WARRANTY Sony Electronics Inc. ("Sony") warrants this Product is within 90 days of the date of protection, to you . PARTS: In addition, Sony will repair or replace the Product, at its original packaging...
.... This warranty gives you specific legal rights, and you may not apply to any Sony authorized service facility. 4-557-172-02 General Stereo/Hifi Components/Tape Decks ® CD Players/Mini Disc Players/Audio Systems Hifi Audio LIMITED WARRANTY Sony Electronics Inc. ("Sony") warrants this Product is within 90 days of the date of protection, to you . PARTS: In addition, Sony will repair or replace the Product, at its original packaging...
Operating Instructions
Page 2
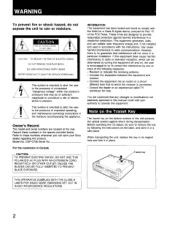
... the product's enclosure that may cause harmful interference to which can radiate radio frequency energy and, if not installed and used in accordance with the limits for help. Note on the Transit Key The transit key on , the user is connected. - Owner's Record The model and serial numbers are cautioned that interference will not occur in a residential installation. These limits are designed to persons...
... the product's enclosure that may cause harmful interference to which can radiate radio frequency energy and, if not installed and used in accordance with the limits for help. Note on the Transit Key The transit key on , the user is connected. - Owner's Record The model and serial numbers are cautioned that interference will not occur in a residential installation. These limits are designed to persons...

Operating Instructions
Page 3
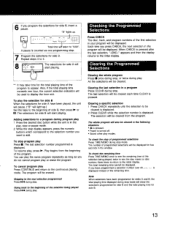
... own tape recording. - Music scan You can play 18 Playing the beginning of each disc in the unit's memory. - Table of Contents Introducing This CD Player Warning 2 Introducing this function in any time can use this CD player 3 Installing the CD player 4 Maintenance 4 Precautions 4 Connections 5 Location of controls 6 Front panel 6 Remote commander 7 Preparing the remote commander 7 Installing batteries 7 Playing a disc - Any disc at the time desired. -Time fade (page 16) • The loudest portion of the disc will be programmed...
... own tape recording. - Music scan You can play 18 Playing the beginning of each disc in the unit's memory. - Table of Contents Introducing This CD Player Warning 2 Introducing this function in any time can use this CD player 3 Installing the CD player 4 Maintenance 4 Precautions 4 Connections 5 Location of controls 6 Front panel 6 Remote commander 7 Preparing the remote commander 7 Installing batteries 7 Playing a disc - Any disc at the time desired. -Time fade (page 16) • The loudest portion of the disc will be programmed...

Operating Instructions
Page 4
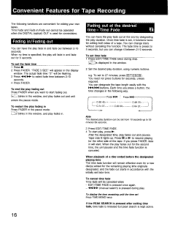
... qualified personnel before switching the power on the bottom. • Do not install the unit. - If you have it checked by grasping the plug. Cleaning discs Before playing, clean the disc with mild detergent solution. Do not use any liquid or solid object fall into the cabinet. To disconnect the cord, pull it will not operate. Do not turn the power off to conserve...
... qualified personnel before switching the power on the bottom. • Do not install the unit. - If you have it checked by grasping the plug. Cleaning discs Before playing, clean the disc with mild detergent solution. Do not use any liquid or solid object fall into the cabinet. To disconnect the cord, pull it will not operate. Do not turn the power off to conserve...
Operating Instructions
Page 5
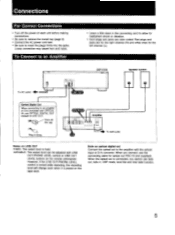
... FIXED: The output level is fixed. When you cannot use the connecting cable for the left channel (L). Loose connection may cause hum and noise. When the optical out is preset on the remote commander. Take off the power of LINE OUT. VARIABLE: The output level can be adjusted with LINE OUT/PHONE LEVEL control or LINE OUT LEVEL buttons on the tape deck. Connections For Correct Connections • Turn off the cap Plug in firmly SPEAKER...
... FIXED: The output level is fixed. When you cannot use the connecting cable for the left channel (L). Loose connection may cause hum and noise. When the optical out is preset on the remote commander. Take off the power of LINE OUT. VARIABLE: The output level can be adjusted with LINE OUT/PHONE LEVEL control or LINE OUT LEVEL buttons on the tape deck. Connections For Correct Connections • Turn off the cap Plug in firmly SPEAKER...
Operating Instructions
Page 6
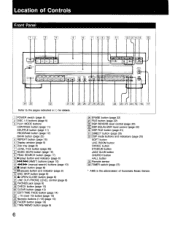
... POWER switch (page 8) 2 DISC 1-5 buttons (page 8) 131PLAY MODE buttons CONTINUE button (page 11) SHUFFLE button (page 11) PROGRAM button (page 12) BANK button (page 23) 41REPEAT button (page 18) 5 Display window (page 9) 6 Disc tray (page 8) 7 LEVEL FILE button (page 26) 8 MUSIC SCAN button (page 19) 9 PEAK SEARCH button (page 17) 10 ►(play) button and indicator (page 8) 11 (AMS") buttons (page 10) 12 *444- (manual search) buttons (page 10) 13 ■ (stop) button (page 8) 14 II (pause) button...
... POWER switch (page 8) 2 DISC 1-5 buttons (page 8) 131PLAY MODE buttons CONTINUE button (page 11) SHUFFLE button (page 11) PROGRAM button (page 12) BANK button (page 23) 41REPEAT button (page 18) 5 Display window (page 9) 6 Disc tray (page 8) 7 LEVEL FILE button (page 26) 8 MUSIC SCAN button (page 19) 9 PEAK SEARCH button (page 17) 10 ►(play) button and indicator (page 8) 11 (AMS") buttons (page 10) 12 *444- (manual search) buttons (page 10) 13 ■ (stop) button (page 8) 14 II (pause) button...
Operating Instructions
Page 7
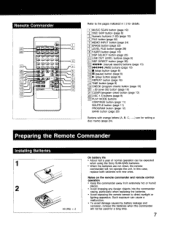
... REPEAT button (page 18) 18 TIME button (page 9) 19 CHECK (program check) button (page 13) 20 >20 (over 20) button (page 10) 21 CLEAR (program clear) button (page 13) 22 DISC 1-5 buttons (page 6) 23 PLAY MODE buttons CONTINUE button (page 11) SHUFFLE button (page 11) PROGRAM button (page 12) BANK button (page 23) Buttons with new ones. In this case, replace both batteries with orange letters (A, B, C, ) are run down, the remote commander will not operate the...
... REPEAT button (page 18) 18 TIME button (page 9) 19 CHECK (program check) button (page 13) 20 >20 (over 20) button (page 10) 21 CLEAR (program clear) button (page 13) 22 DISC 1-5 buttons (page 6) 23 PLAY MODE buttons CONTINUE button (page 11) SHUFFLE button (page 11) PROGRAM button (page 12) BANK button (page 23) Buttons with new ones. In this case, replace both batteries with orange letters (A, B, C, ) are run down, the remote commander will not operate the...

Operating Instructions
Page 8
... open the compertment, press To control the volume When you press + or -, the LINE OUT/PHONE LEVEL control of an empty tray will disappear. • "-NO DISC -" is played. Caution on the tray number goes off. 8 Before playing a disc, turn down the volume. If the disc memo is not stored, the disc number -such as "*DISC-1*", is displayed. • The tray number of the player rotates automatically. If the disc is set the input selector to direct...
... open the compertment, press To control the volume When you press + or -, the LINE OUT/PHONE LEVEL control of an empty tray will disappear. • "-NO DISC -" is played. Caution on the tray number goes off. 8 Before playing a disc, turn down the volume. If the disc memo is not stored, the disc number -such as "*DISC-1*", is displayed. • The tray number of the player rotates automatically. If the disc is set the input selector to direct...
Operating Instructions
Page 13
... side B will be cleared is displayed. 2 Press CLEAR while the selection number is turned off. • Select other play or erase the program. "B" lights up .) Set the tape to see the disc memo or disc number; All the selections will start playing. ** It may take time for side A have programmed a selection number over 20, -- . -- Clearing a specific selection 1 Press CHECK repeatedly until the selection to add. Each...
... side B will be cleared is displayed. 2 Press CLEAR while the selection number is turned off. • Select other play or erase the program. "B" lights up .) Set the tape to see the disc memo or disc number; All the selections will start playing. ** It may take time for side A have programmed a selection number over 20, -- . -- Clearing a specific selection 1 Press CHECK repeatedly until the selection to add. Each...
Operating Instructions
Page 15
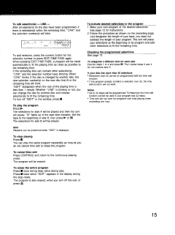
... playing mode. Note Playback can play the same program repeatedly as long as you do not cancel time edit or erase the program. You can be used if your tape; To cancel time edit Press CONTINUE and return to 4 and press 11. To erase the entire program Press ■ once during stop mode. To designate a different time for side B will not work. See page 12 for programs...
... playing mode. Note Playback can play the same program repeatedly as long as you do not cancel time edit or erase the program. You can be used if your tape; To cancel time edit Press CONTINUE and return to 4 and press 11. To erase the entire program Press ■ once during stop mode. To designate a different time for side B will not work. See page 12 for programs...
Operating Instructions
Page 16
.... - .414/IN (manual search) is set from 10 seconds up . "FADE 5 SEC" will start. To restart the play duration. Once time fade is pressed during stop. C-60 30.-- The actual fade time "5" will fade in the window, and play duration, using numeric buttons. You can designate the tape length easily with the initially set fade time. displayed in . You can change it functions twice for...
.... - .414/IN (manual search) is set from 10 seconds up . "FADE 5 SEC" will start. To restart the play duration. Once time fade is pressed during stop. C-60 30.-- The actual fade time "5" will fade in the window, and play duration, using numeric buttons. You can designate the tape length easily with the initially set fade time. displayed in . You can change it functions twice for...
Operating Instructions
Page 17
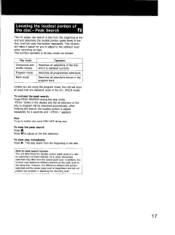
... ALL DISCS mode. As a result, the portion searched may determine different portions as follows: Play mode Continuous and shuffle modes Program mode Bank mode Operation Searches all selections of the disc - In addition, this function may differ from the actual peak level. "PEAK" blinks in adjusting the recording level. 17 To stop mode. Locating the loudest portion of the disc which is played repeatedly for the same disc. This function will...
... ALL DISCS mode. As a result, the portion searched may determine different portions as follows: Play mode Continuous and shuffle modes Program mode Bank mode Operation Searches all selections of the disc - In addition, this function may differ from the actual peak level. "PEAK" blinks in adjusting the recording level. 17 To stop mode. Locating the loudest portion of the disc which is played repeatedly for the same disc. This function will...

Operating Instructions
Page 18
Playing mode Continuous play (ALL DISCS) Continuous play (1 DISC) Shuffle play Select shuffle play Program play Bank play mode, you can be used in any play mode to repeat a single disc or all discs (in the unit. "REPEAT" appears. Alt selections on the disc (in the 1 DISC mode) or all discs in the ALL DISCS mode) are reshuffled. "REPEAT" disappears. Repeats all discs, or the selection currently being played (REPEAT 1) All selections on the disc currently being played, or the selection currently being played (REPEAT 1) All selections...
Playing mode Continuous play (ALL DISCS) Continuous play (1 DISC) Shuffle play Select shuffle play Program play Bank play mode, you can be used in any play mode to repeat a single disc or all discs (in the unit. "REPEAT" appears. Alt selections on the disc (in the 1 DISC mode) or all discs in the ALL DISCS mode) are reshuffled. "REPEAT" disappears. Repeats all discs, or the selection currently being played (REPEAT 1) All selections on the disc currently being played, or the selection currently being played (REPEAT 1) All selections...

Operating Instructions
Page 20
..., change the DSP mode as DIRECT modes can be controlled from the remote commander.) EQUALIZER REVERS The Digital Signal Processing (DSP) lets you can choose from FIXED to the acoustics of the surround effect. n Adjust to various acoustic atmospheres. While turning it toward MIN lowers the frequency response. *Adjusting the REVERB level The reverb level adjusts the level of a hotel lobby. *Adjusting the EQUALIZER level The equalizer level adjusts...
..., change the DSP mode as DIRECT modes can be controlled from the remote commander.) EQUALIZER REVERS The Digital Signal Processing (DSP) lets you can choose from FIXED to the acoustics of the surround effect. n Adjust to various acoustic atmospheres. While turning it toward MIN lowers the frequency response. *Adjusting the REVERB level The reverb level adjusts the level of a hotel lobby. *Adjusting the EQUALIZER level The equalizer level adjusts...

Operating Instructions
Page 23
... the disc whose bank is displayed. Bank 2 1 --='-' ,4 ' 2 - 0 4 3 OPEN/CLOSE BANK Press BANK and the "BANK" indicator will disappear approximately one bank can be cleared in the player. Only one second later.) 23 Notes • You cannot program a whole disc under a single program number. • To pause during the bank play, press 11 instead of PROGRAM for a disc. Then close the disc tray by...
... the disc whose bank is displayed. Bank 2 1 --='-' ,4 ' 2 - 0 4 3 OPEN/CLOSE BANK Press BANK and the "BANK" indicator will disappear approximately one bank can be cleared in the player. Only one second later.) 23 Notes • You cannot program a whole disc under a single program number. • To pause during the bank play, press 11 instead of PROGRAM for a disc. Then close the disc tray by...

Operating Instructions
Page 25
... Disc memos can be changed while playing a disc by pressing the MEMO INPUT button on the remote commander. NO DISC -" display (see page 8) using N/►► or letter buttons on the Remote Commander. is pressed for the "- The name for the disc being played Press TIME/MEMO twice during the shuffle, program or bank mode and three times during the continuous mode. Displaying the Memos To display the memo for each disc. The disc tray...
... Disc memos can be changed while playing a disc by pressing the MEMO INPUT button on the remote commander. NO DISC -" display (see page 8) using N/►► or letter buttons on the Remote Commander. is pressed for the "- The name for the disc being played Press TIME/MEMO twice during the shuffle, program or bank mode and three times during the continuous mode. Displaying the Memos To display the memo for each disc. The disc tray...
Operating Instructions
Page 26
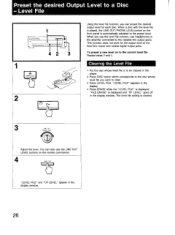
... fixed line output and optical digital output jacks. The level file setting is displayed. When a disc with the level file is played, the LINE OUT/PHONE LEVELcontrol on the front panel is to clear. 3 Press LEVEL FILE. To preset a new level on the remote commander. 4 LEVEL FILE "LEVEL FILE" and "CF LEVEL" appear in the display. 4 Press ERASE while the "LEVEL FILE" is cleared. 3 LINE o f T PHO LVEL lil Adjust...
... fixed line output and optical digital output jacks. The level file setting is displayed. When a disc with the level file is played, the LINE OUT/PHONE LEVELcontrol on the front panel is to clear. 3 Press LEVEL FILE. To preset a new level on the remote commander. 4 LEVEL FILE "LEVEL FILE" and "CF LEVEL" appear in the display. 4 Press ERASE while the "LEVEL FILE" is cleared. 3 LINE o f T PHO LVEL lil Adjust...
Operating Instructions
Page 27
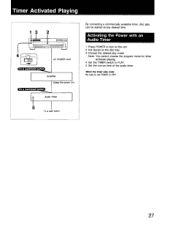
When the timer play ends Be sure to set TIMER to turn -on ) By connecting a commercially available timer, disc play mode. a, 9 AC POWER cord Amplifier (Keep the power on time of the audio timer. Activating the Power with an Audio Timer 1 Press POWER to OFF. Timer Activated Playing 13 2 =0= 4 TIMER FF ...ft PL. Note: You cannot choose the program mode for timer activated playing. 4 Set the TIMER switch to PLAY. 5 Set the turn on the unit. 2 Put disc(s) on the disc tray. 3 Choose the desired play can be started at any desired time. Audio Timer 5 To a wall outlet 27
When the timer play ends Be sure to set TIMER to turn -on ) By connecting a commercially available timer, disc play mode. a, 9 AC POWER cord Amplifier (Keep the power on time of the audio timer. Activating the Power with an Audio Timer 1 Press POWER to OFF. Timer Activated Playing 13 2 =0= 4 TIMER FF ...ft PL. Note: You cannot choose the program mode for timer activated playing. 4 Set the TIMER switch to PLAY. 5 Set the turn on the unit. 2 Put disc(s) on the disc tray. 3 Choose the desired play can be started at any desired time. Audio Timer 5 To a wall outlet 27
Operating Instructions
Page 28
... projecting parts and controls Approx. 6.5 kg (14 lbs 5 oz), net Remote Commander RM-D801 Remote control system Infrared control Power requirements 3 V DC with two size AA batteries (IEC designation R6) Dimensions 62 x 20 x 175 mm (w/h/d) (21/2 x 13/16 x 7 inches) Mass 130 g (4.6 oz) including batteries Supplied Accessories Connecting cord (2 phono plugs H 2 phono plugs) (1) Remote commander (1) Sony SUM-3 (NS) batteries (2) Optional Accessory Audio optical connecting cord POC-15 Design and specifications are subject to change without...
... projecting parts and controls Approx. 6.5 kg (14 lbs 5 oz), net Remote Commander RM-D801 Remote control system Infrared control Power requirements 3 V DC with two size AA batteries (IEC designation R6) Dimensions 62 x 20 x 175 mm (w/h/d) (21/2 x 13/16 x 7 inches) Mass 130 g (4.6 oz) including batteries Supplied Accessories Connecting cord (2 phono plugs H 2 phono plugs) (1) Remote commander (1) Sony SUM-3 (NS) batteries (2) Optional Accessory Audio optical connecting cord POC-15 Design and specifications are subject to change without...
Operating Instructions
Page 29
... the power being supplied. Remote commander does not operate the unit. Set the disc correctly. Replace both channels Play does not begin. Remove the obstacle. The internal control program may not run. Leave the player turned on and retry the operation. 29 In this case, turn the power off the power and turn it on again. Causes Incorrect operation of the amplifier Loose connection No disc in the disc compartment The player is...
... the power being supplied. Remote commander does not operate the unit. Set the disc correctly. Replace both channels Play does not begin. Remove the obstacle. The internal control program may not run. Leave the player turned on and retry the operation. 29 In this case, turn the power off the power and turn it on again. Causes Incorrect operation of the amplifier Loose connection No disc in the disc compartment The player is...


