

Limited Warranty (US Only)
Page 1
... of one (1) year from the Product. 4-557-172-02 General Stereo/Hifi Components/Tape Decks ® CD Players/Mini Disc Players/Audio Systems Hifi Audio LIMITED WARRANTY Sony Electronics Inc. ("Sony") warrants this Product is invalid if the factory applied serial number has been altered or removed from the date of the Product, including the antenna. This warranty does not cover damage due to improper operation or maintenance, connection to service the Product.
... of one (1) year from the Product. 4-557-172-02 General Stereo/Hifi Components/Tape Decks ® CD Players/Mini Disc Players/Audio Systems Hifi Audio LIMITED WARRANTY Sony Electronics Inc. ("Sony") warrants this Product is invalid if the factory applied serial number has been altered or removed from the date of the Product, including the antenna. This warranty does not cover damage due to improper operation or maintenance, connection to service the Product.
Operating Instructions
Page 2
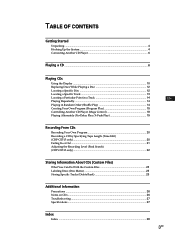
... Sony Compact Disc Player. Before operating the unit, please read this manual describe the controls on the player. About This Manual The instructions in this manual are used for making the task easier. 2EN Indicates hints and tips for illustration purposes, unless otherwise mentioned. The CLASS 1 LASER PRODUCT MARKING is located inside the unit. For the customers in this manual thoroughly and retain it for example, "CDP...
... Sony Compact Disc Player. Before operating the unit, please read this manual describe the controls on the player. About This Manual The instructions in this manual are used for making the task easier. 2EN Indicates hints and tips for illustration purposes, unless otherwise mentioned. The CLASS 1 LASER PRODUCT MARKING is located inside the unit. For the customers in this manual thoroughly and retain it for example, "CDP...
Operating Instructions
Page 3
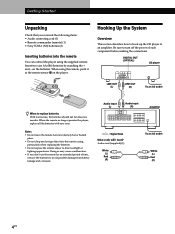
......4 Hooking Up the System ...4 Connecting Another CD Player 6 Playing a CD ...8 Playing CDs Using the Display ...10 Replacing Discs While Playing a Disc 12 Locating a Specific Disc ...12 Locating a Specific Track 13 Locating a Particular Point in a Track 14 EN Playing Repeatedly ...14 GB Playing in Random Order (Shuffle Play 14 Creating Your Own Program (Program Play 15 Controlling Another CD Player (Mega Control 18 Playing Alternately (No-Delay Play/X-Fade Play 19 Recording From CDs Recording Your Own Program 20 Recording a CD by Specifying Tape Length (Time Edit) (CDP...
......4 Hooking Up the System ...4 Connecting Another CD Player 6 Playing a CD ...8 Playing CDs Using the Display ...10 Replacing Discs While Playing a Disc 12 Locating a Specific Disc ...12 Locating a Specific Track 13 Locating a Particular Point in a Track 14 EN Playing Repeatedly ...14 GB Playing in Random Order (Shuffle Play 14 Creating Your Own Program (Program Play 15 Controlling Another CD Player (Mega Control 18 Playing Alternately (No-Delay Play/X-Fade Play 19 Recording From CDs Recording Your Own Program 20 Recording a CD by Specifying Tape Length (Time Edit) (CDP...
Operating Instructions
Page 4
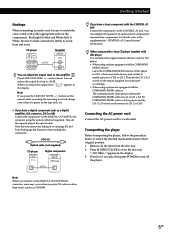
... foreign object into the remote You can control the player using the remote, point it at the remote sensor g on the batteries. Audio input (L) Audio input (R) Amplifier : Signal flow What cords will I need? Insert two size AA (R6) batteries by matching the + and - Be sure to turn off the power of time, remove the batteries to replace batteries With normal use the remote for about six months. When using the supplied remote. Doing so may...
... foreign object into the remote You can control the player using the remote, point it at the remote sensor g on the batteries. Audio input (L) Audio input (R) Amplifier : Signal flow What cords will I need? Insert two size AA (R6) batteries by matching the + and - Be sure to turn off the power of time, remove the batteries to replace batteries With normal use the remote for about six months. When using the supplied remote. Doing so may...
Operating Instructions
Page 5
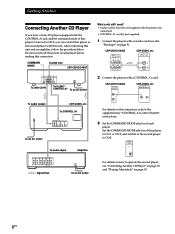
... operation of audio systems composed of separate Sony components. buttons on the remote while recording, the recording level will change even when it is preset on the tape deck, etc. • If you cannot use fading in the display. 3 Wait for this player. • When using a player not equipped with the CONTROL A1 jack Connect the component via the DIGITAL OUT (OPTICAL) connector using another player to CD 2 or CD 3. Then set that you have a Sony...
... operation of audio systems composed of separate Sony components. buttons on the remote while recording, the recording level will change even when it is preset on the tape deck, etc. • If you cannot use fading in the display. 3 Wait for this player. • When using a player not equipped with the CONTROL A1 jack Connect the component via the DIGITAL OUT (OPTICAL) connector using another player to CD 2 or CD 3. Then set that you have a Sony...
Operating Instructions
Page 6
... MODE CD 123 : Signal flow To an AC outlet For details on how to operate the second player, see also "Hookups" on page 5). Be sure to turn off the power of the second player to CD 3, you have a Sony CD player equipped with the CONTROL A1 jack and the command mode of each player before making this connection. COMMAND MODE To LINE OUT CDP-CE515/C460Z What cords will I need? • Audio cord (1) (Use the cord supplied with a CONTROL...
... MODE CD 123 : Signal flow To an AC outlet For details on how to operate the second player, see also "Hookups" on page 5). Be sure to turn off the power of the second player to CD 3, you have a Sony CD player equipped with the CONTROL A1 jack and the command mode of each player before making this connection. COMMAND MODE To LINE OUT CDP-CE515/C460Z What cords will I need? • Audio cord (1) (Use the cord supplied with a CONTROL...

Operating Instructions
Page 8
POWER CONTINUE SHUFFLE PROGRAM REPEAT DISC CHECK DISC 1 DISC 2 DISC 3 DISC 4 DISC 5 PHONES MEMO INPUT FADER TIME/ EDIT/ PEAK TEXT TIME FADE SEARCH EXCHANGE DISC SKIP OPEN/CLOSE AMS (DISC) (-AMS+) CHECK CLEAR NO DELAY X-FADE PUSH ENTER MEGA CONTROL • See pages 4 - 5 for the hookup information. 1 Turn on the disc tray. The player plays the disc in the order of you can listen to the sound from this player. 2 Press POWER to play. Basic Operations Playing a CD 25 6 43 Connect the headphones. When...
POWER CONTINUE SHUFFLE PROGRAM REPEAT DISC CHECK DISC 1 DISC 2 DISC 3 DISC 4 DISC 5 PHONES MEMO INPUT FADER TIME/ EDIT/ PEAK TEXT TIME FADE SEARCH EXCHANGE DISC SKIP OPEN/CLOSE AMS (DISC) (-AMS+) CHECK CLEAR NO DELAY X-FADE PUSH ENTER MEGA CONTROL • See pages 4 - 5 for the hookup information. 1 Turn on the disc tray. The player plays the disc in the order of you can listen to the sound from this player. 2 Press POWER to play. Basic Operations Playing a CD 25 6 43 Connect the headphones. When...

Operating Instructions
Page 9
Adjust the volume on the tape deck, etc. 6 Press ·. When you press the LINE OUT LEVEL +/- buttons on the remote while recording, the recording level will also change even when it is preset on the amplifier. DISC 1 - 5 · P p DISC SKIP POWER CONTINUE SHUFFLE PROGRAM REPEAT DISC CHECK DISC 1 DISC 2 DISC 3 DISC 4 DISC 5 PHONES MEMO INPUT FADER TIME/ EDIT/ PEAK TEXT TIME FADE SEARCH To Pause Resume play after pause Go to the next track Go back to the...
Adjust the volume on the tape deck, etc. 6 Press ·. When you press the LINE OUT LEVEL +/- buttons on the remote while recording, the recording level will also change even when it is preset on the amplifier. DISC 1 - 5 · P p DISC SKIP POWER CONTINUE SHUFFLE PROGRAM REPEAT DISC CHECK DISC 1 DISC 2 DISC 3 DISC 4 DISC 5 PHONES MEMO INPUT FADER TIME/ EDIT/ PEAK TEXT TIME FADE SEARCH To Pause Resume play after pause Go to the next track Go back to the...
Operating Instructions
Page 10
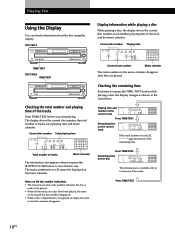
...; OPEN/CLOSE button to be displayed in Continuous Play mode. Checking the remaining time Each time you press the TIME/TEXT button while playing a disc, the display changes as empty, the semi- Press TIME/TEXT. Playing CDs Using the Display You can check information about the disc using the display. circle around a disc number indicates the disc is recognized as shown in the music calendar disappear after they are played. circled disc number disappears. Press TIME/TEXT. 10EN Current disc number...
...; OPEN/CLOSE button to be displayed in Continuous Play mode. Checking the remaining time Each time you press the TIME/TEXT button while playing a disc, the display changes as empty, the semi- Press TIME/TEXT. Playing CDs Using the Display You can check information about the disc using the display. circle around a disc number indicates the disc is recognized as shown in the music calendar disappear after they are played. circled disc number disappears. Press TIME/TEXT. 10EN Current disc number...
Operating Instructions
Page 12
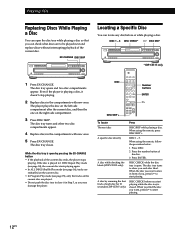
... 1 DISC Repeat Play mode (see page 14), the current disc starts playing again. • In ALL DISCS Shuffle Play mode (see page 14), tracks are reshuffled on the current disc. • In Program Play mode (see page 15), only the tracks on the right side compartment. 3 Press DISC SKIP. The disc tray turns and other two disc compartments appear. 4 Replace discs in the compartments with new ones. 5 Press EX-CHANGE. When using the remote, press DISC SKIP +. The disc tray opens...
... 1 DISC Repeat Play mode (see page 14), the current disc starts playing again. • In ALL DISCS Shuffle Play mode (see page 14), tracks are reshuffled on the current disc. • In Program Play mode (see page 15), only the tracks on the right side compartment. 3 Press DISC SKIP. The disc tray turns and other two disc compartments appear. 4 Replace discs in the compartments with new ones. 5 Press EX-CHANGE. When using the remote, press DISC SKIP +. The disc tray opens...

Operating Instructions
Page 13
... display. Each time you find the track. Locating a Specific Track You can quickly locate any track while playing a disc using the remote, press =repeatedly until you press the button, the playing time changes cyclically. When using the AMS (AMS: Automatic Music Sensor) control or number buttons on the remote. ≠ AMS ± To locate You need to ALL DISCS Continuous Play mode. • When you've opened the disc tray by scanning each track for 10 seconds Z (Music Scan) Press MUSIC...
... display. Each time you find the track. Locating a Specific Track You can quickly locate any track while playing a disc using the remote, press =repeatedly until you press the button, the playing time changes cyclically. When using the AMS (AMS: Automatic Music Sensor) control or number buttons on the remote. ≠ AMS ± To locate You need to ALL DISCS Continuous Play mode. • When you've opened the disc tray by scanning each track for 10 seconds Z (Music Scan) Press MUSIC...

Operating Instructions
Page 14
... hear the sound during the operation. SHUFFLE DISC 1 - 5 · Press REPEAT while playing a disc. The player repeats the discs/tracks as follows: Shuffle Play on the current disc in random orders Program Play (page 15) The same program To cancel Repeat Play Press REPEAT repeatedly until you find the point A point quickly by ) (forward) or 0 (backward) and observing the display hold down until "REPEAT OFF" appears in the display. Repeating the current track You can repeat only the...
... hear the sound during the operation. SHUFFLE DISC 1 - 5 · Press REPEAT while playing a disc. The player repeats the discs/tracks as follows: Shuffle Play on the current disc in random orders Program Play (page 15) The same program To cancel Repeat Play Press REPEAT repeatedly until you find the point A point quickly by ) (forward) or 0 (backward) and observing the display hold down until "REPEAT OFF" appears in the display. Repeating the current track You can repeat only the...
Operating Instructions
Page 16
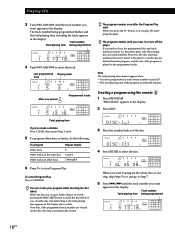
... turn off the player If you 've made a mistake Press CLEAR, then repeat Steps 3 and 4. 5 To program other discs Repeat Step(s) 2 3 and 4 2 through 4 6 Press · to start Program Play. "PROGRAM" appears in the display. However, the disc and track numbers that step is automatically erased. Creating a program using the remote Z 1 Press PROGRAM. Track number Total playing time being programmed flashes and the total playing time including the track appears in the display. Note that, if the programmed track number...
... turn off the player If you 've made a mistake Press CLEAR, then repeat Steps 3 and 4. 5 To program other discs Repeat Step(s) 2 3 and 4 2 through 4 6 Press · to start Program Play. "PROGRAM" appears in the display. However, the disc and track numbers that step is automatically erased. Creating a program using the remote Z 1 Press PROGRAM. Track number Total playing time being programmed flashes and the total playing time including the track appears in the display. Note that, if the programmed track number...
Operating Instructions
Page 18
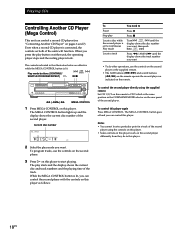
... operating player stops and the resting player starts. The play mode you press the play button on the rear panel of the track. When you want • To do to this player. The controls indicated in a track of the second player using the supplied remote Set CD 1/2/3 on the remote to CD 3 which is connected, the controls on both of the second player. To control the second player directly using the controls on this player. • Some controls on this player work on...
... operating player stops and the resting player starts. The play mode you press the play button on the rear panel of the track. When you want • To do to this player. The controls indicated in a track of the second player using the supplied remote Set CD 1/2/3 on the remote to CD 3 which is connected, the controls on both of the second player. To control the second player directly using the controls on this player. • Some controls on this player work on...

Operating Instructions
Page 19
... work correctly. The X-FADE button lights up . Playing CDs Playing Alternately (No-Delay Play/X-Fade Play) When you connect the second player, you can play tracks in this player and those in the second player alternately in portion and starts playing from where the sound actually begins. • X-Fade Play: The current player changes at each track or at the specified interval. Each time the current player changes to the other player starts play...
... work correctly. The X-FADE button lights up . Playing CDs Playing Alternately (No-Delay Play/X-Fade Play) When you connect the second player, you can play tracks in this player and those in the second player alternately in portion and starts playing from where the sound actually begins. • X-Fade Play: The current player changes at each track or at the specified interval. Each time the current player changes to the other player starts play...
Operating Instructions
Page 21
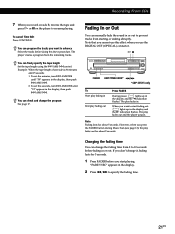
... can program the tracks you want to prevent tracks from starting or ending abruptly. The play fades out and the player pauses. Recording From CDs 7 When you want in advance Select the tracks before you use the DIGITAL OUT (OPTICAL) connector. ·P FADER EDIT/TIME FADE* 0/) *CDP-CE515 only To Start play fading in End play fades out for about 5 seconds. You can manually fade the sound...
... can program the tracks you want to prevent tracks from starting or ending abruptly. The play fades out and the player pauses. Recording From CDs 7 When you want in advance Select the tracks before you use the DIGITAL OUT (OPTICAL) connector. ·P FADER EDIT/TIME FADE* 0/) *CDP-CE515 only To Start play fading in End play fades out for about 5 seconds. You can manually fade the sound...
Operating Instructions
Page 22
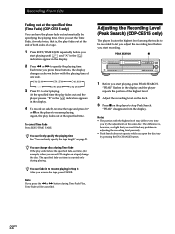
... try the adjustment on the player to resume playing. You can freely specify the playing time See "You can fade in the display and the player repeats the portion of the highest level. 2 Adjust the recording level on the deck. 3 Press p on the same disc. Once you set the Time Fade, it works twice, that you won't find any problem in Step 4 After you record CD-singles...
... try the adjustment on the player to resume playing. You can freely specify the playing time See "You can fade in the display and the player repeats the portion of the highest level. 2 Adjust the recording level on the deck. 3 Press p on the same disc. Once you set the Time Fade, it works twice, that you won't find any problem in Step 4 After you record CD-singles...
Operating Instructions
Page 26
... if the player itself ; Wipe the disc from the center out. • Do not use any questions or problems concerning your player, please consult your local power supply. On placement • Place the player in a location with very low level inputs or no audio signals. On adjusting volume • Do not turn up the volume while listening to a portion with adequate ventilation to direct sunlight...
... if the player itself ; Wipe the disc from the center out. • Do not use any questions or problems concerning your player, please consult your local power supply. On placement • Place the player in a location with very low level inputs or no audio signals. On adjusting volume • Do not turn up the volume while listening to a portion with adequate ventilation to direct sunlight...
Operating Instructions
Page 27
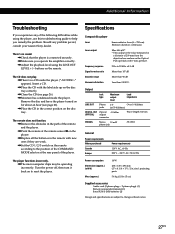
.... /Adjust the playback level using the LINE OUT LEVEL +/- Insert a CD. /Place the CD with the label side up block with new ones if they are subject to reset the player. Remove the disc and leave the player turned on to change without notice. 27EN The player functions incorrectly. /The microcomputer chips may be operating incorrectly. projecting parts 5.4 kg (11 lbs 15 oz) Supplied accessories Audio cord (2 phono plugs - 2 phono plugs) (1) Remote commander (remote) (1) Sony...
.... /Adjust the playback level using the LINE OUT LEVEL +/- Insert a CD. /Place the CD with the label side up block with new ones if they are subject to reset the player. Remove the disc and leave the player turned on to change without notice. 27EN The player functions incorrectly. /The microcomputer chips may be operating incorrectly. projecting parts 5.4 kg (11 lbs 15 oz) Supplied accessories Audio cord (2 phono plugs - 2 phono plugs) (1) Remote commander (remote) (1) Sony...

Operating Instructions
Page 28
... directly 13 using AMS 13 while checking the labels 12 M Mega Control 18 Music Scan 13 N, O No-Delay Play 19 P, Q Peak Search 22 Playback Continuous Play 8 X-Fade Play 19 No-Delay Play 19 Playing alternately 19 Program Play 15 Repeat Play 14 Shuffle Play 14 Program 15 changing 17 checking 17 for recording 20 R Recording 20 a program 20 using Time Edit 20 Remaining time 10 Remote control 4 Repeating 14 Replacing discs while playing a disc 12 S Scanning. See AMS C, D CD-TEXT 11 Connecting 4 another CD player 6 Continuous Play 8 Controlling...
... directly 13 using AMS 13 while checking the labels 12 M Mega Control 18 Music Scan 13 N, O No-Delay Play 19 P, Q Peak Search 22 Playback Continuous Play 8 X-Fade Play 19 No-Delay Play 19 Playing alternately 19 Program Play 15 Repeat Play 14 Shuffle Play 14 Program 15 changing 17 checking 17 for recording 20 R Recording 20 a program 20 using Time Edit 20 Remaining time 10 Remote control 4 Repeating 14 Replacing discs while playing a disc 12 S Scanning. See AMS C, D CD-TEXT 11 Connecting 4 another CD player 6 Continuous Play 8 Controlling...


