Operating Instructions
Page 2
... Reorient or relocate the receiving antenna. - Connect the equipment into an outlet on , the user is very easy to radio communications. For the Sony Service Center nearest you call 1-800-222-SONY (United States only) For the Sony Factory Service Center nearest you can be prohibited.... These limits are cautioned that interference will soon be producing home video that may be determined by...
... Reorient or relocate the receiving antenna. - Connect the equipment into an outlet on , the user is very easy to radio communications. For the Sony Service Center nearest you call 1-800-222-SONY (United States only) For the Sony Factory Service Center nearest you can be prohibited.... These limits are cautioned that interference will soon be producing home video that may be determined by...
Operating Instructions
Page 3
... 6 Checking supplied accessories 8 Step 1 Preparing the power supply ..... 9 Installing the battery pack 9 Charging the battery pack 10 Connecting to a wall outlet 14 Step 2 Inserting a cassette 15 Playing back a tape with digital effects (CCD-TRV87 only 51 Editing Dubbing a tape 52 Recording video or TV programs (CCD-TRV87 only 54 Recording - Picture effect 37 Using special effects -
... 6 Checking supplied accessories 8 Step 1 Preparing the power supply ..... 9 Installing the battery pack 9 Charging the battery pack 10 Connecting to a wall outlet 14 Step 2 Inserting a cassette 15 Playing back a tape with digital effects (CCD-TRV87 only 51 Editing Dubbing a tape 52 Recording video or TV programs (CCD-TRV87 only 54 Recording - Picture effect 37 Using special effects -
Operating Instructions
Page 4
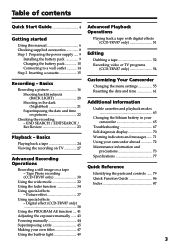
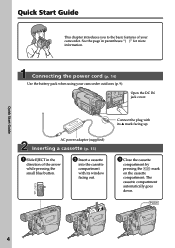
... blue button. 2 Insert a cassette into the cassette compartment with its window facing out. 3 Close the cassette compartment by pressing the mark on the cassette compartment. Connecting the power cord (p. 14) Use the battery pack when using your camcorder...
... blue button. 2 Insert a cassette into the cassette compartment with its window facing out. 3 Close the cassette compartment by pressing the mark on the cassette compartment. Connecting the power cord (p. 14) Use the battery pack when using your camcorder...
Operating Instructions
Page 8
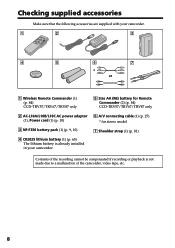
Contents of the camcorder, video tape, etc. 8 Checking supplied accessories Make sure that the following accessories are supplied with your camcorder. 1 2 3 4 5 6 7 * or 1 Wireless Remote Commander (1) (p. 84) CCD-TRV57/TRV67/TRV87 only 5 Size AA (R6) battery for Remote Commander (2) (p. 84) CCD-TRV57/TRV67/TRV87 only 2 AC-L10A/L10B/L10C AC power adaptor 6 A/V connecting cable (1) (p. 27) (1), Power cord (1) (p. 10...
Contents of the camcorder, video tape, etc. 8 Checking supplied accessories Make sure that the following accessories are supplied with your camcorder. 1 2 3 4 5 6 7 * or 1 Wireless Remote Commander (1) (p. 84) CCD-TRV57/TRV67/TRV87 only 5 Size AA (R6) battery for Remote Commander (2) (p. 84) CCD-TRV57/TRV67/TRV87 only 2 AC-L10A/L10B/L10C AC power adaptor 6 A/V connecting cable (1) (p. 27) (1), Power cord (1) (p. 10...
Operating Instructions
Page 10
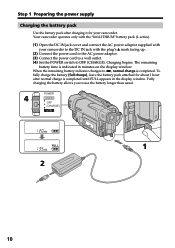
...power supply Charging the battery pack Use the battery pack after normal charge is completed until FULL appears in minutes on the display window. POWER 4 CAMERA OFF (CHARGE) VTR 1 2 10 The remaining battery time is indicated in the display window. To fully charge the battery (full charge), leave... about 1 hour after charging it for your camcorder to the DC IN jack with the plug's v mark facing up. (2) Connect the power cord to the AC power adaptor. (3) Connect the power cord to a wall outlet. (4) Set the POWER switch to OFF (CHARGE). Your camcorder operates only with the "...
...power supply Charging the battery pack Use the battery pack after normal charge is completed until FULL appears in minutes on the display window. POWER 4 CAMERA OFF (CHARGE) VTR 1 2 10 The remaining battery time is indicated in the display window. To fully charge the battery (full charge), leave... about 1 hour after charging it for your camcorder to the DC IN jack with the plug's v mark facing up. (2) Connect the power cord to the AC power adaptor. (3) Connect the power cord to a wall outlet. (4) Set the POWER switch to OFF (CHARGE). Your camcorder operates only with the "...

Operating Instructions
Page 14
Using a car battery Use Sony DC Adaptor/Charger (not supplied). 14 This means that you use your camcorder for a long time, we recommend that the battery pack cannot supply any power if the power cord is connected to the DC IN jack, even when the power cord is not plugged into a wall outlet... supply power even if the battery pack is attached to your camcorder. • The DC IN jack has "source priority". Step 1 Preparing the power supply Connecting to a wall outlet When you power it from a wall outlet using the AC power adaptor. (1) Open the DC IN jack cover, and...
Using a car battery Use Sony DC Adaptor/Charger (not supplied). 14 This means that you use your camcorder for a long time, we recommend that the battery pack cannot supply any power if the power cord is connected to the DC IN jack, even when the power cord is not plugged into a wall outlet... supply power even if the battery pack is attached to your camcorder. • The DC IN jack has "source priority". Step 1 Preparing the power supply Connecting to a wall outlet When you power it from a wall outlet using the AC power adaptor. (1) Open the DC IN jack cover, and...
Operating Instructions
Page 27
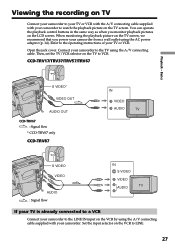
...the jack cover. Basics S VIDEO* VIDEO OUT AUDIO OUT CCD-TRV67 : Signal flow * CCD-TRV67 only CCD-TRV87 IN VIDEO AUDIO S VIDEO VIDEO AUDIO : Signal flow IN S VIDEO VIDEO AUDIO If your TV is already connected to a VCR Connect your camcorder to the LINE IN input on the VCR by using the A/V connecting cable supplied with your camcorder... playback control buttons in the same way as when you power your TV or VCR. Viewing the recording on TV Connect your camcorder to your TV or VCR with the A/V connecting cable supplied with your camcorder to the TV using the AC power adaptor (p. 14).
...the jack cover. Basics S VIDEO* VIDEO OUT AUDIO OUT CCD-TRV67 : Signal flow * CCD-TRV67 only CCD-TRV87 IN VIDEO AUDIO S VIDEO VIDEO AUDIO : Signal flow IN S VIDEO VIDEO AUDIO If your TV is already connected to a VCR Connect your camcorder to the LINE IN input on the VCR by using the A/V connecting cable supplied with your camcorder... playback control buttons in the same way as when you power your TV or VCR. Viewing the recording on TV Connect your camcorder to your TV or VCR with the A/V connecting cable supplied with your camcorder to the TV using the AC power adaptor (p. 14).
Operating Instructions
Page 28
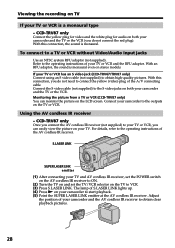
... picture on the TV to VCR. (3) Press S.LASER LINK. Viewing the recording on both your TV or VCR has an S video jack (CCD-TRV67/TRV87 only) Connect using an S video cable (not supplied) to obtain high-quality pictures. CCD-TRV87 only Connect the yellow plug for video and the white plug for audio on TV If your camcorder to...
... picture on the TV to VCR. (3) Press S.LASER LINK. Viewing the recording on both your TV or VCR has an S video jack (CCD-TRV67/TRV87 only) Connect using an S video cable (not supplied) to obtain high-quality pictures. CCD-TRV87 only Connect the yellow plug for video and the white plug for audio on TV If your camcorder to...
Operating Instructions
Page 29
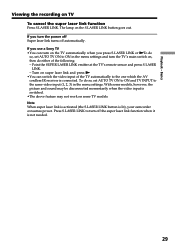
If you use a Sony TV •You can switch the video input of the following: - Press S.LASER LINK to the one which the AV cordless IR receiver is switched. •The above feature may be disconnected momentarily when the video input is connected. To do so, set AUTO TV ON to ON and TV... on the TV automatically when you turn off automatically. Turn on the S.LASER LINK button goes out. With some TV models. Basics Viewing the recording on some models, however, the picture and sound may not work on TV To cancel the super laser link function Press S.LASER LINK. If ...
If you use a Sony TV •You can switch the video input of the following: - Press S.LASER LINK to the one which the AV cordless IR receiver is switched. •The above feature may be disconnected momentarily when the video input is connected. To do so, set AUTO TV ON to ON and TV... on the TV automatically when you turn off automatically. Turn on the S.LASER LINK button goes out. With some TV models. Basics Viewing the recording on some models, however, the picture and sound may not work on TV To cancel the super laser link function Press S.LASER LINK. If ...
Operating Instructions
Page 31
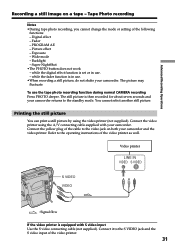
... picture is in use the tape photo recording function during normal CAMERA recording Press PHOTO deeper. To use . - You cannot select another still picture. Advanced Recording Operations Recording a still image on both your camcorder and the video printer. Fader - while the digital effect function is equipped with your camcorder. Connect the yellow plug of the following functions...
... picture is in use the tape photo recording function during normal CAMERA recording Press PHOTO deeper. To use . - You cannot select another still picture. Advanced Recording Operations Recording a still image on both your camcorder and the video printer. Fader - while the digital effect function is equipped with your camcorder. Connect the yellow plug of the following functions...
Operating Instructions
Page 52
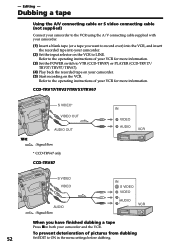
... using the A/V connecting cable supplied with your camcorder. (1) Insert a blank tape (or a tape you have finished dubbing a tape Press xon both your camcorder. (2) Set the input selector on the VCR to the operating instructions of your camcorder. (5) Start recording on your VCR for more information. Editing - CCD-TRV17/TRV37/TRV57/TRV67 S VIDEO* VIDEO OUT AUDIO OUT...
... using the A/V connecting cable supplied with your camcorder. (1) Insert a blank tape (or a tape you have finished dubbing a tape Press xon both your camcorder. (2) Set the input selector on the VCR to the operating instructions of your camcorder. (5) Start recording on your VCR for more information. Editing - CCD-TRV17/TRV37/TRV57/TRV67 S VIDEO* VIDEO OUT AUDIO OUT...
Operating Instructions
Page 53
... (not supplied) to the S video jacks of the A/V connecting cable. You can edit on VCRs that they will be superimposed on both your camcorder and the VCR. With this connection, you have displayed the screen indicators on the TV Make the indicators disappear by pressing DISPLAY so ...on the edited tape. You do not need to obtain high-quality pictures (CCD-TRV67/TRV87 only) With this connection, the sound will not be monaural. Editing 53 Connect using an S video cable (not supplied) to connect the yellow (video) plug of both your camcorder and the VCR. Dubbing a tape If ...
... (not supplied) to the S video jacks of the A/V connecting cable. You can edit on VCRs that they will be superimposed on both your camcorder and the VCR. With this connection, you have displayed the screen indicators on the TV Make the indicators disappear by pressing DISPLAY so ...on the edited tape. You do not need to obtain high-quality pictures (CCD-TRV67/TRV87 only) With this connection, the sound will not be monaural. Editing 53 Connect using an S video cable (not supplied) to connect the yellow (video) plug of both your camcorder and the VCR. Dubbing a tape If ...
Operating Instructions
Page 54
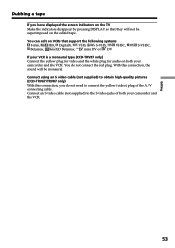
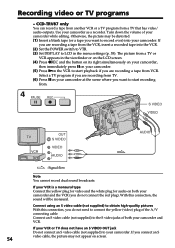
... to the S video jacks of your camcorder. Recording video or TV programs - CCD-TRV87 only You can record a tape from another VCR or a TV program from . 4 PAUSE REC S VIDEO VIDEO OUT S VIDEO VIDEO AUDIO AUDIO : Signal flow Note You cannot record dual sound broadcasts. Use your camcorder and the VCR (you are recording a tape from VCR. If you connect an S video cable, the...
... to the S video jacks of your camcorder. Recording video or TV programs - CCD-TRV87 only You can record a tape from another VCR or a TV program from . 4 PAUSE REC S VIDEO VIDEO OUT S VIDEO VIDEO AUDIO AUDIO : Signal flow Note You cannot record dual sound broadcasts. Use your camcorder and the VCR (you are recording a tape from VCR. If you connect an S video cable, the...
Operating Instructions
Page 60
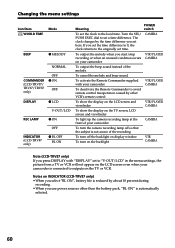
...camera recording lamp at the front of your camcorder CAMERA To turn the camera recording lamp off so that the subject is not aware of the recording To turn off the backlight on display window To turn on the backlight VTR CAMERA Note (CCD...CAMERA To deactivate the Remote Commander to avoid remote control misoperation caused by about 10 percent during recording. • When you use power sources other than the battery pack, "BL ON" is connected...MELODY NORMAL COMMANDER (CCD-TRV57/ TRV67/TRV87 only) OFF z ON OFF DISPLAY z LCD V-OUT/LCD REC LAMP z ON OFF INDICATOR (CCD-TRV87 only) ...
...camera recording lamp at the front of your camcorder CAMERA To turn the camera recording lamp off so that the subject is not aware of the recording To turn off the backlight on display window To turn on the backlight VTR CAMERA Note (CCD...CAMERA To deactivate the Remote Commander to avoid remote control misoperation caused by about 10 percent during recording. • When you use power sources other than the battery pack, "BL ON" is connected...MELODY NORMAL COMMANDER (CCD-TRV57/ TRV67/TRV87 only) OFF z ON OFF DISPLAY z LCD V-OUT/LCD REC LAMP z ON OFF INDICATOR (CCD-TRV87 only) ...
Operating Instructions
Page 61
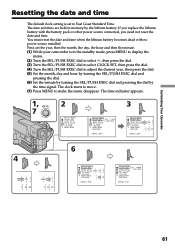
... East Coast Standard Time. You must reset the date and time when the lithium battery becomes dead with the battery pack or other power source connected, you replace the lithium battery with no power source installed. If you need not reset the date and time. The time indicator appears. 1, MENU 7 2 SETUP...
... East Coast Standard Time. You must reset the date and time when the lithium battery becomes dead with the battery pack or other power source connected, you replace the lithium battery with no power source installed. If you need not reset the date and time. The time indicator appears. 1, MENU 7 2 SETUP...
Operating Instructions
Page 68
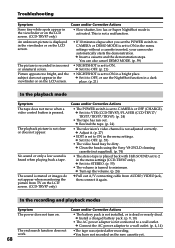
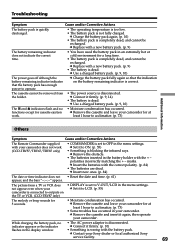
... muted or images do not appear when monitoring the picture from AUDIO/VIDEO jack, then connect it to STEREO. (p. 55) • The volume is played... is not connected to CAMERA or OFF (CHARGE). No sound or only a low sound is pressed. c Turn up the volume. (p. 24) c Pull out A/V connecting cable from TV on the LCD screen. (CCD-TRV87 only)...Sony V8-25CLD cleaning cassette (not supplied). (p. 74) • The stereo tape is turned to VTR (CCD-TRV87)/PLAYER (CCD-TRV17/ TRV37/TRV57/TRV67). (p. 24) • The tape has run out. You can also cancel DEMO MODE. (p. 59) The picture is recorded...
... muted or images do not appear when monitoring the picture from AUDIO/VIDEO jack, then connect it to STEREO. (p. 55) • The volume is played... is not connected to CAMERA or OFF (CHARGE). No sound or only a low sound is pressed. c Turn up the volume. (p. 24) c Pull out A/V connecting cable from TV on the LCD screen. (CCD-TRV87 only)...Sony V8-25CLD cleaning cassette (not supplied). (p. 74) • The stereo tape is turned to VTR (CCD-TRV87)/PLAYER (CCD-TRV17/ TRV37/TRV57/TRV67). (p. 24) • The tape has run out. You can also cancel DEMO MODE. (p. 59) The picture is recorded...
Operating Instructions
Page 69
...• Something is completely dead, and cannot be removed from a TV or VCR does not appear even when your Sony dealer or local authorized Sony service facility. 69 c Connect it firmly. (p. 10) flashes in the menu settings. c Remove the cassette and insert it to acclimatize. (p. 73... polarity. (p. 84) • The batteries are dead. least 1 hour to LCD. (p. 55) The melody or beep sounds for at work . (CCD-TRV57/TRV67/TRV87 only) • COMMANDER is disconnected. c Charge the battery pack again. (p. 10) • The battery pack is blocking the infrared rays. c...
...• Something is completely dead, and cannot be removed from a TV or VCR does not appear even when your Sony dealer or local authorized Sony service facility. 69 c Connect it firmly. (p. 10) flashes in the menu settings. c Remove the cassette and insert it to acclimatize. (p. 73... polarity. (p. 84) • The batteries are dead. least 1 hour to LCD. (p. 55) The melody or beep sounds for at work . (CCD-TRV57/TRV67/TRV87 only) • COMMANDER is disconnected. c Charge the battery pack again. (p. 10) • The battery pack is blocking the infrared rays. c...
Operating Instructions
Page 76
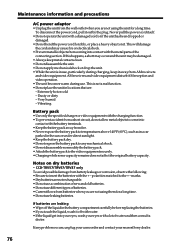
...connecting section. This is in locations that are not rechargeable. • Do not use a combination of batteries. • Current flows from batteries when you are not using them for a long time. CCD-TRV57/TRV67... Do not use leaking batteries. Vibrating Battery pack • Use only the specified charger or video equipment with the charging function. • To prevent accident from a short circuit, do not ...allow metal objects to come into your eyes, wash your nearest Sony dealer. 76 To disconnect the power cord, pull it . Extremely hot or cold - Never...
...connecting section. This is in locations that are not rechargeable. • Do not use a combination of batteries. • Current flows from batteries when you are not using them for a long time. CCD-TRV57/TRV67... Do not use leaking batteries. Vibrating Battery pack • Use only the specified charger or video equipment with the charging function. • To prevent accident from a short circuit, do not ...allow metal objects to come into your eyes, wash your nearest Sony dealer. 76 To disconnect the power cord, pull it . Extremely hot or cold - Never...
Operating Instructions
Page 83
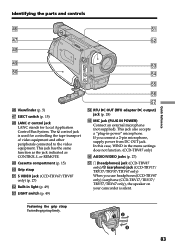
...). rl Cassette compartment (p. 15) t; In this case, WIND in the menu settings does not function. (CCD-TRV87 only) th AUDIO/VIDEO jacks (p. 27) tj i (headphones) jack (CCD-TRV87 only)/v (earphone) jack (CCD-TRV17/ TRV37/TRV57/TRV67 only) When you connect a 2-pin microphone, supply power from DC OUT jack. Quick Reference Identifying the parts and controls rh...
...). rl Cassette compartment (p. 15) t; In this case, WIND in the menu settings does not function. (CCD-TRV87 only) th AUDIO/VIDEO jacks (p. 27) tj i (headphones) jack (CCD-TRV87 only)/v (earphone) jack (CCD-TRV17/ TRV37/TRV57/TRV67 only) When you connect a 2-pin microphone, supply power from DC OUT jack. Quick Reference Identifying the parts and controls rh...
Operating Instructions
Page 86
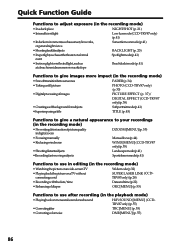
...) • Focusingmanually Manual focus (p. 44) • Reducingwindnoise WIND [MENU] (CCD-TRV87 only) (p. 55) • Shootingdistantsubjects Landscape mode (p. 41) •Recording fast-moving subjects Sports lesson mode (p. 41) Functions to use in editing (in the recording mode) • Watchingthepictureonawide-screenTV Wide mode (p. 32) • PlayingbackthepictureonaTVwithout connecting a cord SUPER LASER LINK (CCDTRV87 only) (p. 28) • Recordingwiththedate...
...) • Focusingmanually Manual focus (p. 44) • Reducingwindnoise WIND [MENU] (CCD-TRV87 only) (p. 55) • Shootingdistantsubjects Landscape mode (p. 41) •Recording fast-moving subjects Sports lesson mode (p. 41) Functions to use in editing (in the recording mode) • Watchingthepictureonawide-screenTV Wide mode (p. 32) • PlayingbackthepictureonaTVwithout connecting a cord SUPER LASER LINK (CCDTRV87 only) (p. 28) • Recordingwiththedate...


