Operating Instructions
Page 1
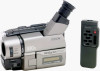
3-868-323-12 (1) Video Camera Recorder Operating Instructions Before operating the unit, please read this product. Owner's Record The model and serial numbers are located on the bottom. Refer to these numbers whenever you call upon your Sony dealer regarding this manual thoroughly, and retain it for future reference. Serial No. CCD-TRV Model No. Model No. AC-L Serial No. CCD-TRV87 CCD-TRV87 CCD-TRV67 CCD-TRV17/TRV37/TRV57 ©1999 Sony Corporation Record the serial number in the space provided below.
3-868-323-12 (1) Video Camera Recorder Operating Instructions Before operating the unit, please read this product. Owner's Record The model and serial numbers are located on the bottom. Refer to these numbers whenever you call upon your Sony dealer regarding this manual thoroughly, and retain it for future reference. Serial No. CCD-TRV Model No. Model No. AC-L Serial No. CCD-TRV87 CCD-TRV87 CCD-TRV67 CCD-TRV17/TRV37/TRV57 ©1999 Sony Corporation Record the serial number in the space provided below.
Operating Instructions
Page 5
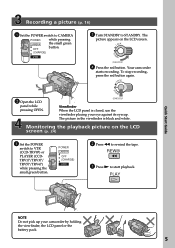
... picture on the LCD screen. POWER CAMERA OFF (CHARGE) VTR 2 Press m to start playback. NDBY START/STOP Viewfinder When the LCD panel is black and white. The picture in the viewfinder is closed, use the viewfinder placing your camcorder by holding the viewfinder, the LCD ... Do not pick up your eye against its eyecup. Recording a picture (p. 16) 1 Set the POWER switch to CAMERA POWER while pressing CAMERA OFF the small green button. (CHARGE) VTR STA 3 Turn STANDBY to VTR (CCD-TRV87) or PLAYER (CCDTRV17/TRV37/ TRV57/TRV67) while pressing the small green button.
... picture on the LCD screen. POWER CAMERA OFF (CHARGE) VTR 2 Press m to start playback. NDBY START/STOP Viewfinder When the LCD panel is black and white. The picture in the viewfinder is closed, use the viewfinder placing your camcorder by holding the viewfinder, the LCD ... Do not pick up your eye against its eyecup. Recording a picture (p. 16) 1 Set the POWER switch to CAMERA POWER while pressing CAMERA OFF the small green button. (CHARGE) VTR STA 3 Turn STANDBY to VTR (CCD-TRV87) or PLAYER (CCDTRV17/TRV37/ TRV57/TRV67) while pressing the small green button.
Operating Instructions
Page 6
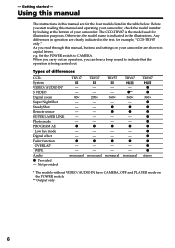
...z - - monaural TRV87 z z 360× z z z z z z z z z z z stereo * The models without VIDEO/AUDIO IN have CAMERA, OFF and PLAYER mode on your camcorder. The CCD-TRV87 is being carried out. Otherwise, the model name is indicated in capital letters. monaural - - 360× - z - - z - - Set the... - As you start reading this manual, buttons and settings on the POWER switch. ** Output only 6 Types of your camcorder are for example, "CCD-TRV87 only." Not provided TRV17 TRV37 TRV57 TRV67 - - 80 z - - z** 360× - z z - - Getting started - z z - - ...
...z - - monaural TRV87 z z 360× z z z z z z z z z z z stereo * The models without VIDEO/AUDIO IN have CAMERA, OFF and PLAYER mode on your camcorder. The CCD-TRV87 is being carried out. Otherwise, the model name is indicated in capital letters. monaural - - 360× - z - - z - - Set the... - As you start reading this manual, buttons and settings on the POWER switch. ** Output only 6 Types of your camcorder are for example, "CCD-TRV87 only." Not provided TRV17 TRV37 TRV57 TRV67 - - 80 z - - z** 360× - z z - - Getting started - z z - - ...
Operating Instructions
Page 10
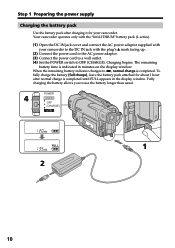
...is completed. To fully charge the battery (full charge), leave the battery pack attached for about 1 hour after charging it for your camcorder to OFF (CHARGE). When the remaining battery indicator changes to use the battery longer than usual. The remaining battery time is indicated ...in the display window. POWER 4 CAMERA OFF (CHARGE) VTR 1 2 10 Step 1 Preparing the power supply Charging the battery pack Use the battery pack after normal charge is...
...is completed. To fully charge the battery (full charge), leave the battery pack attached for about 1 hour after charging it for your camcorder to OFF (CHARGE). When the remaining battery indicator changes to use the battery longer than usual. The remaining battery time is indicated ...in the display window. POWER 4 CAMERA OFF (CHARGE) VTR 1 2 10 Step 1 Preparing the power supply Charging the battery pack Use the battery pack after normal charge is...
Operating Instructions
Page 16
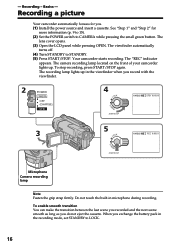
...H SP STBY 0:00:00 3 5 LOCK 40min H SP REC 0:00:01 STA NDBY START/STOP Microphone Camera recording lamp Note Fasten the grip strap firmly. Your camcorder starts recording. To enable smooth transition You can make the transition between the last scene you recorded and the next...the battery pack in microphone during recording. The viewfinder automatically turns off. (4) Turn STANDBY to CAMERA while pressing the small green button. The camera recording lamp located on the front of your camcorder lights up in the viewfinder when you . (1) Install the power source and insert a cassette....
...H SP STBY 0:00:00 3 5 LOCK 40min H SP REC 0:00:01 STA NDBY START/STOP Microphone Camera recording lamp Note Fasten the grip strap firmly. Your camcorder starts recording. To enable smooth transition You can make the transition between the last scene you recorded and the next...the battery pack in microphone during recording. The viewfinder automatically turns off. (4) Turn STANDBY to CAMERA while pressing the small green button. The camera recording lamp located on the front of your camcorder lights up in the viewfinder when you . (1) Install the power source and insert a cassette....
Operating Instructions
Page 24
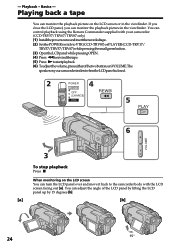
... and move it back to the camcorder body with your camcorder. (CCD-TRV57/TRV67/TRV87 only) (1) Installthepowersourceandinserttherecordedtape. (2) SetthePOWERswitchtoVTR(CCD-TRV87)orPLAYER(CCD-TRV17/ TRV37/TRV57/TRV67) while pressing the small green button. (3) OpentheLCDpanelwhilepressingOPEN. (4) Press mtorewindthetape. (5) Press Ntostartplayback. (6) Toadjustthevolume,presseitherofthetwobuttonsonVOLUME.The speaker on your camcorder is silent when the LCD panel is closed. 2 POWER 4 CAMERA OFF REW (CHARGE) VTR 5 PLAY...
... and move it back to the camcorder body with your camcorder. (CCD-TRV57/TRV67/TRV87 only) (1) Installthepowersourceandinserttherecordedtape. (2) SetthePOWERswitchtoVTR(CCD-TRV87)orPLAYER(CCD-TRV17/ TRV37/TRV57/TRV67) while pressing the small green button. (3) OpentheLCDpanelwhilepressingOPEN. (4) Press mtorewindthetape. (5) Press Ntostartplayback. (6) Toadjustthevolume,presseitherofthetwobuttonsonVOLUME.The speaker on your camcorder is silent when the LCD panel is closed. 2 POWER 4 CAMERA OFF REW (CHARGE) VTR 5 PLAY...
Operating Instructions
Page 31
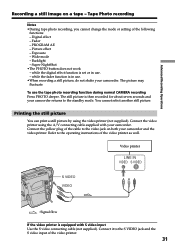
...camcorder and the video printer. Tape Photo recording Notes •During tape photo recording, you cannot change the mode or setting of the video printer as well. Digital effect - Picture effect - while the fader function is set or in use the tape photo recording function during normal CAMERA.... 31 Video printer LINE IN VIDEO S VIDEO S VIDEO VIDEO : Signal flow If the video printer is then recorded for about seven seconds and your camcorder. Exposure - Super NightShot •The PHOTO button does not work: - The picture may fluctuate. Wide mode - PROGRAM AE - To use . &#...
...camcorder and the video printer. Tape Photo recording Notes •During tape photo recording, you cannot change the mode or setting of the video printer as well. Digital effect - Picture effect - while the fader function is set or in use the tape photo recording function during normal CAMERA.... 31 Video printer LINE IN VIDEO S VIDEO S VIDEO VIDEO : Signal flow If the video printer is then recorded for about seven seconds and your camcorder. Exposure - Super NightShot •The PHOTO button does not work: - The picture may fluctuate. Wide mode - PROGRAM AE - To use . &#...
Operating Instructions
Page 55
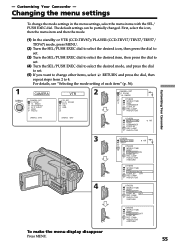
...EXEC dial. S. Customizing Your Camcorder - For details, see "Selecting the mode setting of each item" (p. 56). 1 MENU CAMERA CAMERA SET D ZOOM 16 : 9WIDE STEADYSHOT N. First, select the icon, then the menu item and then the mode. (1) In the standby or VTR (CCD-TRV87)/PLAYER (CCD-TRV17/TRV37/TRV57/ TRV67) mode, press MENU...mode, and press the dial to set. (5) If you want to 4. LIGHT WIND PHOTO VTR VTR SET H i F i SOUND EDIT TBC DNR 2 CAMERA SET D ZOOM 16 : 9WIDE OTHERS WORLD TIME BEEP COMMANDER DISPLAY REC LAMP INDICATOR [MENU] : END [MENU] : END OTHERS WORLD TIME BEEP COMMANDER ...
...EXEC dial. S. Customizing Your Camcorder - For details, see "Selecting the mode setting of each item" (p. 56). 1 MENU CAMERA CAMERA SET D ZOOM 16 : 9WIDE STEADYSHOT N. First, select the icon, then the menu item and then the mode. (1) In the standby or VTR (CCD-TRV87)/PLAYER (CCD-TRV17/TRV37/TRV57/ TRV67) mode, press MENU...mode, and press the dial to set. (5) If you want to 4. LIGHT WIND PHOTO VTR VTR SET H i F i SOUND EDIT TBC DNR 2 CAMERA SET D ZOOM 16 : 9WIDE OTHERS WORLD TIME BEEP COMMANDER DISPLAY REC LAMP INDICATOR [MENU] : END [MENU] : END OTHERS WORLD TIME BEEP COMMANDER ...
Operating Instructions
Page 56
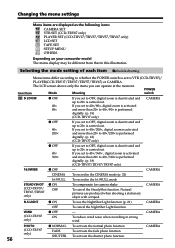
...to 20× is performed digitally. (p. 18) (CCD-TRV57/TRV67/TRV87 only) 16:9WIDE z OFF - CAMERA N.S.LIGHT z ON To use the NightShot Light function (p. 21) CAMERA OFF To cancel the NightShot Light function WIND (CCD-TRV87 only) z OFF ON - CAMERA CINEMA To record in the CINEMA mode (p. 32) 16...is carried out. Natural pictures are displayed as the following icons: CAMERA SET VTR SET (CCD-TRV87 only) PLAYER SET (CCD-TRV17/TRV37/TRV57/TRV67 only) LCD SET TAPE SET SETUP MENU OTHERS Depending on your camcorder model The menu display may be different from that in this ...
...to 20× is performed digitally. (p. 18) (CCD-TRV57/TRV67/TRV87 only) 16:9WIDE z OFF - CAMERA N.S.LIGHT z ON To use the NightShot Light function (p. 21) CAMERA OFF To cancel the NightShot Light function WIND (CCD-TRV87 only) z OFF ON - CAMERA CINEMA To record in the CINEMA mode (p. 32) 16...is carried out. Natural pictures are displayed as the following icons: CAMERA SET VTR SET (CCD-TRV87 only) PLAYER SET (CCD-TRV17/TRV37/TRV57/TRV67 only) LCD SET TAPE SET SETUP MENU OTHERS Depending on your camcorder model The menu display may be different from that in this ...
Operating Instructions
Page 57
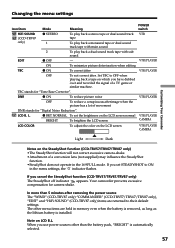
... normal VTR/PLAYER BRIGHT To brighten the LCD screen CAMERA LCD COLOR To adjust the color on the LCD screen VTR/PLAYER CAMERA Customizing Your Camcorder Light Dark Notes on the SteadyShot function (CCD-TRV57/TRV67/TRV87 only) •The SteadyShot function will not correct excessive camera-shake. •Attachment of a TV game or similar machine...
... normal VTR/PLAYER BRIGHT To brighten the LCD screen CAMERA LCD COLOR To adjust the color on the LCD screen VTR/PLAYER CAMERA Customizing Your Camcorder Light Dark Notes on the SteadyShot function (CCD-TRV57/TRV67/TRV87 only) •The SteadyShot function will not correct excessive camera-shake. •Attachment of a TV game or similar machine...
Operating Instructions
Page 58
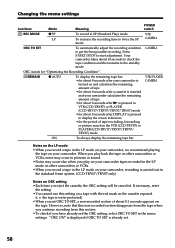
... about 8 seconds after your camcorder is turned on the tape. Press START/STOP to display the screen indicators • for the period of tape rewinding, forwarding or picture search in the VTR (CCD-TRV87) or PLAYER (CCD-TRV17/TRV37/TRV57/ TRV67) mode VTR/PLAYER CAMERA ON To always display the remaining... tape bar Notes on the LP mode • When you record a tape in the LP mode on your camcorder, we recommend playing the tape on your camcorder calculates the ...
... about 8 seconds after your camcorder is turned on the tape. Press START/STOP to display the screen indicators • for the period of tape rewinding, forwarding or picture search in the VTR (CCD-TRV87) or PLAYER (CCD-TRV17/TRV37/TRV57/ TRV67) mode VTR/PLAYER CAMERA ON To always display the remaining... tape bar Notes on the LP mode • When you record a tape in the LP mode on your camcorder, we recommend playing the tape on your camcorder calculates the ...
Operating Instructions
Page 59
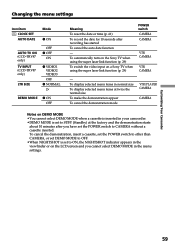
... function (p. 29) To switch the video input on a Sony TV when using the super laser link function (p. 29) POWER switch CAMERA CAMERA VTR CAMERA VTR CAMERA - Customizing Your Camcorder 59 To cancel the demonstration, insert a cassette, set the POWER switch to other than CAMERA, or set DEMO MODE to OFF. •When NIGHTSHOT ...has started To cancel the auto date function - Changing the menu settings Icon/item CLOCK SET AUTO DATE Mode z ON AUTO TV ON (CCD-TRV87 only) TV INPUT (CCD-TRV87 only) LTR SIZE OFF z OFF ON z VIDEO1 VIDEO2 VIDEO3 OFF z NORMAL 2× DEMO MODE z ON OFF Meaning To ...
... function (p. 29) To switch the video input on a Sony TV when using the super laser link function (p. 29) POWER switch CAMERA CAMERA VTR CAMERA VTR CAMERA - Customizing Your Camcorder 59 To cancel the demonstration, insert a cassette, set the POWER switch to other than CAMERA, or set DEMO MODE to OFF. •When NIGHTSHOT ...has started To cancel the auto date function - Changing the menu settings Icon/item CLOCK SET AUTO DATE Mode z ON AUTO TV ON (CCD-TRV87 only) TV INPUT (CCD-TRV87 only) LTR SIZE OFF z OFF ON z VIDEO1 VIDEO2 VIDEO3 OFF z NORMAL 2× DEMO MODE z ON OFF Meaning To ...
Operating Instructions
Page 60
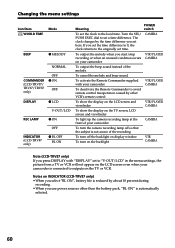
... display window To turn off so that the subject is not aware of your camcorder is automatically selected. 60 Turn the SEL/ PUSH EXEC dial to outputs on the backlight VTR CAMERA Note (CCD-TRV87 only) If you set the time difference to 0, the clock returns to...you press DISPLAY with your camcorder VTR/PLAYER CAMERA To deactivate the Remote Commander to avoid remote control misoperation caused by about 10 percent during recording. • When you set here. Changing the menu settings Icon/item Mode WORLD TIME BEEP z MELODY NORMAL COMMANDER (CCD-TRV57/ TRV67/TRV87 only) OFF...
... display window To turn off so that the subject is not aware of your camcorder is automatically selected. 60 Turn the SEL/ PUSH EXEC dial to outputs on the backlight VTR CAMERA Note (CCD-TRV87 only) If you set the time difference to 0, the clock returns to...you press DISPLAY with your camcorder VTR/PLAYER CAMERA To deactivate the Remote Commander to avoid remote control misoperation caused by about 10 percent during recording. • When you set here. Changing the menu settings Icon/item Mode WORLD TIME BEEP z MELODY NORMAL COMMANDER (CCD-TRV57/ TRV67/TRV87 only) OFF...
Operating Instructions
Page 65
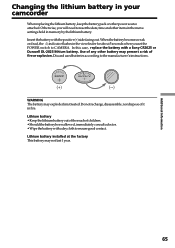
... mistreated. Do not recharge, disassemble, nor dispose of any other battery may not last 1 year. Changing the lithium battery in your camcorder When replacing the lithium battery, keep the battery pack or other items in the menu settings hold in memory by the lithium battery....of children. • Should the battery be swallowed, immediately consult a doctor. • Wipe the battery with a dry cloth to CAMERA. Insert the battery with a Sony CR2025 or Duracell DL-2025 lithium battery. Use of it in fire. Otherwise, you set the POWER switch to ensure good contact. Discard...
... mistreated. Do not recharge, disassemble, nor dispose of any other battery may not last 1 year. Changing the lithium battery in your camcorder When replacing the lithium battery, keep the battery pack or other items in the menu settings hold in memory by the lithium battery....of children. • Should the battery be swallowed, immediately consult a doctor. • Wipe the battery with a dry cloth to CAMERA. Insert the battery with a Sony CR2025 or Duracell DL-2025 lithium battery. Use of it in fire. Otherwise, you set the POWER switch to ensure good contact. Discard...
Operating Instructions
Page 67
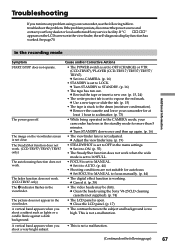
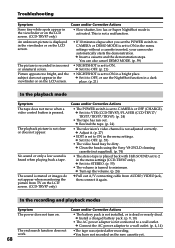
...CCD-TRV17/TRV37/TRV57/ TRV67). c Rewind the tape or insert a new one. (p. 15, 24) • The write-protect tab is set to acclimatize. (p. 73) • While being operated in the menu settings. This is not adjusted. The fader function does not work . c Remove the cassette and leave your camcorder...See page 70. The picture does not appear in the standby mode for autofocus. c Set it to OFF in the CAMERA mode, your Sony dealer or local authorized Sony service facility. c Close the LCD panel. (p. 17) • The contrast between the subject and background is working...
...CCD-TRV17/TRV37/TRV57/ TRV67). c Rewind the tape or insert a new one. (p. 15, 24) • The write-protect tab is set to acclimatize. (p. 73) • While being operated in the menu settings. This is not adjusted. The fader function does not work . c Remove the cassette and leave your camcorder...See page 70. The picture does not appear in the standby mode for autofocus. c Set it to OFF in the CAMERA mode, your Sony dealer or local authorized Sony service facility. c Close the LCD panel. (p. 17) • The contrast between the subject and background is working...
Operating Instructions
Page 68
...back with HiFi SOUND set to ON. c Clean the heads using the Sony V8-25CLD cleaning cassette (not supplied). (p. 74) • The ... to 2 in the menu settings (CCD-TRV87 only). c Set it to ON in the menu settings without a cassette inserted, your camcorder automatically starts the demonstration. The sound ...CCD-TRV17/ TRV37/TRV57/TRV67). (p. 24) • The tape has run out. c Connect the AC power adaptor to a wall outlet. (p. 4, 14) The end search function does not work. 68 •The tape was ejected after you set the POWER switch to CAMERA or DEMO MODE is set to CAMERA...
...back with HiFi SOUND set to ON. c Clean the heads using the Sony V8-25CLD cleaning cassette (not supplied). (p. 74) • The ... to 2 in the menu settings (CCD-TRV87 only). c Set it to ON in the menu settings without a cassette inserted, your camcorder automatically starts the demonstration. The sound ...CCD-TRV17/ TRV37/TRV57/TRV67). (p. 24) • The tape has run out. c Connect the AC power adaptor to a wall outlet. (p. 4, 14) The end search function does not work. 68 •The tape was ejected after you set the POWER switch to CAMERA or DEMO MODE is set to CAMERA...

Operating Instructions
Page 74
...information Cleaning the video head To ensure normal recording and clear pictures, clean the video heads. If this happens, clean the video heads with the Sony V8-25CLD cleaning cassette (not supplied). [a] [b] [a] Slightly dirty [b] Very dirty Note on the LCD screen or in the viewfinder. •...video head may have cleaned the video heads with a cleaning cassette, the video heads may be replaced with a commercially available blower for a still camera. (3) Turn the eyecup in a counterclockwise direction and pull it out. (2) Clean the surface with new heads. If this is the case, ...
...information Cleaning the video head To ensure normal recording and clear pictures, clean the video heads. If this happens, clean the video heads with the Sony V8-25CLD cleaning cassette (not supplied). [a] [b] [a] Slightly dirty [b] Very dirty Note on the LCD screen or in the viewfinder. •...video head may have cleaned the video heads with a cleaning cassette, the video heads may be replaced with a commercially available blower for a still camera. (3) Turn the eyecup in a counterclockwise direction and pull it out. (2) Clean the surface with new heads. If this is the case, ...
Operating Instructions
Page 75
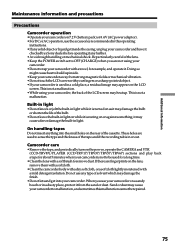
... the type and thickness of the bulb. •Do not leave the built-in light on while it may cause your camcorder and have it checked by a Sony dealer before operating it from strong magnetic fields or mechanical vibration. •Do not touch the LCD screen with a towel,... or against something; On handling tapes Do not insert anything into your camcorder is not to remove dust. Camcorder care •Remove the tape, and periodically turn on the power, operate the CAMERA and VTR (CCD-TRV87)/PLAYER (CCD-TRV17/TRV37/TRV57/TRV67) sections and play back a tape for a long time. •...
... the type and thickness of the bulb. •Do not leave the built-in light on while it may cause your camcorder and have it checked by a Sony dealer before operating it from strong magnetic fields or mechanical vibration. •Do not touch the LCD screen with a towel,... or against something; On handling tapes Do not insert anything into your camcorder is not to remove dust. Camcorder care •Remove the tape, and periodically turn on the power, operate the CAMERA and VTR (CCD-TRV87)/PLAYER (CCD-TRV17/TRV37/TRV57/TRV67) sections and play back a tape for a long time. •...
Operating Instructions
Page 77
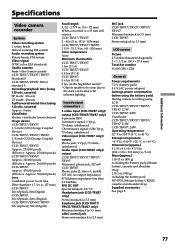
.../rewind time (using 120 min. Additional Information Specifications Video camera recorder System Video recording system 2 rotary heads Helical scanning FM system Audio recording system Rotary heads, FM system Video signal NTSC color, EIA standards Usable cassette 8mm video format cassette CCD-TRV17/TRV37/TRV57: Standard 8 CCD-TRV67/TRV87: Hi8 or standard 8 Recording/playback time (using...
.../rewind time (using 120 min. Additional Information Specifications Video camera recorder System Video recording system 2 rotary heads Helical scanning FM system Audio recording system Rotary heads, FM system Video signal NTSC color, EIA standards Usable cassette 8mm video format cassette CCD-TRV17/TRV37/TRV57: Standard 8 CCD-TRV67/TRV87: Hi8 or standard 8 Recording/playback time (using...
Operating Instructions
Page 80
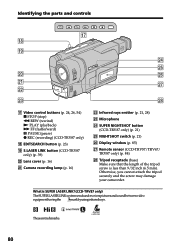
... parts and controls qj qk ql wf wg w; These are trademarks. 80 Otherwise, you cannot attach the tripod securely and the screw may damage your camcorder. What is less than 9/32 inch (6.5 mm). wh wa wj ws wd wk qj Video control buttons (p. 24, 26, 54) x STOP (stop...23) ql S.LASER LINK button (CCD-TRV87 only) (p. 39) w; Lens cover (p. 16) wa Camera recording lamp (p. 16) ws Infrared rays emitter (p. 21, 28) wd Microphone wf SUPER NIGHTSHOT button (CCD-TRV87 only) (p. 21) wg NIGHTSHOT switch (p. 21) wh Display window (p. 85) wj Remote sensor (CCD-TRV57/TRV67/ TRV87 only) (p. 84)...
... parts and controls qj qk ql wf wg w; These are trademarks. 80 Otherwise, you cannot attach the tripod securely and the screw may damage your camcorder. What is less than 9/32 inch (6.5 mm). wh wa wj ws wd wk qj Video control buttons (p. 24, 26, 54) x STOP (stop...23) ql S.LASER LINK button (CCD-TRV87 only) (p. 39) w; Lens cover (p. 16) wa Camera recording lamp (p. 16) ws Infrared rays emitter (p. 21, 28) wd Microphone wf SUPER NIGHTSHOT button (CCD-TRV87 only) (p. 21) wg NIGHTSHOT switch (p. 21) wh Display window (p. 85) wj Remote sensor (CCD-TRV57/TRV67/ TRV87 only) (p. 84)...


