Operating Instructions
Page 3
...precautions 63 Using your own titles 46 Recording with the date/time 47 Optimizing the recording condition .. 48 Using the built-in light (CCD-TRV36/ TRV43/TRV46 only 49 Releasing the STEADYSHOT function (CCD-TRV43/TRV46 only 51 Basic operations Camera recording 11 Using the zoom feature 13 ...Selecting the START/STOP mode 14 Shooting with backlighting 30 Using the FADER function 31 Shooting in the camcorder 55 Resetting the...
...precautions 63 Using your own titles 46 Recording with the date/time 47 Optimizing the recording condition .. 48 Using the built-in light (CCD-TRV36/ TRV43/TRV46 only 49 Releasing the STEADYSHOT function (CCD-TRV43/TRV46 only 51 Basic operations Camera recording 11 Using the zoom feature 13 ...Selecting the START/STOP mode 14 Shooting with backlighting 30 Using the FADER function 31 Shooting in the camcorder 55 Resetting the...
Operating Instructions
Page 11
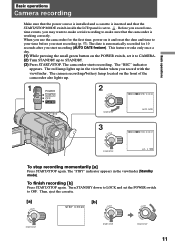
...the small green button on the POWER switch, set it and reset the date and time to CAMERA. (2) Turn STANDBY up in the viewfinder (Standby mode). Turn STANDBY down to LOCK and set to OFF. The camcorder starts recording. The "REC" indicator appears. The "STBY" indicator appears ...installed and a cassette is inserted and that the camcorder is working correctly. Before you record onetime events, you start recording (p. 57). The camera recording/battery lamp located on it to your time before you record with the viewfinder. STA [a] LOCK NDBY START/STOP [b] STBY 0:35:20 LOCK ...
...the small green button on the POWER switch, set it and reset the date and time to CAMERA. (2) Turn STANDBY up in the viewfinder (Standby mode). Turn STANDBY down to LOCK and set to OFF. The camcorder starts recording. The "REC" indicator appears. The "STBY" indicator appears ...installed and a cassette is inserted and that the camcorder is working correctly. Before you record onetime events, you start recording (p. 57). The camera recording/battery lamp located on it to your time before you record with the viewfinder. STA [a] LOCK NDBY START/STOP [b] STBY 0:35:20 LOCK ...
Operating Instructions
Page 12
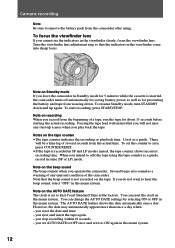
... beep sound The beep sounds when you play back the tape. The AUTO DATE feature shows the date automatically once a day. you reset the date and time. - Camera recording Note Be sure to remove the battery pack from the actual time. To set to ON again in the viewfinder come into sharp... focus. Note on recording When you record from wearing down and up scenes when you operate the camcorder. Note on the tape. you eject and...
... beep sound The beep sounds when you play back the tape. The AUTO DATE feature shows the date automatically once a day. you reset the date and time. - Camera recording Note Be sure to remove the battery pack from the actual time. To set to ON again in the viewfinder come into sharp... focus. Note on recording When you record from wearing down and up scenes when you operate the camcorder. Note on the tape. you eject and...
Operating Instructions
Page 28
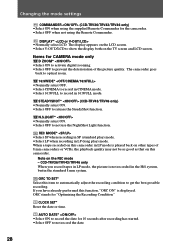
... camcorder in LP mode is not recorded in the Hi8 system, but in 16:9FULL mode. AUTO DATE* •Select ON to record the date for "Optimizing the Recording Condition." The display appears on other types of the picture quality. STEADYSHOT* (CCD-TRV43/TRV46 only) •Normally select ON... camcorder. When a tape recorded on this item to automatically adjust the recording condition to release the SteadyShot function. If you record tapes in LP (long play) mode. Items for the camcorder. •Select OFF when not using the supplied Remote Commander for CAMERA mode only D ZOOM* ...
... camcorder in LP mode is not recorded in the Hi8 system, but in 16:9FULL mode. AUTO DATE* •Select ON to record the date for "Optimizing the Recording Condition." The display appears on other types of the picture quality. STEADYSHOT* (CCD-TRV43/TRV46 only) •Normally select ON... camcorder. When a tape recorded on this item to automatically adjust the recording condition to release the SteadyShot function. If you record tapes in LP (long play) mode. Items for the camcorder. •Select OFF when not using the supplied Remote Commander for CAMERA mode only D ZOOM* ...
Operating Instructions
Page 39
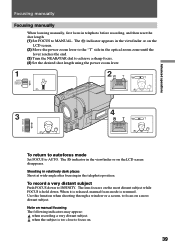
...2W T W T 3 4 WT W T FAR NEAR To return to autofocus mode Set FOCUS to focus on manual focusing The following indicators may appear: when recording a very distant subject. The lens focuses on the most distant subject. Use this function when shooting through a window or a screen, to focus on a most... screen. (2) Move the power zoom lever to MANUAL. Shooting in relatively dark places Shoot at wide-angle after focusing in telephoto before recording, and then reset the shot length. (1) Set FOCUS to the "T" side in the viewfinder or on the LCD screen disappears. Note on . 39 ...
...2W T W T 3 4 WT W T FAR NEAR To return to autofocus mode Set FOCUS to focus on manual focusing The following indicators may appear: when recording a very distant subject. The lens focuses on the most distant subject. Use this function when shooting through a window or a screen, to focus on a most... screen. (2) Move the power zoom lever to MANUAL. Shooting in relatively dark places Shoot at wide-angle after focusing in telephoto before recording, and then reset the shot length. (1) Set FOCUS to the "T" side in the viewfinder or on the LCD screen disappears. Note on . 39 ...

Operating Instructions
Page 47
...title. Press DATE (or TIME), then press TIME (or DATE) to select [M] then press the dial. The date and/or time indicator disappears. You can record the date or time displayed in the viewfinder or on which title you want to East Coast Standard time at the factory. Note You cannot.... To delete a title In step 4, turn the control dial to display the date and time together. Advanced operations Recording with the date and/or time Press DATE and/or TIME again. You can reset the clock in the camcorder The power goes off automatically. The clock is erased. Making your own titles...
...title. Press DATE (or TIME), then press TIME (or DATE) to select [M] then press the dial. The date and/or time indicator disappears. You can record the date or time displayed in the viewfinder or on which title you want to East Coast Standard time at the factory. Note You cannot.... To delete a title In step 4, turn the control dial to display the date and time together. Advanced operations Recording with the date and/or time Press DATE and/or TIME again. You can reset the clock in the camcorder The power goes off automatically. The clock is erased. Making your own titles...
Operating Instructions
Page 56
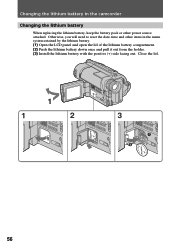
Changing the lithium battery in the menu system retained by the lithium battery. (1) Open the LCD panel and open the lid of the lithium battery compartment. (2) Push the lithium battery down once and pull it out from the holder. (3) Install the lithium battery with the positive (+) side facing out. Otherwise, you will need to reset the date, time and other items in the camcorder Changing the lithium battery When replacing the lithium battery, keep the battery pack or other power source attached. Close the lid. 1 1 2 5 3 5 CR 202 CR 202 56
Changing the lithium battery in the menu system retained by the lithium battery. (1) Open the LCD panel and open the lid of the lithium battery compartment. (2) Push the lithium battery down once and pull it out from the holder. (3) Install the lithium battery with the positive (+) side facing out. Otherwise, you will need to reset the date, time and other items in the camcorder Changing the lithium battery When replacing the lithium battery, keep the battery pack or other power source attached. Close the lid. 1 1 2 5 3 5 CR 202 CR 202 56

Operating Instructions
Page 57
... and time Press DATE to display the time indicator. When you press the same button again, the indicator goes off. Additional information Resetting the date and time You can reset the date and time in the menu system. (1) While the camcorder is in Standby mode, press MENU to display the menu. (2) Turn...
... and time Press DATE to display the time indicator. When you press the same button again, the indicator goes off. Additional information Resetting the date and time You can reset the date and time in the menu system. (1) While the camcorder is in Standby mode, press MENU to display the menu. (2) Turn...
Operating Instructions
Page 70
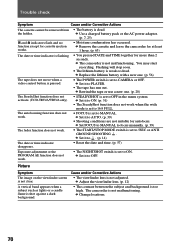
...recording. The autofocusing function does not work . • The START/STOP MODE switch is set to 5SEC or ANTI GROUND SHOOTING . m Set FOCUS to MANUAL to focus manually. (p. 39) The fader function does not work . • FOCUS is set to . (p. 14) The date or time indicator disappears. • Reset...not move when a video control button is pressed. • The POWER switch is not adjusted. m Set it to CAMERA or OFF. Picture Symptom... new one . (p. 20) The SteadyShot function does not activate. (CCD-TRV43/TRV46 only) • STEADYSHOT is flashing. • You pressed DATE and...
...recording. The autofocusing function does not work . • The START/STOP MODE switch is set to 5SEC or ANTI GROUND SHOOTING . m Set FOCUS to MANUAL to focus manually. (p. 39) The fader function does not work . • FOCUS is set to . (p. 14) The date or time indicator disappears. • Reset...not move when a video control button is pressed. • The POWER switch is not adjusted. m Set it to CAMERA or OFF. Picture Symptom... new one . (p. 20) The SteadyShot function does not activate. (CCD-TRV43/TRV46 only) • STEADYSHOT is flashing. • You pressed DATE and...

Operating Instructions
Page 76
Identifying the parts #∞ @ª COUNTER RESET button (p. 12) #º TIME button (p. 47) #¡ DATE button (p. 47) #™ DISPLAY button (p. 21) #£ TITLE button (p. 44) #¢ END SEARCH button (p. 23) #∞ PICTURE EFFECT button (p. 41) #§ #¶ #• #ª $º $¡ #§ START/STOP MODE switch (p. 14) #¶ BACK LIGHT button (p. 30) #• PROGRAM AE button (p. 37) #ª EXPOSURE button (p. 42) $º Control dial (p. 26) $¡ MENU button (p. 26) 76
Identifying the parts #∞ @ª COUNTER RESET button (p. 12) #º TIME button (p. 47) #¡ DATE button (p. 47) #™ DISPLAY button (p. 21) #£ TITLE button (p. 44) #¢ END SEARCH button (p. 23) #∞ PICTURE EFFECT button (p. 41) #§ #¶ #• #ª $º $¡ #§ START/STOP MODE switch (p. 14) #¶ BACK LIGHT button (p. 30) #• PROGRAM AE button (p. 37) #ª EXPOSURE button (p. 42) $º Control dial (p. 26) $¡ MENU button (p. 26) 76
Operating Instructions
Page 83
... information Index A, B Adjusting viewfinder 12 ANTI GROUND SHOOTING 14 Auto focus 39 Backlight 30 Beep 12 C, D Camera recording 11 Car battery 24 Charging battery 7 Cleaning video heads 64 Clock set 57 Connection 52 COUNTER RESET 12 DATE/TIME 47 DEMO 29, 80 Digital zoom 13 DISPLAY 21 E EDIT 29 Editing 54 EDITSEARCH 19 END... 12 Title 44 Tripod mounting 18 Trouble check 69 W, X, Y, Z Watching on a TV 52 WIDE mode 34 WORLD TIME 58 Zoom 13 R Rec review 19 Recording mode 28 Remote control jack (LANC) 77 Rewind 20 F, G, H, I, J, K FADER 31 House current 25 83
... information Index A, B Adjusting viewfinder 12 ANTI GROUND SHOOTING 14 Auto focus 39 Backlight 30 Beep 12 C, D Camera recording 11 Car battery 24 Charging battery 7 Cleaning video heads 64 Clock set 57 Connection 52 COUNTER RESET 12 DATE/TIME 47 DEMO 29, 80 Digital zoom 13 DISPLAY 21 E EDIT 29 Editing 54 EDITSEARCH 19 END... 12 Title 44 Tripod mounting 18 Trouble check 69 W, X, Y, Z Watching on a TV 52 WIDE mode 34 WORLD TIME 58 Zoom 13 R Rec review 19 Recording mode 28 Remote control jack (LANC) 77 Rewind 20 F, G, H, I, J, K FADER 31 House current 25 83


