Camera Operations Guide
Page 2
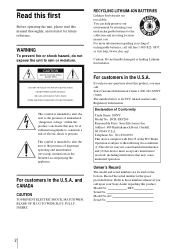
... may not cause harmful interference, and (2) this product. You can help preserve our environment by returning your Sony dealer regarding recycling of rechargeable batteries, call : Sony Customer Information Center 1-800-222-SONY (7669) The number below . Record the serial number in the literature accompanying the appliance. This symbol is intended to alert the user....AC- WARNING To prevent fire or shock hazard, do not expose the unit to persons. Read this first Before operating the unit, please read this manual thoroughly, and retain it for FCC related matters only.
... may not cause harmful interference, and (2) this product. You can help preserve our environment by returning your Sony dealer regarding recycling of rechargeable batteries, call : Sony Customer Information Center 1-800-222-SONY (7669) The number below . Record the serial number in the literature accompanying the appliance. This symbol is intended to alert the user....AC- WARNING To prevent fire or shock hazard, do not expose the unit to persons. Read this first Before operating the unit, please read this manual thoroughly, and retain it for FCC related matters only.

Camera Operations Guide
Page 3
...points and/ or bright points (white, red, blue, or green in this manual could void your authority to operate this equipment does cause harmful interference to radio ... Television programs, films, video tapes, and other device such as a VCR or a computer with an USB or i.LINK cable, be copyrighted. Be careful when placing the camera near a window or ... the copyright laws. CCD-TRV128: TRV128 CCD-TRV228: TRV228 CCD-TRV328: TRV328 CCD-TRV428: TRV428 DCR-TRV260: TRV260 DCR-TRV265: TRV265 Instructions with the instructions, may be contrary to Part 15 of recordings cannot be used in...
...points and/ or bright points (white, red, blue, or green in this manual could void your authority to operate this equipment does cause harmful interference to radio ... Television programs, films, video tapes, and other device such as a VCR or a computer with an USB or i.LINK cable, be copyrighted. Be careful when placing the camera near a window or ... the copyright laws. CCD-TRV128: TRV128 CCD-TRV228: TRV228 CCD-TRV328: TRV328 CCD-TRV428: TRV428 DCR-TRV260: TRV260 DCR-TRV265: TRV265 Instructions with the instructions, may be contrary to Part 15 of recordings cannot be used in...
Camera Operations Guide
Page 5
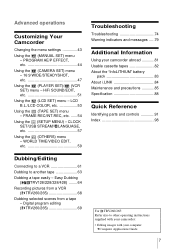
...18 Step 7: Setting the screen language 19 Recording Recording movies 21 Recording for backlit subjects 27 Adjusting the exposure manually 28 Recording in dark places - FADER 30 ,continued 5 Table of a scene - Tape photo recording ( TRV260/265 25 Recording with ease 10 Getting started Step 1: ... Using the built-in light 23 Recording in and out of Contents CCD-TRV128: CCD-TRV228: TRV128 CCD-TRV428: TRV428 TRV228 DCR-TRV260: TRV260 CCD-TRV328: TRV328 DCR-TRV265: TRV265 Read this first 2 Quick Start Guide Recording movies on a tape 8 Recording/Playing back with ease -
...18 Step 7: Setting the screen language 19 Recording Recording movies 21 Recording for backlit subjects 27 Adjusting the exposure manually 28 Recording in dark places - FADER 30 ,continued 5 Table of a scene - Tape photo recording ( TRV260/265 25 Recording with ease 10 Getting started Step 1: ... Using the built-in light 23 Recording in and out of Contents CCD-TRV128: CCD-TRV228: TRV128 CCD-TRV428: TRV428 TRV228 DCR-TRV260: TRV260 CCD-TRV328: TRV328 DCR-TRV265: TRV265 Read this first 2 Quick Start Guide Recording movies on a tape 8 Recording/Playing back with ease -
Camera Operations Guide
Page 7
...MANUAL SET) menu - HiFi SOUND/EDIT, etc 51 Using the (LCD SET) menu - WORLD TIME/VIDEO EDIT, etc 59 Troubleshooting Troubleshooting 74 Warning indicators and messages .....79 Additional Information Using your computer cComputer Applications Guide 7 CLOCK SET/USB STREAM/ LANGUAGE, etc 57 Using the (OTHERS) menu - Easy Dubbing ( TRV128/228/328/428) ........64 Recording.../Editing Connecting to a VCR 61 Dubbing to another tape 63 Dubbing a tape easily - PROGRAM AE/P EFFECT, etc 44 Using the (CAMERA SET) menu - 16:9 WIDE/STEADYSHOT, etc 47 Using the (PLAYER SET)/ (VCR SET) menu -
...MANUAL SET) menu - HiFi SOUND/EDIT, etc 51 Using the (LCD SET) menu - WORLD TIME/VIDEO EDIT, etc 59 Troubleshooting Troubleshooting 74 Warning indicators and messages .....79 Additional Information Using your computer cComputer Applications Guide 7 CLOCK SET/USB STREAM/ LANGUAGE, etc 57 Using the (OTHERS) menu - Easy Dubbing ( TRV128/228/328/428) ........64 Recording.../Editing Connecting to a VCR 61 Dubbing to another tape 63 Dubbing a tape easily - PROGRAM AE/P EFFECT, etc 44 Using the (CAMERA SET) menu - 16:9 WIDE/STEADYSHOT, etc 47 Using the (PLAYER SET)/ (VCR SET) menu -
Camera Operations Guide
Page 11
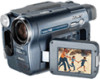
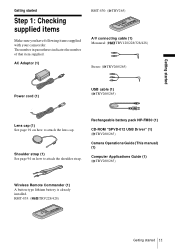
...items supplied with your camcorder. Rechargeable battery pack NP-FM30 (1) CD-ROM "SPVD-012 USB Driver" (1) ( TRV260/265) Camera Operations Guide (This manual) (1) Computer Applications Guide (1) ( TRV260/265) Wireless Remote Commander (1) A button-type lithium battery is already installed. AC ...Adaptor (1) RMT-830: ( TRV265) A/V connecting cable (1) Monaural: ( TRV128/228/328/428) Stereo: ( TRV260/265) Power cord (1) USB cable (1)...
...items supplied with your camcorder. Rechargeable battery pack NP-FM30 (1) CD-ROM "SPVD-012 USB Driver" (1) ( TRV260/265) Camera Operations Guide (This manual) (1) Computer Applications Guide (1) ( TRV260/265) Wireless Remote Commander (1) A button-type lithium battery is already installed. AC ...Adaptor (1) RMT-830: ( TRV265) A/V connecting cable (1) Monaural: ( TRV128/228/328/428) Stereo: ( TRV260/265) Power cord (1) USB cable (1)...
Camera Operations Guide
Page 17
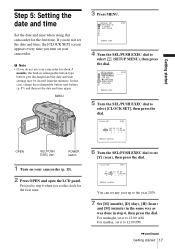
b Note • If you set the clock for the first time. 6 Turn the SEL/PUSH EXEC dial to set it to 12:00 AM. MANUAL SET PROGRAM AE P EFFECT AUTO SHTR STBY [MENU] : END 4 Turn the SEL/PUSH EXEC dial to select [CLOCK SET], then press the dial. For midday, ...
b Note • If you set the clock for the first time. 6 Turn the SEL/PUSH EXEC dial to set it to 12:00 AM. MANUAL SET PROGRAM AE P EFFECT AUTO SHTR STBY [MENU] : END 4 Turn the SEL/PUSH EXEC dial to select [CLOCK SET], then press the dial. For midday, ...
Camera Operations Guide
Page 19
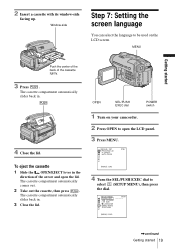
OPEN SEL/PUSH EXEC dial POWER switch 1 Turn on the LCD screen. MANUAL SET PROGRAM AE P EFFECT AUTO SHTR STBY [MENU] : END 4 Turn the SEL/PUSH EXEC dial to open the lid. The cassette compartment automatically slides back ...
OPEN SEL/PUSH EXEC dial POWER switch 1 Turn on the LCD screen. MANUAL SET PROGRAM AE P EFFECT AUTO SHTR STBY [MENU] : END 4 Turn the SEL/PUSH EXEC dial to open the lid. The cassette compartment automatically slides back ...

Camera Operations Guide
Page 25
... • The date and time indicators recorded manually cannot be deleted. OPEN PHOTO DATE CCD-TRV428 TIME Press DATE to the grip belt. Tape photo recording ( TRV260/265) You can record the date and/or time displayed on the screen superimposed on pictures ( TRV128/228/328 /428) You can record still images. POWER switch 1 Remove the lens...
... • The date and time indicators recorded manually cannot be deleted. OPEN PHOTO DATE CCD-TRV428 TIME Press DATE to the grip belt. Tape photo recording ( TRV260/265) You can record the date and/or time displayed on the screen superimposed on pictures ( TRV128/228/328 /428) You can record still images. POWER switch 1 Remove the lens...
Camera Operations Guide
Page 28
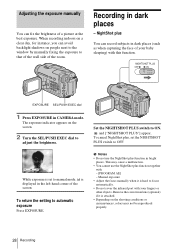
... • Do not use the NightShot plus , set to ON. To return the setting to OFF. Recording in CAMERA mode. Manual exposure • Adjust the focus manually when it is displayed in the left-hand corner of the screen. The exposure indicator appears on the screen. 2 Turn the SEL.../PUSH EXEC dial to that of the wall side of the room. When recording indoors on a clear day, for ...
... • Do not use the NightShot plus , set to ON. To return the setting to OFF. Recording in CAMERA mode. Manual exposure • Adjust the focus manually when it is displayed in the left-hand corner of the screen. The exposure indicator appears on the screen. 2 Turn the SEL.../PUSH EXEC dial to that of the wall side of the room. When recording indoors on a clear day, for ...
Camera Operations Guide
Page 29
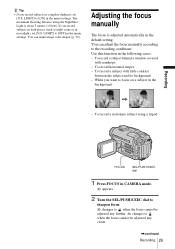
...when the focus cannot be adjusted any closer. ,continued Recording 29 To record a subject with raindrops. - LIGHT] to focus on a subject in the following cases. - Adjusting the focus manually The focus is about 3 meters (10 feet). To record horizontal stripes. - When you want to [ON] ...in moonlight), set [N.S. Use this function in the background. - The maximum shooting distance using a tripod. LIGHT] to [OFF] in CAMERA mode. 9 appears. 2 Turn...
...when the focus cannot be adjusted any closer. ,continued Recording 29 To record a subject with raindrops. - LIGHT] to focus on a subject in the following cases. - Adjusting the focus manually The focus is about 3 meters (10 feet). To record horizontal stripes. - When you want to [ON] ...in moonlight), set [N.S. Use this function in the background. - The maximum shooting distance using a tripod. LIGHT] to [OFF] in CAMERA mode. 9 appears. 2 Turn...

Camera Operations Guide
Page 30
... of a subject, move the power zoom lever towards W (wide angle) to adjust the zoom for focusing manually • It is easier to focus on the subject when you want to record a close-up image of a scene - FADER You can add the following effects to fully magnify the image..., then adjust the focus. Recording a picture using various effects FADER To adjust the focus automatically Press FOCUS again. Tips for recording. • When you use the zoom function. Move the power zoom lever towards T (telephoto) to...
... of a subject, move the power zoom lever towards W (wide angle) to adjust the zoom for focusing manually • It is easier to focus on the subject when you want to record a close-up image of a scene - FADER You can add the following effects to fully magnify the image..., then adjust the focus. Recording a picture using various effects FADER To adjust the focus automatically Press FOCUS again. Tips for recording. • When you use the zoom function. Move the power zoom lever towards T (telephoto) to...

Camera Operations Guide
Page 39
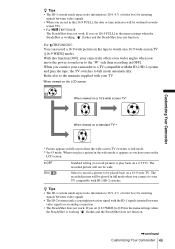
...: A/V OUT jack Yellow White Red VCRs or TVs Signal flow A/V connecting cable (supplied) VCRs or TVs ,continued Playback 39 Playing the picture on a TV For TRV128/228/328/428: A/V OUT jack Connect your camcorder to the wall outlet for the power supply (p. 12). Connect the supplied AC Adaptor to a TV using... the supplied A/V connecting cable as shown in the following illustration. To copy to be connected. Refer also to the instruction manuals supplied with the devices to another tape, see page 63.
...: A/V OUT jack Yellow White Red VCRs or TVs Signal flow A/V connecting cable (supplied) VCRs or TVs ,continued Playback 39 Playing the picture on a TV For TRV128/228/328/428: A/V OUT jack Connect your camcorder to the wall outlet for the power supply (p. 12). Connect the supplied AC Adaptor to a TV using... the supplied A/V connecting cable as shown in the following illustration. To copy to be connected. Refer also to the instruction manuals supplied with the devices to another tape, see page 63.
Camera Operations Guide
Page 43
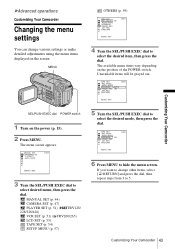
... EXEC dial to select the desired mode, then press the dial. TAPE SET REC MODE AUDIO MODE REMAIN AUTO FRAME REC ON I N T. MANUAL SET (p. 44) CAMERA SET (p. 47) PLAYER SET (p. 51) ( TRV128/ 228/328/428) VCR SET (p. 51) ( TRV260/265) LCD SET (p. 53) TAPE SET (p. 54) SETUP MENU (p. 57) 5 Turn the SEL/PUSH... Camcorder SEL/PUSH EXEC dial POWER switch 1 Turn on the position of the POWER switch. TAPE SET REC MODE AUDIO MODE REMAIN ON FRAME REC I N T. MANUAL SET PROGRAM AE P EFFECT AUTO SHTR STBY [MENU] : END 3 Turn the SEL/PUSH EXEC dial to hide the menu screen. If you want to change...
... EXEC dial to select the desired mode, then press the dial. TAPE SET REC MODE AUDIO MODE REMAIN AUTO FRAME REC ON I N T. MANUAL SET (p. 44) CAMERA SET (p. 47) PLAYER SET (p. 51) ( TRV128/ 228/328/428) VCR SET (p. 51) ( TRV260/265) LCD SET (p. 53) TAPE SET (p. 54) SETUP MENU (p. 57) 5 Turn the SEL/PUSH... Camcorder SEL/PUSH EXEC dial POWER switch 1 Turn on the position of the POWER switch. TAPE SET REC MODE AUDIO MODE REMAIN ON FRAME REC I N T. MANUAL SET PROGRAM AE P EFFECT AUTO SHTR STBY [MENU] : END 3 Turn the SEL/PUSH EXEC dial to hide the menu screen. If you want to change...
Camera Operations Guide
Page 44
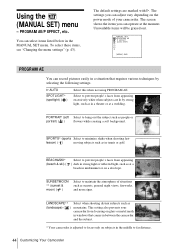
You can operate at the moment. G AUTO SPOTLIGHT* (spotlight) ( ) Select this when not using PROGRAM AE. MANUAL SET PROGRAM AE P EFFECT AUTO SHTR [MENU] : END PROGRAM AE You can adjust vary depending on subjects in between the camcorder and the subject....AE/P EFFECT, etc. Unavailable items will be grayed out. The screen shows the items you can record pictures easily in a situation that comes in the middle to minimize shake when shooting fast- Using the (MANUAL SET) menu - PORTRAIT (soft Select to prevent people's faces from appearing excessively white when subjects ...
You can operate at the moment. G AUTO SPOTLIGHT* (spotlight) ( ) Select this when not using PROGRAM AE. MANUAL SET PROGRAM AE P EFFECT AUTO SHTR [MENU] : END PROGRAM AE You can adjust vary depending on subjects in between the camcorder and the subject....AE/P EFFECT, etc. Unavailable items will be grayed out. The screen shows the items you can record pictures easily in a situation that comes in the middle to minimize shake when shooting fast- Using the (MANUAL SET) menu - PORTRAIT (soft Select to prevent people's faces from appearing excessively white when subjects ...
Camera Operations Guide
Page 48
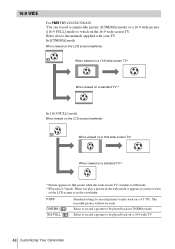
... in the viewfinder. The recorded picture will not be played back on a 16:9 wide TV. 48 Customizing Your Camcorder GOFF Standard setting (to record pictures to play a picture in the wide mode, it appears as you have seen on a 4:3 TV). CINEMA ( ) Select to record a picture to be played... back in CINEMA mode. 16:9 FULL ( ) Select to record a picture to be wide. Refer also to the manuals supplied with your TV. 16:9 WIDE For TRV128/228/328/428: You can record a cinema-like picture ([CINEMA] mode) or a 16:9...
... in the viewfinder. The recorded picture will not be played back on a 16:9 wide TV. 48 Customizing Your Camcorder GOFF Standard setting (to record pictures to play a picture in the wide mode, it appears as you have seen on a 4:3 TV). CINEMA ( ) Select to record a picture to be played... back in CINEMA mode. 16:9 FULL ( ) Select to record a picture to be wide. Refer also to the manuals supplied with your TV. 16:9 WIDE For TRV128/228/328/428: You can record a cinema-like picture ([CINEMA] mode) or a 16:9...
Camera Operations Guide
Page 49
... wider angles when you have seen on wide- The recorded picture will be widened on the LCD screen. Refer also to the manuals supplied with the ID-1 signals inserted between video signals. • The ID-2 system sends a copyright protection signal with your TV. The recorded picture will not be played back on the tape...
... wider angles when you have seen on wide- The recorded picture will be widened on the LCD screen. Refer also to the manuals supplied with the ID-1 signals inserted between video signals. • The ID-2 system sends a copyright protection signal with your TV. The recorded picture will not be played back on the tape...
Camera Operations Guide
Page 56
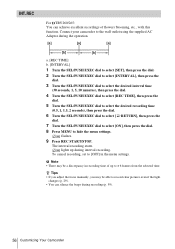
... REC START/STOP. z Tips • If you adjust the focus manually, you may be able to ± 6 frames from the selected time. The interval recording starts. lights up to record clear pictures even if the light changes (p. 29). • You can achieve excellent recordings of up during the operation. [a] [a] [a] [b] [b] a. [REC TIME] b. [INTERVAL] 1 Turn the...
... REC START/STOP. z Tips • If you adjust the focus manually, you may be able to ± 6 frames from the selected time. The interval recording starts. lights up to record clear pictures even if the light changes (p. 29). • You can achieve excellent recordings of up during the operation. [a] [a] [a] [b] [b] a. [REC TIME] b. [INTERVAL] 1 Turn the...
Camera Operations Guide
Page 76
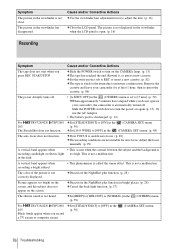
... stuck to the drum due to [OFF] in the viewfinder has disappeared. A vertical band appears when recording a bright subject. • This phenomenon is not a malfunction. This is called the smear effect....265: Black bands appear when you press REC START/STOP. The picture in the (CAMERA SET) menu. (p. 48) The auto focus does not function. The picture is not displayed... have elapsed while you do not operate your camcorder, the camcorder is not correctly displayed. Adjust the focus manually. (p. 29) A vertical band appears when • This occurs when the contrast between the subject and ...
... stuck to the drum due to [OFF] in the viewfinder has disappeared. A vertical band appears when recording a bright subject. • This phenomenon is not a malfunction. This is called the smear effect....265: Black bands appear when you press REC START/STOP. The picture in the (CAMERA SET) menu. (p. 48) The auto focus does not function. The picture is not displayed... have elapsed while you do not operate your camcorder, the camcorder is not correctly displayed. Adjust the focus manually. (p. 29) A vertical band appears when • This occurs when the contrast between the subject and ...
Camera Operations Guide
Page 97
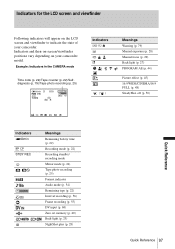
... and viewfinder to indicate the state of your camcorder model. Example: Indicators in the CAMERA mode Time code (p. 22)/Tape counter (p. 22)/Selfdiagnosis (p. 79)/Tape photo recording (p. 25) 60min STBY 0:00:00 Indicators Q E Z 9 . () Meanings Warning (p. 79) Manual exposure (p. 28) Manual focus (p. 29) Back light (p. 27) PROGRAM AE (p. 44) Picture effect (p. 45) 16:9 WIDE/CINEMA...
... and viewfinder to indicate the state of your camcorder model. Example: Indicators in the CAMERA mode Time code (p. 22)/Tape counter (p. 22)/Selfdiagnosis (p. 79)/Tape photo recording (p. 25) 60min STBY 0:00:00 Indicators Q E Z 9 . () Meanings Warning (p. 79) Manual exposure (p. 28) Manual focus (p. 29) Back light (p. 27) PROGRAM AE (p. 44) Picture effect (p. 45) 16:9 WIDE/CINEMA...
Camera Operations Guide
Page 98
... (CLOCK SET) 17, 57 COMMANDER 60 D Data code (DATA CODE 37, 59 Date search 41 Date/time 37 DEMO MODE 58 Digital program editing (VIDEO EDIT 69 Digital zoom (D ZOOM) ...47 Digital8 system 82 Display DISPLAY 60 Display indicator .........97 DNR 52 Dual sound track tape ........51 Dubbing 61 E ...LCD B.L 53 LCD brightness (LCD BRIGHT).......... 16 LCD COLOR 53 LCD screen 3 LP (Long Play) See Recording mode (REC MODE) LTR SIZE 57 M Main sound See HiFi SOUND Menu 43 CAMERA SET 47 LCD SET 53 MANUAL SET........... 44 OTHERS 59 PLAYER SET 51 SETUP MENU 57 TAPE SET 54 VCR SET 51...
... (CLOCK SET) 17, 57 COMMANDER 60 D Data code (DATA CODE 37, 59 Date search 41 Date/time 37 DEMO MODE 58 Digital program editing (VIDEO EDIT 69 Digital zoom (D ZOOM) ...47 Digital8 system 82 Display DISPLAY 60 Display indicator .........97 DNR 52 Dual sound track tape ........51 Dubbing 61 E ...LCD B.L 53 LCD brightness (LCD BRIGHT).......... 16 LCD COLOR 53 LCD screen 3 LP (Long Play) See Recording mode (REC MODE) LTR SIZE 57 M Main sound See HiFi SOUND Menu 43 CAMERA SET 47 LCD SET 53 MANUAL SET........... 44 OTHERS 59 PLAYER SET 51 SETUP MENU 57 TAPE SET 54 VCR SET 51...


