Operating Instructions
Page 2
...fire, do not cover the ventilation opening of fire or electric shock, do not attempt to disassemble the cabinet. Should you call upon your Sony dealer regarding this appliance is harmful to eyes, do not expose this Blu-ray Disc/DVD Home Theatre System is classified as a CLASS 3R...not expose the appliance to an easily accessible AC outlet. For the main unit and surround amplifier The nameplate is not disconnected from the mains, connect the unit to naked flame sources (for example, lighted candles). To prevent injury, this apparatus must be sure to indoor operations only. NOT...
...fire, do not cover the ventilation opening of fire or electric shock, do not attempt to disassemble the cabinet. Should you call upon your Sony dealer regarding this appliance is harmful to eyes, do not expose this Blu-ray Disc/DVD Home Theatre System is classified as a CLASS 3R...not expose the appliance to an easily accessible AC outlet. For the main unit and surround amplifier The nameplate is not disconnected from the mains, connect the unit to naked flame sources (for example, lighted candles). To prevent injury, this apparatus must be sure to indoor operations only. NOT...
Operating Instructions
Page 3
... cautioned that interference will turn on the RF transmitter, which the receiver is encouraged to try to persons. Connect the equipment into an outlet on , the user is connected. - CAUTION You are the only ways the digital baseband portion will not occur in this equipment. This equipment...more away from that may cause harmful interference to Part 15 of the aforementioned 3US Blu-ray Disc/DVD receiver (HBD-N9200W/HBD-N7200W/ HBD-N5200W) Surround amplifier (TA-SA700WR/TA-SA500WR) This equipment must be installed and operated keeping the radiator at the end of...
... cautioned that interference will turn on the RF transmitter, which the receiver is encouraged to try to persons. Connect the equipment into an outlet on , the user is connected. - CAUTION You are the only ways the digital baseband portion will not occur in this equipment. This equipment...more away from that may cause harmful interference to Part 15 of the aforementioned 3US Blu-ray Disc/DVD receiver (HBD-N9200W/HBD-N7200W/ HBD-N5200W) Surround amplifier (TA-SA700WR/TA-SA500WR) This equipment must be installed and operated keeping the radiator at the end of...

Operating Instructions
Page 4
... produce heat. 9) Do not defeat the safety purpose of fire or electric shock, do not expose this apparatus during lightning storms or when unused for connection to host computers and/or peripherals. packets is damaged, liquid has been spilled or objects have fallen into your safety. If the provided plug does...
... produce heat. 9) Do not defeat the safety purpose of fire or electric shock, do not expose this apparatus during lightning storms or when unused for connection to host computers and/or peripherals. packets is damaged, liquid has been spilled or objects have fallen into your safety. If the provided plug does...
Operating Instructions
Page 10
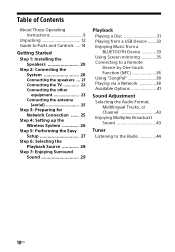
... .... 14 Getting Started Step 1: Installing the Speakers 20 Step 2: Connecting the System 20 Connecting the speakers ... 21 Connecting the TV 22 Connecting the other equipment 23 Connecting the antenna (aerial 25 Step 3: Preparing for Network Connection ...... 25 Step 4: Setting up the Wireless System 26 Step 5:...29 Playback Playing a Disc 31 Playing from a USB Device ....... 33 Enjoying Music from a BLUETOOTH Device 33 Using Screen mirroring 35 Connecting to a Remote Device by One-touch Function (NFC 36 Using "SongPal 38 Playing via a Network 38 Available Options 41 Sound ...
... .... 14 Getting Started Step 1: Installing the Speakers 20 Step 2: Connecting the System 20 Connecting the speakers ... 21 Connecting the TV 22 Connecting the other equipment 23 Connecting the antenna (aerial 25 Step 3: Preparing for Network Connection ...... 25 Step 4: Setting up the Wireless System 26 Step 5:...29 Playback Playing a Disc 31 Playing from a USB Device ....... 33 Enjoying Music from a BLUETOOTH Device 33 Using Screen mirroring 35 Connecting to a Remote Device by One-touch Function (NFC 36 Using "SongPal 38 Playing via a Network 38 Available Options 41 Sound ...

Operating Instructions
Page 14
Connection is detected: Flashes - B Disc lid (page 31) C Top panel display D (N-Mark) (page 36) Position the NFC-compatible device near this indication to activate the NFC ...
Connection is detected: Flashes - B Disc lid (page 31) C Top panel display D (N-Mark) (page 36) Position the NFC-compatible device near this indication to activate the NFC ...
Operating Instructions
Page 15
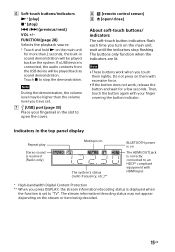
...the main unit for a few seconds. Do not press on them lightly. H (remote control sensor) I Z (open the cover. If a USB device is connected, the audio contents from the USB device will be played back as sound demonstration. Indicators in the slot to open /close) About soft-touch buttons... received (Radio only) Muting is on The system's status (radio frequency, etc.)** BLUETOOTH power is on The HDMI (OUT) jack is correctly connected to an HDCP* compliant equipment with HDMI input * High-bandwidth Digital Content Protection ** When you turn on the main unit, wait until the ...
...the main unit for a few seconds. Do not press on them lightly. H (remote control sensor) I Z (open the cover. If a USB device is connected, the audio contents from the USB device will be played back as sound demonstration. Indicators in the slot to open /close) About soft-touch buttons... received (Radio only) Muting is on The system's status (radio frequency, etc.)** BLUETOOTH power is on The HDMI (OUT) jack is correctly connected to an HDCP* compliant equipment with HDMI input * High-bandwidth Digital Content Protection ** When you turn on the main unit, wait until the ...
Operating Instructions
Page 18
.... F MIRRORING (pages 35, 38) Selects the "SCR M" function. Tip V/v are recorded on a BD-ROM/DVD VIDEO. 3D Converts 2D content into simulated 3D content when connected to the "BD/DVD" function. B/V/v/b Moves the highlight to the previous display. SEN Accesses the...
.... F MIRRORING (pages 35, 38) Selects the "SCR M" function. Tip V/v are recorded on a BD-ROM/DVD VIDEO. 3D Converts 2D content into simulated 3D content when connected to the "BD/DVD" function. B/V/v/b Moves the highlight to the previous display. SEN Accesses the...
Operating Instructions
Page 20
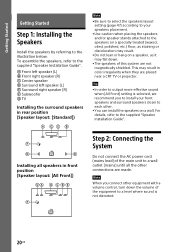
...Getting Started Getting Started Step 1: Installing the Speakers Install the speakers by referring to the supplied "Speaker Installation Guide". Note When you connect other equipment with a volume control, turn down the volume of the equipment to a level where sound is selected, we recommend you... to install your speakers placement. • Use caution when placing the speakers and/or speaker stands attached to each other connections are not magnetically shielded. This may result in front position (Speaker layout: [All Front]) DA G C B E F Note • Be...
...Getting Started Getting Started Step 1: Installing the Speakers Install the speakers by referring to the supplied "Speaker Installation Guide". Note When you connect other equipment with a volume control, turn down the volume of the equipment to a level where sound is selected, we recommend you... to install your speakers placement. • Use caution when placing the speakers and/or speaker stands attached to each other connections are not magnetically shielded. This may result in front position (Speaker layout: [All Front]) DA G C B E F Note • Be...

Operating Instructions
Page 21
To the main unit Red (Front right speaker (R)) Purple (Subwoofer) White Green (Front left (Center speaker (L)) speaker) To the surround amplifier Blue (Surround left speaker (L)) Gray (Surround right speaker (R)) 21US Getting Started Connecting the speakers Connect the speaker cords to insert the speaker connector until it clicks. Be sure to match the color of the SPEAKERS jacks of the main unit and surround amplifier.
To the main unit Red (Front right speaker (R)) Purple (Subwoofer) White Green (Front left (Center speaker (L)) speaker) To the surround amplifier Blue (Surround left speaker (L)) Gray (Surround right speaker (R)) 21US Getting Started Connecting the speakers Connect the speaker cords to insert the speaker connector until it clicks. Be sure to match the color of the SPEAKERS jacks of the main unit and surround amplifier.

Operating Instructions
Page 22
...your TV's ARC function, refer to the operating instructions supplied with your TV's HDMI jack is not compatible with an HDMI connection, without performing the B or C connection below. B High quality Optical digital cord (not supplied) DIGITAL OUT OPTICAL C Audio cable (not supplied) L AUDIO ... according to output sound through the system with the ARC function, make an appropriate audio connection (B or C) for listening to TV sound via the system's speakers. B C Video connection A HDMI cable1) (not supplied) A 2) or 1) High Speed HDMI cable 2) The Audio Return Channel (ARC)...
...your TV's ARC function, refer to the operating instructions supplied with your TV's HDMI jack is not compatible with an HDMI connection, without performing the B or C connection below. B High quality Optical digital cord (not supplied) DIGITAL OUT OPTICAL C Audio cable (not supplied) L AUDIO ... according to output sound through the system with the ARC function, make an appropriate audio connection (B or C) for listening to TV sound via the system's speakers. B C Video connection A HDMI cable1) (not supplied) A 2) or 1) High Speed HDMI cable 2) The Audio Return Channel (ARC)...

Operating Instructions
Page 23
... cannot enjoy the audio and video of the equipment. Getting Started Note To enjoy TV sound, select "TV" function for connection B or "AUDIO" function for connection A (HDMI connection). TV Video out* Equipment (Set-top box, VCR, PlayStation®, or digital satellite receiver, etc.) A System B, ...C Signal flow : Video signal : Audio signal * This connection is off or in standby mode. B C A 23US Select one of the following connection methods according to the jack type of the connected equipment on the TV through this system when the system is unnecessary for...
... cannot enjoy the audio and video of the equipment. Getting Started Note To enjoy TV sound, select "TV" function for connection B or "AUDIO" function for connection A (HDMI connection). TV Video out* Equipment (Set-top box, VCR, PlayStation®, or digital satellite receiver, etc.) A System B, ...C Signal flow : Video signal : Audio signal * This connection is off or in standby mode. B C A 23US Select one of the following connection methods according to the jack type of the connected equipment on the TV through this system when the system is unnecessary for...

Operating Instructions
Page 24
... Speed HDMI cable B Optical digital cord (not supplied) DIGITAL OUT OPTICAL C Audio cable (not supplied) L AUDIO OUTPUT R Standard quality When you make either connection above, set [Control for HDMI] in [Audio Settings] (page 57). For details, see [Audio Output] in [HDMI Settings] of [System Settings] to ...function is selected. • To output an audio signal from the HDMI (IN 1/2) jacks to the HDMI (OUT) jack, you make connection B, C Connect the system so that video signals from the system and other equipment are output to the TV, and audio signals from the equipment are output...
... Speed HDMI cable B Optical digital cord (not supplied) DIGITAL OUT OPTICAL C Audio cable (not supplied) L AUDIO OUTPUT R Standard quality When you make either connection above, set [Control for HDMI] in [Audio Settings] (page 57). For details, see [Audio Output] in [HDMI Settings] of [System Settings] to ...function is selected. • To output an audio signal from the HDMI (IN 1/2) jacks to the HDMI (OUT) jack, you make connection B, C Connect the system so that video signals from the system and other equipment are output to the TV, and audio signals from the equipment are output...

Operating Instructions
Page 25
Getting Started Connecting the antenna (aerial) Rear of the main unit or FM wire antenna (aerial) (supplied) Note • Be...100) terminal on your network, perform [Easy Network Settings]. Step 3: Preparing for Network Connection Tip To connect the system to fully extend the FM wire antenna (aerial). • After connecting the FM wire antenna (aerial), keep it as horizontal as possible. Select the method ..." (page 27). Tip If you have poor FM reception, use a 75-ohm coaxial cable (not supplied) to connect the main unit to the network by making the network settings. • If you can...
Getting Started Connecting the antenna (aerial) Rear of the main unit or FM wire antenna (aerial) (supplied) Note • Be...100) terminal on your network, perform [Easy Network Settings]. Step 3: Preparing for Network Connection Tip To connect the system to fully extend the FM wire antenna (aerial). • After connecting the FM wire antenna (aerial), keep it as horizontal as possible. Select the method ..." (page 27). Tip If you have poor FM reception, use a 75-ohm coaxial cable (not supplied) to connect the main unit to the network by making the network settings. • If you can...

Operating Instructions
Page 26
... security level than WEP. WEP is a security technology that there is established by radio waves, the wireless signal may be connected. To activate wireless transmission, perform the following website: http://www.sony.com/ blurayhtsupport/ - Keep in mind that uses an advanced security method distinct from intercepting communications or intruding into your wireless...
... security level than WEP. WEP is a security technology that there is established by radio waves, the wireless signal may be connected. To activate wireless transmission, perform the following website: http://www.sony.com/ blurayhtsupport/ - Keep in mind that uses an advanced security method distinct from intercepting communications or intruding into your wireless...
Operating Instructions
Page 27
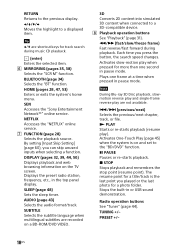
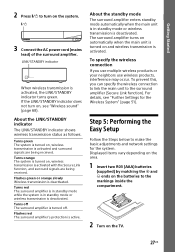
... the Secure Link function, and surround signals are being received. LINK/STANDBY indicator When wireless transmission is deactivated. To specify the wireless connection If you can specify the wireless connection to link the main unit to the markings inside the compartment. 2 Turn on the TV. 27US Step 5: Performing the Easy Setup Follow... the Steps below to turn on and wireless transmission is turned on the batteries to the surround amplifier (Secure Link function). "/1 3 Connect the AC power cord (mains lead) of the surround amplifier.
... the Secure Link function, and surround signals are being received. LINK/STANDBY indicator When wireless transmission is deactivated. To specify the wireless connection If you can specify the wireless connection to link the main unit to the markings inside the compartment. 2 Turn on the TV. 27US Step 5: Performing the Easy Setup Follow... the Steps below to turn on and wireless transmission is turned on the batteries to the surround amplifier (Secure Link function). "/1 3 Connect the AC power cord (mains lead) of the surround amplifier.
Operating Instructions
Page 28
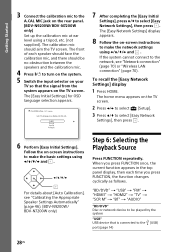
...follows. Getting Started 3 Connect the calibration mic to the A.CAL MIC jack on the TV screen. The calibration mic should be played by the system "USB" USB device that the signal from the system appears on the rear panel. (BDV-N9200W/BDV-N7200W only) Set up the... Press [/1 to turn on the system. 5 Switch the input selector on your TV so that is connected to the network, see "Calibrating the Appropriate Speaker Settings Automatically" (page 46). (BDV-N9200W/ BDV-N7200W only) Step 6: Selecting the Playback Source Press FUNCTION repeatedly. The home menu appears on the TV screen....
...follows. Getting Started 3 Connect the calibration mic to the A.CAL MIC jack on the TV screen. The calibration mic should be played by the system "USB" USB device that the signal from the system appears on the rear panel. (BDV-N9200W/BDV-N7200W only) Set up the... Press [/1 to turn on the system. 5 Switch the input selector on your TV so that is connected to the network, see "Calibrating the Appropriate Speaker Settings Automatically" (page 46). (BDV-N9200W/ BDV-N7200W only) Step 6: Selecting the Playback Source Press FUNCTION repeatedly. The home menu appears on the TV screen....
Operating Instructions
Page 29
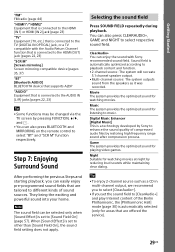
... selected (only for listening to [Sound Field On] (page 57). ClearAudio+ You can enjoy the sound with the Audio Return Channel function that is connected to the HDMI (OUT) jack (pages 22, 23) "SCR M" [Screen mirroring] Screen mirroring-compatible device (pages 35, 37) "BT" [...than [Sound Field On], the sound field setting does not apply. Digital Music Enhancer [Digital Music] This is a technology developed by Sony to different kinds of compressed audio files by restoring high frequency range sound after compression process. You can also press CLEARAUDIO+, GAME and...
... selected (only for listening to [Sound Field On] (page 57). ClearAudio+ You can enjoy the sound with the Audio Return Channel function that is connected to the HDMI (OUT) jack (pages 22, 23) "SCR M" [Screen mirroring] Screen mirroring-compatible device (pages 35, 37) "BT" [...than [Sound Field On], the sound field setting does not apply. Digital Music Enhancer [Digital Music] This is a technology developed by Sony to different kinds of compressed audio files by restoring high frequency range sound after compression process. You can also press CLEARAUDIO+, GAME and...

Operating Instructions
Page 31
... the football mode from the system appears on your TV screen. 2 Press Z, and place a disc on your TV so that can be downloaded for enjoyment. * 1 Connect the USB device to the (USB) port (page 33). Enjoying BONUSVIEW/ BD-LIVE Some BD-ROMs with "BD-LIVE Logo*" have bonus content and other...
... the football mode from the system appears on your TV screen. 2 Press Z, and place a disc on your TV so that can be downloaded for enjoyment. * 1 Connect the USB device to the (USB) port (page 33). Enjoying BONUSVIEW/ BD-LIVE Some BD-ROMs with "BD-LIVE Logo*" have bonus content and other...

Operating Instructions
Page 32
..., etc., by pressing DISPLAY. Refer to the operating instructions supplied with the 3D logo*. * 1 Prepare for Blu-ray 3D Disc playback. • Connect the system to [Allow] (page 58). 3 Insert a BD-ROM with BONUSVIEW/BD-LIVE. Refer to the operating instructions of your 3D-compatible TV ...). • Set [3D Output Setting] and [TV Screen Size Setting for BD-LIVE (BD-LIVE only). • Connect the system to a network (page 25). • Set [BD Internet Connection] to your 3D-compatible TV. All data stored in [Video], and press . A Output resolution/Video frequency B Title number...
..., etc., by pressing DISPLAY. Refer to the operating instructions supplied with the 3D logo*. * 1 Prepare for Blu-ray 3D Disc playback. • Connect the system to [Allow] (page 58). 3 Insert a BD-ROM with BONUSVIEW/BD-LIVE. Refer to the operating instructions of your 3D-compatible TV ...). • Set [3D Output Setting] and [TV Screen Size Setting for BD-LIVE (BD-LIVE only). • Connect the system to a network (page 25). • Set [BD Internet Connection] to your 3D-compatible TV. All data stored in [Video], and press . A Output resolution/Video frequency B Title number...
Operating Instructions
Page 33
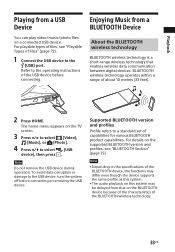
...the TV screen. 3 Press B/b to select [Video], [Music], or [Photo]. 4 Press V/v to the operating instructions of the USB device before connecting or removing the USB device. For details on the supported BLUETOOTH version and profiles, see "Playable Types of Files" (page 72... types of files, see "BLUETOOTH Section" (page 75). Enjoying Music from a USB Device You can play video/music/photo files on a connected USB device. Playback Playing from a BLUETOOTH Device About the BLUETOOTH wireless technology BLUETOOTH wireless technology is a short-range wireless technology that on the ...
...the TV screen. 3 Press B/b to select [Video], [Music], or [Photo]. 4 Press V/v to the operating instructions of the USB device before connecting or removing the USB device. For details on the supported BLUETOOTH version and profiles, see "Playable Types of Files" (page 72... types of files, see "BLUETOOTH Section" (page 75). Enjoying Music from a USB Device You can play video/music/photo files on a connected USB device. Playback Playing from a BLUETOOTH Device About the BLUETOOTH wireless technology BLUETOOTH wireless technology is a short-range wireless technology that on the ...


