Operating Instructions
Page 5
... is a mark of the Wi-Fi Alliance. • "Wi-Fi CERTIFIED™" and "WiFi Protected Setup™" are trademarks of the Wi-Fi Alliance. • "PhotoTV HD" and the "PhotoTV HD" logo are trademarks of Sony Corporation. • MPEG Layer-3 audio coding technology and patents licensed from Fraunhofer IIS and Thomson. •...
... is a mark of the Wi-Fi Alliance. • "Wi-Fi CERTIFIED™" and "WiFi Protected Setup™" are trademarks of the Wi-Fi Alliance. • "PhotoTV HD" and the "PhotoTV HD" logo are trademarks of Sony Corporation. • MPEG Layer-3 audio coding technology and patents licensed from Fraunhofer IIS and Thomson. •...

Operating Instructions
Page 7
...Step 2: Connecting the System... 20 Step 3: Connecting to the Network 27 Step 4: Setting up the Wireless System 28 Step 5: Performing the Easy Setup 29 Step 6: Selecting the Source ....... 30 Step 7: Enjoying Surround Sound 31 Playback Playing a Disc 34 Playing from a USB Device 35 Enjoying... 61 [BD/DVD Viewing Settings 62 [Parental Control Settings 63 [Music Settings 63 [System Settings 63 [Network Settings 64 [Easy Setup 65 [Resetting 65 Additional Information Precautions 66 Notes about the Discs 67 Troubleshooting 68 Playable Discs 74 Playable Types of Files 75 Supported...
...Step 2: Connecting the System... 20 Step 3: Connecting to the Network 27 Step 4: Setting up the Wireless System 28 Step 5: Performing the Easy Setup 29 Step 6: Selecting the Source ....... 30 Step 7: Enjoying Surround Sound 31 Playback Playing a Disc 34 Playing from a USB Device 35 Enjoying... 61 [BD/DVD Viewing Settings 62 [Parental Control Settings 63 [Music Settings 63 [System Settings 63 [Network Settings 64 [Easy Setup 65 [Resetting 65 Additional Information Precautions 66 Notes about the Discs 67 Troubleshooting 68 Playable Discs 74 Playable Types of Files 75 Supported...
Operating Instructions
Page 8
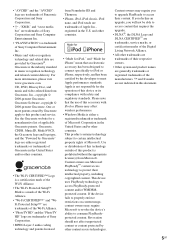
Unpacking BDV-E980W • Front speakers (2) • Speaker-bottom covers (4) • Calibration mic (1) • Bases (4) • Dock for iPod/iPhone (TDM-iP30) (1) • Surround speakers ...(4) • Wireless transceivers (2) • Screws (black) (12) • FM wire antenna (aerial) (1) or • Operating Instructions • Quick Setup Guide • Speaker Installation Guide • Software License Information • Easy Setup Disc (DVD) • Video cord (1) • Speaker cords (5, red/white/ green/gray/blue) • Remote commander (remote) (1) • R6 ...
Unpacking BDV-E980W • Front speakers (2) • Speaker-bottom covers (4) • Calibration mic (1) • Bases (4) • Dock for iPod/iPhone (TDM-iP30) (1) • Surround speakers ...(4) • Wireless transceivers (2) • Screws (black) (12) • FM wire antenna (aerial) (1) or • Operating Instructions • Quick Setup Guide • Speaker Installation Guide • Software License Information • Easy Setup Disc (DVD) • Video cord (1) • Speaker cords (5, red/white/ green/gray/blue) • Remote commander (remote) (1) • R6 ...
Operating Instructions
Page 9
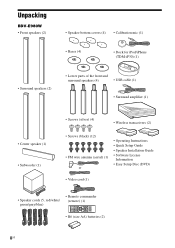
BDV-E780W • Front speakers (2) • Speaker cords (3, green/ gray/blue) • Dock for iPod/iPhone (TDM-iP30) (1) • Surround speakers (2) • Center speaker (1) • Subwoofer (1) ... (remote) (1) • Wireless transceivers (2) • R6 (size AA) batteries (2) • Calibration mic (1) • Operating Instructions • Quick Setup Guide • Speaker Installation Guide • Software License Information • Easy Setup Disc (DVD) Preparing the remote Insert two R6 (size AA) batteries (supplied) by matching the 3 and # ends on the batteries...
BDV-E780W • Front speakers (2) • Speaker cords (3, green/ gray/blue) • Dock for iPod/iPhone (TDM-iP30) (1) • Surround speakers (2) • Center speaker (1) • Subwoofer (1) ... (remote) (1) • Wireless transceivers (2) • R6 (size AA) batteries (2) • Calibration mic (1) • Operating Instructions • Quick Setup Guide • Speaker Installation Guide • Software License Information • Easy Setup Disc (DVD) Preparing the remote Insert two R6 (size AA) batteries (supplied) by matching the 3 and # ends on the batteries...

Operating Instructions
Page 23
...TV sound via the system. When connecting with a component video cable, you need to select the type of output signal when performing the Easy Setup (page 29). You do not need to select the type of connections. For connection details, see "Connecting the other types of output signal in... the Easy Setup (page 29). For setting the Audio Return Channel function, see "[HDMI Settings]" (page 64). When connecting with an HDMI cable, you need to...
...TV sound via the system. When connecting with a component video cable, you need to select the type of output signal when performing the Easy Setup (page 29). You do not need to select the type of connections. For connection details, see "Connecting the other types of output signal in... the Easy Setup (page 29). For setting the Audio Return Channel function, see "[HDMI Settings]" (page 64). When connecting with an HDMI cable, you need to...
Operating Instructions
Page 29
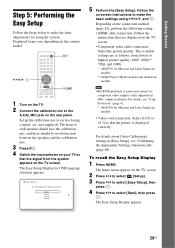
... follows, from the system appears on the TV screen. For details, see "Calibrating the Appropriate Settings Automatically" (page 48). To recall the Easy Setup Display 1 Press HOME. Displayed items vary depending on the country model. 123 456 789 0 "/1 C/X/x/c, HOME 1 Turn on the TV. 2 ... MIC jack on the TV screen. • Component video cable connection: Select the picture quality. For details about [Auto Calibration] settings in [Easy Setup], see "Copy Protection" (page 4). * 480i/576i for Mexican and Latin American models. • Video cord connection: Select [16:9] or [4:3] so...
... follows, from the system appears on the TV screen. For details, see "Calibrating the Appropriate Settings Automatically" (page 48). To recall the Easy Setup Display 1 Press HOME. Displayed items vary depending on the country model. 123 456 789 0 "/1 C/X/x/c, HOME 1 Turn on the TV. 2 ... MIC jack on the TV screen. • Component video cable connection: Select the picture quality. For details about [Auto Calibration] settings in [Easy Setup], see "Copy Protection" (page 4). * 480i/576i for Mexican and Latin American models. • Video cord connection: Select [16:9] or [4:3] so...
Operating Instructions
Page 32
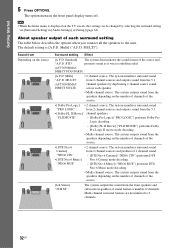
... STANDARD) [A.F.D. About speaker output of each speaker. • Multi-channel source: The system outputs sound from the speakers depending on the number of channels of [Setup] (page 62). Surround setting Effect [A.F.D. Multi] "A.F.D. "PLII MOVIE" - [Dolby Pro Logic] ("PRO LOGIC") performs Dolby Pro Logic decoding. - [Dolby PL II Movie] ("PLII MOVIE") performs...
... STANDARD) [A.F.D. About speaker output of each speaker. • Multi-channel source: The system outputs sound from the speakers depending on the number of channels of [Setup] (page 62). Surround setting Effect [A.F.D. Multi] "A.F.D. "PLII MOVIE" - [Dolby Pro Logic] ("PRO LOGIC") performs Dolby Pro Logic decoding. - [Dolby PL II Movie] ("PLII MOVIE") performs...
Operating Instructions
Page 48
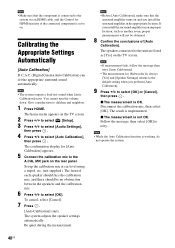
... [Auto Calibration]. • The measurement for [Auto Calibration] appears. 5 Connect the calibration mic to the A.CAL MIC jack on the TV screen. 2 Press C/c to select [Setup]. 3 Press X/x to select [Audio Settings], then press . 4 Press X/x to select [OK]. Set up the calibration mic at ear level using a tripod, etc. (not supplied). x The...
... [Auto Calibration]. • The measurement for [Auto Calibration] appears. 5 Connect the calibration mic to the A.CAL MIC jack on the TV screen. 2 Press C/c to select [Setup]. 3 Press X/x to select [Audio Settings], then press . 4 Press X/x to select [OK]. Set up the calibration mic at ear level using a tripod, etc. (not supplied). x The...
Operating Instructions
Page 49
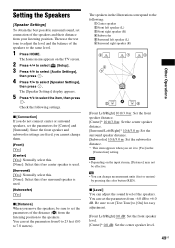
... sure to set the parameters of the speakers to 7.0 meters). The speakers in the [Connection] setting. • Depending on the TV screen. 2 Press C/c to select [Setup]. 3 Press X/x to select [Audio Settings], then press . 4 Press X/x to [On] for [Center] and [Surround]. Other Operations Setting the Speakers [Speaker Settings] To obtain the best...
... sure to set the parameters of the speakers to 7.0 meters). The speakers in the [Connection] setting. • Depending on the TV screen. 2 Press C/c to select [Setup]. 3 Press X/x to select [Audio Settings], then press . 4 Press X/x to [On] for [Center] and [Surround]. Other Operations Setting the Speakers [Speaker Settings] To obtain the best...

Operating Instructions
Page 52
... button you pressed) starts flashing. 8 When the TV or STB operation mode button starts flashing, enter the code on the TV screen. 2 Press C/c to select [Setup]. 3 Press X/x to select [Remote Controller Setting Guide], then press . 4 Press X/x to select [Preset Mode], then press . 5 Press X/x to select the component type that the following...
... button you pressed) starts flashing. 8 When the TV or STB operation mode button starts flashing, enter the code on the TV screen. 2 Press C/c to select [Setup]. 3 Press X/x to select [Remote Controller Setting Guide], then press . 4 Press X/x to select [Preset Mode], then press . 5 Press X/x to select the component type that the following...

Operating Instructions
Page 54
... to enter characters while browsing a website. [Break] Moves the cursor to select [Wireless Sound Connection], then press . Items Details [Browser Setup] Displays the Internet Browser settings. • [Zoom]: Increases or decreases the size of all currently opened websites. The home menu appears on... the TV screen. 2 Press C/c to select [Setup]. 3 Press X/x to select [System Settings], then press . 4 Press X/x to the next line in the text input field. [Delete] Erases one...
... to enter characters while browsing a website. [Break] Moves the cursor to select [Wireless Sound Connection], then press . Items Details [Browser Setup] Displays the Internet Browser settings. • [Zoom]: Increases or decreases the size of all currently opened websites. The home menu appears on... the TV screen. 2 Press C/c to select [Setup]. 3 Press X/x to select [System Settings], then press . 4 Press X/x to the next line in the text input field. [Delete] Erases one...

Operating Instructions
Page 55
... unit and the LINK/STANDBY indicator turns orange. If the message [Cannot set Secure Link.] appears, follow the on the TV screen. 2 Press C/c to select [Setup]. 3 Press X/x to select [System Settings], then press . 4 Press X/x to select [Wireless Sound Connection], then press . The [Wireless Sound Connection] display appears. 5 Press X/x to select [RF...
... unit and the LINK/STANDBY indicator turns orange. If the message [Cannot set Secure Link.] appears, follow the on the TV screen. 2 Press C/c to select [Setup]. 3 Press X/x to select [System Settings], then press . 4 Press X/x to select [Wireless Sound Connection], then press . The [Wireless Sound Connection] display appears. 5 Press X/x to select [RF...

Operating Instructions
Page 56
...sony.com/LA 56US When connecting to the LAN with the router. • For more information, go to select [Custom], then press . The system performs the network setting automatically, and internet settings appear on the [Internet Settings] display, then press . 2 Press X/x to the following URL. The setup...on the [Internet Settings] display, then press . 2 Press X/x to select [Save & Connect], then press . 2 Press C/c to select [Setup]. 3 Press X/x to select [Network Settings], then press . 4 Press X/x to the Internet. For details, refer to the instruction manuals that need to select...
...sony.com/LA 56US When connecting to the LAN with the router. • For more information, go to select [Custom], then press . The system performs the network setting automatically, and internet settings appear on the [Internet Settings] display, then press . 2 Press X/x to the following URL. The setup...on the [Internet Settings] display, then press . 2 Press X/x to select [Save & Connect], then press . 2 Press C/c to select [Setup]. 3 Press X/x to select [Network Settings], then press . 4 Press X/x to the Internet. For details, refer to the instruction manuals that need to select...

Operating Instructions
Page 57
...press . 2 Press X/x to select [Scan], then press . The system starts checking the network connection. 7 Check that the message [Wi-Fi Protected Setup was successful.] appears, then press c. When your wireless router is not used. • [Yes]: Enter the proxy server setting. Follow Steps 4 to...router, press X/x to 7 of your router. 4 Check that the message [Internet Settings is not compatible with a LAN cable" above. Setup of the internet settings appears on -screen messages. Next, enter the proxy server setting. Press C/X/x/c and the number buttons to set the ...
...press . 2 Press X/x to select [Scan], then press . The system starts checking the network connection. 7 Check that the message [Wi-Fi Protected Setup was successful.] appears, then press c. When your wireless router is not used. • [Yes]: Enter the proxy server setting. Follow Steps 4 to...router, press X/x to 7 of your router. 4 Check that the message [Internet Settings is not compatible with a LAN cable" above. Setup of the internet settings appears on -screen messages. Next, enter the proxy server setting. Press C/X/x/c and the number buttons to set the ...

Operating Instructions
Page 58
... Keep in response to interception. TKIP assures a higher security level than WEP or TKIP. 58US Setup of wireless LAN connectivity is a risk of unauthorized access or interception of WEP. Setup of wireless LAN connectivity is finished. x When the selected wireless LAN is finished. The input... or "Manual setting" in accordance with a LAN cable" above . 3 Press X/x to Step 5. x When the selected wireless LAN is unsecured Setup of wireless LAN connectivity is secured The display for entering a WEP or WPA key appears. Go to select the wireless LAN name, then press ....
... Keep in response to interception. TKIP assures a higher security level than WEP or TKIP. 58US Setup of wireless LAN connectivity is a risk of unauthorized access or interception of WEP. Setup of wireless LAN connectivity is finished. x When the selected wireless LAN is finished. The input... or "Manual setting" in accordance with a LAN cable" above . 3 Press X/x to Step 5. x When the selected wireless LAN is unsecured Setup of wireless LAN connectivity is secured The display for entering a WEP or WPA key appears. Go to select the wireless LAN name, then press ....

Operating Instructions
Page 59
...63) Makes the system-related settings. [Network Settings] (page 64) Makes detailed settings for Internet and network. [Easy Setup] (page 65) Re-runs the Easy Setup to make various adjustments of the system. Example: [Screen Settings] Icon Explanation [Screen Settings] (page 60) Makes the... system. Icon Explanation [Remote Controller Setting Guide] (page 59) Makes the remote settings for controlling non-Sony components. Settings and Adjustments Settings and Adjustments Using the Setup Display You can make the basic settings. [Resetting] (page 65) Resets the system to change, then...
...63) Makes the system-related settings. [Network Settings] (page 64) Makes detailed settings for Internet and network. [Easy Setup] (page 65) Re-runs the Easy Setup to make various adjustments of the system. Example: [Screen Settings] Icon Explanation [Screen Settings] (page 60) Makes the... system. Icon Explanation [Remote Controller Setting Guide] (page 59) Makes the remote settings for controlling non-Sony components. Settings and Adjustments Settings and Adjustments Using the Setup Display You can make the basic settings. [Resetting] (page 65) Resets the system to change, then...
Operating Instructions
Page 65
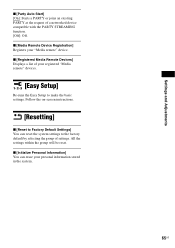
... can reset the system settings to make the basic settings. x [Registered Media Remote Devices] Displays a list of your registered "Media remote" devices. [Easy Setup] Re-runs the Easy Setup to the factory default by selecting the group of a networked device compatible with the PARTY STREAMING function. [Off]: Off. Settings and Adjustments x [Party...
... can reset the system settings to make the basic settings. x [Registered Media Remote Devices] Displays a list of your registered "Media remote" devices. [Easy Setup] Re-runs the Easy Setup to the factory default by selecting the group of a networked device compatible with the PARTY STREAMING function. [Off]: Off. Settings and Adjustments x [Party...
Operating Instructions
Page 68
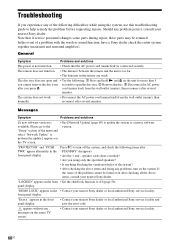
... after several minutes. panel display. front panel display. "Exxxx" appears in the front panel display. • Contact your nearest Sony dealer or local authorized Sony service facility. 68US Troubleshooting If you experience any of the following : 1 Press and hold N and Z on . •... checking the above items, consult your nearest Sony dealer. General Symptom Problems and solutions The power is not turned on the unit for more than 5 you press Z. "Setup" section of a problem with the wireless sound function, have a Sony dealer check the entire system together (main ...
... after several minutes. panel display. front panel display. "Exxxx" appears in the front panel display. • Contact your nearest Sony dealer or local authorized Sony service facility. 68US Troubleshooting If you experience any of the following : 1 Press and hold N and Z on . •... checking the above items, consult your nearest Sony dealer. General Symptom Problems and solutions The power is not turned on the unit for more than 5 you press Z. "Setup" section of a problem with the wireless sound function, have a Sony dealer check the entire system together (main ...
Operating Instructions
Page 73
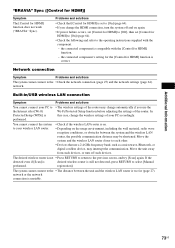
Problems and solutions • Check that use the Wi-Fi Protected Setup function before adjusting the settings of the router. Move the system and the wireless LAN router closer to each other. • Devices that [Control for ...HDMI] is set [Control for HDMI] to [On] (page 64). • Check the following and refer to the Internet after [Wi-Fi Protected Setup (WPS)] is performed. • The wireless settings of your wireless LAN router. • Check if the wireless LAN router is on. • Depending on again...
Problems and solutions • Check that use the Wi-Fi Protected Setup function before adjusting the settings of the router. Move the system and the wireless LAN router closer to each other. • Devices that [Control for ...HDMI] is set [Control for HDMI] to [On] (page 64). • Check the following and refer to the Internet after [Wi-Fi Protected Setup (WPS)] is performed. • The wireless settings of your wireless LAN router. • Check if the wireless LAN router is on. • Depending on again...

Operating Instructions
Page 80
..., 64 D D.C.A.C. (Digital Cinema Auto Calibration) 48 DLNA 38, 64 Dolby Digital 43 DTS 43 DVD 74 DVD Aspect Ratio 60 DVD Parental Control 63 E Easy Setup 29, 65 80US F FM Mode 45 Front panel 10 Front panel display 11 G Gracenote Settings 64 H HDMI YCbCr/RGB (HDMI) 61 HDMI Deep Color Output...
..., 64 D D.C.A.C. (Digital Cinema Auto Calibration) 48 DLNA 38, 64 Dolby Digital 43 DTS 43 DVD 74 DVD Aspect Ratio 60 DVD Parental Control 63 E Easy Setup 29, 65 80US F FM Mode 45 Front panel 10 Front panel display 11 G Gracenote Settings 64 H HDMI YCbCr/RGB (HDMI) 61 HDMI Deep Color Output...

