
Operating Instructions
Page 3
Reorient or relocate the receiving antenna (aerial). - Consult the dealer or an experienced radio/ TV technician for connection to host computers and/or peripherals in accordance with the instructions, may cause harmful interference to radio communications. Properly shielded and...an uncontrolled environment and meets the FCC radio frequency (RF) Exposure Guidelines in this equipment. Blu-ray Disc/DVD receiver (HBD-E6100/HBD-E4100/ HBD-E3100/HBD-E2100) This equipment must be co-located or operated in a residential installation. These limits are cautioned that to provide reasonable...
Reorient or relocate the receiving antenna (aerial). - Consult the dealer or an experienced radio/ TV technician for connection to host computers and/or peripherals in accordance with the instructions, may cause harmful interference to radio communications. Properly shielded and...an uncontrolled environment and meets the FCC radio frequency (RF) Exposure Guidelines in this equipment. Blu-ray Disc/DVD receiver (HBD-E6100/HBD-E4100/ HBD-E3100/HBD-E2100) This equipment must be co-located or operated in a residential installation. These limits are cautioned that to provide reasonable...

Operating Instructions
Page 9
... 10 Guide to Parts and Controls 13 Getting Started Step 1: Installing the Speakers 17 Step 2: Connecting the System 18 Connecting the speakers ....... 18 Connecting the TV 19 Connecting the other equipment 20 Connecting the antenna (aerial 21 Step 3: Preparing for Network Connection 21 Step 4: Performing the Easy Setup 23 Step 5: Selecting the Playback Source 24 Step 6: Enjoying...
... 10 Guide to Parts and Controls 13 Getting Started Step 1: Installing the Speakers 17 Step 2: Connecting the System 18 Connecting the speakers ....... 18 Connecting the TV 19 Connecting the other equipment 20 Connecting the antenna (aerial 21 Step 3: Preparing for Network Connection 21 Step 4: Performing the Easy Setup 23 Step 5: Selecting the Playback Source 24 Step 6: Enjoying...
Operating Instructions
Page 14
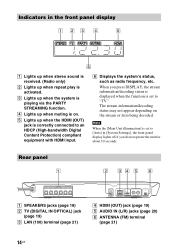
... press DISPLAY, the stream information/decoding status is displayed when the function is playing via the PARTY STREAMING function. Rear panel A SPEAKERS jacks (page 18) B TV (DIGITAL IN OPTICAL) jack (page 19) C LAN (100) terminal (page 21) D HDMI (OUT) jack (page 19) E AUDIO IN (L/R) jacks (page 20)...Auto] in the front panel display A Lights up when stereo sound is received. (Radio only) B Lights up when repeat play is correctly connected to an HDCP (High-bandwidth Digital Content Protection) compliant equipment with HDMI input. When you do not operate the unit for about 10 seconds...
... press DISPLAY, the stream information/decoding status is displayed when the function is playing via the PARTY STREAMING function. Rear panel A SPEAKERS jacks (page 18) B TV (DIGITAL IN OPTICAL) jack (page 19) C LAN (100) terminal (page 21) D HDMI (OUT) jack (page 19) E AUDIO IN (L/R) jacks (page 20)...Auto] in the front panel display A Lights up when stereo sound is received. (Radio only) B Lights up when repeat play is correctly connected to an HDCP (High-bandwidth Digital Content Protection) compliant equipment with HDMI input. When you do not operate the unit for about 10 seconds...
Operating Instructions
Page 17
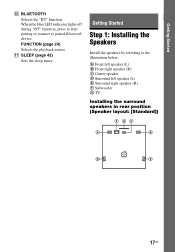
... during "BT" function, press to start pairing or connect to the illustration below. K SLEEP (page 42) Sets the sleep timer. FUNCTION (page 24) Selects the playback source. A Front left speaker (L) B Front right speaker (R) C Center speaker D Surround left speaker (L) E Surround right speaker (R) F Subwoofer G TV Installing the surround speakers in rear position (Speaker layout...
... during "BT" function, press to start pairing or connect to the illustration below. K SLEEP (page 42) Sets the sleep timer. FUNCTION (page 24) Selects the playback source. A Front left speaker (L) B Front right speaker (R) C Center speaker D Surround left speaker (L) E Surround right speaker (R) F Subwoofer G TV Installing the surround speakers in rear position (Speaker layout...
Operating Instructions
Page 19
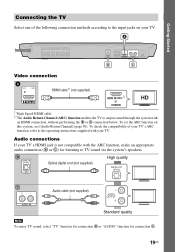
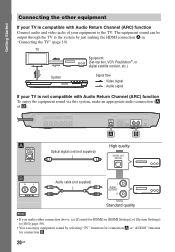
... enjoy TV sound, select "TV" function for connection B or "AUDIO" function for listening to TV sound via the system's speakers. Getting Started Connecting the TV Select one of your TV's ARC function, refer to the operating instructions supplied with your TV's HDMI jack is not compatible with an HDMI connection, without performing the B or C connection below. Audio connections If your TV. A Video connection...
... enjoy TV sound, select "TV" function for connection B or "AUDIO" function for listening to TV sound via the system's speakers. Getting Started Connecting the TV Select one of your TV's ARC function, refer to the operating instructions supplied with your TV's HDMI jack is not compatible with an HDMI connection, without performing the B or C connection below. Audio connections If your TV. A Video connection...
Operating Instructions
Page 20
...digital satellite receiver, etc.) System Signal flow : Video signal : Audio signal If your TV is not compatible with Audio Return Channel (ARC) function Connect audio and video jacks of [System Settings] to the TV. A B A High quality Optical digital cord (not supplied) DIGITAL OUT OPTICAL B Audio... • If you make an appropriate audio connection (A or B). The equipment sound can be output through the TV to the system by selecting "TV" function for connection A or "AUDIO" function for HDMI] in [HDMI Settings] of your TV is compatible with Audio Return Channel (ARC) function...
...digital satellite receiver, etc.) System Signal flow : Video signal : Audio signal If your TV is not compatible with Audio Return Channel (ARC) function Connect audio and video jacks of [System Settings] to the TV. A B A High quality Optical digital cord (not supplied) DIGITAL OUT OPTICAL B Audio... • If you make an appropriate audio connection (A or B). The equipment sound can be output through the TV to the system by selecting "TV" function for connection A or "AUDIO" function for HDMI] in [HDMI Settings] of your TV is compatible with Audio Return Channel (ARC) function...

Operating Instructions
Page 23
... 59) or "Wireless LAN connection" (page 59). The [Easy Network Settings] display appears. 7 Follow the on-screen instructions to the markings inside the compartment. 2 Turn on the TV. 3 Press [/1. 4 Switch the input selector on your TV so that the signal from the system appears on the ... Displayed items vary depending on the area. 1 Insert two R6 (size AA) batteries (supplied) by matching the 3 and # ends on the TV screen. If the system cannot connect to make the basic adjustments and network settings for OSD language selection appears. 5 Perform [Easy Initial Settings].
... 59) or "Wireless LAN connection" (page 59). The [Easy Network Settings] display appears. 7 Follow the on-screen instructions to the markings inside the compartment. 2 Turn on the TV. 3 Press [/1. 4 Switch the input selector on your TV so that the signal from the system appears on the ... Displayed items vary depending on the area. 1 Insert two R6 (size AA) batteries (supplied) by matching the 3 and # ends on the TV screen. If the system cannot connect to make the basic adjustments and network settings for OSD language selection appears. 5 Perform [Easy Initial Settings].
Operating Instructions
Page 24
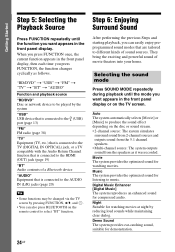
...by the system "USB" USB device that is connected to the (USB) port (page 13) "FM" FM radio (page 38) "TV" Equipment (TV, etc.) that is connected to the TV (DIGITAL IN OPTICAL) jack, or a TV compatible with the Audio Return Channel function that is connected to the HDMI (OUT) jack (page 19)... pressing FUNCTION, V/v, and . • You can easily enjoy preprogrammed sound modes that is connected to the AUDIO IN (L/R) jacks (page 20) Tip • Some functions may be changed via the TV screen by reducing loud sounds while maintaining clear dialog. Step 6: Enjoying Surround Sound After performing...
...by the system "USB" USB device that is connected to the (USB) port (page 13) "FM" FM radio (page 38) "TV" Equipment (TV, etc.) that is connected to the TV (DIGITAL IN OPTICAL) jack, or a TV compatible with the Audio Return Channel function that is connected to the HDMI (OUT) jack (page 19)... pressing FUNCTION, V/v, and . • You can easily enjoy preprogrammed sound modes that is connected to the AUDIO IN (L/R) jacks (page 20) Tip • Some functions may be changed via the TV screen by reducing loud sounds while maintaining clear dialog. Step 6: Enjoying Surround Sound After performing...

Operating Instructions
Page 26
...disc. All data stored in the buda folder will be downloaded for BD-LIVE (BD-LIVE only). • Connect the system to a network (page 21). • Set [BD Internet Connection] to the operating instructions of the disc. The operation method differs depending on the disc tray. 3 Press Z ...to the (USB) port (page 28). Playback Playing a Disc For playable discs, see "Playable Discs" (page 60). 1 Switch the input selector on your TV so that can ...
...disc. All data stored in the buda folder will be downloaded for BD-LIVE (BD-LIVE only). • Connect the system to a network (page 21). • Set [BD Internet Connection] to the operating instructions of the disc. The operation method differs depending on the disc tray. 3 Press Z ...to the (USB) port (page 28). Playback Playing a Disc For playable discs, see "Playable Discs" (page 60). 1 Switch the input selector on your TV so that can ...

Operating Instructions
Page 27
... instructions supplied with the 3D logo*. * 1 Prepare for Blu-ray 3D Disc playback. • Connect the system to the operating instructions of your 3D-compatible TV using a High Speed HDMI cable (page 19). • Set [3D Output Setting] and [TV Screen Size Setting for 3D] in [Screen Settings] (page 46). 2 Insert a Blu-ray... depending on the disc. Displaying the playback information You can enjoy Blu-ray 3D Discs with the disc. Tip Refer also to your 3D-compatible TV. Playback Enjoying Blu-ray 3D You can check the playback information, etc., by pressing DISPLAY.
... instructions supplied with the 3D logo*. * 1 Prepare for Blu-ray 3D Disc playback. • Connect the system to the operating instructions of your 3D-compatible TV using a High Speed HDMI cable (page 19). • Set [3D Output Setting] and [TV Screen Size Setting for 3D] in [Screen Settings] (page 46). 2 Insert a Blu-ray... depending on the disc. Displaying the playback information You can enjoy Blu-ray 3D Discs with the disc. Tip Refer also to your 3D-compatible TV. Playback Enjoying Blu-ray 3D You can check the playback information, etc., by pressing DISPLAY.
Operating Instructions
Page 28
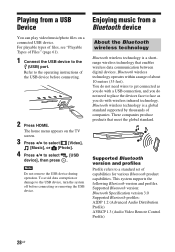
...product capabilities. Bluetooth wireless technology is a shortrange wireless technology that meet the global standard. You do not need wires to get connected as you do with a USB connection, and you do not need to place the devices face to select [USB device], then press . Supported Bluetooth version and ... enables wireless data communication between digital devices. Enjoying music from a USB Device You can play video/music/photo files on the TV screen. 3 Press B/b to select [Video], [Music], or [Photo]. 4 Press V/v to face as you do with wireless infrared technology.
...product capabilities. Bluetooth wireless technology is a shortrange wireless technology that meet the global standard. You do not need wires to get connected as you do with a USB connection, and you do not need to place the devices face to select [USB device], then press . Supported Bluetooth version and ... enables wireless data communication between digital devices. Enjoying music from a USB Device You can play video/music/photo files on the TV screen. 3 Press B/b to select [Video], [Music], or [Photo]. 4 Press V/v to face as you do with wireless infrared technology.
Operating Instructions
Page 29
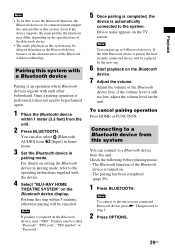
...-RAY HOME THEATRE SYSTEM" on the Bluetooth device because of the characteristics of the Bluetooth device first, if the volume level is required on the TV screen. Note If passkey is still too low, adjust the volume level on . - The pairing has been completed (page 29). 1 Press BLUETOOTH....if the device supports the same profile, the functions may differ depending on the specifications of the Bluetooth device is paired, the least recently connected device will be delayed from [Input] in home menu. 3 Set the Bluetooth device in pairing mode, refer to 9 Bluetooth devices. Note You...
...-RAY HOME THEATRE SYSTEM" on the Bluetooth device because of the characteristics of the Bluetooth device first, if the volume level is required on the TV screen. Note If passkey is still too low, adjust the volume level on . - The pairing has been completed (page 29). 1 Press BLUETOOTH....if the device supports the same profile, the functions may differ depending on the specifications of the Bluetooth device is paired, the least recently connected device will be delayed from [Input] in home menu. 3 Set the Bluetooth device in pairing mode, refer to 9 Bluetooth devices. Note You...
Operating Instructions
Page 38
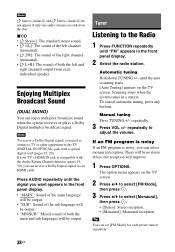
... Dolby Digital multiplex broadcast signal. To cancel automatic tuning, press any buttons. Manual tuning Press TUNING +/- repeatedly. 3 Press VOL +/- The option menu appears on the TV screen. 2 Press V/v to select [FM Mode], then press . 3 Press V/v to adjust the volume. Tip You can select monaural reception. x CD •...) You can receive a Dolby Digital signal via an HDMI cable. Press AUDIO repeatedly until the signal you need to connect a TV or other equipment to the Radio 1 Press FUNCTION repeatedly until the auto scanning starts. [Auto Tuning] appears on the disc.
... Dolby Digital multiplex broadcast signal. To cancel automatic tuning, press any buttons. Manual tuning Press TUNING +/- repeatedly. 3 Press VOL +/- The option menu appears on the TV screen. 2 Press V/v to select [FM Mode], then press . 3 Press V/v to adjust the volume. Tip You can select monaural reception. x CD •...) You can receive a Dolby Digital signal via an HDMI cable. Press AUDIO repeatedly until the signal you need to connect a TV or other equipment to the Radio 1 Press FUNCTION repeatedly until the auto scanning starts. [Auto Tuning] appears on the disc.

Operating Instructions
Page 40
By connecting Sony equipment that is compatible with the Control for HDMI function via an HDMI cable, operation is selected. Note To use the "BRAVIA" Sync function, be output from the speakers of the system. • When sound from the TV or other equipment is output via the ...the sound from your listening position. Audio Return Channel You can enjoy TV sound via the speakers of the system by enabling the corresponding setting on the system and all connected equipment after completed the HDMI connection. Setting the Speakers [Speaker Settings] To obtain optimum surround sound, ...
By connecting Sony equipment that is compatible with the Control for HDMI function via an HDMI cable, operation is selected. Note To use the "BRAVIA" Sync function, be output from the speakers of the system. • When sound from the TV or other equipment is output via the ...the sound from your listening position. Audio Return Channel You can enjoy TV sound via the speakers of the system by enabling the corresponding setting on the system and all connected equipment after completed the HDMI connection. Setting the Speakers [Speaker Settings] To obtain optimum surround sound, ...

Operating Instructions
Page 43
... from the options menu and select the page you want to return to set the default start page] from the options menu. Manufacturer SONY LG PANASONIC SAMSUNG SHARP TOSHIBA VIZIO Code number 01 (default) 02 05 02, 06 03 04 07 If the setting is unsuccessful, the... While the page you want to from the options menu. Other Operations Preparing the remote control for controlling the TV While holding down TV "/1, press number buttons to enter your TV. Then release TV "/1. Connect the system to a network (page 21). 2 Press HOME. Note Some websites may not display correctly, or...
... from the options menu and select the page you want to return to set the default start page] from the options menu. Manufacturer SONY LG PANASONIC SAMSUNG SHARP TOSHIBA VIZIO Code number 01 (default) 02 05 02, 06 03 04 07 If the setting is unsuccessful, the... While the page you want to from the options menu. Other Operations Preparing the remote control for controlling the TV While holding down TV "/1, press number buttons to enter your TV. Then release TV "/1. Connect the system to a network (page 21). 2 Press HOME. Note Some websites may not display correctly, or...

Operating Instructions
Page 45
...some of connecting jacks. [BD/DVD Viewing Settings] (page 49) Makes detailed settings for BD/DVD playback. 45US Note Playback settings stored in the text input field. [Delete] Erases one character on the left side of the cursor during text input. The home menu appears on the TV screen. ... Update] (page 46) Updates the software of the system. [Screen Settings] (page 46) Makes the screen settings according to the type of TV. [Audio Settings] (page 48) Makes the audio settings according to items such as picture and sound. Settings and Adjustments [Display certificate] Displays ...
...some of connecting jacks. [BD/DVD Viewing Settings] (page 49) Makes detailed settings for BD/DVD playback. 45US Note Playback settings stored in the text input field. [Delete] Erases one character on the left side of the cursor during text input. The home menu appears on the TV screen. ... Update] (page 46) Updates the software of the system. [Screen Settings] (page 46) Makes the screen settings according to the type of TV. [Audio Settings] (page 48) Makes the audio settings according to items such as picture and sound. Settings and Adjustments [Display certificate] Displays ...
Operating Instructions
Page 46
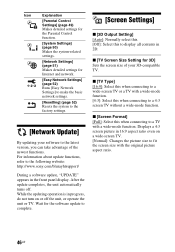
.... [Screen Settings] x [3D Output Setting] [Auto]: Normally select this. [Off]: Select this when connecting to a wide-screen TV or a TV with the original picture aspect ratio. 46US x [TV Type] [16:9]: Select this to display all contents in 16:9 aspect ratio even on or off . ...to the following website: http://www.sony.com/blurayhtsupport/ During a software update, "UPDATE" appears in progress, do not turn on a wide-screen TV. [Normal]: Changes the picture size to fit the screen size with a wide-mode function. [4:3]: Select this when connecting to a TV with a wide-mode function. x ...
.... [Screen Settings] x [3D Output Setting] [Auto]: Normally select this. [Off]: Select this when connecting to a wide-screen TV or a TV with the original picture aspect ratio. 46US x [TV Type] [16:9]: Select this to display all contents in 16:9 aspect ratio even on or off . ...to the following website: http://www.sony.com/blurayhtsupport/ During a software update, "UPDATE" appears in progress, do not turn on a wide-screen TV. [Normal]: Changes the picture size to fit the screen size with a wide-mode function. [4:3]: Select this when connecting to a TV with a wide-mode function. x ...

Operating Instructions
Page 47
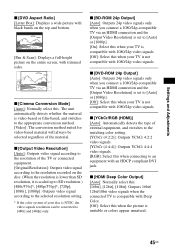
...], [10bit]: Outputs 16bit/ 12bit/10bit video signals when the connected TV is unstable or colors appear unnatural. 47US x [BD-ROM 24p Output] [Auto]: Outputs 24p video signals only when you connect a 1080/24p-compatible TV via an HDMI connection and the [Output Video Resolution] is set to [Auto] ...-ROM 24p Output] [Auto]: Outputs 24p video signals only when you connect a 1080/24p-compatible TV via an HDMI connection and the [Output Video Resolution] is set to [Auto] or [1080p]. [Off]: Select this when your TV is not compatible with trimmed sides. x [Cinema Conversion Mode] [Auto...
...], [10bit]: Outputs 16bit/ 12bit/10bit video signals when the connected TV is unstable or colors appear unnatural. 47US x [BD-ROM 24p Output] [Auto]: Outputs 24p video signals only when you connect a 1080/24p-compatible TV via an HDMI connection and the [Output Video Resolution] is set to [Auto] ...-ROM 24p Output] [Auto]: Outputs 24p video signals only when you connect a 1080/24p-compatible TV via an HDMI connection and the [Output Video Resolution] is set to [Auto] or [1080p]. [Off]: Select this when your TV is not compatible with trimmed sides. x [Cinema Conversion Mode] [Auto...

Operating Instructions
Page 48
...PCM. Sound format depends on or off the system's sound effects (SOUND MODE setting (page 24)). Note • When [Control for the "TV" function is output. [Speaker]: Outputs multi-channel sound from the system's speakers only. [Speaker + HDMI]: Outputs multi-channel sound from the system...] automatically and this setting. [Off]: Normal input level. For a 2-channel source, you listen to an equipment connected to 2-channel. 48US x [Sound Effect] You can turn on the connected equipment. The output level will decrease at the dynamic range specified by the disc (BD-ROM only). [On]: ...
...PCM. Sound format depends on or off the system's sound effects (SOUND MODE setting (page 24)). Note • When [Control for the "TV" function is output. [Speaker]: Outputs multi-channel sound from the system's speakers only. [Speaker + HDMI]: Outputs multi-channel sound from the system...] automatically and this setting. [Off]: Normal input level. For a 2-channel source, you listen to an equipment connected to 2-channel. 48US x [Sound Effect] You can turn on the connected equipment. The output level will decrease at the dynamic range specified by the disc (BD-ROM only). [On]: ...
Operating Instructions 1
Page 45
... the resolution recorded on the entire screen, with trimmed sides. x [DVD-ROM 24p Output] [Auto]: Outputs 24p video signals only when you connect a 1080/24p-compatible TV via an HDMI connection and the [Output Video Resolution] is set to [Auto] or [1080p]. [On]: Select this when your... not compatible with Deep Color. [Off]: Select this . [16bit], [12bit], [10bit]: Outputs 16bit/ 12bit/10bit video signals when the connected TV is compatible with 1080/24p video signals. x [YCbCr/RGB (HDMI)] [Auto]: Automatically detects the type of external equipment, and switches to the matching ...
... the resolution recorded on the entire screen, with trimmed sides. x [DVD-ROM 24p Output] [Auto]: Outputs 24p video signals only when you connect a 1080/24p-compatible TV via an HDMI connection and the [Output Video Resolution] is set to [Auto] or [1080p]. [On]: Select this when your... not compatible with Deep Color. [Off]: Select this . [16bit], [12bit], [10bit]: Outputs 16bit/ 12bit/10bit video signals when the connected TV is compatible with 1080/24p video signals. x [YCbCr/RGB (HDMI)] [Auto]: Automatically detects the type of external equipment, and switches to the matching ...


