Operating Instructions
Page 1
Blu-ray Disc™ / DVD Player Operating Instructions 4-418-506-12(1) Hookups and Settings Playback Internet Settings and Adjustments Additional Information BDP-S790
Blu-ray Disc™ / DVD Player Operating Instructions 4-418-506-12(1) Hookups and Settings Playback Internet Settings and Adjustments Additional Information BDP-S790
Operating Instructions
Page 2
As the laser beam used in this device must not be used in the literature accompanying the appliance. Precautions • To prevent fire or shock hazard, do not place objects filled with the instructions, may cause undesired operation of the device. These limits are cautioned that any changes or modifications not expressly approved in this manual could void your authority to operate this unit so that may cause harmful interference to Part 15 of the FCC Rules. The AC power cord must be co-located or operating in conjunction with this apparatus to rain or moisture. ...
As the laser beam used in this device must not be used in the literature accompanying the appliance. Precautions • To prevent fire or shock hazard, do not place objects filled with the instructions, may cause undesired operation of the device. These limits are cautioned that any changes or modifications not expressly approved in this manual could void your authority to operate this unit so that may cause harmful interference to Part 15 of the FCC Rules. The AC power cord must be co-located or operating in conjunction with this apparatus to rain or moisture. ...
Operating Instructions
Page 3
... when the apparatus has been damaged in the USA If this product. Servicing is damaged, liquid has been spilled or objects have fallen into your Sony dealer regarding this product is used, use caution when moving the cart/apparatus combination to avoid injury from that produce heat. 9) Do not defeat the...
... when the apparatus has been damaged in the USA If this product. Servicing is damaged, liquid has been spilled or objects have fallen into your Sony dealer regarding this product is used, use caution when moving the cart/apparatus combination to avoid injury from that produce heat. 9) Do not defeat the...
Operating Instructions
Page 4
It is designed to use a pacemaker or other medical device, consult your physician or the manufacturer of your ears and the speakers may be damaged when a peak level section is connected to the wall outlet, even if the player itself has been turned off. • Disconnect the player from the wall outlet if you use the player for about half an hour until the moisture evaporates. • Do not install the player in use the AC power cord if it is played. If you move the player. On power sources • The player is not disconnected from the player when you don't, the disc may ...
It is designed to use a pacemaker or other medical device, consult your physician or the manufacturer of your ears and the speakers may be damaged when a peak level section is connected to the wall outlet, even if the player itself has been turned off. • Disconnect the player from the wall outlet if you use the player for about half an hour until the moisture evaporates. • Do not install the player in use the AC power cord if it is played. If you move the player. On power sources • The player is not disconnected from the player when you don't, the disc may ...
Operating Instructions
Page 5
... of the advanced content protection systems used with, or Blu-ray Disc contents played with this product and (ii) our website (http:// esupport.sony.com/) for the latest information. If you believe necessary. On watching 3D video images Some people may experience discomfort (such as eye strain, fatigue... handling may damage the HDMI OUT jack and the connector. • Carefully align the HDMI OUT jack on the rear of purchase. Sony recommends that all viewers take regular breaks while watching 3D video images. The vision of necessary breaks will be advised of time you should...
... of the advanced content protection systems used with, or Blu-ray Disc contents played with this product and (ii) our website (http:// esupport.sony.com/) for the latest information. If you believe necessary. On watching 3D video images Some people may experience discomfort (such as eye strain, fatigue... handling may damage the HDMI OUT jack and the connector. • Carefully align the HDMI OUT jack on the rear of purchase. Sony recommends that all viewers take regular breaks while watching 3D video images. The vision of necessary breaks will be advised of time you should...
Operating Instructions
Page 6
...to protect their content. Copyrights and Trademarks • "AVCHD" and the "AVCHD 3D/ Progressive" logo are trademarks of Panasonic Corporation and Sony Corporation. • Java is a trademark of such technology. Patent 7,369,677 and other countries. Copyright 2004-2010 Verance Corporation. 6...to access PlayReady-protected content and/or WMDRM-protected content. ENERGY STAR and the ENERGY STAR mark are trademarks of Sony Corporation and Sony Computer Entertainment Inc. • This product incorporates High-Definition Multimedia Interface (HDMI™) technology. ENERGY STAR is ...
...to protect their content. Copyrights and Trademarks • "AVCHD" and the "AVCHD 3D/ Progressive" logo are trademarks of Panasonic Corporation and Sony Corporation. • Java is a trademark of such technology. Patent 7,369,677 and other countries. Copyright 2004-2010 Verance Corporation. 6...to access PlayReady-protected content and/or WMDRM-protected content. ENERGY STAR and the ENERGY STAR mark are trademarks of Sony Corporation and Sony Computer Entertainment Inc. • This product incorporates High-Definition Multimedia Interface (HDMI™) technology. ENERGY STAR is ...
Operating Instructions
Page 7
of Gracenote Data are either registered trademarks or trademarks of the Gracenote Data, the Gracenote Software, and Gracenote Servers. You agree that your non-exclusive license to use of Gracenote in its own name. You agree that 7 Copyright 1995-2010 Opera Software ASA. may use only. patents. You agree not to assign, copy, transfer or transmit the Gracenote Software or any Gracenote Data to you "AS IS." If your own personal non-commercial use Gracenote Data only by Gracenote" logo are licensed to any and all ownership rights. Gracenote reserves all ...
of Gracenote Data are either registered trademarks or trademarks of the Gracenote Data, the Gracenote Software, and Gracenote Servers. You agree that your non-exclusive license to use of Gracenote in its own name. You agree that 7 Copyright 1995-2010 Opera Software ASA. may use only. patents. You agree not to assign, copy, transfer or transmit the Gracenote Software or any Gracenote Data to you "AS IS." If your own personal non-commercial use Gracenote Data only by Gracenote" logo are licensed to any and all ownership rights. Gracenote reserves all ...
Operating Instructions
Page 8
GRACENOTE DISCLAIMS ALL WARRANTIES EXPRESS OR IMPLIED, INCLUDING, BUT NOT LIMITED TO, IMPLIED WARRANTIES OF MERCHANTABILITY, FITNESS FOR A PARTICULAR PURPOSE, TITLE, AND NONINFRINGEMENT. IN NO CASE WILL GRACENOTE BE LIABLE FOR ANY CONSEQUENTIAL OR INCIDENTAL DAMAGES OR FOR ANY LOST PROFITS OR LOST REVENUES. © Gracenote, Inc. 2009 8 GRACENOTE DOES NOT WARRANT THE RESULTS THAT WILL BE OBTAINED BY YOUR USE OF THE GRACENOTE SOFTWARE OR ANY GRACENOTE SERVER. Gracenote is not obligated to discontinue its services at any time. Gracenote deems sufficient. No warranty is free to provide...
GRACENOTE DISCLAIMS ALL WARRANTIES EXPRESS OR IMPLIED, INCLUDING, BUT NOT LIMITED TO, IMPLIED WARRANTIES OF MERCHANTABILITY, FITNESS FOR A PARTICULAR PURPOSE, TITLE, AND NONINFRINGEMENT. IN NO CASE WILL GRACENOTE BE LIABLE FOR ANY CONSEQUENTIAL OR INCIDENTAL DAMAGES OR FOR ANY LOST PROFITS OR LOST REVENUES. © Gracenote, Inc. 2009 8 GRACENOTE DOES NOT WARRANT THE RESULTS THAT WILL BE OBTAINED BY YOUR USE OF THE GRACENOTE SOFTWARE OR ANY GRACENOTE SERVER. Gracenote is not obligated to discontinue its services at any time. Gracenote deems sufficient. No warranty is free to provide...
Operating Instructions
Page 9
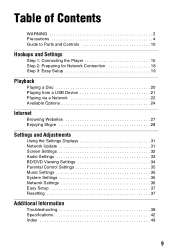
Table of Contents WARNING 2 Precautions 4 Guide to Parts and Controls 10 Hookups and Settings Step 1: Connecting the Player 15 Step 2: Preparing for Network Connection 18 Step 3: Easy Setup 19 Playback Playing a Disc 20 Playing from a USB Device 21 Playing via a Network 22 Available Options 24 Internet Browsing Websites 27 Enjoying Skype 28 Settings and Adjustments Using the Settings Displays 31 Network Update 31 Screen Settings 32 Audio Settings 33 BD/DVD Viewing Settings 34 Parental Control Settings 35 Music Settings 35 System Settings 35 Network Settings 36 Easy Setup ...
Table of Contents WARNING 2 Precautions 4 Guide to Parts and Controls 10 Hookups and Settings Step 1: Connecting the Player 15 Step 2: Preparing for Network Connection 18 Step 3: Easy Setup 19 Playback Playing a Disc 20 Playing from a USB Device 21 Playing via a Network 22 Available Options 24 Internet Browsing Websites 27 Enjoying Skype 28 Settings and Adjustments Using the Settings Displays 31 Network Update 31 Screen Settings 32 Audio Settings 33 BD/DVD Viewing Settings 34 Parental Control Settings 35 Music Settings 35 System Settings 35 Network Settings 36 Easy Setup ...
Operating Instructions
Page 10
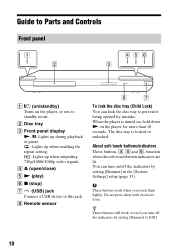
Guide to Parts and Controls Front panel A [/1 (on/standby) Turns on the player, or sets to this jack. About soft-touch buttons/indicators These buttons, 4, 5 and 6, function when the soft-touch button indicators are lit. b These buttons work , even if you touch them with excessive force. B Disc tray C Front panel display N, X: Lights up during playback or pause. : Lights up when enabling the repeat setting. : Lights up when outputting 720p/1080i/1080p video signals. The disc tray is turned on, hold down N on /off the indicators by setting [Dimmer] to prevent it being opened by ...
Guide to Parts and Controls Front panel A [/1 (on/standby) Turns on the player, or sets to this jack. About soft-touch buttons/indicators These buttons, 4, 5 and 6, function when the soft-touch button indicators are lit. b These buttons work , even if you touch them with excessive force. B Disc tray C Front panel display N, X: Lights up during playback or pause. : Lights up when enabling the repeat setting. : Lights up when outputting 720p/1080i/1080p video signals. The disc tray is turned on, hold down N on /off the indicators by setting [Dimmer] to prevent it being opened by ...
Operating Instructions
Page 11
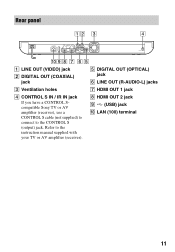
Refer to the CONTROL S (output) jack. E DIGITAL OUT (OPTICAL) jack F LINE OUT (R-AUDIO-L) jacks G HDMI OUT 1 jack H HDMI OUT 2 jack I (USB) jack J LAN (100) terminal 11 Rear panel A LINE OUT (VIDEO) jack B DIGITAL OUT (COAXIAL) jack C Ventilation holes D CONTROL S IN / IR IN jack If you have a CONTROL Scompatible Sony TV or AV amplifier (receiver), use a CONTROL S cable (not supplied) to connect to the instruction manual supplied with your TV or AV amplifier (receiver).
Refer to the CONTROL S (output) jack. E DIGITAL OUT (OPTICAL) jack F LINE OUT (R-AUDIO-L) jacks G HDMI OUT 1 jack H HDMI OUT 2 jack I (USB) jack J LAN (100) terminal 11 Rear panel A LINE OUT (VIDEO) jack B DIGITAL OUT (COAXIAL) jack C Ventilation holes D CONTROL S IN / IR IN jack If you have a CONTROL Scompatible Sony TV or AV amplifier (receiver), use a CONTROL S cable (not supplied) to connect to the instruction manual supplied with your TV or AV amplifier (receiver).
Operating Instructions
Page 12
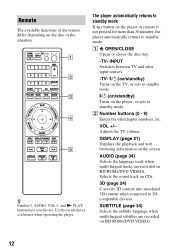
INPUT Switches between TV and other input sources. -TV- [/1 (on/standby) Turns on the TV, or sets to standby mode. [/1 (on/standby) Turns on the player, or sets to standby mode. SUBTITLE (page 34) Selects the subtitle language when multi-lingual subtitles are recorded on the player or remote is not pressed for more than 30 minutes, the player automatically returns to standby mode. VOL +/- The player automatically returns to standby mode If any button on BD-ROMs/DVD VIDEOs. Adjusts the TV volume. Selects the sound track on the screen. B Number buttons (0 - 9) Enters the ...
INPUT Switches between TV and other input sources. -TV- [/1 (on/standby) Turns on the TV, or sets to standby mode. [/1 (on/standby) Turns on the player, or sets to standby mode. SUBTITLE (page 34) Selects the subtitle language when multi-lingual subtitles are recorded on the player or remote is not pressed for more than 30 minutes, the player automatically returns to standby mode. VOL +/- The player automatically returns to standby mode If any button on BD-ROMs/DVD VIDEOs. Adjusts the TV volume. Selects the sound track on the screen. B Number buttons (0 - 9) Enters the ...
Operating Instructions
Page 13
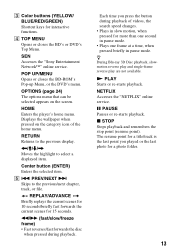
Displays the wallpaper when pressed on the screen. X PAUSE Pauses or re-starts playback. SEN Accesses the "Sony Entertainment Network™" online service. Each time you played or the last photo for 15 seconds. x STOP Stops playback and remembers the stop point (resume ...
Displays the wallpaper when pressed on the screen. X PAUSE Pauses or re-starts playback. SEN Accesses the "Sony Entertainment Network™" online service. Each time you played or the last photo for 15 seconds. x STOP Stops playback and remembers the stop point (resume ...
Operating Instructions
Page 14
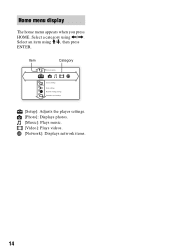
Home menu display The home menu appears when you press HOME. Select a category using
Home menu display The home menu appears when you press HOME. Select a category using
Operating Instructions
Page 15
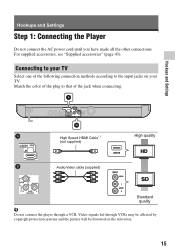
Hookups and Settings High Speed HDMI Cable*1 (not supplied) Audio/video cable (supplied) High quality Standard quality b Do not connect the player through VCRs may be affected by copyright protection systems and the picture will be distorted on your TV. Video signals fed through a VCR. Match the color of the plug to that of the following connection methods according to your TV Select one of the jack when connecting. Connecting to the input jacks on the television. 15 For supplied accessories, see "Supplied accessories" (page 43). Hookups and Settings Step 1: Connecting ...
Hookups and Settings High Speed HDMI Cable*1 (not supplied) Audio/video cable (supplied) High quality Standard quality b Do not connect the player through VCRs may be affected by copyright protection systems and the picture will be distorted on your TV. Video signals fed through a VCR. Match the color of the plug to that of the following connection methods according to your TV Select one of the jack when connecting. Connecting to the input jacks on the television. 15 For supplied accessories, see "Supplied accessories" (page 43). Hookups and Settings Step 1: Connecting ...
Operating Instructions
Page 16
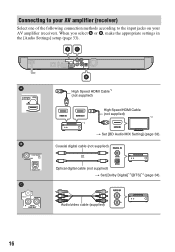
High Speed HDMI Cable*1 (not supplied) High Speed HDMI Cable (not supplied) *2 *1 t Set [BD Audio MIX Setting] (page 33). Audio/video cable (supplied) 16 Connecting to your AV amplifier (receiver) Select one of the following connection methods according to the input jacks on your AV amplifier (receiver). Coaxial digital cable (not supplied) or Optical digital cable (not supplied) t Set [Dolby Digital]*3/[DTS]*4 (page 34). When you select A or B, make the appropriate settings in the [Audio Settings] setup (page 33).
High Speed HDMI Cable*1 (not supplied) High Speed HDMI Cable (not supplied) *2 *1 t Set [BD Audio MIX Setting] (page 33). Audio/video cable (supplied) 16 Connecting to your AV amplifier (receiver) Select one of the following connection methods according to the input jacks on your AV amplifier (receiver). Coaxial digital cable (not supplied) or Optical digital cable (not supplied) t Set [Dolby Digital]*3/[DTS]*4 (page 34). When you select A or B, make the appropriate settings in the [Audio Settings] setup (page 33).
Operating Instructions
Page 17
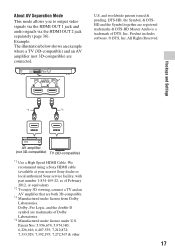
...) TV (3D-compatible) *1 Use a High Speed HDMI Cable. Product includes software. © DTS, Inc. All Rights Reserved. We recommend using a Sony HDMI cable (available at your nearest Sony dealer or local authorized Sony service facility, with part number 1-834-169-22, as of DTS, Inc. About AV Separation Mode This mode allows you...
...) TV (3D-compatible) *1 Use a High Speed HDMI Cable. Product includes software. © DTS, Inc. All Rights Reserved. We recommend using a Sony HDMI cable (available at your nearest Sony dealer or local authorized Sony service facility, with part number 1-834-169-22, as of DTS, Inc. About AV Separation Mode This mode allows you...
Operating Instructions
Page 18
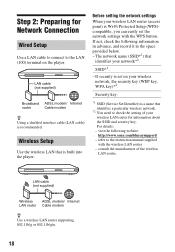
For details: - If not, check the following website: http://www.sony.com/bluraysupport/ - Before setting the network settings When your wireless LAN router for Network Connection Wired Setup Use a LAN cable to connect to the instruction ...
For details: - If not, check the following website: http://www.sony.com/bluraysupport/ - Before setting the network settings When your wireless LAN router for Network Connection Wired Setup Use a LAN cable to connect to the instruction ...

Operating Instructions
Page 19
Follow the on the batteries to make the basic settings using Step 3: Easy Setup When turned on for the first time Wait for a short while before the player turns on and starts [Easy Setup]. 1 Insert two Size AA (R6) batteries by matching the 3 and # ends on -screen instructions to the markings inside the battery compartment. 5 Perform [Easy Setup].
Follow the on the batteries to make the basic settings using Step 3: Easy Setup When turned on for the first time Wait for a short while before the player turns on and starts [Easy Setup]. 1 Insert two Size AA (R6) batteries by matching the 3 and # ends on -screen instructions to the markings inside the battery compartment. 5 Perform [Easy Setup].
Operating Instructions
Page 20
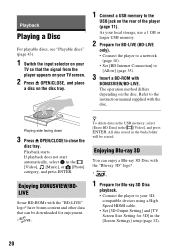
Enjoying Blu-ray 3D You can be erased. Playback starts. Playing side facing down 3 Press Z OPEN/CLOSE to the USB jack on the rear of the player (page 11). If playback does not start automatically, select in the buda folder will be downloaded for BD-LIVE (BD-LIVE only). • Connect the player to a network (page 18). • Set [BD Internet Connection] to [Allow] (page 35). 3 Insert a BD-ROM with the disc. compatible devices using a High Speed HDMI cable. • Set [3D Output Setting] and [TV Screen Size Setting for Blu-ray 3D Disc playback. • Connect the player to ...
Enjoying Blu-ray 3D You can be erased. Playback starts. Playing side facing down 3 Press Z OPEN/CLOSE to the USB jack on the rear of the player (page 11). If playback does not start automatically, select in the buda folder will be downloaded for BD-LIVE (BD-LIVE only). • Connect the player to a network (page 18). • Set [BD Internet Connection] to [Allow] (page 35). 3 Insert a BD-ROM with the disc. compatible devices using a High Speed HDMI cable. • Set [3D Output Setting] and [TV Screen Size Setting for Blu-ray 3D Disc playback. • Connect the player to ...
