Operating Instructions
Page 1
2-546-892-13(1) AIT Drive Operating Instructions AIT-2 Turbo TAPE DRIVE AITe200/AITe200T AIT-1 Turbo TAPE DRIVE AITe100/AITe100T AIT-E Turbo TAPE DRIVE AITe50/AITe50T ©2004 Sony Corporation
2-546-892-13(1) AIT Drive Operating Instructions AIT-2 Turbo TAPE DRIVE AITe200/AITe200T AIT-1 Turbo TAPE DRIVE AITe100/AITe100T AIT-E Turbo TAPE DRIVE AITe50/AITe50T ©2004 Sony Corporation
Operating Instructions
Page 9
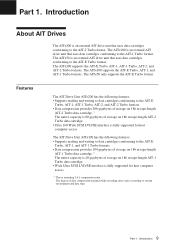
The AITe100 is an external AIT drive unit that uses data cartridges conforming to the AIT-E Turbo, AIT-1, AIT-1 Turbo, AIT-2, and AIT-2 Turbo formats. • Data compression provides 208 gigabytes of storage on 186 m tape-length AIT-2 Turbo data cartridge.*1 The native capacity is 80 gigabytes of storage on 186 m tape-length AIT-2 Turbo data cartridge. • Ultra 160 Wide SCSI LVD...
The AITe100 is an external AIT drive unit that uses data cartridges conforming to the AIT-E Turbo, AIT-1, AIT-1 Turbo, AIT-2, and AIT-2 Turbo formats. • Data compression provides 208 gigabytes of storage on 186 m tape-length AIT-2 Turbo data cartridge.*1 The native capacity is 80 gigabytes of storage on 186 m tape-length AIT-2 Turbo data cartridge. • Ultra 160 Wide SCSI LVD...

Operating Instructions
Page 10
...AIT-E Turbo, AIT-1 Turbo, or AIT-1 logo. The AITe50 can damage the AIT drive. Although commercially available 8mm videotapes resemble AIT cartridges in appearance, they have entirely different specifications and cannot be marked with the AITe100 must be used . 10 Part 1. AIT-E Turbo AIT-1 Turbo AIT-2 Turbo LOGO LOGO LOGO AIT-1 LOGO AIT... with the AITe200 must be used with data cartridges marked with AIT-E Turbo, AIT-1 Turbo, AIT-2 Turbo, AIT-1, or AIT-2 logo. The degree of storage on 98 m tape-length AIT-E Turbo data cartridge.*1 The native capacity is 20 gigabytes of data...
...AIT-E Turbo, AIT-1 Turbo, or AIT-1 logo. The AITe50 can damage the AIT drive. Although commercially available 8mm videotapes resemble AIT cartridges in appearance, they have entirely different specifications and cannot be marked with the AITe100 must be used . 10 Part 1. AIT-E Turbo AIT-1 Turbo AIT-2 Turbo LOGO LOGO LOGO AIT-1 LOGO AIT... with the AITe200 must be used with data cartridges marked with AIT-E Turbo, AIT-1 Turbo, AIT-2 Turbo, AIT-1, or AIT-2 logo. The degree of storage on 98 m tape-length AIT-E Turbo data cartridge.*1 The native capacity is 20 gigabytes of data...

Operating Instructions
Page 12
... 1 pulse (0.3 sec on . 3 Dust Cover This cover protects the AIT data cartridge receptacle. 4 LED Indication for Drive Status The LED indicators are defined as follows. LED TAPE CLEANING REPLACE MOTION REQUEST TAPE Sense Independent Independent Tape Loaded Independent Independent Tape Access in Progress (write/read) Independent Independent Tape Access in Progress (others) Independent Independent Cleaning is requested...
... 1 pulse (0.3 sec on . 3 Dust Cover This cover protects the AIT data cartridge receptacle. 4 LED Indication for Drive Status The LED indicators are defined as follows. LED TAPE CLEANING REPLACE MOTION REQUEST TAPE Sense Independent Independent Tape Loaded Independent Independent Tape Access in Progress (write/read) Independent Independent Tape Access in Progress (others) Independent Independent Cleaning is requested...

Operating Instructions
Page 18
... indicator lights. 3 Computer software controls the reading and writing of tapes. Operation Part 3. How to use the AIT drive, and how to use the AIT Drive 1 Press the POWER switch on the front panel. While reading or writing, the TAPE MOTION indicator blinks. 4 Close the dust cover. 18 Part 3. Operation This section describes how to handle...
... indicator lights. 3 Computer software controls the reading and writing of tapes. Operation Part 3. How to use the AIT drive, and how to use the AIT Drive 1 Press the POWER switch on the front panel. While reading or writing, the TAPE MOTION indicator blinks. 4 Close the dust cover. 18 Part 3. Operation This section describes how to handle...
Operating Instructions
Page 20
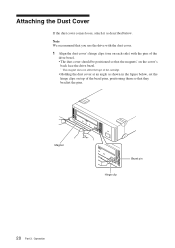
...comes loose, attach it as shown in the figure below . Note We recommend that you use the drive with the dust cover. 1 Align the dust cover's hinge clips (one on each side) with the pins of the... drive bezel. • The dust cover should be positioned so that the magnets* on top of the cartridge. ... cover at an angle as described below , set the hinge clips on the cover's back face the drive bezel. * This magnet does not affect the tape of the bezel pins, positioning them so that they bracket the pins.
...comes loose, attach it as shown in the figure below . Note We recommend that you use the drive with the dust cover. 1 Align the dust cover's hinge clips (one on each side) with the pins of the... drive bezel. • The dust cover should be positioned so that the magnets* on top of the cartridge. ... cover at an angle as described below , set the hinge clips on the cover's back face the drive bezel. * This magnet does not affect the tape of the bezel pins, positioning them so that they bracket the pins.
Operating Instructions
Page 22
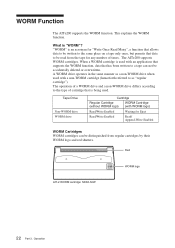
...be written to the same place on a tape only once, but permits that has been written to as a non-WORM drive when used . A WORM drive operates in the same manner as "regular cartridge"). This explains the WORM function. Operation Red AIT-2 WORM cartridge: SDX2-50W WORM logo ... function, data that data to be accidentally deleted or overwritten. The operation of a WORM drive and a non-WORM drive differs according to the type of times. Tape Drive Non-WORM drive WORM drive Cartridge Regular Cartridge (without WORM logo) WORM Cartridge (with WORM logo) Read/Write Enabled ...
...be written to the same place on a tape only once, but permits that has been written to as a non-WORM drive when used . A WORM drive operates in the same manner as "regular cartridge"). This explains the WORM function. Operation Red AIT-2 WORM cartridge: SDX2-50W WORM logo ... function, data that data to be accidentally deleted or overwritten. The operation of a WORM drive and a non-WORM drive differs according to the type of times. Tape Drive Non-WORM drive WORM drive Cartridge Regular Cartridge (without WORM logo) WORM Cartridge (with WORM logo) Read/Write Enabled ...
Operating Instructions
Page 23
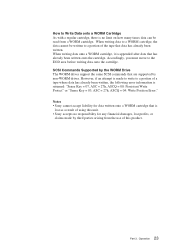
... the data cannot be read from the use of this unit. • Sony accepts no limit on how many times data can be written to a portion of the tape that is made by the WORM Drive The WORM drives support the same SCSI commands that has already been written onto the cartridge. ...Notes • Sony cannot accept liability for any financial damages, lost as a result of a tape where data has already been written, the ...
... the data cannot be read from the use of this unit. • Sony accepts no limit on how many times data can be written to a portion of the tape that is made by the WORM Drive The WORM drives support the same SCSI commands that has already been written onto the cartridge. ...Notes • Sony cannot accept liability for any financial damages, lost as a result of a tape where data has already been written, the ...

Operating Instructions
Page 25
... cleaning Wipe the cabinet with a soft dry cloth. Leaving the drive on . For heavy dirt, wipe with a soft cloth moistened with... If the drive is condensation inside. Immediately remove cartridges in temperature, wait at least one hour before turning the drive on without inserting... cartridges, moreover, will quickly evaporate any condensation. ■ Abnormal occurrences If the drive behaves abnormally,...or if the room temperature suddenly rises, moisture may condense inside the drive can damage the finish. 25 Part 4. Inserting a cartridge with a...
... cleaning Wipe the cabinet with a soft dry cloth. Leaving the drive on . For heavy dirt, wipe with a soft cloth moistened with... If the drive is condensation inside. Immediately remove cartridges in temperature, wait at least one hour before turning the drive on without inserting... cartridges, moreover, will quickly evaporate any condensation. ■ Abnormal occurrences If the drive behaves abnormally,...or if the room temperature suddenly rises, moisture may condense inside the drive can damage the finish. 25 Part 4. Inserting a cartridge with a...

Operating Instructions
Page 26
...the direction of the cartridge is opened automatically when it is inserted into the drive. Taking Care of Cartridges Use Precautions • Avoid heavy vibration and dropping. • The shutter on the face of the arrow to protect the tape from being written to open the shutter by hand, as touching the...; Avoid unnecessary insertion and removal of cartridges if you do not need to write or read a tape. • When finished using the drive, remove the cartridge. If you do not try to or accidentally erased. Return the switch to its original position to re-enable writing. • In...
...the direction of the cartridge is opened automatically when it is inserted into the drive. Taking Care of Cartridges Use Precautions • Avoid heavy vibration and dropping. • The shutter on the face of the arrow to protect the tape from being written to open the shutter by hand, as touching the...; Avoid unnecessary insertion and removal of cartridges if you do not need to write or read a tape. • When finished using the drive, remove the cartridge. If you do not try to or accidentally erased. Return the switch to its original position to re-enable writing. • In...