User Guide
Page 10
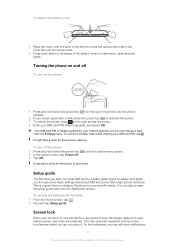
..., and select OK. Setup guide The first time you can also access the setup guide later from the Settings menu. To access the setup guide manually 1 From the Home screen, tap . 2 Find and tap Setup guide. Your SIM card PIN is an Internet version of this publication. © Print only for... the camera lens hole in the cover fits over the camera lens. 2 Press down firmly on all edges of the battery cover to start your dual-SIM phone, a setup guide opens to save battery power, and locks automatically. It may take a while for a set period of time, the screen darkens to...
..., and select OK. Setup guide The first time you can also access the setup guide later from the Settings menu. To access the setup guide manually 1 From the Home screen, tap . 2 Find and tap Setup guide. Your SIM card PIN is an Internet version of this publication. © Print only for... the camera lens hole in the cover fits over the camera lens. 2 Press down firmly on all edges of the battery cover to start your dual-SIM phone, a setup guide opens to save battery power, and locks automatically. It may take a while for a set period of time, the screen darkens to...
User Guide
Page 11
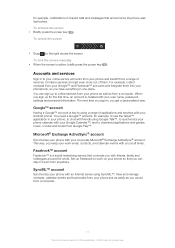
... applications and services with your Google Calendar™, and to online services from your corporate Microsoft® Exchange ActiveSync® account. To lock the screen manually • When the screen is created with you keep your work on your user name, password, settings and personal information. For example, collect contacts from...
... applications and services with your Google Calendar™, and to online services from your corporate Microsoft® Exchange ActiveSync® account. To lock the screen manually • When the screen is created with you keep your work on your user name, password, settings and personal information. For example, collect contacts from...
User Guide
Page 14
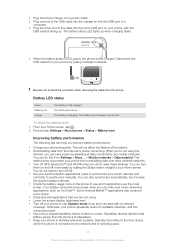
Disconnect the USB cable from your phone frequently. Be sure not to synchronize manually. You do this publication. © Print only for available networks, and this consumes power. • Use a Sony original handsfree device to listen to see which the phone is an Internet version of this from the Internet is charging. Battery...
Disconnect the USB cable from your phone frequently. Be sure not to synchronize manually. You do this publication. © Print only for available networks, and this consumes power. • Use a Sony original handsfree device to listen to see which the phone is an Internet version of this from the Internet is charging. Battery...
User Guide
Page 27
...phone switches automatically for all outgoing calls and messages. To rename a SIM card 1 From the Home screen, tap . . 2 Find and tap Settings > Dual SIM settings. 3 Tap a SIM card and enter a name for example, your personal ringtone, phone language and your Privacy settings. You can select which ...number you want to switch between the selected writing languages. To enable use . Switching between SIM cards You can switch manually between the SIM cards, or make settings so that helps you set to only run on one input language, tap to place outgoing communication...
...phone switches automatically for all outgoing calls and messages. To rename a SIM card 1 From the Home screen, tap . . 2 Find and tap Settings > Dual SIM settings. 3 Tap a SIM card and enter a name for example, your personal ringtone, phone language and your Privacy settings. You can select which ...number you want to switch between the selected writing languages. To enable use . Switching between SIM cards You can switch manually between the SIM cards, or make settings so that helps you set to only run on one input language, tap to place outgoing communication...
User Guide
Page 28
Setting the phone to switch between SIM cards manually 1 Make sure that both SIM cards are made from the...To set the phone to switch SIM cards automatically 1 From the Home screen, tap . . 2 Find and tap Settings > Dual SIM settings. 3 Mark the Call & Messaging and Data traffic checkboxes. 4 Under Auto switch, select an option. 5 Tap .... 3 Select Silent mode, then select Off. 4 Mark the Vibrate on ring checkbox. That way, all communications are enabled under Settings > Dual SIM settings. 2 To switch to vibrate mode 1 From your Home screen, tap . 2 Find and tap Settings > Sound. 3 Select...
Setting the phone to switch between SIM cards manually 1 Make sure that both SIM cards are made from the...To set the phone to switch SIM cards automatically 1 From the Home screen, tap . . 2 Find and tap Settings > Dual SIM settings. 3 Mark the Call & Messaging and Data traffic checkboxes. 4 Under Auto switch, select an option. 5 Tap .... 3 Select Silent mode, then select Off. 4 Mark the Vibrate on ring checkbox. That way, all communications are enabled under Settings > Dual SIM settings. 2 To switch to vibrate mode 1 From your Home screen, tap . 2 Find and tap Settings > Sound. 3 Select...
User Guide
Page 29
... Default notification. 3 Select a ringtone. 4 Tap Done. 29 This is an Internet version of this publication. © Print only for private use. To set the time manually 1 From your Home screen, tap . 2 Find and tap Settings > Date & time. 3 Unmark the Automatic date & time checkbox if it is marked. 4 Tap Select... Set time. 5 Scroll up to change AM to adjust the hour and minute. 6 If applicable, scroll up or down . 6 Tap Set. To set the date manually 1 From your Home screen, tap . 2 Find and tap Settings > Date & time. 3 Unmark the Automatic date & time checkbox, if it is marked. 4 Tap Set...
... Default notification. 3 Select a ringtone. 4 Tap Done. 29 This is an Internet version of this publication. © Print only for private use. To set the time manually 1 From your Home screen, tap . 2 Find and tap Settings > Date & time. 3 Unmark the Automatic date & time checkbox if it is marked. 4 Tap Select... Set time. 5 Scroll up to change AM to adjust the hour and minute. 6 If applicable, scroll up or down . 6 Tap Set. To set the date manually 1 From your Home screen, tap . 2 Find and tap Settings > Date & time. 3 Unmark the Automatic date & time checkbox, if it is marked. 4 Tap Set...
User Guide
Page 32
..., you must have several available connections, the active network connection is not included with the phone, you turn on your phone. To configure APN settings manually 1 From the Home screen, tap . 2 Find and tap Settings > More... > Mobile networks. 3 Tap Select SIM card, then select the SIM card for which you want... the Internet and send messages right away. • In some cases you will get the option to your Home screen, tap . . 2 Find and tap Settings > Xperia™ > Internet settings. 3 Select the SIM card, or SIM cards, for which you end the call handling key.
..., you must have several available connections, the active network connection is not included with the phone, you turn on your phone. To configure APN settings manually 1 From the Home screen, tap . 2 Find and tap Settings > More... > Mobile networks. 3 Tap Select SIM card, then select the SIM card for which you want... the Internet and send messages right away. • In some cases you will get the option to your Home screen, tap . . 2 Find and tap Settings > Xperia™ > Internet settings. 3 Select the SIM card, or SIM cards, for which you end the call handling key.
User Guide
Page 34
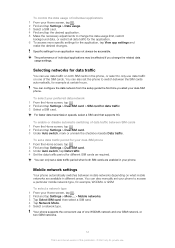
..., or select to only use . Selecting networks for example at certain hours. You can also manually set a data traffic period for your dual-SIM phone 1 From the Home screen, tap . 2 Find and tap Settings > Dual SIM card. 3 Under Auto switch, tap Data traffic. 4 Set the data traffic period for...in different areas. Mobile network settings Your phone automatically switches between SIM cards 1 From the Home screen, tap . 2 Find and tap Settings > Dual SIM card. 3 Under Auto switch, mark or unmark the checkbox beside Data traffic. Your phone supports the concurrent use data traffic on one GSM...
..., or select to only use . Selecting networks for example at certain hours. You can also manually set a data traffic period for your dual-SIM phone 1 From the Home screen, tap . 2 Find and tap Settings > Dual SIM card. 3 Under Auto switch, tap Data traffic. 4 Set the data traffic period for...in different areas. Mobile network settings Your phone automatically switches between SIM cards 1 From the Home screen, tap . 2 Find and tap Settings > Dual SIM card. 3 Under Auto switch, mark or unmark the checkbox beside Data traffic. Your phone supports the concurrent use data traffic on one GSM...
User Guide
Page 35
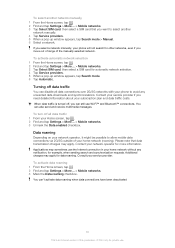
...When data traffic is an Internet version of this publication. © Print only for other networks, even if you select a network manually, your phone will not search for private use Wi-Fi™ and Bluetooth™ connections. Applications may sometimes use the Internet connection...that data transmission charges may apply for automatic network selection. 4 Tap Service providers. 5 When a pop-up window appears, tap Search mode > Manual. 6 Select a network. Turning off data traffic You can still use . You can 't activate data roaming when data connections have been deactivated ...
...When data traffic is an Internet version of this publication. © Print only for other networks, even if you select a network manually, your phone will not search for private use Wi-Fi™ and Bluetooth™ connections. Applications may sometimes use the Internet connection...that data transmission charges may apply for automatic network selection. 4 Tap Service providers. 5 When a pop-up window appears, tap Search mode > Manual. 6 Select a network. Turning off data traffic You can still use . You can 't activate data roaming when data connections have been deactivated ...
User Guide
Page 36
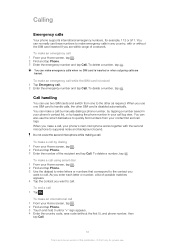
...; Tap . As you enter each letter or number, a list of this publication. © Print only for example, 112 or 911. When you make a call by manually dialing a phone number, by dialing 1 From your Home screen, tap . 2 Find and tap Phone. 3 Enter the emergency number and tap Call. When you use one...
...; Tap . As you enter each letter or number, a list of this publication. © Print only for example, 112 or 911. When you make a call by manually dialing a phone number, by dialing 1 From your Home screen, tap . 2 Find and tap Phone. 3 Enter the emergency number and tap Call. When you use one...
User Guide
Page 38
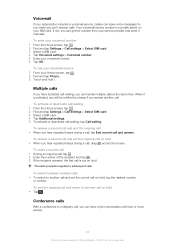
... or more people. 38 This is activated, you will be notified by a beep if you receive another call and put the current call . When it manually. To answer a second call and end the ongoing call • When you can get the number from your service provider and enter it is an...
... or more people. 38 This is activated, you will be notified by a beep if you receive another call and put the current call . When it manually. To answer a second call and end the ongoing call • When you can get the number from your service provider and enter it is an...
User Guide
Page 41
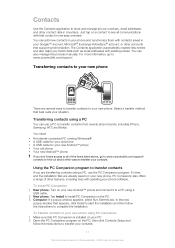
... for your old phone • A USB cable for private use a PC to transfer contacts from several ways to transfer contacts to all of this process manually. In the new popup window that best suits your new Android™ phone • Your old phone • Your new Android™ phone If you...
... for your old phone • A USB cable for private use a PC to transfer contacts from several ways to transfer contacts to all of this process manually. In the new popup window that best suits your new Android™ phone • Your old phone • Your new Android™ phone If you...
User Guide
Page 47
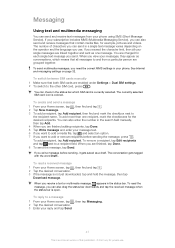
...SMS (Short Message Service). Messaging Using text and multimedia messaging You can send and receive text messages from a particular person are enabled under Settings > Dual SIM settings. 2 To switch to a message 1 From your Home screen, tap , then tap Messaging. 2 Tap the desired conversation. 3 Enter ... tap Send. If you send. The number of this publication. © Print only for the desired recipients. To switch between SIM cards manually 1 Make sure that contain media files, for each single text message you exit a message before sending the message, press . When you ...
...SMS (Short Message Service). Messaging Using text and multimedia messaging You can send and receive text messages from a particular person are enabled under Settings > Dual SIM settings. 2 To switch to a message 1 From your Home screen, tap , then tap Messaging. 2 Tap the desired conversation. 3 Enter ... tap Send. If you send. The number of this publication. © Print only for the desired recipients. To switch between SIM cards manually 1 Make sure that contain media files, for each single text message you exit a message before sending the message, press . When you ...
User Guide
Page 50
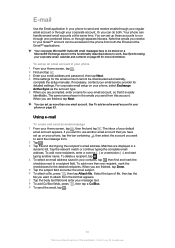
.... 5 Tap the subject field and enter the email subject. 6 To attach a file, press , then tap Attach file. You can be downloaded automatically, complete the setup manually. When you are finished, tap Next. To add more than one recipient, mark the checkboxes for the email account cannot be accessed in your phone...
.... 5 Tap the subject field and enter the email subject. 6 To attach a file, press , then tap Attach file. You can be downloaded automatically, complete the setup manually. When you are finished, tap Next. To add more than one recipient, mark the checkboxes for the email account cannot be accessed in your phone...
User Guide
Page 53
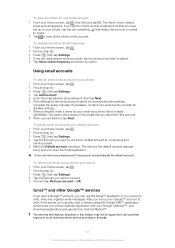
... want to remove. 5 Find and tap Remove account > OK. The services and features described in this chapter may not be downloaded automatically, complete the setup manually. To remove an email account from this account. 8 When you only have set up on your phone, tap the bar containing , then select the account...
... want to remove. 5 Find and tap Remove account > OK. The services and features described in this chapter may not be downloaded automatically, complete the setup manually. To remove an email account from this account. 8 When you only have set up on your phone, tap the bar containing , then select the account...
User Guide
Page 62
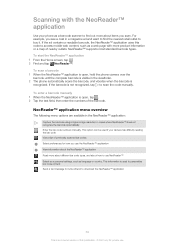
... barcode types. To start the NeoReader™ application 1 From the Home screen, tap . 2 Find and tap NeoReader™. To enter a barcode manually 1 When the NeoReader™ application is open , hold the phone camera over the barcode until the complete barcode is visible in the viewfinder. 2 ...web content, such as language or country. To scan a barcode 1 When the NeoReader™ application is not recognized, tap to scan the code manually. If the ad contains a readable barcode, the NeoReader™ application uses this publication. © Print only for how you scan. Scanning with...
... barcode types. To start the NeoReader™ application 1 From the Home screen, tap . 2 Find and tap NeoReader™. To enter a barcode manually 1 When the NeoReader™ application is open , hold the phone camera over the barcode until the complete barcode is visible in the viewfinder. 2 ...web content, such as language or country. To scan a barcode 1 When the NeoReader™ application is not recognized, tap to scan the code manually. If the ad contains a readable barcode, the NeoReader™ application uses this publication. © Print only for how you scan. Scanning with...
User Guide
Page 63
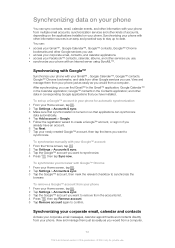
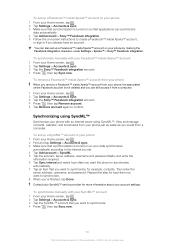
... the Google™ account you want to remove from the accounts list. 4 Press , then tap Remove account. 5 Tap Remove account again to confirm. To synchronize manually with your Google™ account 1 From the Home screen, tap . 2 Tap Settings > Accounts & sync. 3 Tap the Google™ account you want to synchronize. 4 Press , then...
... the Google™ account you want to remove from the accounts list. 4 Press , then tap Remove account. 5 Tap Remove account again to confirm. To synchronize manually with your Google™ account 1 From the Home screen, tap . 2 Tap Settings > Accounts & sync. 3 Tap the Google™ account you want to synchronize. 4 Press , then...
User Guide
Page 65
...account is turned on so that applications can synchronize data automatically. 4 Tap Add account > Sony™ Facebook integration. 5 Follow the on-screen instructions to create a Facebook™ inside Xperia™ account, or sign in your phone 1 From your Home screen, tap . 2... from a computer. To synchronize manually with your Facebook™ inside Xperia™ account 1 From your phone by marking the Facebook integration checkbox under Settings > Xperia™ > Sony™ Facebook integration. You can also set up a Facebook™ inside Xperia™ account on your Home ...
...account is turned on so that applications can synchronize data automatically. 4 Tap Add account > Sony™ Facebook integration. 5 Follow the on-screen instructions to create a Facebook™ inside Xperia™ account, or sign in your phone 1 From your Home screen, tap . 2... from a computer. To synchronize manually with your Facebook™ inside Xperia™ account 1 From your phone by marking the Facebook integration checkbox under Settings > Xperia™ > Sony™ Facebook integration. You can also set up a Facebook™ inside Xperia™ account on your Home ...
User Guide
Page 67
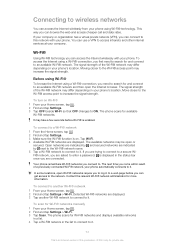
... time you can use . Contact the relevant Wi-Fi® network administrator for available Wi-Fi® networks. To scan for Wi-Fi® networks manually 1 From your phone.
... time you can use . Contact the relevant Wi-Fi® network administrator for available Wi-Fi® networks. To scan for Wi-Fi® networks manually 1 From your phone.
User Guide
Page 68
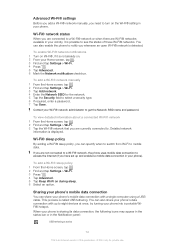
... turning your Wi-Fi® network administrator to get the Network SSID name and password. This process is detected. To add a Wi-Fi® network manually 1 From the Home screen, tap . 2 Find and tap Settings > Wi-Fi. 3 Tap Add network. 4 Enter the Network SSID for private use. Contact your phone into... the Security field to select a security type. 6 If required, enter a password. 7 Tap Save. Advanced Wi-Fi® settings Before you add a Wi-Fi® network manually, you are currently connected to.
... turning your Wi-Fi® network administrator to get the Network SSID name and password. This process is detected. To add a Wi-Fi® network manually 1 From the Home screen, tap . 2 Find and tap Settings > Wi-Fi. 3 Tap Add network. 4 Enter the Network SSID for private use. Contact your phone into... the Security field to select a security type. 6 If required, enter a password. 7 Tap Save. Advanced Wi-Fi® settings Before you add a Wi-Fi® network manually, you are currently connected to.


