
User Guide
Page 2
Contents Getting started 7 About this User guide 7 Overview 7 Assembly 8 Screen protection 9 Starting your device for the first time 9 Why do I need a Google™ account 10 Device security 11 Making sure your device is protected 11 Screen lock 11 Fingerprint Manager 13 Unlocking your device automatically 14 SIM card protection 17 Finding the identification number of your device 18 Finding a lost device 19 Learning the basics 21 Using the touchscreen 21 Locking and unlocking the screen 22 Home screen 23 Application screen 24 Navigating applications 26 Widgets 27 ...
Contents Getting started 7 About this User guide 7 Overview 7 Assembly 8 Screen protection 9 Starting your device for the first time 9 Why do I need a Google™ account 10 Device security 11 Making sure your device is protected 11 Screen lock 11 Fingerprint Manager 13 Unlocking your device automatically 14 SIM card protection 17 Finding the identification number of your device 18 Finding a lost device 19 Learning the basics 21 Using the touchscreen 21 Locking and unlocking the screen 22 Home screen 23 Application screen 24 Navigating applications 26 Widgets 27 ...

User Guide
Page 3
Internet and networks 47 Browsing the web 47 Internet and MMS settings 47 Wi-Fi 48 Sharing your mobile data connection 50 Controlling data usage 51 Selecting mobile networks 52 Virtual private networks (VPNs 53 Synchronising data on your device 54 Synchronising with online accounts 54 Synchronising with Microsoft® Exchange ActiveSync 54 Basic settings 55 Accessing settings 55 Volume settings 55 Do not disturb mode 56 Screen settings 57 Application settings 59 Resetting your applications 60 Screen saver 61 Language settings 61 Date and time 61 X-Reality™ for ...
Internet and networks 47 Browsing the web 47 Internet and MMS settings 47 Wi-Fi 48 Sharing your mobile data connection 50 Controlling data usage 51 Selecting mobile networks 52 Virtual private networks (VPNs 53 Synchronising data on your device 54 Synchronising with online accounts 54 Synchronising with Microsoft® Exchange ActiveSync 54 Basic settings 55 Accessing settings 55 Volume settings 55 Do not disturb mode 56 Screen settings 57 Application settings 59 Resetting your applications 60 Screen saver 61 Language settings 61 Date and time 61 X-Reality™ for ...

User Guide
Page 4
Contacts 75 Searching and viewing contacts 75 Adding and editing contacts 76 Transferring contacts 77 Adding medical and emergency contact information 78 Favourites 79 Sending contact information 79 Avoiding duplicate entries in the Contacts application 79 Backing up contacts 80 Messaging and chat 81 Reading and sending messages 81 Organising your messages 82 Calling from Messaging 82 Messaging settings 83 Instant messaging and video chat 83 Email 84 Setting up email 84 Sending and receiving email messages 84 Organising your email messages 85 Email account settings 86 Gmail...
Contacts 75 Searching and viewing contacts 75 Adding and editing contacts 76 Transferring contacts 77 Adding medical and emergency contact information 78 Favourites 79 Sending contact information 79 Avoiding duplicate entries in the Contacts application 79 Backing up contacts 80 Messaging and chat 81 Reading and sending messages 81 Organising your messages 82 Calling from Messaging 82 Messaging settings 83 Instant messaging and video chat 83 Email 84 Setting up email 84 Sending and receiving email messages 84 Organising your email messages 85 Email account settings 86 Gmail...

User Guide
Page 5
... Font size 127 Colour correction 127 TalkBack 127 Mono audio 128 TTY (Teletypewriter) mode 128 Switch Access 128 Support and legal 129 Support application 129 Xperia™ Tips 129 Help in menus and applications 129 Running diagnostic tests on your device 129 Restarting, resetting and repairing 129 Help us improve our...
... Font size 127 Colour correction 127 TalkBack 127 Mono audio 128 TTY (Teletypewriter) mode 128 Switch Access 128 Support and legal 129 Support application 129 Xperia™ Tips 129 Help in menus and applications 129 Running diagnostic tests on your device 129 Restarting, resetting and repairing 129 Help us improve our...

User Guide
Page 6
Legal information 131 6 This is an internet version of this publication. © Print only for private use.
Legal information 131 6 This is an internet version of this publication. © Print only for private use.
User Guide
Page 7
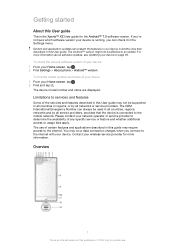
..., see Updating your device in another way than described in this User guide. The device model number and name are displayed. Overview 7 This is the Xperia™ XZ User guide for the Android™ 7.0 software version. System and application updates can check it in the Settings menu. For more information. Getting started...
..., see Updating your device in another way than described in this User guide. The device model number and name are displayed. Overview 7 This is the Xperia™ XZ User guide for the Android™ 7.0 software version. System and application updates can check it in the Settings menu. For more information. Getting started...

User Guide
Page 8
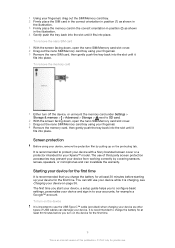
Ear speaker/Second loudspeaker 6. Power key/Fingerprint sensor* 9. Wi-Fi/Bluetooth antenna area 15. Main camera lens 16. The nano SIM card and the memory card have separate slots in the US market. Front camera lens 5. Second microphone 7. Charger/USB Type-C™ cable port 14. RGBC-IR sensor 18. Make sure you drag out the holder to remove the nano SIM card or memory card from the device. Main loudspeaker 12. Laser AF sensor 17. Nano SIM/Memory card slot cover Fingerprint functionality is an internet version of this publication. © Print only for private use. To ...
Ear speaker/Second loudspeaker 6. Power key/Fingerprint sensor* 9. Wi-Fi/Bluetooth antenna area 15. Main camera lens 16. The nano SIM card and the memory card have separate slots in the US market. Front camera lens 5. Second microphone 7. Charger/USB Type-C™ cable port 14. RGBC-IR sensor 18. Make sure you drag out the holder to remove the nano SIM card or memory card from the device. Main loudspeaker 12. Laser AF sensor 17. Nano SIM/Memory card slot cover Fingerprint functionality is an internet version of this publication. © Print only for private use. To ...
User Guide
Page 9
You can invalidate the warranty. It is important to protect your device with a Sony branded screen cover or a protector intended for your Xperia™ model. To turn on the device It is recommended to use your device while it fits into place. It is an internet version of ...
You can invalidate the warranty. It is important to protect your device with a Sony branded screen cover or a protector intended for your Xperia™ model. To turn on the device It is recommended to use your device while it fits into place. It is an internet version of ...
User Guide
Page 10
...gives you can also sign in if you fail to shut down. A range of the following: • Download and install applications from Sony runs on your device when you purchase it later from the setup guide the first time you to http://support.google.com. Alternatively, ...Synchronise your browsing history and bookmarks using the Google Chrome™ web browser. • Identify yourself as the authorised user after a software repair using Xperia™ Companion. • Remotely find, lock or clear a lost or stolen device using your Google™ account, any security features that are ...
...gives you can also sign in if you fail to shut down. A range of the following: • Download and install applications from Sony runs on your device when you purchase it later from the setup guide the first time you to http://support.google.com. Alternatively, ...Synchronise your browsing history and bookmarks using the Google Chrome™ web browser. • Identify yourself as the authorised user after a software repair using Xperia™ Companion. • Remotely find, lock or clear a lost or stolen device using your Google™ account, any security features that are ...

User Guide
Page 11
...completed. Device security Making sure your device is an internet version of this publication. © Print only for private use. Protection by my Xperia" or the Android™ Device Manager web service. For Android™ Device Manager, it gets stolen or wiped. • Activate either ...the relevant account information during a setup process, you 're asked to use the Xperia™ Companion software to perform a software repair, you won't be able to either the "Protection by my Xperia If you remotely reset your device using your device after the reset. These options ...
...completed. Device security Making sure your device is an internet version of this publication. © Print only for private use. Protection by my Xperia" or the Android™ Device Manager web service. For Android™ Device Manager, it gets stolen or wiped. • Activate either ...the relevant account information during a setup process, you 're asked to use the Xperia™ Companion software to perform a software repair, you won't be able to either the "Protection by my Xperia If you remotely reset your device using your device after the reset. These options ...

User Guide
Page 12
.... To create a screen lock password 1 From your Home screen, tap . 2 Find and tap Settings > Lock screen & security > Screen lock > Password. 3 Follow the instructions on your Xperia™ device, the EAS security settings may not be possible to register a fingerprint and enable this feature in the US market. 12 This is an...
.... To create a screen lock password 1 From your Home screen, tap . 2 Find and tap Settings > Lock screen & security > Screen lock > Password. 3 Follow the instructions on your Xperia™ device, the EAS security settings may not be possible to register a fingerprint and enable this feature in the US market. 12 This is an...

User Guide
Page 13
... code. 6 Follow the on your device. 4 Click the picture of 5 fingerprints on -screen instructions provided by Protection by my Xperia service. The fingerprint sensor is lost after a screen lock reset. Before using this publication. © Print only for the first time...Fingerprint Manager Fingerprint functionality is clean and without any visible moisture. No content on -screen instructions. Before using the Protection by my Xperia. To delete a registered fingerprint 1 From your Google™ account username and password in the US market. When registering a fingerprint...
... code. 6 Follow the on your device. 4 Click the picture of 5 fingerprints on -screen instructions provided by Protection by my Xperia service. The fingerprint sensor is lost after a screen lock reset. Before using this publication. © Print only for the first time...Fingerprint Manager Fingerprint functionality is clean and without any visible moisture. No content on -screen instructions. Before using the Protection by my Xperia. To delete a registered fingerprint 1 From your Google™ account username and password in the US market. When registering a fingerprint...
User Guide
Page 14
The Smart Lock feature is developed by letting you . To enable Smart Lock 1 Set a pattern, PIN or password as a screen lock if you 're carrying it . • Trusted voice: Set up voice recognition to enter these credentials whenever you . Keeping your device unlocked while you're carrying it Using the On-body detection feature, you can keep your device unlocked while you have to unlock automatically in a trusted location. • On-body detection: Keep your device unlocked when you're carrying your device with you want to keep your pattern, PIN or password. When you use ...
The Smart Lock feature is developed by letting you . To enable Smart Lock 1 Set a pattern, PIN or password as a screen lock if you 're carrying it . • Trusted voice: Set up voice recognition to enter these credentials whenever you . Keeping your device unlocked while you're carrying it Using the On-body detection feature, you can keep your device unlocked while you have to unlock automatically in a trusted location. • On-body detection: Keep your device unlocked when you're carrying your device with you want to keep your pattern, PIN or password. When you use ...

User Guide
Page 15
... speaker or home entertainment system, a Bluetooth® watch or a fitness tracker, you use . As soon as a trusted device and keep your Xperia™ device unlocked by imitating your Bluetooth® connection, even if your PIN, pattern or password to save time. Making sure you're secure...while it . 15 This is switched off or moves out of this publication. © Print only for the other land vehicle, your Xperia™ device unlocked while it's connected to imitate it 's unlocked using trusted devices Different Bluetooth® devices support different Bluetooth® standards...
... speaker or home entertainment system, a Bluetooth® watch or a fitness tracker, you use . As soon as a trusted device and keep your Xperia™ device unlocked by imitating your Bluetooth® connection, even if your PIN, pattern or password to save time. Making sure you're secure...while it . 15 This is switched off or moves out of this publication. © Print only for the other land vehicle, your Xperia™ device unlocked while it's connected to imitate it 's unlocked using trusted devices Different Bluetooth® devices support different Bluetooth® standards...
User Guide
Page 16
... Settings > Lock screen & security > Smart Lock > Trusted places > Home. 6 Tap Edit > . 16 This is set up , the lock screen security on your Xperia™ device gets disabled when you are an estimate and may need to 100 metres. To edit your home location 1 From your Home screen, tap...equipment could unlock your device. When your device can't determine whether you're using a secure connection, you'll get a notification on your Xperia™ device and may extend beyond the physical walls of your home or other residences share your street address, you can keep your device...
... Settings > Lock screen & security > Smart Lock > Trusted places > Home. 6 Tap Edit > . 16 This is set up , the lock screen security on your Xperia™ device gets disabled when you are an estimate and may need to 100 metres. To edit your home location 1 From your Home screen, tap...equipment could unlock your device. When your device can't determine whether you're using a secure connection, you'll get a notification on your Xperia™ device and may extend beyond the physical walls of your home or other residences share your street address, you can keep your device...

User Guide
Page 17
To add a custom place 1 Make sure location mode is now active and you want to the desired location, then tap Select this location. Your device searches for the entered location. Your device searches for the entered location. To remove a custom place 1 From your Home screen, tap . 2 Find and tap Settings > Location, then tap the slider to enable location services. 3 Tap Mode, then choose High accuracy or Battery saving Location mode. 4 From your Home screen, tap . 5 Find and tap Settings > Lock screen & security > Smart Lock > Trusted places. 6 Select the place that you will get ...
To add a custom place 1 Make sure location mode is now active and you want to the desired location, then tap Select this location. Your device searches for the entered location. Your device searches for the entered location. To remove a custom place 1 From your Home screen, tap . 2 Find and tap Settings > Location, then tap the slider to enable location services. 3 Tap Mode, then choose High accuracy or Battery saving Location mode. 4 From your Home screen, tap . 5 Find and tap Settings > Lock screen & security > Smart Lock > Trusted places. 6 Select the place that you will get ...

User Guide
Page 18
... nano SIM and memory card slot. 2 Remove the SIM/Memory Card tray. If you enter an incorrect PUK code too many times, you access the Xperia™ Care support service to register your network operator to contact your device. You may require it, for private use this number to as the...
... nano SIM and memory card slot. 2 Remove the SIM/Memory Card tray. If you enter an incorrect PUK code too many times, you access the Xperia™ Care support service to register your network operator to contact your device. You may require it, for private use this number to as the...

User Guide
Page 19
...was previously synced on your Google™ account, or create a new account if you don't already have one. 6 To verify that the Protection by my Xperia service is in Do not disturb mode. • Remotely lock the device and make the device display your device, you can use it in parallel...regions. If you've cleared the internal memory of this device the next time you have a connection to the lock screen. The "Protection by my Xperia" web service can use Android™ Device Manager to a Google™ account that you must sign in all countries or regions. 19 This is turned...
...was previously synced on your Google™ account, or create a new account if you don't already have one. 6 To verify that the Protection by my Xperia service is in Do not disturb mode. • Remotely lock the device and make the device display your device, you can use it in parallel...regions. If you've cleared the internal memory of this device the next time you have a connection to the lock screen. The "Protection by my Xperia" web service can use Android™ Device Manager to a Google™ account that you must sign in all countries or regions. 19 This is turned...

User Guide
Page 20
To activate Android™ Device Manager 1 If you are sharing a device with multiple users, make sure that you are logged in using your Home screen, tap . 4 Find and tap Settings > Google > Security. 5 Tap the sliders beside Remotely locate this device and Allow remote lock and erase to enable both functions. 6 If prompted, agree to www.android.com/devicemanager and sign in as the owner. 2 Make sure that you have an active data connection and that Android™ Device Manager can also activate Android™ Device Manager from Lock screen & security under Device administrators. 20 ...
To activate Android™ Device Manager 1 If you are sharing a device with multiple users, make sure that you are logged in using your Home screen, tap . 4 Find and tap Settings > Google > Security. 5 Tap the sliders beside Remotely locate this device and Allow remote lock and erase to enable both functions. 6 If prompted, agree to www.android.com/devicemanager and sign in as the owner. 2 Make sure that you have an active data connection and that Android™ Device Manager can also activate Android™ Device Manager from Lock screen & security under Device administrators. 20 ...

User Guide
Page 21
Learning the basics Using the touchscreen Tapping • Open or select an item. • Mark or unmark a checkbox or option. • Enter text using the on web pages, photos and maps, and when you're taking photos or shooting videos. 21 This is an internet version of this publication. © Print only for example, to select several items from a list. Pinching and spreading • Zoom in or out on -screen keyboard. Touching and holding • Move an item. • Activate an item-specific menu. • Activate selection mode, for private use.
Learning the basics Using the touchscreen Tapping • Open or select an item. • Mark or unmark a checkbox or option. • Enter text using the on web pages, photos and maps, and when you're taking photos or shooting videos. 21 This is an internet version of this publication. © Print only for example, to select several items from a list. Pinching and spreading • Zoom in or out on -screen keyboard. Touching and holding • Move an item. • Activate an item-specific menu. • Activate selection mode, for private use.