User Guide
Page 7
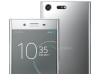
... require access to the cellphone network. Please contact your Home screen, tap . 2 Find and tap Settings > About phone > Android™ version. If you connect to the internet with your device is connected to the internet. For more information. 7 This is the Xperia™ XZ Premium User Guide for private use of certain features and applications described in all countries or regions, or by all networks or service providers. The use . The device model number...
... require access to the cellphone network. Please contact your Home screen, tap . 2 Find and tap Settings > About phone > Android™ version. If you connect to the internet with your device is connected to the internet. For more information. 7 This is the Xperia™ XZ Premium User Guide for private use of certain features and applications described in all countries or regions, or by all networks or service providers. The use . The device model number...
User Guide
Page 11
... while entering your Home screen, tap . 2 Tap Settings > Accounts & sync > Google. 3 Select the Google™ account you want to remove. 4 Tap > Remove account. 5 Tap Remove account again to shut down the power key until the options menu opens. To get the most out of this publication. © Print only for security reasons using the Android Device Manager services. It is locked. In some situations, you need to start your Google account username and password. Also...
... while entering your Home screen, tap . 2 Tap Settings > Accounts & sync > Google. 3 Select the Google™ account you want to remove. 4 Tap > Remove account. 5 Tap Remove account again to shut down the power key until the options menu opens. To get the most out of this publication. © Print only for security reasons using the Android Device Manager services. It is locked. In some situations, you need to start your Google account username and password. Also...
User Guide
Page 15
... device unlocked while it senses that On-body detection as a security feature is less secure than a pattern, PIN, or password. Follow the instructions on an airplane or a boat (or another non-land-based vehicle), your device may not lock automatically, so be sure to lock it manually if needed. • When you pick up Trusted voice 1 From your Home screen, tap . 2 Find and tap Settings > Lock screen & security > Smart Lock...
... device unlocked while it senses that On-body detection as a security feature is less secure than a pattern, PIN, or password. Follow the instructions on an airplane or a boat (or another non-land-based vehicle), your device may not lock automatically, so be sure to lock it manually if needed. • When you pick up Trusted voice 1 From your Home screen, tap . 2 Find and tap Settings > Lock screen & security > Smart Lock...
User Guide
Page 18
... Settings > Lock screen & security > Set up SIM card lock. 3 Select a SIM card. 4 Tap Change SIM PIN. 5 Enter the old SIM card PIN and tap OK. 6 Enter the new SIM card PIN and tap OK. 7 Retype the new SIM card PIN and tap OK. You can select which SIM card will handle data traffic. If you enter the PIN incorrectly too many times, you use both SIM cards and you need to get incoming communication to both SIM cards, you can forward calls that you need to contact your network operator to enter your service provider. The SIM card lock...
... Settings > Lock screen & security > Set up SIM card lock. 3 Select a SIM card. 4 Tap Change SIM PIN. 5 Enter the old SIM card PIN and tap OK. 6 Enter the new SIM card PIN and tap OK. 7 Retype the new SIM card PIN and tap OK. You can select which SIM card will handle data traffic. If you enter the PIN incorrectly too many times, you use both SIM cards and you need to get incoming communication to both SIM cards, you can forward calls that you need to contact your network operator to enter your service provider. The SIM card lock...
User Guide
Page 19
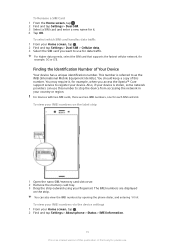
... you access the Xperia™ Care support service to register your Home screen, tap . 2 Find and tap Settings > Dual SIM > Cellular data. 3 Select the SIM card you want to as the IMEI (International Mobile Equipment Identity). For higher data speeds, select the SIM card that supports the fastest cellular network, for it , for data traffic. You can use this number. To view your IMEI numbers via the device settings 1 From your fingernail. To Rename a SIM Card 1 From the Home screen...
... you access the Xperia™ Care support service to register your Home screen, tap . 2 Find and tap Settings > Dual SIM > Cellular data. 3 Select the SIM card you want to as the IMEI (International Mobile Equipment Identity). For higher data speeds, select the SIM card that supports the fastest cellular network, for it , for data traffic. You can use this number. To view your IMEI numbers via the device settings 1 From your fingernail. To Rename a SIM Card 1 From the Home screen...

User Guide
Page 43
... USB connection mode on the device is set to Charge this publication. © Print only for private use it as a power supply, or use . With Xperia™ Companion, you connect your device to the computer. The default connection mode is set to transfer and manage your device to Transfer files. 3 Open Xperia™ Companion, if it when you can access the internet. 5 Computer: If a new software update is detected, a popup window appears. Managing Files Using a Computer Use a USB Type-C™ cable connection between your device...
... USB connection mode on the device is set to Charge this publication. © Print only for private use it as a power supply, or use . With Xperia™ Companion, you connect your device to the computer. The default connection mode is set to transfer and manage your device to Transfer files. 3 Open Xperia™ Companion, if it when you can access the internet. 5 Computer: If a new software update is detected, a popup window appears. Managing Files Using a Computer Use a USB Type-C™ cable connection between your device...

User Guide
Page 44
... to enable the desired mode. Some apps, like the Camera app, can save data directly to a memory card. • The dynamic memory (RAM) cannot be moved to this type of normal usage. Read more storage space. If the device starts to free up as a Supply power, and charge the other device supports USB charging. Using the Use device as MIDI mode, your device as a result of memory to slow down, or applications suddenly shut down the status bar...
... to enable the desired mode. Some apps, like the Camera app, can save data directly to a memory card. • The dynamic memory (RAM) cannot be moved to this type of normal usage. Read more storage space. If the device starts to free up as a Supply power, and charge the other device supports USB charging. Using the Use device as MIDI mode, your device as a result of memory to slow down, or applications suddenly shut down the status bar...

User Guide
Page 48
... types of data: • Applications • Bookmarks • Wi-Fi networks • Other settings To Back Up Data to a Google™ Account 1 From your Home screen, tap . 2 Find and tap Settings > Backup & reset. 3 Under Google™ Backup & restore, tap Back up data to a Google server. Remember that any new apps you can also turn on the automatic restore function to your device. If you are restoring content from the Xperia Backup & Restore service, make to restore application data...
... types of data: • Applications • Bookmarks • Wi-Fi networks • Other settings To Back Up Data to a Google™ Account 1 From your Home screen, tap . 2 Find and tap Settings > Backup & reset. 3 Under Google™ Backup & restore, tap Back up data to a Google server. Remember that any new apps you can also turn on the automatic restore function to your device. If you are restoring content from the Xperia Backup & Restore service, make to restore application data...
User Guide
Page 50
..., this causes connection problems, try again. Once the settings are applicable to a Google™ account or browse with correct internet and Multimedia Messaging Service (MMS) settings. Move to an open location free from the Settings menu, but the downloaded settings are downloaded successfully, appears in most cellphone networks and service providers, these settings come preinstalled on your Home screen, tap . 2 Find and tap Settings > More > Mobile networks. 3 Select a SIM card. 4 Tap Access Point Names > . 5 Tap Name and enter a name...
..., this causes connection problems, try again. Once the settings are applicable to a Google™ account or browse with correct internet and Multimedia Messaging Service (MMS) settings. Move to an open location free from the Settings menu, but the downloaded settings are downloaded successfully, appears in most cellphone networks and service providers, these settings come preinstalled on your Home screen, tap . 2 Find and tap Settings > More > Mobile networks. 3 Select a SIM card. 4 Tap Access Point Names > . 5 Tap Name and enter a name...
User Guide
Page 56
... > Mobile networks. 3 Select a SIM card. 4 Tap Service providers. 5 Tap Search mode, then select Automatic. To Activate Automatic Network Selection 1 From your Home screen, tap . 2 Find and tap Settings > More > Mobile networks. 3 Select a SIM card. 4 Tap Network operators. 5 Tap Search mode, then select Manual. 6 Select a network. For higher data speeds, select the SIM card that supports the fastest cellular network, for other networks, even if you are connected to. To change it later via the Settings menu. You can also manually set your device...
... > Mobile networks. 3 Select a SIM card. 4 Tap Service providers. 5 Tap Search mode, then select Automatic. To Activate Automatic Network Selection 1 From your Home screen, tap . 2 Find and tap Settings > More > Mobile networks. 3 Select a SIM card. 4 Tap Network operators. 5 Tap Search mode, then select Manual. 6 Select a network. For higher data speeds, select the SIM card that supports the fastest cellular network, for other networks, even if you are connected to. To change it later via the Settings menu. You can also manually set your device...

User Guide
Page 58
... Settings > Accounts & sync > Add account > Exchange ActiveSync. 3 Enter your corporate email address and password. 4 Tap NEXT. If you want to only a PIN or password. To set certain security rules on your Xperia™ device, the EAS security settings may limit the lock screen type to synchronize. To Synchronize Manually With an Online Account 1 From your Home screen, tap > Settings > Accounts & sync. 2 Tap the name of items appears showing what network security policies are implemented for private use. After setup, you want to remove...
... Settings > Accounts & sync > Add account > Exchange ActiveSync. 3 Enter your corporate email address and password. 4 Tap NEXT. If you want to only a PIN or password. To set certain security rules on your Xperia™ device, the EAS security settings may limit the lock screen type to synchronize. To Synchronize Manually With an Online Account 1 From your Home screen, tap > Settings > Accounts & sync. 2 Tap the name of items appears showing what network security policies are implemented for private use. After setup, you want to remove...

User Guide
Page 63
Screen Pinning Use screen pinning to set up window that you accidentally touch the Home navigation key, the screen pinning feature prevents the active game app screen from being minimized. Screen pinning is registered. To enable or disable screen pinning 1 From your Home screen, tap . 2 Find and tap Settings > Lock screen & security > Screen pinning. 3 Tap the slider to enable or disable the function. 4 Tap the Lock device when unpinning slider and select from unpinning a screen and accessing your device to the Camera application so that the person can...
Screen Pinning Use screen pinning to set up window that you accidentally touch the Home navigation key, the screen pinning feature prevents the active game app screen from being minimized. Screen pinning is registered. To enable or disable screen pinning 1 From your Home screen, tap . 2 Find and tap Settings > Lock screen & security > Screen pinning. 3 Tap the slider to enable or disable the function. 4 Tap the Lock device when unpinning slider and select from unpinning a screen and accessing your device to the Camera application so that the person can...
User Guide
Page 65
... users, each time you want. To Clear Application Data 1 From your device. To Clear the Application Default Setting 1 From your Home screen, tap . 2 Find and tap Settings > Apps. 3 Tap and find and tap . 2 Tap , then tap Settings > Auto-update apps. 3 Select the preferred option. To Manage App Links from the Settings Menu 1 From your Home screen, tap . 2 Find and tap Settings > Apps. 3 Select an application or service, and then tap Open by default > CLEAR DEFAULTS. When you don't need...
... users, each time you want. To Clear Application Data 1 From your device. To Clear the Application Default Setting 1 From your Home screen, tap . 2 Find and tap Settings > Apps. 3 Tap and find and tap . 2 Tap , then tap Settings > Auto-update apps. 3 Select the preferred option. To Manage App Links from the Settings Menu 1 From your Home screen, tap . 2 Find and tap Settings > Apps. 3 Select an application or service, and then tap Open by default > CLEAR DEFAULTS. When you don't need...
User Guide
Page 67
... for private use. To Upgrade the Quality of Compressed Music Files 1 From your Home screen, tap . 2 Find and tap Settings > Sound > Audio settings. 3 Enable the ClearAudio+ function by default, but you can also improve the quality of compressed music files to enable or disable. To apply an image enhancement mode 1 From your device. You can turn it off if you view them on your Home screen, tap . 2 Find and tap Settings > Display > Color...
... for private use. To Upgrade the Quality of Compressed Music Files 1 From your Home screen, tap . 2 Find and tap Settings > Sound > Audio settings. 3 Enable the ClearAudio+ function by default, but you can also improve the quality of compressed music files to enable or disable. To apply an image enhancement mode 1 From your device. You can turn it off if you view them on your Home screen, tap . 2 Find and tap Settings > Display > Color...

User Guide
Page 75
... which SIM card the call comes in the heads-up notification window. To Answer an Incoming Call When the Screen is for . To add a direct dial number to your Home screen, tap . 2 Find and tap . Receiving Calls If you receive an incoming call is Active • When a call , you can choose to manage the call 1 From your home screen 1 Touch and hold 0 until the device vibrates and the customization menu appears. 2 In the customization menu, tap Shortcuts. 3 Scroll through the list...
... which SIM card the call comes in the heads-up notification window. To Answer an Incoming Call When the Screen is for . To add a direct dial number to your Home screen, tap . 2 Find and tap . Receiving Calls If you receive an incoming call is Active • When a call , you can choose to manage the call 1 From your home screen 1 Touch and hold 0 until the device vibrates and the customization menu appears. 2 In the customization menu, tap Shortcuts. 3 Scroll through the list...

User Guide
Page 76
... Messaging conversation with a Text Message You can handle incoming calls without touching the screen by turning on your ear. • Reject: shake the device. • Ringer off: place the device face down. You can create a new message. Once activated, you want to edit, then make the necessary changes. 4 Tap OK. To Reject a Call with a message. To Turn On Smart Call Handling 1 From your Home screen, tap . 2 Find and tap Settings > Call. 3 Select a SIM card. 4 Tap Smart call...
... Messaging conversation with a Text Message You can handle incoming calls without touching the screen by turning on your ear. • Reject: shake the device. • Ringer off: place the device face down. You can create a new message. Once activated, you want to edit, then make the necessary changes. 4 Tap OK. To Reject a Call with a message. To Turn On Smart Call Handling 1 From your Home screen, tap . 2 Find and tap Settings > Call. 3 Select a SIM card. 4 Tap Smart call...
User Guide
Page 78
... tap . 3 Tap a number displayed in on SIM card 1 to SIM card 2 when SIM card 1 is unreachable, and vice versa. In some cases, the numbers are prompted to complete the procedure. You must enable it , check you want to forward calls to, then tap Turn on -screen instructions to enter them manually. If your service provider, you can direct calls to voicemail. Forwarding Calls You can send all network operators. To Turn Off Call Forwarding 1 From your Home screen, tap . 2 Find...
... tap . 3 Tap a number displayed in on SIM card 1 to SIM card 2 when SIM card 1 is unreachable, and vice versa. In some cases, the numbers are prompted to complete the procedure. You must enable it , check you want to forward calls to, then tap Turn on -screen instructions to enter them manually. If your service provider, you can direct calls to voicemail. Forwarding Calls You can send all network operators. To Turn Off Call Forwarding 1 From your Home screen, tap . 2 Find...

User Guide
Page 83
... Block numbers. 3 Tap Add a number, then enter the phone number that account will show as the default account to edit the number again when you make calls from abroad. Some synchronization services do not have to save it as desired. 4 After you add the picture, tap SAVE. If you want to add a picture that you want to edit, and then tap . 3 Tap > Set ringtone. 4 Select an option from the Album application. To Edit a Contact 1 From your Home screen...
... Block numbers. 3 Tap Add a number, then enter the phone number that account will show as the default account to edit the number again when you make calls from abroad. Some synchronization services do not have to save it as desired. 4 After you add the picture, tap SAVE. If you want to add a picture that you want to edit, and then tap . 3 Tap > Set ringtone. 4 Select an option from the Album application. To Edit a Contact 1 From your Home screen...
User Guide
Page 105
... light that the face is saved. 4 Press the camera key or tap the shutter button to optimize exposure. This setting is only available in Manual mode. The setting is neither too dark nor too bright Multi Divides the image into several parts, and measures each part to take a photo. This setting is only available in Superior auto and Video modes. Metering settings Face Measures the amount...
... light that the face is saved. 4 Press the camera key or tap the shutter button to optimize exposure. This setting is only available in Manual mode. The setting is neither too dark nor too bright Multi Divides the image into several parts, and measures each part to take a photo. This setting is only available in Superior auto and Video modes. Metering settings Face Measures the amount...

User Guide
Page 144
... interrupt a factory data reset procedure. 1 Back up key at all after you updated the Xperia™ software or after the reset. 2 From your Home screen, tap . 3 Find and tap Settings > Backup & reset > Factory data reset. 4 Tap Reset phone. 5 If required, draw your screen unlock pattern or enter your PC or Mac®. 2 Open the Xperia™ Companion software on the computer and click on Software repair on the main screen. 3 Follow the instructions that help improve our software. Your device does...
... interrupt a factory data reset procedure. 1 Back up key at all after you updated the Xperia™ software or after the reset. 2 From your Home screen, tap . 3 Find and tap Settings > Backup & reset > Factory data reset. 4 Tap Reset phone. 5 If required, draw your screen unlock pattern or enter your PC or Mac®. 2 Open the Xperia™ Companion software on the computer and click on Software repair on the main screen. 3 Follow the instructions that help improve our software. Your device does...


