User Guide
Page 2
Contents Getting started 6 User guide in the phone 6 Assembly 6 Turning the phone on and off 7 Connect and communicate 7 Getting to know your phone 10 Phone overview 10 Charging the battery 10 Using the hardware keys 11 Home screen 12 Status bar 14 Notification panel 15 Applications screen 16 Recently used applications window 18 Notification LED 18 Sensors 18 Using the touch screen 18 Screen lock 20 Entering text 21 Phone settings overview 22 SIM card 24 Memory 24 Internet and messaging settings 25 Network settings 26 Calling 27 Emergency calls 27 Call handling 27 ...
Contents Getting started 6 User guide in the phone 6 Assembly 6 Turning the phone on and off 7 Connect and communicate 7 Getting to know your phone 10 Phone overview 10 Charging the battery 10 Using the hardware keys 11 Home screen 12 Status bar 14 Notification panel 15 Applications screen 16 Recently used applications window 18 Notification LED 18 Sensors 18 Using the touch screen 18 Screen lock 20 Entering text 21 Phone settings overview 22 SIM card 24 Memory 24 Internet and messaging settings 25 Network settings 26 Calling 27 Emergency calls 27 Call handling 27 ...

User Guide
Page 3
...Timescape™ settings 42 Web service setup in Timescape 42 Using Timescape™ as your home screen 43 Calendar 44 Synchronizing 45 Sony Ericsson Sync 45 Google Sync™syncing service 46 Wi-Fi 47 Before using Wi-Fi 47 Wi-Fi™ network status 47 Advanced...USB cable 56 PC Companion 56 Media Go 57 Bluetooth™ wireless technology 58 Phone name 58 Pairing with another Bluetooth™ device 58 Sony Ericsson Mediascape 60 Exploring related media content 60 Viewing detailed information about media content 60 3 This is an Internet version of this publication. ©...
...Timescape™ settings 42 Web service setup in Timescape 42 Using Timescape™ as your home screen 43 Calendar 44 Synchronizing 45 Sony Ericsson Sync 45 Google Sync™syncing service 46 Wi-Fi 47 Before using Wi-Fi 47 Wi-Fi™ network status 47 Advanced...USB cable 56 PC Companion 56 Media Go 57 Bluetooth™ wireless technology 58 Phone name 58 Pairing with another Bluetooth™ device 58 Sony Ericsson Mediascape 60 Exploring related media content 60 Viewing detailed information about media content 60 3 This is an Internet version of this publication. ©...

User Guide
Page 4
...Browsing locally stored audio content 63 Music player overview 64 Using the music player 65 Podcasts 67 TrackID™ technology 67 Photos in Sony Ericsson Mediascape 68 Setting up accounts for online services 68 Photo home screen 68 Browsing locally stored photos 69 Photo viewer overview 70 Adding... names to faces in photos 71 Videos in Sony Ericsson Mediascape 73 Video home screen 73 Browsing videos 73 Video player overview 74 PlayNow™ service 76 Before using PlayNow 76 Using ...
...Browsing locally stored audio content 63 Music player overview 64 Using the music player 65 Podcasts 67 TrackID™ technology 67 Photos in Sony Ericsson Mediascape 68 Setting up accounts for online services 68 Photo home screen 68 Browsing locally stored photos 69 Photo viewer overview 70 Adding... names to faces in photos 71 Videos in Sony Ericsson Mediascape 73 Video home screen 73 Browsing videos 73 Video player overview 74 PlayNow™ service 76 Before using PlayNow 76 Using ...

User Guide
Page 5
Legal information 96 Index 97 5 This is an Internet version of this publication. © Print only for private use.
Legal information 96 Index 97 5 This is an Internet version of this publication. © Print only for private use.

User Guide
Page 6
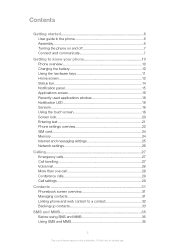
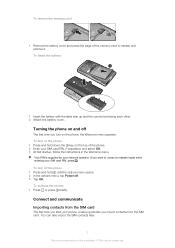
User guide in the phone An extended user guide is available in all networks and/or service providers in your phone when the supplied memory card is also available at www.sonyericsson.com/support. Please contact your cell phone. Important information Please read the Important information leaflet before you use . The extended User guide and more information is inserted into the holders with the gold colored contacts facing down. 6 This is an Internet version of this applies to determine availability of the services and features described in this User guide, unless otherwise ...
User guide in the phone An extended user guide is available in all networks and/or service providers in your phone when the supplied memory card is also available at www.sonyericsson.com/support. Please contact your cell phone. Important information Please read the Important information leaflet before you use . The extended User guide and more information is inserted into the holders with the gold colored contacts facing down. 6 This is an Internet version of this applies to determine availability of the services and features described in this User guide, unless otherwise ...
User Guide
Page 7
Your PIN is an Internet version of this publication. © Print only for private use. To activate the screen • Press or press briefly. Turning the phone on the phone 1 Press and hold until the options menu opens. 2 In the options menu, tap Power off The first time you want to release and remove it. To insert the battery 1 Insert the battery with the label side up and the connectors facing each other. 2 Attach the battery cover. To turn on and off . 3 Tap OK. If you turn off the phone 1 Press and hold down the key on the phone, the Welcome menu appears. You can also...
Your PIN is an Internet version of this publication. © Print only for private use. To activate the screen • Press or press briefly. Turning the phone on the phone 1 Press and hold until the options menu opens. 2 In the options menu, tap Power off The first time you want to release and remove it. To insert the battery 1 Insert the battery with the label side up and the connectors facing each other. 2 Attach the battery cover. To turn on and off . 3 Tap OK. If you turn off the phone 1 Press and hold down the key on the phone, the Welcome menu appears. You can also...
User Guide
Page 8
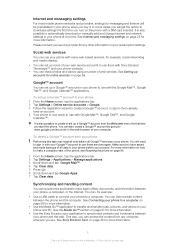
...; applications. See Internet and messaging settings on page 68. menu the first time you proceed. For more information. • Use the Sony Ericsson sync application to make a complete reset of files, documents, and information between your phone and the web. To set up a Google...™ account in your phone and PC. Make sure you have an account. 4 Your phone is also possible to use these services again. See Sony Ericsson Sync on page 94. 1 From the Home screen, tap the applications bar. 2 Tap Settings > Applications > Manage applications. 3 Scroll down and tap...
...; applications. See Internet and messaging settings on page 68. menu the first time you proceed. For more information. • Use the Sony Ericsson sync application to make a complete reset of files, documents, and information between your phone and the web. To set up a Google...™ account in your phone and PC. Make sure you have an account. 4 Your phone is also possible to use these services again. See Sony Ericsson Sync on page 94. 1 From the Home screen, tap the applications bar. 2 Tap Settings > Applications > Manage applications. 3 Scroll down and tap...

User Guide
Page 9
• Use the Google Sync™ application to synchronize your Google Mail™, calendar, and contacts with your phone. See Google Sync™syncing service on page 46 for more information. 9 This is an Internet version of this publication. © Print only for private use.
• Use the Google Sync™ application to synchronize your Google Mail™, calendar, and contacts with your phone. See Google Sync™syncing service on page 46 for more information. 9 This is an Internet version of this publication. © Print only for private use.
User Guide
Page 10
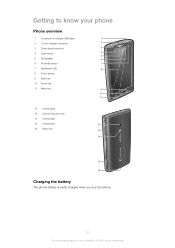
Getting to know your phone Phone overview 1 Connector for charger/USB cable 1 2 3.5 mm headset connector 2 3 Power key/screen lock 3 4 Light sensor 4 5 5 Ear speaker 6 6 Proximity sensor 7 7 Notification LED 8 8 Touch screen 9 Back key 10 Home key 11 Menu key 9 10 11 12 Camera lens 13 Volume key/zoom key 14 Camera light 15 Camera key 12 16 Strap hole 13 14 15 16 Charging the battery The phone battery is partly charged when you buy the phone. 10 This is an Internet version of this publication. © Print only for private use.
Getting to know your phone Phone overview 1 Connector for charger/USB cable 1 2 3.5 mm headset connector 2 3 Power key/screen lock 3 4 Light sensor 4 5 5 Ear speaker 6 6 Proximity sensor 7 7 Notification LED 8 8 Touch screen 9 Back key 10 Home key 11 Menu key 9 10 11 12 Camera lens 13 Volume key/zoom key 14 Camera light 15 Camera key 12 16 Strap hole 13 14 15 16 Charging the battery The phone battery is partly charged when you buy the phone. 10 This is an Internet version of this publication. © Print only for private use.

User Guide
Page 11
To charge the phone using a computer • Connect the phone to maximize the battery performance. This consumes power. The antenna is an Internet version of this publication. © Print only for available networks. Maximizing battery performance You can 't move to improve your battery performance: • Decrease the brightness of the phone Go to www.sonyericsson.com/support to learn more about how to a USB port on a computer using the USB cable and the power adapter. If you are in a call or when transferring data. Using the hardware keys 11 This is located at the...
To charge the phone using a computer • Connect the phone to maximize the battery performance. This consumes power. The antenna is an Internet version of this publication. © Print only for available networks. Maximizing battery performance You can 't move to improve your battery performance: • Decrease the brightness of the phone Go to www.sonyericsson.com/support to learn more about how to a USB port on a computer using the USB cable and the power adapter. If you are in a call or when transferring data. Using the hardware keys 11 This is located at the...
User Guide
Page 12
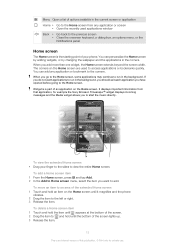
... the bottom of the screen lights up. 3 Release the item. 12 This is an Internet version of this publication. © Print only for example the Sony Ericsson Timescape™ widget displays incoming messages and the Media widget allows you to start the music directly. Menu Open a list of options available in the...
... the bottom of the screen lights up. 3 Release the item. 12 This is an Internet version of this publication. © Print only for example the Sony Ericsson Timescape™ widget displays incoming messages and the Media widget allows you to start the music directly. Menu Open a list of options available in the...

User Guide
Page 13
To add items to a folder 1 Touch and hold an application until it appears on the Home screen until it . 2 Touch and hold on the Home screen. To create a shortcut from a variety of colors, backgrounds, shapes, and elements: 1 2 3 4 5 13 This is an Internet version of this publication. © Print only for private use. You can also create free-hand drawings, and add text or photos. Creatouch™ menu overview Choose from the applications screen 1 From the Home screen, tap the applications bar. 2 Touch and hold an application icon until the Add to the folder. To ...
To add items to a folder 1 Touch and hold an application until it appears on the Home screen until it . 2 Touch and hold on the Home screen. To create a shortcut from a variety of colors, backgrounds, shapes, and elements: 1 2 3 4 5 13 This is an Internet version of this publication. © Print only for private use. You can also create free-hand drawings, and add text or photos. Creatouch™ menu overview Choose from the applications screen 1 From the Home screen, tap the applications bar. 2 Touch and hold an application icon until the Add to the folder. To ...
User Guide
Page 14
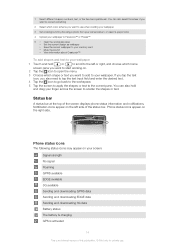
1 Select different shapes, numbers, text, or the free-hand paintbrush. Status bar A status bar at the top of the status bar. Notification icons appear on the left or right, and choose which home screen pane you want to start working on. 2 Tap the icon to open the menu. 3 Choose which color scheme you want to your wallpaper 1 Touch and hold and drag your finger across the screen to the current pane. You can also select the eraser if you want to add to use . Phone status icons appear on your screen: Signal strength No signal Roaming GPRS available EDGE available 3G ...
1 Select different shapes, numbers, text, or the free-hand paintbrush. Status bar A status bar at the top of the status bar. Notification icons appear on the left or right, and choose which home screen pane you want to start working on. 2 Tap the icon to open the menu. 3 Choose which color scheme you want to your wallpaper 1 Touch and hold and drag your finger across the screen to the current pane. You can also select the eraser if you want to add to use . Phone status icons appear on your screen: Signal strength No signal Roaming GPRS available EDGE available 3G ...

User Guide
Page 15
Airplane mode is activated Headset connected The Bluetooth™ function is activated Connected to another Bluetooth™ device SIM card is locked Phone microphone is mute Speakerphone on Phone speaker is mute Vibrate mode An alarm is set Syncing error Notification icons The following notification icons may appear on Downloading data Uploading data More (undisplayed) notifications Notification panel Notification icons are displayed in /sync Storage card is full Wi-Fi™ connection is an Internet version of this publication. © Print only for private use. You can open ...
Airplane mode is activated Headset connected The Bluetooth™ function is activated Connected to another Bluetooth™ device SIM card is locked Phone microphone is mute Speakerphone on Phone speaker is mute Vibrate mode An alarm is set Syncing error Notification icons The following notification icons may appear on Downloading data Uploading data More (undisplayed) notifications Notification panel Notification icons are displayed in /sync Storage card is full Wi-Fi™ connection is an Internet version of this publication. © Print only for private use. You can open ...

User Guide
Page 16
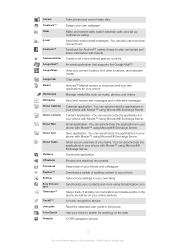
To clear the Notification panel • From the Notification panel, tap Clear. To close the Notification panel • Press . To open the Notification panel • Drag the status bar downwards. Applications overview Alarm Clock Browser Calculator Calendar Set an alarm Browse web sites as well as download new programs and files from the Internet Perform basic calculations such as addition, subtraction, multiplication, and division Keep track of this publication. © Print only for private use. To close the Applications screen • Tap the applications bar. • ...
To clear the Notification panel • From the Notification panel, tap Clear. To close the Notification panel • Press . To open the Notification panel • Drag the status bar downwards. Applications overview Alarm Clock Browser Calculator Calendar Set an alarm Browse web sites as well as download new programs and files from the Internet Perform basic calculations such as addition, subtraction, multiplication, and division Keep track of this publication. © Print only for private use. To close the Applications screen • Tap the applications bar. • ...
User Guide
Page 17
... Mail™ Google Maps Google Talk Market Mediascape Messaging Moxier Calendar Moxier Contacts Moxier Mail Moxier Sync Moxier Tasks MySpace OfficeSuite Phonebook PlayNow™ Settings Sony Ericsson sync Timescape™ TrackID™ User guide Voice Search Wisepilot Take photos and record video clips Design your phone with Moxier™ using Microsoft®...
... Mail™ Google Maps Google Talk Market Mediascape Messaging Moxier Calendar Moxier Contacts Moxier Mail Moxier Sync Moxier Tasks MySpace OfficeSuite Phonebook PlayNow™ Settings Sony Ericsson sync Timescape™ TrackID™ User guide Voice Search Wisepilot Take photos and record video clips Design your phone with Moxier™ using Microsoft®...
User Guide
Page 18
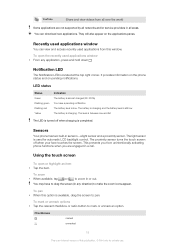
YouTube Share and view videos from unintentionally activating phone functions when you from all over the world Some applications are engaged in a call. Notification LED The Notification LED is completed. a light sensor and a proximity sensor. To zoom • When available, tap or to make the zoom icons appear. They will also appear on pending notifications. Using the touch screen To open the recently used for private use. You may have a pending notification The battery level is available, drag the screen to mark or unmark an option. To pan • When ...
YouTube Share and view videos from unintentionally activating phone functions when you from all over the world Some applications are engaged in a call. Notification LED The Notification LED is completed. a light sensor and a proximity sensor. To zoom • When available, tap or to make the zoom icons appear. They will also appear on pending notifications. Using the touch screen To open the recently used for private use. You may have a pending notification The battery level is available, drag the screen to mark or unmark an option. To pan • When ...

User Guide
Page 19
To scroll • Drag up or down to scroll. • Flick to scroll quickly. To prevent the screen orientation from changing automatically means that the phone stays in portrait orientation by tapping the screen. You can stop or you can wait for private use. List Some lists have an alphabetic index on the screen. You can also scroll to the sides. Preventing the screen orientation from changing automatically 1 From the Home screen, tap the applications bar. 2 Tap Settings > Sound & display. 3 Unmark the Orientation checkbox. To set the phone to stay in portrait...
To scroll • Drag up or down to scroll. • Flick to scroll quickly. To prevent the screen orientation from changing automatically means that the phone stays in portrait orientation by tapping the screen. You can stop or you can wait for private use. List Some lists have an alphabetic index on the screen. You can also scroll to the sides. Preventing the screen orientation from changing automatically 1 From the Home screen, tap the applications bar. 2 Tap Settings > Sound & display. 3 Unmark the Orientation checkbox. To set the phone to stay in portrait...

User Guide
Page 20
or right-handed. To lock the screen • Press briefly. To unlock the screen • Drag the screen lock arrow along the screen lock path. Screen lock The screen lock prevents unwanted actions on the touchscreen when you want to select on if you are not using your phone. To change the direction of the screen lock path to get a better feel, depending on the index. To set period of this publication. © Print only for the automatic screen lock 1 From the Home screen, tap the applications bar, then tap Settings. 2 Tap Sound & display > Screen timeout. 3 Select an option....
or right-handed. To lock the screen • Press briefly. To unlock the screen • Drag the screen lock arrow along the screen lock path. Screen lock The screen lock prevents unwanted actions on the touchscreen when you want to select on if you are not using your phone. To change the direction of the screen lock path to get a better feel, depending on the index. To set period of this publication. © Print only for the automatic screen lock 1 From the Home screen, tap the applications bar, then tap Settings. 2 Tap Sound & display > Screen timeout. 3 Select an option....

User Guide
Page 21
To set keyboard options 1 From the Home screen, tap the applications bar. 2 Tap Settings > Locale & text > Standard keyboard. 3 Set the options you want to open the keyboard. 5 Write the word and tap OK. 21 This is an overview of some of this publication. © Print only for private use . To add words to the User dictionary 1 From the Home screen, tap the applications bar. 2 Tap Settings > Locale & text > Standard keyboard > My words. 3 Press . 4 Tap Add and tap the text bar to use . You can close the keyboard at any time by pressing . To display the keyboard and enter text &#...
To set keyboard options 1 From the Home screen, tap the applications bar. 2 Tap Settings > Locale & text > Standard keyboard. 3 Set the options you want to open the keyboard. 5 Write the word and tap OK. 21 This is an overview of some of this publication. © Print only for private use . To add words to the User dictionary 1 From the Home screen, tap the applications bar. 2 Tap Settings > Locale & text > Standard keyboard > My words. 3 Press . 4 Tap Add and tap the text bar to use . You can close the keyboard at any time by pressing . To display the keyboard and enter text &#...
