
User Guide
Page 3
...8 Charging the battery 8 Phone overview 10 Menu overview 12 Navigation 14 Memory 15 Phone Language 16 Entering Text 17 Cyber-shot 18 Using the camera 18 More camera features 19 Viewing and tagging photos............20 Working with photos 22 Blogging 22 Printing photos 23 Transferring and handling... content in the phone.........24 Sending content to another phone 25 Transferring content to and from a computer 25 Using the USB cable 26 Phone name 27 Using Bluetooth™ wireless technology 27 Backing up and restoring 28 Calling 30 Making and Receiving Calls 30 Contacts 32...
...8 Charging the battery 8 Phone overview 10 Menu overview 12 Navigation 14 Memory 15 Phone Language 16 Entering Text 17 Cyber-shot 18 Using the camera 18 More camera features 19 Viewing and tagging photos............20 Working with photos 22 Blogging 22 Printing photos 23 Transferring and handling... content in the phone.........24 Sending content to another phone 25 Transferring content to and from a computer 25 Using the USB cable 26 Phone name 27 Using Bluetooth™ wireless technology 27 Backing up and restoring 28 Calling 30 Making and Receiving Calls 30 Contacts 32...

User Guide
Page 4
... 54 Google Maps™ for mobile 54 Driving directions 55 More GPS features 55 Synchronizing 57 Synchronizing using a computer......57 Synchronizing using an Internet service 58 More Features 59 Flight mode 59 Update Service 59 Alarms 60 Calendar 61 Notes 61 Tasks 62 Profiles 62 Time and ... 67 Common Questions 67 Error Messages 70 Important information.........71 Index 83 2 This is an Internet version of this publication. © Print only for private use.
... 54 Google Maps™ for mobile 54 Driving directions 55 More GPS features 55 Synchronizing 57 Synchronizing using a computer......57 Synchronizing using an Internet service 58 More Features 59 Flight mode 59 Update Service 59 Alarms 60 Calendar 61 Notes 61 Tasks 62 Profiles 62 Time and ... 67 Common Questions 67 Error Messages 70 Important information.........71 Index 83 2 This is an Internet version of this publication. © Print only for private use.
User Guide
Page 5
...Mobile MusicID™. Adobe Photoshop Album Starter Edition is a trademark or registered trademark of Adobe Systems Incorporated in any warranty. Sony Ericsson C905a Cyber-shot™ UMTS/HSDPA 850/1900/2100 GSM/GPRS/EDGE 850/900/1800/1900 This User guide is an Internet version...trademarks or registered trademarks of Sony Corporation. You, and not Sony Ericsson, are not supported by Sony Ericsson Mobile Communications AB at any time and without any way for your improper use of ACCESS Co., Ltd. Smart-Fit Rendering is powered by Sony Ericsson Mobile Communications AB or its...
...Mobile MusicID™. Adobe Photoshop Album Starter Edition is a trademark or registered trademark of Adobe Systems Incorporated in any warranty. Sony Ericsson C905a Cyber-shot™ UMTS/HSDPA 850/1900/2100 GSM/GPRS/EDGE 850/900/1800/1900 This User guide is an Internet version...trademarks or registered trademarks of Sony Corporation. You, and not Sony Ericsson, are not supported by Sony Ericsson Mobile Communications AB at any time and without any way for your improper use of ACCESS Co., Ltd. Smart-Fit Rendering is powered by Sony Ericsson Mobile Communications AB or its...

User Guide
Page 6
...technology (WMDRM) to protect their content. This product is protected by certain intellectual property rights of a consumer for private use. This device uses WMDRM software to anyone on the U.S. This product is a trademark or a registered trademark of Specially Designated Nations or ... technical data, is prohibited without a license from Fraunhofer IIS and Thomson. export control laws, including the U.S. Customer agrees to use of Microsoft. Treasury Department's list of Tegic Communications. T9™ Text Input is licensed under one or more of this publication...
...technology (WMDRM) to protect their content. This product is protected by certain intellectual property rights of a consumer for private use. This device uses WMDRM software to anyone on the U.S. This product is a trademark or a registered trademark of Specially Designated Nations or ... technical data, is prohibited without a license from Fraunhofer IIS and Thomson. export control laws, including the U.S. Customer agrees to use of Microsoft. Treasury Department's list of Tegic Communications. T9™ Text Input is licensed under one or more of this publication...
User Guide
Page 7
... illustrations are reserved. Instruction Symbols These symbols may be the trademarks of this publication. © Print only for details. > Use a selection or navigation key to the restrictions as set forth in the Rights in Technical Data and Computer Software Clauses in DFARS... 252.227-7013(c) (1) and FAR 52.227-19(c) (2) as applicable. Restricted Rights: Use, duplication or disclosure by the United States government is subject to scroll and select. or subscription-dependent. Any rights not expressly granted herein are...
... illustrations are reserved. Instruction Symbols These symbols may be the trademarks of this publication. © Print only for details. > Use a selection or navigation key to the restrictions as set forth in the Rights in Technical Data and Computer Software Clauses in DFARS... 252.227-7013(c) (1) and FAR 52.227-19(c) (2) as applicable. Restricted Rights: Use, duplication or disclosure by the United States government is subject to scroll and select. or subscription-dependent. Any rights not expressly granted herein are...

User Guide
Page 8
To insert the SIM card To insert the battery 1 Remove the battery cover. 2 Slide the SIM card into its holder with the gold-coloured contacts facing down. 1 Insert the battery with the label side up and the connectors facing each other. 2 Slide the battery cover into place. 6 Getting started Assembly Before you start using your phone, you need to insert a SIM card and the battery. Getting started This is an Internet version of this publication. © Print only for private use.
To insert the SIM card To insert the battery 1 Remove the battery cover. 2 Slide the SIM card into its holder with the gold-coloured contacts facing down. 1 Insert the battery with the label side up and the connectors facing each other. 2 Slide the battery cover into place. 6 Getting started Assembly Before you start using your phone, you need to insert a SIM card and the battery. Getting started This is an Internet version of this publication. © Print only for private use.

User Guide
Page 9
..., contains information about your PIN, press . See SIM card lock on your phone and entered your network operator. This view is now ready for use. You can see and call an emergency number without entering a PIN. PIN You may need a PIN (Personal Identification Number) to activate the services... is called standby. SIM card The SIM (Subscriber Identity Module) card, which you remove it starts with emergency number digits, for basic settings and useful tips. If you want to the SIM card on the phone 1 Press and hold down . 2 Enter your phone. If you enter your subscription...
..., contains information about your PIN, press . See SIM card lock on your phone and entered your network operator. This view is now ready for use. You can see and call an emergency number without entering a PIN. PIN You may need a PIN (Personal Identification Number) to activate the services... is called standby. SIM card The SIM (Subscriber Identity Module) card, which you remove it starts with emergency number digits, for basic settings and useful tips. If you want to the SIM card on the phone 1 Press and hold down . 2 Enter your phone. If you enter your subscription...

User Guide
Page 10
... Options. Charging the battery The phone battery is shown. It takes approximately 2.5 hours to a function and select Info, if available. Contact your operator for private use. To view the phone status • From standby press the volume key. Help In addition to this publication. © Print only for more information are...
... Options. Charging the battery The phone battery is shown. It takes approximately 2.5 hours to a function and select Info, if available. Contact your operator for private use. To view the phone status • From standby press the volume key. Help In addition to this publication. © Print only for more information are...

User Guide
Page 11
You can charge the battery at any time and for private use your phone while it is an Internet version of this publication. © Print only for more or less than 2.5 hours. You can use . Getting started 9 This is charging. You can interrupt the charging without damaging the battery. 2 Remove the charger by tilting the plug upwards.
You can charge the battery at any time and for private use your phone while it is an Internet version of this publication. © Print only for more or less than 2.5 hours. You can use . Getting started 9 This is charging. You can interrupt the charging without damaging the battery. 2 Remove the charger by tilting the plug upwards.

User Guide
Page 12
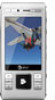
Phone overview 1 Photo key, gaming key B 2 Photo key, gaming key A 1 3 Light sensor 2 10 3 4 Screen 5 Selection keys 4 6 Memory card slot 7 Call key 8 Activity menu key 9 Connector for charger, handsfree and USB cable 5 10 Ear speaker 11 11 End, on/off key 6 7 12 13 12 C key (Clear) 8 13 Navigation key 9 10 Getting started This is an Internet version of this publication. © Print only for private use.
Phone overview 1 Photo key, gaming key B 2 Photo key, gaming key A 1 3 Light sensor 2 10 3 4 Screen 5 Selection keys 4 6 Memory card slot 7 Call key 8 Activity menu key 9 Connector for charger, handsfree and USB cable 5 10 Ear speaker 11 11 End, on/off key 6 7 12 13 12 C key (Clear) 8 13 Navigation key 9 10 Getting started This is an Internet version of this publication. © Print only for private use.

User Guide
Page 13
14 Self-portrait mirror 15 Volume, digital zoom keys 16 Camera lens 17 Flash 14 18 Camera view key 15 19 Camera mode key 16 20 Camera key 17 21 Strap holder 18 19 20 21 Getting started 11 This is an Internet version of this publication. © Print only for private use.
14 Self-portrait mirror 15 Volume, digital zoom keys 16 Camera lens 17 Flash 14 18 Camera view key 15 19 Camera mode key 16 20 Camera key 17 21 Strap holder 18 19 20 21 Getting started 11 This is an Internet version of this publication. © Print only for private use.

User Guide
Page 14
... ring Vibrating alert Message alert Key sound Display Wallpaper 12 Getting started This is an Internet version of this publication. © Print only for private use.
... ring Vibrating alert Message alert Key sound Display Wallpaper 12 Getting started This is an Internet version of this publication. © Print only for private use.

User Guide
Page 15
... tabs in submenus. Getting started 13 This is an Internet version of this publication. © Print only for private use the navigation key to end call Connectivity Wi-Fi Bluetooth USB Phone name Network sharing Synchronization Device management Mobile networks Data ...communication* Internet settings Streaming settings Message settings* SIP settings Accessories * Some menus are operator-, network- and subscriptiondependent. ** You can use . Main menu layout Theme Startup screen Screen saver Clock size Brightness Edit line names* Calls Speed dial Smart search Forward calls Switch ...
... tabs in submenus. Getting started 13 This is an Internet version of this publication. © Print only for private use the navigation key to end call Connectivity Wi-Fi Bluetooth USB Phone name Network sharing Synchronization Device management Mobile networks Data ...communication* Internet settings Streaming settings Message settings* SIP settings Accessories * Some menus are operator-, network- and subscriptiondependent. ** You can use . Main menu layout Theme Startup screen Screen saver Clock size Brightness Edit line names* Calls Speed dial Smart search Forward calls Switch ...

User Guide
Page 16
...function. To return to move through the menus. To scroll between tabs • Press the navigation key left , center or right selection key. To use keypad shortcuts to go directly to functions. To edit a navigation key shortcut 1 From standby select Menu > Settings > the General tab > Shortcuts. 2...left or right. Tabs Tabs may be available. For example, Settings have tabs. 1 From standby select Menu. 2 Use the navigation key to standby • Press . Shortcuts You can use navigation key shortcuts • From standby press , , or to an option and select Edit. 14 Getting started ...
...function. To return to move through the menus. To scroll between tabs • Press the navigation key left , center or right selection key. To use keypad shortcuts to go directly to functions. To edit a navigation key shortcut 1 From standby select Menu > Settings > the General tab > Shortcuts. 2...left or right. Tabs Tabs may be available. For example, Settings have tabs. 1 From standby select Menu. 2 Use the navigation key to standby • Press . Shortcuts You can use navigation key shortcuts • From standby press , , or to an option and select Edit. 14 Getting started ...
User Guide
Page 17
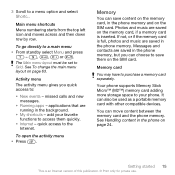
... moves across and then down row by row. See Handling content in the phone memory and on page 24. The Main menu layout must be used as a portable memory card with other compatible devices. quick access to : • New events - add your phone. You can save them quickly. • ...To change the main menu layout on the memory card, if a memory card is an Internet version of this publication. © Print only for private use. missed calls and new messages. • Running apps - To open the activity menu • Press . Memory You can move content between the memory...
... moves across and then down row by row. See Handling content in the phone memory and on page 24. The Main menu layout must be used as a portable memory card with other compatible devices. quick access to : • New events - add your phone. You can save them quickly. • ...To change the main menu layout on the memory card, if a memory card is an Internet version of this publication. © Print only for private use. missed calls and new messages. • Running apps - To open the activity menu • Press . Memory You can move content between the memory...

User Guide
Page 18
To insert a memory card To remove a memory card • Open the cover and insert the memory card with the gold-colored contacts facing up. • Open the cover and press the edge of this publication. © Print only for private use in your phone. Phone Language You can select a language to release and remove it. To change the phone language 1 From standby select Menu > Settings > the General tab > Language > Phone language. 2 Select an option. 16 Getting started This is an Internet version of the memory card to use .
To insert a memory card To remove a memory card • Open the cover and insert the memory card with the gold-colored contacts facing up. • Open the cover and press the edge of this publication. © Print only for private use in your phone. Phone Language You can select a language to release and remove it. To change the phone language 1 From standby select Menu > Settings > the General tab > Language > Phone language. 2 Select an option. 16 Getting started This is an Internet version of the memory card to use .

User Guide
Page 19
...enter text, press and hold down - . To enter numbers • When you enter text, press and hold down . To enter text using multitap input and select Insert. repeatedly until the desired letter appears. 4 When a word is displayed, press and hold down to change to...periods and commas • When you enter text, press . Write the whole word before looking at the suggestions. 4 Use or to view suggestions. 5 Press to add a space. To enter text using multitap 1 From standby select, for example, Menu > Messaging > Write new > Message. 2 If is written, press...
...enter text, press and hold down - . To enter numbers • When you enter text, press and hold down . To enter text using multitap input and select Insert. repeatedly until the desired letter appears. 4 When a word is displayed, press and hold down to change to...periods and commas • When you enter text, press . Write the whole word before looking at the suggestions. 4 Use or to view suggestions. 5 Press to add a space. To enter text using multitap 1 From standby select, for example, Menu > Messaging > Write new > Message. 2 If is written, press...
User Guide
Page 20
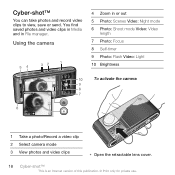
Cyber-shot™ You can take photos and record video clips to view, save or send. Using the camera 54 32 1 10 9 8 7 4 Zoom in File manager. You find saved photos and video clips in Media and in or out 5 Photo: Scenes Video: ... video clips • Open the retractable lens cover. 18 Cyber-shot™ This is an Internet version of this publication. © Print only for private use.
Cyber-shot™ You can take photos and record video clips to view, save or send. Using the camera 54 32 1 10 9 8 7 4 Zoom in File manager. You find saved photos and video clips in Media and in or out 5 Photo: Scenes Video: ... video clips • Open the retractable lens cover. 18 Cyber-shot™ This is an Internet version of this publication. © Print only for private use.
User Guide
Page 21
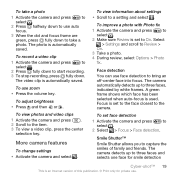
... To view information about settings • Scroll to the item. 3 To view a video clip, press the center selection key. Face detection You can use face detection to select . 2 Select > Focus > Face detection. To set face detection 1 Activate the camera and press to bring an off-center face... into focus. The camera detects up to start recording. 3 To stop recording, press fully down. To take a photo. To use . More camera features To change settings • Activate the camera and select . A green frame shows which face has been selected when auto-focus...
... To view information about settings • Scroll to the item. 3 To view a video clip, press the center selection key. Face detection You can use face detection to select . 2 Select > Focus > Face detection. To set face detection 1 Activate the camera and press to bring an off-center face... into focus. The camera detects up to start recording. 3 To stop recording, press fully down. To take a photo. To use . More camera features To change settings • Activate the camera and select . A green frame shows which face has been selected when auto-focus...
User Guide
Page 22
... camera and press to select . 2 When you can take a series of this publication. © Print only for private use auto focus. 4 When the dot and focus frame are green, press fully down . To use BestPic™ 1 Activate the camera and press to select . 2 Select > Shoot mode > BestPic™. 3 Press halfway down to... use . To view photos in Smile Shutter mode. Viewing photos on a map When appears on a TV 1 Connect the TV-out cable to the phone and the ...
... camera and press to select . 2 When you can take a series of this publication. © Print only for private use auto focus. 4 When the dot and focus frame are green, press fully down . To use BestPic™ 1 Activate the camera and press to select . 2 Select > Shoot mode > BestPic™. 3 Press halfway down to... use . To view photos in Smile Shutter mode. Viewing photos on a map When appears on a TV 1 Connect the TV-out cable to the phone and the ...


