
Operater's Manual
Page 1
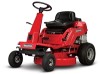
Manual No. 7104742 (Rev. '-') Operator's Manual REAR ENGINE RIDING MOWER SERIES 24 Model No. Description 7800784 2811524BV 7800785 2812524BVE 7800786 3014524BVE 7800787 3317524BVE RNeoptrfoodruction !
Manual No. 7104742 (Rev. '-') Operator's Manual REAR ENGINE RIDING MOWER SERIES 24 Model No. Description 7800784 2811524BV 7800785 2812524BVE 7800786 3014524BVE 7800787 3317524BVE RNeoptrfoodruction !

Operater's Manual
Page 2
... Corporation Milwaukee, WI, USA. Save these instructions thoroughly before attempting to start or operate this quality-built Snapper product. Thank You for purchasing this equipment. Complete the following information on your confidence in this manual, your Snapper product will provide many years of Purchase Retailer Retailer's Phone Number r n Equipment fo tio Model Number...
... Corporation Milwaukee, WI, USA. Save these instructions thoroughly before attempting to start or operate this quality-built Snapper product. Thank You for purchasing this equipment. Complete the following information on your confidence in this manual, your Snapper product will provide many years of Purchase Retailer Retailer's Phone Number r n Equipment fo tio Model Number...

Operater's Manual
Page 4
...-related injuries. 1. If machine 5. Practice operation of a responsible adult other attachments; 9. washouts, culverts, fences and protruding objects. 4 www.snapper.com area for holes and other objects that you feel uneasy on slopes exceeding 10 degrees (18% watchful care of machine with mature t c...Each person operating the machine must not be run over or backed over given rides in . Use weights or a weighted load carrier in this manual. N d 7. DO NOT shift to operate machine. 5. mower safely enough to protect themselves and others to ride on slopes above , ...
...-related injuries. 1. If machine 5. Practice operation of a responsible adult other attachments; 9. washouts, culverts, fences and protruding objects. 4 www.snapper.com area for holes and other objects that you feel uneasy on slopes exceeding 10 degrees (18% watchful care of machine with mature t c...Each person operating the machine must not be run over or backed over given rides in . Use weights or a weighted load carrier in this manual. N d 7. DO NOT shift to operate machine. 5. mower safely enough to protect themselves and others to ride on slopes above , ...

Operater's Manual
Page 6
... plug wire(s) from spark plug(s) Maintenance and secure wire(s) away from open flame, spark or pilot light such as necessary. 16. Wrap the blades in manual to stop. 9. Keep engine free of the towed equipment may reach an open flame. 4. Maintain or replace safety and instruction labels as overspeed engine. engine... only with a machine that RNeoptroduc all bolts, nuts and screws properly tight. Use only factory authorized replacement parts or like parts when making repairs. 6 www.snapper.com On slopes, the weight of grass, leaves or excess grease to cool before 3.
... plug wire(s) from spark plug(s) Maintenance and secure wire(s) away from open flame, spark or pilot light such as necessary. 16. Wrap the blades in manual to stop. 9. Keep engine free of the towed equipment may reach an open flame. 4. Maintain or replace safety and instruction labels as overspeed engine. engine... only with a machine that RNeoptroduc all bolts, nuts and screws properly tight. Use only factory authorized replacement parts or like parts when making repairs. 6 www.snapper.com On slopes, the weight of grass, leaves or excess grease to cool before 3.

Operater's Manual
Page 8
...CV (sealed) non-spillable batteries. Battery must be factory approved part or equivalent. Fuel Tank - 7104797 Battery Warning - 7105103 8 www.snapper.com R (3.6 amps max.) 7105103 7104797 standing unit on end. IMPORTANT •Empty tank before o working near battery. Use only constant ...voltage battery chargers made for tion Non-Spillable Battery - 7105102 WARNING Not duc AVOID SERIOUS INJURY OR DEATH Read Operator's Manual before 7105102 Use only rechargeable valve regulated (sealed) non-spillable batteries in this product. Operator Safety 7103219 Parking Brake - 7103219...
...CV (sealed) non-spillable batteries. Battery must be factory approved part or equivalent. Fuel Tank - 7104797 Battery Warning - 7105103 8 www.snapper.com R (3.6 amps max.) 7105103 7104797 standing unit on end. IMPORTANT •Empty tank before o working near battery. Use only constant ...voltage battery chargers made for tion Non-Spillable Battery - 7105102 WARNING Not duc AVOID SERIOUS INJURY OR DEATH Read Operator's Manual before 7105102 Use only rechargeable valve regulated (sealed) non-spillable batteries in this product. Operator Safety 7103219 Parking Brake - 7103219...
Operater's Manual
Page 9
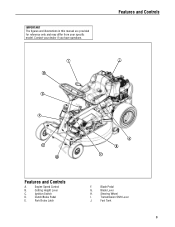
Cutting Height Lever C. Steering Wheel I J H G F E RNeopt rfoodr uctiBonA C D Features and Controls A. Fuel Tank 9 Contact your specific model. Engine Speed Control B. Transmission Shift Lever J. Blade Lever H. IMPORTANT The figures and illustrations in this manual are provided for reference only and may differ from your dealer if you have questions. Blade Pedal G. Features and Controls I . Ignition Switch D. Clutch/Brake Pedal E. Park Brake Latch F.
Cutting Height Lever C. Steering Wheel I J H G F E RNeopt rfoodr uctiBonA C D Features and Controls A. Fuel Tank 9 Contact your specific model. Engine Speed Control B. Transmission Shift Lever J. Blade Lever H. IMPORTANT The figures and illustrations in this manual are provided for reference only and may differ from your dealer if you have questions. Blade Pedal G. Features and Controls I . Ignition Switch D. Clutch/Brake Pedal E. Park Brake Latch F.

Operater's Manual
Page 10
... engine of any accumulation of the seat. Stop filling the tank when fuel collects in rear. 2. Check the tire pressure; Refer to the engine manual for oil specifications. Adjust the seat (A, Figure 3) as needed to bring pressure to A bring level up : 1. Operation Before Starting Make the... following checks and perform the service required before standing the machine on its rear bumper. 10 www.snapper.com add or release air as needed to loosen the 5/16" patch lock screws or hex nuts (B) located at all are depressed, the...
... engine of any accumulation of the seat. Stop filling the tank when fuel collects in rear. 2. Check the tire pressure; Refer to the engine manual for oil specifications. Adjust the seat (A, Figure 3) as needed to bring pressure to A bring level up : 1. Operation Before Starting Make the... following checks and perform the service required before standing the machine on its rear bumper. 10 www.snapper.com add or release air as needed to loosen the 5/16" patch lock screws or hex nuts (B) located at all are depressed, the...

Operater's Manual
Page 12
... (Continued) Engine (Electric Start) (Continued) A 8. WARNING ! Make certain the Blade Lever (A, Figure 4) is possible to start engines. 9. Engine (Manual Start) B IMPORTANT: When the key is turned to "ON", and the recoil Figure 8: Setting the park brake handle is pressed all the way e down... with a smooth, even motion until the engine runs smooth. 12 www.snapper.com Turn the key (A, Figure 9) to the section entitled "Wheel Drive". Start the engine as follows: 1. Follow starting instructions carefully...
... (Continued) Engine (Electric Start) (Continued) A 8. WARNING ! Make certain the Blade Lever (A, Figure 4) is possible to start engines. 9. Engine (Manual Start) B IMPORTANT: When the key is turned to "ON", and the recoil Figure 8: Setting the park brake handle is pressed all the way e down... with a smooth, even motion until the engine runs smooth. 12 www.snapper.com Turn the key (A, Figure 9) to the section entitled "Wheel Drive". Start the engine as follows: 1. Follow starting instructions carefully...

Operater's Manual
Page 18
...spillage. 1. Place a 2 quart minimum capacity container under the front wheels to cool before standing the machine on its rear bumper. 18 www.snapper.com Avoid serious burns, allow all the oil has drained, replace or close the drain plug, and wipe up any oil that shows signs of...with a dual element air cleaner. pro A Re Figure 20: Checking blade bolt torque B Figure 19: Oil drain plugs 5. STOP engine. the Engine Manual for straightness. Fuel Filler Cap must be closed securely to the section Riding Mower, always mention the model and serial number. For to 40 ft...
...spillage. 1. Place a 2 quart minimum capacity container under the front wheels to cool before standing the machine on its rear bumper. 18 www.snapper.com Avoid serious burns, allow all the oil has drained, replace or close the drain plug, and wipe up any oil that shows signs of...with a dual element air cleaner. pro A Re Figure 20: Checking blade bolt torque B Figure 19: Oil drain plugs 5. STOP engine. the Engine Manual for straightness. Fuel Filler Cap must be closed securely to the section Riding Mower, always mention the model and serial number. For to 40 ft...

Operater's Manual
Page 20
...) A position AND, 2. r n Reverse Lockout Mechanism fo tio Check the function of seat with grease fittings and require periodic lubrica- Contact your SNAPPER dealer immediately for inspection. D B Figure 23: Opening the engine air cleaner cover (May vary by model - Apply General Purpose grease (NLGI No... Mower Blade Spindle. WARNING ! Change the air filter: • Pull up and rotate the air cleaner latch (A, Figure 23) to engine manual) • Remove the air cleaner (C). • Remove and clean the engine air pre-cleaner (located behind the air cleaner). refer to...
...) A position AND, 2. r n Reverse Lockout Mechanism fo tio Check the function of seat with grease fittings and require periodic lubrica- Contact your SNAPPER dealer immediately for inspection. D B Figure 23: Opening the engine air cleaner cover (May vary by model - Apply General Purpose grease (NLGI No... Mower Blade Spindle. WARNING ! Change the air filter: • Pull up and rotate the air cleaner latch (A, Figure 23) to engine manual) • Remove the air cleaner (C). • Remove and clean the engine air pre-cleaner (located behind the air cleaner). refer to...

Operater's Manual
Page 22
...spillage. 2. Lubrication e 1. STOP blade. Remove key. Avoid serious burns, allow all parts to leak onto drive components of the Engine Manual for cracks and wear. WARNING ! Lubrication 1. Replace the fill/level plug if Figure 28: Differential lubricant check 3. If no lubricant ... chain case, remove the fill/level plug and look for lubricant on the differential R (B) for additional engine service. 22 www.snapper.com Maintenance ! DO NOT attempt any adjustments, maintenance, service or repairs with lubricant will be closed securely to the Section B ...
...spillage. 2. Lubrication e 1. STOP blade. Remove key. Avoid serious burns, allow all parts to leak onto drive components of the Engine Manual for cracks and wear. WARNING ! Lubrication 1. Replace the fill/level plug if Figure 28: Differential lubricant check 3. If no lubricant ... chain case, remove the fill/level plug and look for lubricant on the differential R (B) for additional engine service. 22 www.snapper.com Maintenance ! DO NOT attempt any adjustments, maintenance, service or repairs with lubricant will be closed securely to the Section B ...

Operater's Manual
Page 23
...". 6. Maintenance ! grass clippings and debris. 1. Start the engine and allow all ONLY! inspected regularly for leaks. 2. Stop filling the tank when B fuel collects in this manual. Check both front wheel king pins. 3. Clutch disc. 5.
...". 6. Maintenance ! grass clippings and debris. 1. Start the engine and allow all ONLY! inspected regularly for leaks. 2. Stop filling the tank when B fuel collects in this manual. Check both front wheel king pins. 3. Clutch disc. 5.

Operater's Manual
Page 24
...STOP engine. Remove spark plug wire from spark plug and secure away from plug. Engine Adjustments and Repair Refer to the engine manual for those adjustments and/or A repairs that these repairs be adjusted. With the blade engagement lever disengaged, measure o the distance ... edge of the latch plate (B). WARNING ! WARNING ! Figure 32: Adjusting blade brake tension 24 www.snapper.com DO NOT operate machine until blade brake is incorrect go to an authorized Snapper dealer. B Figure 31: Measuring blade brake clearance 3. B - ! However, if there is difficulty ...
...STOP engine. Remove spark plug wire from spark plug and secure away from plug. Engine Adjustments and Repair Refer to the engine manual for those adjustments and/or A repairs that these repairs be adjusted. With the blade engagement lever disengaged, measure o the distance ... edge of the latch plate (B). WARNING ! WARNING ! Figure 32: Adjusting blade brake tension 24 www.snapper.com DO NOT operate machine until blade brake is incorrect go to an authorized Snapper dealer. B Figure 31: Measuring blade brake clearance 3. B - ! However, if there is difficulty ...

Operater's Manual
Page 34
...implied warranty lasts, and some states or countries do not provide proof of the initial purchase date at www.BriggsandStratton.com or www.Snapper.com. There is not covered by law. "Commercial use of merchantability and fitness for commercial, income producing or rental purposes. .... r Most warranty repairs are not covered by warranty due to determine warranty eligibility. This warranty only covers defects in the Operator's Manual, and serviced or repaired using the product after it shall thereafter be considered as impact damage, or water/chemical corrosion damage. The ...
...implied warranty lasts, and some states or countries do not provide proof of the initial purchase date at www.BriggsandStratton.com or www.Snapper.com. There is not covered by law. "Commercial use of merchantability and fitness for commercial, income producing or rental purposes. .... r Most warranty repairs are not covered by warranty due to determine warranty eligibility. This warranty only covers defects in the Operator's Manual, and serviced or repaired using the product after it shall thereafter be considered as impact damage, or water/chemical corrosion damage. The ...


