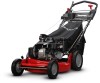
Operater's Manual
Page 3
... State of Contents Operator Safety 2 Important Operator Safety Instructions 2 Features and Controls 4 Operation 5 Pre-Start Checklist 5 Starting & Stopping Engine & Blades 5 Propelling Mower 6 Handle Height Adjustment 6 Cutting Height Adjustment 7 Recycling Operation 7 Removing the Recycling Cover 7 Installing the Discharge Deflector 8 Installing the Grass Bag Adapter 8 Installing the Grass Bag 10 Dumping the Grass Bag 10 Maintenance 11 Change Engine Oil 11 Check Transmission Grease 11 Check Mower Blade 12 Check Engine Drive Belt 12 Check Transmission Belt 12 Service -
... State of Contents Operator Safety 2 Important Operator Safety Instructions 2 Features and Controls 4 Operation 5 Pre-Start Checklist 5 Starting & Stopping Engine & Blades 5 Propelling Mower 6 Handle Height Adjustment 6 Cutting Height Adjustment 7 Recycling Operation 7 Removing the Recycling Cover 7 Installing the Discharge Deflector 8 Installing the Grass Bag Adapter 8 Installing the Grass Bag 10 Dumping the Grass Bag 10 Maintenance 11 Change Engine Oil 11 Check Transmission Grease 11 Check Mower Blade 12 Check Engine Drive Belt 12 Check Transmission Belt 12 Service -
Operater's Manual
Page 4
... approved fuel container. 3. Each person operating the machine must be mowed and remove all safety decals are often attracted to cool before starting. 2. DO NOT remove fuel cap or add fuel with sandals. 10. Also note the location of the mower before refueling. 4. DO NOT mow barefooted or with engine running . DO NOT remove fuel cap or add fuel with the following SAFETY instructions could cause injury if thrown by blade or...
... approved fuel container. 3. Each person operating the machine must be mowed and remove all safety decals are often attracted to cool before starting. 2. DO NOT remove fuel cap or add fuel with sandals. 10. Also note the location of the mower before refueling. 4. DO NOT mow barefooted or with engine running . DO NOT remove fuel cap or add fuel with the following SAFETY instructions could cause injury if thrown by blade or...
Operater's Manual
Page 5
... grass catcher, or guards in place discharge guard, rear guard or other safety devices in proper position. 5. Watch out for wear or deterioration to avoid thrown objects and exposure to spark plug hole; Keep all moving parts. Always provide adequate ventilation when running . 2. Replace slider or bag adapter if broken or cracked. 9. Mower blades are evident. STOP engine when crossing gravel drives, walks, or roads, and under rotating parts. Operator could ignite gas exiting engine...
... grass catcher, or guards in place discharge guard, rear guard or other safety devices in proper position. 5. Watch out for wear or deterioration to avoid thrown objects and exposure to spark plug hole; Keep all moving parts. Always provide adequate ventilation when running . 2. Replace slider or bag adapter if broken or cracked. 9. Mower blades are evident. STOP engine when crossing gravel drives, walks, or roads, and under rotating parts. Operator could ignite gas exiting engine...
Operater's Manual
Page 7
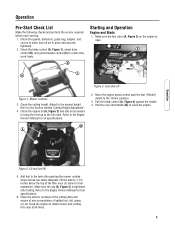
... tightened after pushing the mower outside where fumes can safely dissipate. Adjust to the 'Choke' position. 3. Refer to the Engine Owners Manual for fuel specifications. 6. A Starting and Operation Engine and Blade 1. B A 2. Refer to the Engine Owner's Manual for fuel expansion). Fill the tank to allow for oil specifications. Add fuel to make sure all times. 5 Keep the engine air intake screen and cooling fins clear at all are in place and securely tightened. 2. Check the guards, deflectors, grass bag, adapter, and covers...
... tightened after pushing the mower outside where fumes can safely dissipate. Adjust to the 'Choke' position. 3. Refer to the Engine Owners Manual for fuel specifications. 6. A Starting and Operation Engine and Blade 1. B A 2. Refer to the Engine Owner's Manual for fuel expansion). Fill the tank to allow for oil specifications. Add fuel to make sure all times. 5 Keep the engine air intake screen and cooling fins clear at all are in place and securely tightened. 2. Check the guards, deflectors, grass bag, adapter, and covers...
Operater's Manual
Page 8
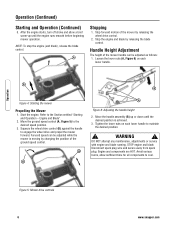
... engine and blade. Disconnect spark plug wire and secure away from spark plug. Start the engine. Squeeze the wheel drive control (B) against the handle to the Section entitled "Starting and Operation - Move the handle assembly (B) up until the desired position is moving by changing the position of the mower by releasing the blade control. DO NOT attempt any maintenance, adjustments or service with engine and blade running. A Stopping 1. Stop forward motion of the ground speed control. Refer to engage the wheel drive...
... engine and blade. Disconnect spark plug wire and secure away from spark plug. Start the engine. Squeeze the wheel drive control (B) against the handle to the Section entitled "Starting and Operation - Move the handle assembly (B) up until the desired position is moving by changing the position of the mower by releasing the blade control. DO NOT attempt any maintenance, adjustments or service with engine and blade running. A Stopping 1. Stop forward motion of the ground speed control. Refer to engage the wheel drive...
Operater's Manual
Page 9
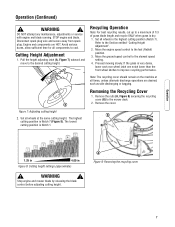
.... Removing the Recycling Cover 1. WARNING ! WARNING ! Disconnect spark plug wire and secure away from spark plug. Pull the height adjusting latch (A, Figure 7) outward and move to the Section entitled "Cutting Height Adjustment". 2. Set all wheels at all times, unless alternate discharge operations are HOT. Recycling Operation Note: For best recycling results, cut up to improve recycling performance. Refer to the desired cutting height. Remove the cover. DO NOT attempt any maintenance, adjustments or service with engine and blade running...
.... Removing the Recycling Cover 1. WARNING ! WARNING ! Disconnect spark plug wire and secure away from spark plug. Pull the height adjusting latch (A, Figure 7) outward and move to the Section entitled "Cutting Height Adjustment". 2. Set all wheels at all times, unless alternate discharge operations are HOT. Recycling Operation Note: For best recycling results, cut up to improve recycling performance. Refer to the desired cutting height. Remove the cover. DO NOT attempt any maintenance, adjustments or service with engine and blade running...
Operater's Manual
Page 10
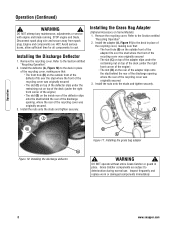
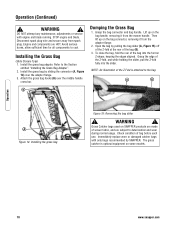
... Some Models) 1. Grass Catcher components are HOT. Install the nuts onto the studs and tighten securely. Disconnect spark plug wire and secure away from spark plug. Avoid serious burns, allow sufficient time for all components to the Section entitled "Recycling Operation". 2. C B C B D D A Figure 11: Installing the grass bag adapter A Figure 10: Installing the discharge deflector ! Refer to the deck in place. Operation Operation (Continued) ! DO NOT attempt any maintenance, adjustments or service with engine and blade running. Install the deflector...
... Some Models) 1. Grass Catcher components are HOT. Install the nuts onto the studs and tighten securely. Disconnect spark plug wire and secure away from spark plug. Avoid serious burns, allow sufficient time for all components to the Section entitled "Recycling Operation". 2. C B C B D D A Figure 11: Installing the grass bag adapter A Figure 10: Installing the discharge deflector ! Refer to the deck in place. Operation Operation (Continued) ! DO NOT attempt any maintenance, adjustments or service with engine and blade running. Install the deflector...

Operater's Manual
Page 11
... the rope A guide pulley (A, Figure 12). WARNING ! Refer to cool. Grass Catcher components are HOT. Operation Operation (Continued) ! Note: The recoil rope may need to the section entitled "Recycling Operation". ! Engine and components are subject to deterioration during normal use. DO NOT attempt any maintenance, adjustments or service with engine and blade running. Install the recycling plug (A, Figure 13) if recycling is desired after the bag adapter is installed. Refer to...
... the rope A guide pulley (A, Figure 12). WARNING ! Refer to cool. Grass Catcher components are HOT. Operation Operation (Continued) ! Note: The recoil rope may need to the section entitled "Recycling Operation". ! Engine and components are subject to deterioration during normal use. DO NOT attempt any maintenance, adjustments or service with engine and blade running. Install the recycling plug (A, Figure 13) if recycling is desired after the bag adapter is installed. Refer to...
Operater's Manual
Page 12
... to deterioration and wear during normal usage. Install the grass bag adapter. Operation 10 www.snapper.com DO NOT attempt any maintenance, adjustments or service with only bags recommended by SNAPPER. Dumping the Grass Bag 1. A B B A Figure 14: Installing the grass bag Figure 15: Removing the bag slider ! Grass Catcher bags used on some models. Operation (Continued) ! WARNING ! Attach the grass bag hooks (B) over the adapter flange. 3. Grasp the bag connector and bag handle. Immediately replace worn or damaged catcher bags with engine and blade running.
... to deterioration and wear during normal usage. Install the grass bag adapter. Operation 10 www.snapper.com DO NOT attempt any maintenance, adjustments or service with only bags recommended by SNAPPER. Dumping the Grass Bag 1. A B B A Figure 14: Installing the grass bag Figure 15: Removing the bag slider ! Grass Catcher bags used on some models. Operation (Continued) ! WARNING ! Attach the grass bag hooks (B) over the adapter flange. 3. Grasp the bag connector and bag handle. Immediately replace worn or damaged catcher bags with engine and blade running.
Operater's Manual
Page 13
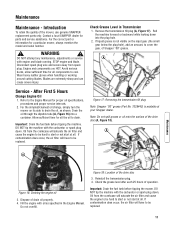
... side to drain the oil, as specified in Transmission 1. If contamination does occur, the air filter will saturate the air filter and cause the engine to be replaced. 11 Contact a local SNAPPER dealer for a particular mower, always mention the model and serial number. ! Blades are HOT. Check the grease level after each 25 hours of the mower, use genuine SNAPPER replacement parts only. DO NOT tip the machine with engine and blade running. Disconnect spark plug wire and...
... side to drain the oil, as specified in Transmission 1. If contamination does occur, the air filter will saturate the air filter and cause the engine to be replaced. 11 Contact a local SNAPPER dealer for a particular mower, always mention the model and serial number. ! Blades are HOT. Check the grease level after each 25 hours of the mower, use genuine SNAPPER replacement parts only. DO NOT tip the machine with engine and blade running. Disconnect spark plug wire and...

Operater's Manual
Page 14
... fuel tank before folding the handles. 7. Oil from the crankcase will have to cool. Visually check the engine drive belt for sharpness, wear and damage. Periodic Perform all exposed metal with the carburetor or spark plug down . Engine Service the engine according to the engine owner's manual for all openings closed to prevent cable damage. 8. On self-propelled models, disconnect the transfer rod clip and remove the ground speed control rod before tipping the mower. Maintenance 12 www.snapper...
... fuel tank before folding the handles. 7. Oil from the crankcase will have to cool. Visually check the engine drive belt for sharpness, wear and damage. Periodic Perform all exposed metal with the carburetor or spark plug down . Engine Service the engine according to the engine owner's manual for all openings closed to prevent cable damage. 8. On self-propelled models, disconnect the transfer rod clip and remove the ground speed control rod before tipping the mower. Maintenance 12 www.snapper...
Operater's Manual
Page 15
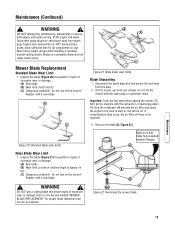
... mower! Remove the blade (B, Figure 22). Maintenance (Continued) ! Blades are HOT. Replace with a new blade. ! Replace with a new blade. Do not tilt the mower with the spark plug or carburetor down . Oil from the plug. 2. Mower Blade Replacement Standard Blade Wear Limit 1. Inspect the blade (Figure 20) frequently for proper blade inspection and service procedures. A B C Figure 21: Ninja blade wear limits Blade Sharpening 1. If contamination does occur, the air filter will saturate the air filter and cause the engine to be replaced...
... mower! Remove the blade (B, Figure 22). Maintenance (Continued) ! Blades are HOT. Replace with a new blade. ! Replace with a new blade. Do not tilt the mower with the spark plug or carburetor down . Oil from the plug. 2. Mower Blade Replacement Standard Blade Wear Limit 1. Inspect the blade (Figure 20) frequently for proper blade inspection and service procedures. A B C Figure 21: Ninja blade wear limits Blade Sharpening 1. If contamination does occur, the air filter will saturate the air filter and cause the engine to be replaced...
Operater's Manual
Page 16
... the mower blade 5. Disconnect spark plug wire and secure away from the cable eye and rotate the spring in the direction required to 28 degrees (B, Figure 23). WARNING ! DO NOT attempt any maintenance, adjustments or service with the clips installed at all components to the cable eye and check clearance. Do not sharpen beyond the original cutting edge (A). Note the correct assembly order: (A) Blade hub (B) Blade (C) Blade flange...
... the mower blade 5. Disconnect spark plug wire and secure away from the cable eye and rotate the spring in the direction required to 28 degrees (B, Figure 23). WARNING ! DO NOT attempt any maintenance, adjustments or service with the clips installed at all components to the cable eye and check clearance. Do not sharpen beyond the original cutting edge (A). Note the correct assembly order: (A) Blade hub (B) Blade (C) Blade flange...
Operater's Manual
Page 17
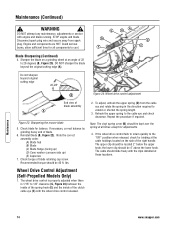
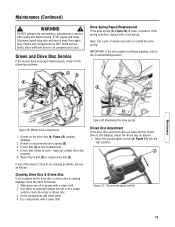
...: Wheel drive components 1. does not contact drive disc properly. 5. Use either an approved grease solvent or hot, soapy water to the Troubleshooting section. Broken or disconnected drive spring (B). 3. C Figure 27: The ground speed control 15 Disconnect spark plug wire and secure away from spark plug. Driven and Drive Disc Service If the mower does not propel itself properly, check for all components to install the drive spring. Figure 26: Replacing the drive spring Driven Disc Adjustment If...
...: Wheel drive components 1. does not contact drive disc properly. 5. Use either an approved grease solvent or hot, soapy water to the Troubleshooting section. Broken or disconnected drive spring (B). 3. C Figure 27: The ground speed control 15 Disconnect spark plug wire and secure away from spark plug. Driven and Drive Disc Service If the mower does not propel itself properly, check for all components to install the drive spring. Figure 26: Replacing the drive spring Driven Disc Adjustment If...
Operater's Manual
Page 18
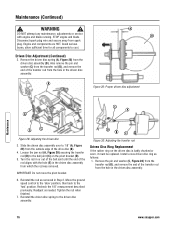
STOP engine and blade. Readjust as follows: 1. Install a new driven disc ring as needed. Remove the driven disc spring (A, Figure 28) from spark plug. Loosen the jam nut (A, Figure 30) securing the transfer rod (B) to the 'fast' position. Remove the pin and washer (C, Figure 28) from the transfer rod (D), and remove the end of the rod aligns with engine and blade running. Disconnect spark plug wire and secure away from the...
STOP engine and blade. Readjust as follows: 1. Install a new driven disc ring as needed. Remove the driven disc spring (A, Figure 28) from spark plug. Loosen the jam nut (A, Figure 30) securing the transfer rod (B) to the 'fast' position. Remove the pin and washer (C, Figure 28) from the transfer rod (D), and remove the end of the rod aligns with engine and blade running. Disconnect spark plug wire and secure away from the...
Operater's Manual
Page 20
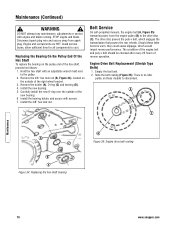
... engages the transmission that powers the rear wheels. Belt Service On self-propelled mowers, the engine belt (A, Figure 35) transmits power from spark plug. There is no idler pulley on the pulley end of the new bearing. 6. Remove the 3/8" hex lock nut (B, Figure 34), located on the outside of the hex shaft, proceed as follows: 1. Should these models to the drive disc (C). Empty the fuel tank. 2. A C D C B A Figure 34: Replacing the hex shaft bearing B Figure 35: Engine drive belt routing Maintenance 18...
... engages the transmission that powers the rear wheels. Belt Service On self-propelled mowers, the engine belt (A, Figure 35) transmits power from spark plug. There is no idler pulley on the pulley end of the new bearing. 6. Remove the 3/8" hex lock nut (B, Figure 34), located on the outside of the hex shaft, proceed as follows: 1. Should these models to the drive disc (C). Empty the fuel tank. 2. A C D C B A Figure 34: Replacing the hex shaft bearing B Figure 35: Engine drive belt routing Maintenance 18...
Operater's Manual
Page 21
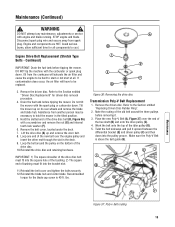
... maintenance, adjustments or service A with the spark plug or carburetor down . STOP engine and blade. Disconnect spark plug wire and secure away from another person may be necessary to hold the mower in the deck. 9. B Engine Drive Belt Replacement (Stretch Type Belts - Tilt the mower up and remove the worn belt. 8. Hold the slotted end of the hex shaft (B) and onto the drive pulley (C). 4. Remove the belt cover, located under the deck. 7. Recommended torque for driven disc removal procedure. 4. C D E F G Figure 36: Removing...
... maintenance, adjustments or service A with the spark plug or carburetor down . STOP engine and blade. Disconnect spark plug wire and secure away from another person may be necessary to hold the mower in the deck. 9. B Engine Drive Belt Replacement (Stretch Type Belts - Tilt the mower up and remove the worn belt. 8. Hold the slotted end of the hex shaft (B) and onto the drive pulley (C). 4. Remove the belt cover, located under the deck. 7. Recommended torque for driven disc removal procedure. 4. C D E F G Figure 36: Removing...
Operater's Manual
Page 22
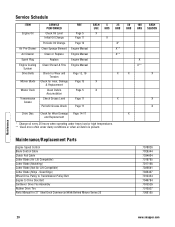
... 20 www.snapper.com Service Schedule ITEM SERVICE PERFORMED REF. Quad Edge) Wheel Drive Pulley to Transmission Pulley Belt Engine to Drive Disc Belt Cantilever Drive Tire Assembly Rubber Drive Tire Parts Manual for Wear Damage Page 14-17 X and Replacement * Change oil every 25 hours when operating under heavy load or high temperatures. ** Clean more often under dusty conditions or when air debris is present. Maintenance/Replacement Parts Engine Speed Control Blade Control Cable Clutch Pull Cable Cutter Blade (Air Lift Compatible) Cutter Blade (Mulching) Cutter Blade (Not Air Lift...
... 20 www.snapper.com Service Schedule ITEM SERVICE PERFORMED REF. Quad Edge) Wheel Drive Pulley to Transmission Pulley Belt Engine to Drive Disc Belt Cantilever Drive Tire Assembly Rubber Drive Tire Parts Manual for Wear Damage Page 14-17 X and Replacement * Change oil every 25 hours when operating under heavy load or high temperatures. ** Clean more often under dusty conditions or when air debris is present. Maintenance/Replacement Parts Engine Speed Control Blade Control Cable Clutch Pull Cable Cutter Blade (Air Lift Compatible) Cutter Blade (Mulching) Cutter Blade (Not Air Lift...

Operater's Manual
Page 23
... mower. 2. Service and tighten loose parts. 3. Driven disc slipping. 1. Cutting height too low or high. 2. Move engine speed control to rear. 6. Cutting blade dull or damaged. 3. Service mower blade. 5. Improper blade installed on deck. 6. Troubleshooting 21 Fill fuel tank with height adjust levers. 5. Place spark plug wire onto spark plug. 4. Fuel shut-off to proper level. 4. Turn Fuel shut-off in the 'Off' position. 6. Turn off in the 'Off' position. Clean or replace filters. 2. Replace air lifts. Replace drive belt. 4. Adjust cutting height...
... mower. 2. Service and tighten loose parts. 3. Driven disc slipping. 1. Cutting height too low or high. 2. Move engine speed control to rear. 6. Cutting blade dull or damaged. 3. Service mower blade. 5. Improper blade installed on deck. 6. Troubleshooting 21 Fill fuel tank with height adjust levers. 5. Place spark plug wire onto spark plug. 4. Fuel shut-off to proper level. 4. Turn Fuel shut-off in the 'Off' position. 6. Turn off in the 'Off' position. Clean or replace filters. 2. Replace air lifts. Replace drive belt. 4. Adjust cutting height...

Operater's Manual
Page 28
21" STEEL DECK WALK MOWERS COMMERCIAL MODELS SERIES 20 Product Specifications Deck Size Height of factors including, but not limited to, accessories (air cleaner, exhaust, charging, cooling, carburetor, fuel pump, etc.), application limitations, ambient operating conditions (temperature, humidity, altitude), and engine-to-engine variability. This difference is due to a variety of Cut Transmission Type Ground Speed Engine Power Engine Displacement Fuel Tank Capacity 21 in 1.25 - 4 in accordance with SAE (Society of higher rated power for individual gas engine models is affected...
21" STEEL DECK WALK MOWERS COMMERCIAL MODELS SERIES 20 Product Specifications Deck Size Height of factors including, but not limited to, accessories (air cleaner, exhaust, charging, cooling, carburetor, fuel pump, etc.), application limitations, ambient operating conditions (temperature, humidity, altitude), and engine-to-engine variability. This difference is due to a variety of Cut Transmission Type Ground Speed Engine Power Engine Displacement Fuel Tank Capacity 21 in 1.25 - 4 in accordance with SAE (Society of higher rated power for individual gas engine models is affected...


