

User manual
Page 3
... Dolce&Gabbana. Write down the model and serial numbers before installing the appliance. Dolce&Gabbana. By choosing this product, you for a product in the workmanship should be considered as unique and distinctive features. IMPORTANT: Save for the local electric inspector's use Installer: Leave installation instructions with the creativity and craftsmanship of a patented industrial and manual process; therefore, any irregularities in...
... Dolce&Gabbana. Write down the model and serial numbers before installing the appliance. Dolce&Gabbana. By choosing this product, you for a product in the workmanship should be considered as unique and distinctive features. IMPORTANT: Save for the local electric inspector's use Installer: Leave installation instructions with the creativity and craftsmanship of a patented industrial and manual process; therefore, any irregularities in...

User manual
Page 4
... cautions 10 1.8 Disposal Warning 10 2 Description 11 2.1 General Description 11 2.2 Control panel 11 3 Use 11 3.1 Instructions 11 4 Cleaning and maintenance 12 4.1 Instructions 12 4.2 Cleaning the appliance 12 5 Installation 14 5.1 Positioning 14 5.2 Air connection systems 15 5.3 Electrical connection 17 1 IMPORTANT SAFETY INSTRUCTIONS WARNING: If the instructions contained in this manual carefully as it contains all the instructions for maintaining the appliance's aesthetic and functional qualities. For further information...
... cautions 10 1.8 Disposal Warning 10 2 Description 11 2.1 General Description 11 2.2 Control panel 11 3 Use 11 3.1 Instructions 11 4 Cleaning and maintenance 12 4.1 Instructions 12 4.2 Cleaning the appliance 12 5 Installation 14 5.1 Positioning 14 5.2 Air connection systems 15 5.3 Electrical connection 17 1 IMPORTANT SAFETY INSTRUCTIONS WARNING: If the instructions contained in this manual carefully as it contains all the instructions for maintaining the appliance's aesthetic and functional qualities. For further information...
User manual
Page 5
WARNING: not following instructions immediately may result in force. • The minimum distance between the range and the lower part of the hood must be 750mm for professional use only. • This appliance has been designed to work as a DUCTING hood (evacuation of the air) or RECYCLING hood (recycling of the filtered air). 6 • This appliance is not designed or manufactured for gas in manufactured (mobile) homes...
WARNING: not following instructions immediately may result in force. • The minimum distance between the range and the lower part of the hood must be 750mm for professional use only. • This appliance has been designed to work as a DUCTING hood (evacuation of the air) or RECYCLING hood (recycling of the filtered air). 6 • This appliance is not designed or manufactured for gas in manufactured (mobile) homes...
User manual
Page 6
... by pulling the power cord. Sort the various items of waste and take them to repair or replace any part of Gas-operated appliances. • To Reduce Risk Of Fire Or Electric Shock, Do Not Use This Fan With Any Solid-State Speed Control Device. • Before connecting, make sure that the mains voltage corresponds to the voltage on the rating plate inside the hood. • Plug...
... by pulling the power cord. Sort the various items of waste and take them to repair or replace any part of Gas-operated appliances. • To Reduce Risk Of Fire Or Electric Shock, Do Not Use This Fan With Any Solid-State Speed Control Device. • Before connecting, make sure that the mains voltage corresponds to the voltage on the rating plate inside the hood. • Plug...

User manual
Page 7
...4 You can fight the fire with a closefitting lid, cookie sheet, or metal tray, then turn hood ON when cooking at the same time. 8 b) Always turn off the burner. c) Clean ventilating fans frequently. You may ignite. d) Use an extinguisher only if: 1 You know you have a Class...Instructions or abrasive cleaners to an exit. • Make sure the room is small and contained in flames being sucked into the hood and causing a fire. • TO REDUCE THE RISK OF A RANGE TOP GREASE FIRE: a) Never leave surface units unattended at high settings. Always use cookware appropriate for the size...
...4 You can fight the fire with a closefitting lid, cookie sheet, or metal tray, then turn hood ON when cooking at the same time. 8 b) Always turn off the burner. c) Clean ventilating fans frequently. You may ignite. d) Use an extinguisher only if: 1 You know you have a Class...Instructions or abrasive cleaners to an exit. • Make sure the room is small and contained in flames being sucked into the hood and causing a fire. • TO REDUCE THE RISK OF A RANGE TOP GREASE FIRE: a) Never leave surface units unattended at high settings. Always use cookware appropriate for the size...

User manual
Page 8
... a breakdown, maintenance, when replacing the light bulb or cleaning. • Do not insert the power plug into a wall socket with wet hands. • Inspect and clean the filters thoroughly and in the vicinity of the appliance by the manufacturer. • Do not store inflammable, explosive or volatile substances. • Do Not Use Water on Grease Fires - Important Safety Instructions EN • Comply...
... a breakdown, maintenance, when replacing the light bulb or cleaning. • Do not insert the power plug into a wall socket with wet hands. • Inspect and clean the filters thoroughly and in the vicinity of the appliance by the manufacturer. • Do not store inflammable, explosive or volatile substances. • Do Not Use Water on Grease Fires - Important Safety Instructions EN • Comply...
User manual
Page 9
...: Installation, operation and inspection. Loosefitting or hanging garments should NEVER use of the appliance and its accessories. Installation Information for proper cleaning and maintenance of the appliance and its accessories. SAVE THESE INSTRUCTIONS 10 Important Safety Instructions 1.7 Usage cautions CAUTION • Wear proper apparel. They can cause suffocation and death. Use Information on the use these items to read the user manual This user manual uses...
...: Installation, operation and inspection. Loosefitting or hanging garments should NEVER use of the appliance and its accessories. Installation Information for proper cleaning and maintenance of the appliance and its accessories. SAVE THESE INSTRUCTIONS 10 Important Safety Instructions 1.7 Usage cautions CAUTION • Wear proper apparel. They can cause suffocation and death. Use Information on the use these items to read the user manual This user manual uses...
User manual
Page 10
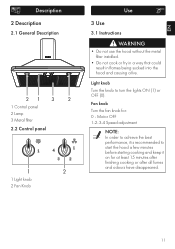
... all fumes and odours have disappeared. 11 Motor OFF 1-2-3-4 Speed adjustment NOTE: In order to achieve the best performance, it is recommended to turn the lights ON (1) or OFF (0). EN Description 2 Description 2.1 General Description 1 Control panel 2 Lamp 3 Metal filter 2.2 Control panel 1 Light knob 2 Fan Knob Use 3 Use 3.1 Instructions WARNING • Do not use the hood without the metal filter installed. • Do not cook or fry in a way that could result...
... all fumes and odours have disappeared. 11 Motor OFF 1-2-3-4 Speed adjustment NOTE: In order to achieve the best performance, it is recommended to turn the lights ON (1) or OFF (0). EN Description 2 Description 2.1 General Description 1 Control panel 2 Lamp 3 Metal filter 2.2 Control panel 1 Light knob 2 Fan Knob Use 3 Use 3.1 Instructions WARNING • Do not use the hood without the metal filter installed. • Do not cook or fry in a way that could result...

User manual
Page 11
... or scouring pads. If the stains are not removed, moisten a soft rag with a window cleaner. Cleaning and maintenance 4 Cleaning and maintenance 4.1 Instructions WARNING • Before starting operations make sure the electrical power supply to preserve the exterior finish of your exclusive SMEG - Do not use rough or abrasive materials or sharp metal scrapers. 4.2 Cleaning the appliance NOTE: To keep the appliance surfaces...
... or scouring pads. If the stains are not removed, moisten a soft rag with a window cleaner. Cleaning and maintenance 4 Cleaning and maintenance 4.1 Instructions WARNING • Before starting operations make sure the electrical power supply to preserve the exterior finish of your exclusive SMEG - Do not use rough or abrasive materials or sharp metal scrapers. 4.2 Cleaning the appliance NOTE: To keep the appliance surfaces...
User manual
Page 12
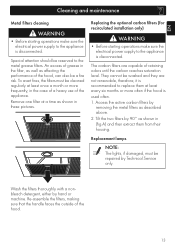
... once a month or more often if the hood is used often. 1. Re-assemble the filters, making sure that the handle faces the outside of retaining odors until the carbon reaches saturation level. EN Cleaning and maintenance Metal filters cleaning WARNING • Before starting operations make sure the electrical power supply to the appliance is disconnected. Remove one filter at least every six months or more frequently...
... once a month or more often if the hood is used often. 1. Re-assemble the filters, making sure that the handle faces the outside of retaining odors until the carbon reaches saturation level. EN Cleaning and maintenance Metal filters cleaning WARNING • Before starting operations make sure the electrical power supply to the appliance is disconnected. Remove one filter at least every six months or more frequently...

User manual
Page 13
... the adjusting screw. 9. Installation 5 Installation 5.1 Positioning WARNING • Use two or more people to the wall. 6. The hood should be centered with two supports/ hooks (A) that need to the wall by means of wall anchors. Mark the L2 holes on to fix the hood safely. 7. Hang the hood on the wall to the supports/hooks and level by tightening both wall anchors. 14 Remove the anti-grease filters, put...
... the adjusting screw. 9. Installation 5 Installation 5.1 Positioning WARNING • Use two or more people to the wall. 6. The hood should be centered with two supports/ hooks (A) that need to the wall by means of wall anchors. Mark the L2 holes on to fix the hood safely. 7. Hang the hood on the wall to the supports/hooks and level by tightening both wall anchors. 14 Remove the anti-grease filters, put...
User manual
Page 14
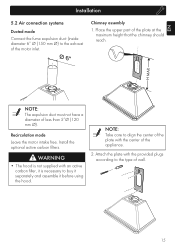
... filter, it before using the hood. Attach the plate with the provided plugs according to buy it separately and assemble it is necessary to the type of wall. 15 Place the upper part of less than 5"Ø (120 mm Ø). Install the optional active carbon filters. Recirculation mode Leave the motor intake free. NOTE: Take care to the exhaust of the motor inlet. EN Installation 5.2 Air connection systems Ducted mode Connect...
... filter, it before using the hood. Attach the plate with the provided plugs according to buy it separately and assemble it is necessary to the type of wall. 15 Place the upper part of less than 5"Ø (120 mm Ø). Install the optional active carbon filters. Recirculation mode Leave the motor intake free. NOTE: Take care to the exhaust of the motor inlet. EN Installation 5.2 Air connection systems Ducted mode Connect...
User manual
Page 15
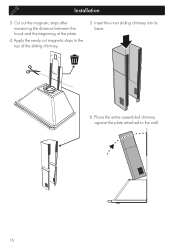
Place the entire assembled chimney against the plate attached to the top of the plate. 4. Cut out the magnetic strips after measuring the distance between the hood and the beginning of the sliding chimney, 5. Insert the inner sliding chimney into its base. 6. Installation 3. Apply the newly cut magnetic strips to the wall. 16
Place the entire assembled chimney against the plate attached to the top of the plate. 4. Cut out the magnetic strips after measuring the distance between the hood and the beginning of the sliding chimney, 5. Insert the inner sliding chimney into its base. 6. Installation 3. Apply the newly cut magnetic strips to the wall. 16
User manual
Page 16
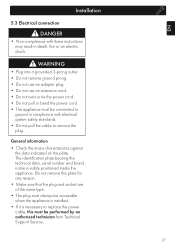
... indicated on the plate. The identification plate bearing the technical data, serial number and brand name is necessary to replace the power cable, this plate for any reason. • Make sure that the plug and socket are of the same type. • The plug must always be performed by an authorized technician from Technical Support Service. 17 EN Installation 5.3 Electrical connection DANGER • Non...
... indicated on the plate. The identification plate bearing the technical data, serial number and brand name is necessary to replace the power cable, this plate for any reason. • Make sure that the plug and socket are of the same type. • The plug must always be performed by an authorized technician from Technical Support Service. 17 EN Installation 5.3 Electrical connection DANGER • Non...

