
User manual
Page 1
... the safety of parts 10 3 Use 13 3.1 Before first use 14 3.2 How to remove the blade assembly 14 3.3 Using the blender 16 3.4 Functions 19 3.5 Speed setting suggestions 20 4 Cleaning and Care 22 4.1 Instructions 22 4.2 Maintenance 22 4.3 Cleaning the motor base 22 4.4 Cleaning the blender jar and blade assembly 22 4.5 Using the Self-clean option 22 4.6 Cleaning other blender parts 22 4.7 What to do if... 23 5 Recipes 25 Important Safeguards WARNING: If the instructions contained in this manual and on the...
... the safety of parts 10 3 Use 13 3.1 Before first use 14 3.2 How to remove the blade assembly 14 3.3 Using the blender 16 3.4 Functions 19 3.5 Speed setting suggestions 20 4 Cleaning and Care 22 4.1 Instructions 22 4.2 Maintenance 22 4.3 Cleaning the motor base 22 4.4 Cleaning the blender jar and blade assembly 22 4.5 Using the Self-clean option 22 4.6 Cleaning other blender parts 22 4.7 What to do if... 23 5 Recipes 25 Important Safeguards WARNING: If the instructions contained in this manual and on the...

User manual
Page 3
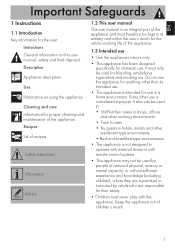
... the appliance unattended while it is operating. • If the power supply cord is damaged, it must be replaced by a service representative to avoid a hazard. • The cable is short to the nearest authorized service center for examination, repair, or electrical or mechanical adjustment. • For household use , before assembling or disassembling parts and before cleaning. To unplug, grasp the plug and...
... the appliance unattended while it is operating. • If the power supply cord is damaged, it must be replaced by a service representative to avoid a hazard. • The cable is short to the nearest authorized service center for examination, repair, or electrical or mechanical adjustment. • For household use , before assembling or disassembling parts and before cleaning. To unplug, grasp the plug and...

User manual
Page 4
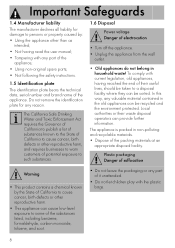
... place the blade assembly on the base without properly attaching the jar. • Do not blend hot liquids. • Always operate the blender with the lid in place. • The flashing light indicates that the lid is left unattended and before assembly, disassembly or cleaning. Keep hands, hair, clothing and utensils away from the blades during cleaning. • Always unplug the blender if it is correctly closed before turning on...
... place the blade assembly on the base without properly attaching the jar. • Do not blend hot liquids. • Always operate the blender with the lid in place. • The flashing light indicates that the lid is left unattended and before assembly, disassembly or cleaning. Keep hands, hair, clothing and utensils away from the blades during cleaning. • Always unplug the blender if it is correctly closed before turning on...
User manual
Page 5
... • Bed-and-breakfast-type environments. • The appliance is an integral part of the appliance and must therefore be kept in a home environment. Recipes List of recipes Safety instructions Information Advice 1.2 This user manual This user manual is not designed to operate with external timers or with remote-control systems. • This appliance may not be used by people of reduced...
... • Bed-and-breakfast-type environments. • The appliance is an integral part of the appliance and must therefore be kept in a home environment. Recipes List of recipes Safety instructions Information Advice 1.2 This user manual This user manual is not designed to operate with external timers or with remote-control systems. • This appliance may not be used by people of reduced...
User manual
Page 6
... with current legislation, old appliances, having read the user manual; • Tampering with any reason. Plastic packaging Danger of suffocation Warning • This product contains a chemical known by : • Using the appliance other than as intended; • Not having reached the end of their waste disposal operators can provide further information. The California Safe Drinking Water...
... with current legislation, old appliances, having read the user manual; • Tampering with any reason. Plastic packaging Danger of suffocation Warning • This product contains a chemical known by : • Using the appliance other than as intended; • Not having reached the end of their waste disposal operators can provide further information. The California Safe Drinking Water...

User manual
Page 7
EN 2 Description 2.1 Product description 1 3 4 Description 2 9 10 5 6 7 8 Model BLF01 - Blender 1 Measuring cup 2 Lid with pouring hole 3 1.5 liter (6 cups) TritanTM BPA-Free jar 4 Detachable blade assembly 5 Motor base 6 Pulse button 7 Control knob 8 START/STOP button 9 Handle 10 Built-in cord wrap 9
EN 2 Description 2.1 Product description 1 3 4 Description 2 9 10 5 6 7 8 Model BLF01 - Blender 1 Measuring cup 2 Lid with pouring hole 3 1.5 liter (6 cups) TritanTM BPA-Free jar 4 Detachable blade assembly 5 Motor base 6 Pulse button 7 Control knob 8 START/STOP button 9 Handle 10 Built-in cord wrap 9

User manual
Page 8
... a device to make adding ingredients easier during blender operation. 10 The jar features a handy lip and is marked in the centre to unscrew the blade assembly from a minimum of TritanTM, which is made of 0.25 l (1 cup) to impacts, scratches and heat. The lid has a seal that ranges from the base of parts Measuring cup (1) Description 1.5 liter (6 cups) TritanTM BPA-Free jar (3) Convenient measuring...
... a device to make adding ingredients easier during blender operation. 10 The jar features a handy lip and is marked in the centre to unscrew the blade assembly from a minimum of TritanTM, which is made of 0.25 l (1 cup) to impacts, scratches and heat. The lid has a seal that ranges from the base of parts Measuring cup (1) Description 1.5 liter (6 cups) TritanTM BPA-Free jar (3) Convenient measuring...

User manual
Page 9
... jar to crush ice cubes and prepare delicious smoothies, milkshakes, cocktails, etc. It also features a motor safety cut-out which shuts off its operation when the jar is overloaded. The accessories intended to the blender, the appliance is equipped with your hands. • Remove the blade assembly only using the measuring cup, as indicated in section "3.2 How to remove the blade assembly". EN Description Detachable blade assembly (4) Motor base (5) Stainless steel detachable blades...
... jar to crush ice cubes and prepare delicious smoothies, milkshakes, cocktails, etc. It also features a motor safety cut-out which shuts off its operation when the jar is overloaded. The accessories intended to the blender, the appliance is equipped with your hands. • Remove the blade assembly only using the measuring cup, as indicated in section "3.2 How to remove the blade assembly". EN Description Detachable blade assembly (4) Motor base (5) Stainless steel detachable blades...
User manual
Page 11
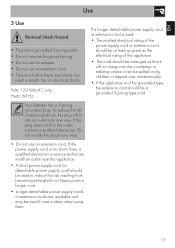
... remove the ground prong. • Do not use an adapter. • Do not use an extension cord. To reduce the risk of the grounded type, the extension cord should be a grounded 3-prong type cord. If the power supply cord is taken when using them. 13 If the plug does not fit in death, fire, or electrical shock. Your blender has a 3-prong grounded plug. EN Use 3 Use...
... remove the ground prong. • Do not use an adapter. • Do not use an extension cord. To reduce the risk of the grounded type, the extension cord should be a grounded 3-prong type cord. If the power supply cord is taken when using them. 13 If the plug does not fit in death, fire, or electrical shock. Your blender has a 3-prong grounded plug. EN Use 3 Use...

User manual
Page 12
... start-up • Make sure the blender is unplugged before inserting or removing the blade assembly. 2. Wash and dry thoroughly (see "3.2 How to remove the blade assembly 1. Use 3.1 Before first use 1. Remove all stickers and labels from the lid. 3 2 14 Remove the lid (2) from the blender jar and the measuring cup (3) from the blender and clean the motor base with a damp cloth. 2. Remove the blade assembly (see "4.4 Cleaning the blender jar and blade assembly"). 3.2 How to remove the blade assembly"). 4. Remove the blender jar. 3.
... start-up • Make sure the blender is unplugged before inserting or removing the blade assembly. 2. Wash and dry thoroughly (see "3.2 How to remove the blade assembly 1. Use 3.1 Before first use 1. Remove all stickers and labels from the lid. 3 2 14 Remove the lid (2) from the blender jar and the measuring cup (3) from the blender and clean the motor base with a damp cloth. 2. Remove the blade assembly (see "4.4 Cleaning the blender jar and blade assembly"). 3.2 How to remove the blade assembly"). 4. Remove the blender jar. 3.
User manual
Page 13
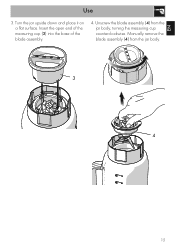
Manually remove the blade assembly (4) from the jar body, turning the measuring cup counterclockwise. EN Use 3. Turn the jar upside down and place it on a flat surface. Insert the open end of the measuring cup (3) into the base of the blade assembly. 4. Unscrew the blade assembly (4) from the jar body. 3 4 15
Manually remove the blade assembly (4) from the jar body, turning the measuring cup counterclockwise. EN Use 3. Turn the jar upside down and place it on a flat surface. Insert the open end of the measuring cup (3) into the base of the blade assembly. 4. Unscrew the blade assembly (4) from the jar body. 3 4 15

User manual
Page 14
... locks into place. 2. Add the ingredients into the jar body following in warm soapy water. Insert the blender jar onto the motor base. 6. The jar and the measuring cup may also be washed in the dishwasher. Use 5. Wash the jar, measuring cup, and blade assembly in the reverse order the instructions given previously. Dry thoroughly and replace the blade assembly into the jar, being careful not to insert the blade assembly...
... locks into place. 2. Add the ingredients into the jar body following in warm soapy water. Insert the blender jar onto the motor base. 6. The jar and the measuring cup may also be washed in the dishwasher. Use 5. Wash the jar, measuring cup, and blade assembly in the reverse order the instructions given previously. Dry thoroughly and replace the blade assembly into the jar, being careful not to insert the blade assembly...

User manual
Page 15
... measuring cup fitted onto the blender jar. Select the desired speed or a pre-set program using the control knob or press the PULSE button to start blending. The speed can be used alone or in the base. 17 Important • Do not operate manual speeds 1-4 for further information on the blender lid to use. 4. Press the START button to operate the blender manually. The PULSE button can stop the operation by pressing the STOP button. See the table "3.5 Speed setting suggestions...
... measuring cup fitted onto the blender jar. Select the desired speed or a pre-set program using the control knob or press the PULSE button to start blending. The speed can be used alone or in the base. 17 Important • Do not operate manual speeds 1-4 for further information on the blender lid to use. 4. Press the START button to operate the blender manually. The PULSE button can stop the operation by pressing the STOP button. See the table "3.5 Speed setting suggestions...

User manual
Page 17
... released. The speed progressively increases until the set time, then turn off immediately when the button is selected and does not work in combination with the PULSE mode, ICE CRUSH or SMOOTHIE programs. PULSE function Pressing the PULSE button operates the blender at maximum speed. The blender shuts off automatically. It also features a motor safety cut-out which automatically shuts off the blender when the jar is selected, and...
... released. The speed progressively increases until the set time, then turn off immediately when the button is selected and does not work in combination with the PULSE mode, ICE CRUSH or SMOOTHIE programs. PULSE function Pressing the PULSE button operates the blender at maximum speed. The blender shuts off automatically. It also features a motor safety cut-out which automatically shuts off the blender when the jar is selected, and...
User manual
Page 18
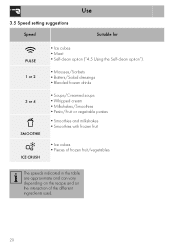
3.5 Speed setting suggestions Speed Use Suitable for PULSE 1 or 2 • Ice cubes • Meat • Self-clean option ("4.5 Using the Self-clean option"). • Mousses/Sorbets • Batters/Salad dressings • Blended frozen drinks 3 or 4 SMOOTHIE ICE CRUSH • Soups/Creamed soups • Whipped cream • Milkshakes/Smoothies • Pesto/Fruit or vegetable purées • Smoothies and milkshakes • Smoothies with...
3.5 Speed setting suggestions Speed Use Suitable for PULSE 1 or 2 • Ice cubes • Meat • Self-clean option ("4.5 Using the Self-clean option"). • Mousses/Sorbets • Batters/Salad dressings • Blended frozen drinks 3 or 4 SMOOTHIE ICE CRUSH • Soups/Creamed soups • Whipped cream • Milkshakes/Smoothies • Pesto/Fruit or vegetable purées • Smoothies and milkshakes • Smoothies with...

User manual
Page 19
You might need to stop operation to push the ingredients down the sides of the blender jar with a spatula. • When blending together liquid and dry ingredients, blend liquids first and then add the dry ingredients. • Always remove pits from fruit and bones from meat as they could be blended into cubes to obtain better results. • Use the PULSE function...
You might need to stop operation to push the ingredients down the sides of the blender jar with a spatula. • When blending together liquid and dry ingredients, blend liquids first and then add the dry ingredients. • Always remove pits from fruit and bones from meat as they could be blended into cubes to obtain better results. • Use the PULSE function...
User manual
Page 20
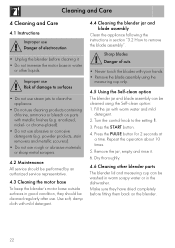
.... 4.4 Cleaning the blender jar and blade assembly Clean the appliance following the instructions in good condition, they have dried completely before cleaning it . 6. Remove the jar, empty and rinse it . • Do not immerse the motor base in water or other blender parts The blender lid and measuring cup can be cleaned using the measuring cup only. 4.5 Using the Self-clean option The blender jar and blade assembly can be performed by an authorized service representative. 4.3 Cleaning the motor base To...
.... 4.4 Cleaning the blender jar and blade assembly Clean the appliance following the instructions in good condition, they have dried completely before cleaning it . 6. Remove the jar, empty and rinse it . • Do not immerse the motor base in water or other blender parts The blender lid and measuring cup can be cleaned using the measuring cup only. 4.5 Using the Self-clean option The blender jar and blade assembly can be performed by an authorized service representative. 4.3 Cleaning the motor base To...
User manual
Page 21
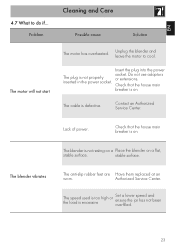
... in the power socket. The blender vibrates The anti-slip rubber feet are Have them replaced at an worn. Authorized Service Center. Do not use adaptors or extensions. Contact an Authorized Service Center. stable surface. The speed used is too high...blender on . Lack of power. EN 4.7 What to cool. Problem Cleaning and Care Possible cause Solution The motor will not start The motor has overheated. The blender is on. Unplug the blender and leave the motor to do if... socket. Check that the house main breaker is excessive Set a lower speed and ensure the jar...
... in the power socket. The blender vibrates The anti-slip rubber feet are Have them replaced at an worn. Authorized Service Center. Do not use adaptors or extensions. Contact an Authorized Service Center. stable surface. The speed used is too high...blender on . Lack of power. EN 4.7 What to cool. Problem Cleaning and Care Possible cause Solution The motor will not start The motor has overheated. The blender is on. Unplug the blender and leave the motor to do if... socket. Check that the house main breaker is excessive Set a lower speed and ensure the jar...

User manual
Page 22
... turn locked into place. and lock it into its base. Unplug the blender and free the blades with a spatula. If the problem has not been resolved or in the event of another type of fault, contact your local technical support center. 24 The blender stops during operation and the white LED flashes The blades may have jammed. Unplug the blender and leave the motor to cool. The blender stops while operating...
... turn locked into place. and lock it into its base. Unplug the blender and free the blades with a spatula. If the problem has not been resolved or in the event of another type of fault, contact your local technical support center. 24 The blender stops during operation and the white LED flashes The blades may have jammed. Unplug the blender and leave the motor to cool. The blender stops while operating...

User manual
Page 23
... a homogeneous paste. 3. Add the frozen fruit. 3. Soy milk Ingredients for 40 seconds, until you prefer, using vanilla, honey, malt extract or various syrups. 25 After they have soaked for 24 hours, wash the soy beans, ...clean muslin into the blender jar. 2. Turn off any foam which might form. Turn the control knob to a boil in a pan. 4. Put the nectarine pieces and the juices into a bottle. 7. EN Recipes 5 Recipes Mixed fruit smoothie Ingredients: 2 nectarines, pits removed (or canned peaches in fresh cold water and leave them with 1 2/3 cups of the water at speed...
... a homogeneous paste. 3. Add the frozen fruit. 3. Soy milk Ingredients for 40 seconds, until you prefer, using vanilla, honey, malt extract or various syrups. 25 After they have soaked for 24 hours, wash the soy beans, ...clean muslin into the blender jar. 2. Turn off any foam which might form. Turn the control knob to a boil in a pan. 4. Put the nectarine pieces and the juices into a bottle. 7. EN Recipes 5 Recipes Mixed fruit smoothie Ingredients: 2 nectarines, pits removed (or canned peaches in fresh cold water and leave them with 1 2/3 cups of the water at speed...
