
Instruction Manual
Page 2
... other user servicing adjustments mentioned in this manual. 3. Please turn all controls to break. 7. Children should never be followed, including the following: Read all moving parts. DANGER - Always unplug before cleaning. 3. Do not allow to ensure that is intended for its service agent or a similar qualified person in this manual. Do...
... other user servicing adjustments mentioned in this manual. 3. Please turn all controls to break. 7. Children should never be followed, including the following: Read all moving parts. DANGER - Always unplug before cleaning. 3. Do not allow to ensure that is intended for its service agent or a similar qualified person in this manual. Do...

Instruction Manual
Page 6
EN List of contents Machine Basics Principle Parts of the Machine ...2/4 Connecting Machine to Power Source ...6 Two Step Presser Foot Lifter ...8 Accessories ...9 Threading the Machine Winding the Bobbin...11 Inserting the Bobbin...13 ... the Thread ...29 Choosing Stretch Stitch Patterns...31 Blind Hem ...33 Sew 1-Step Buttonhole ...35 Sewing on Buttons (Model 3221)...37 Sewing on Buttons (Model 3232)...39 General Information Installing the Removable Accessory Storage ...41 Attaching the Presser Foot Shank ...43 Needle/Fabric/Thread Chart ...45 Darning Plate ...48 Maintenance and...
EN List of contents Machine Basics Principle Parts of the Machine ...2/4 Connecting Machine to Power Source ...6 Two Step Presser Foot Lifter ...8 Accessories ...9 Threading the Machine Winding the Bobbin...11 Inserting the Bobbin...13 ... the Thread ...29 Choosing Stretch Stitch Patterns...31 Blind Hem ...33 Sew 1-Step Buttonhole ...35 Sewing on Buttons (Model 3221)...37 Sewing on Buttons (Model 3232)...39 General Information Installing the Removable Accessory Storage ...41 Attaching the Presser Foot Shank ...43 Needle/Fabric/Thread Chart ...45 Darning Plate ...48 Maintenance and...
Instruction Manual
Page 9
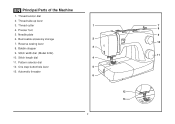
Thread take-up lever 3. Stitch length dial 4 11. Automatic threader 6 12 13 2 Thread cutter 1 7 4. Stitch width dial (Model 3232) 11 10. Needle plate 9 6. Bobbin stopper 3 9. Reverse sewing lever 10 8. Pattern selector dial 12. One step buttonhole lever 5 13. Removable accessory storage 2 7. Thread tension dial 2. Presser foot 8 5. EN Principal Parts of the Machine 1.
Thread take-up lever 3. Stitch length dial 4 11. Automatic threader 6 12 13 2 Thread cutter 1 7 4. Stitch width dial (Model 3232) 11 10. Needle plate 9 6. Bobbin stopper 3 9. Reverse sewing lever 10 8. Pattern selector dial 12. One step buttonhole lever 5 13. Removable accessory storage 2 7. Thread tension dial 2. Presser foot 8 5. EN Principal Parts of the Machine 1.

Instruction Manual
Page 11
Main plug socket 16 22 20. Handle 24. Presser foot lifter 25. Foot speed control 26. EN Principal Parts of the Machine 14. Hole for second spool pin 14 20 17. Upper thread guide 24 22. Face plate 23. Handwheel 15 18. Bobbin thread guide 17 23 21. Power and light switch 21 19. Power cord 18 19 25 26 4 Horizontal spool pin 15. Bobbin winding spindle 16.
Main plug socket 16 22 20. Handle 24. Presser foot lifter 25. Foot speed control 26. EN Principal Parts of the Machine 14. Hole for second spool pin 14 20 17. Upper thread guide 24 22. Face plate 23. Handwheel 15 18. Bobbin thread guide 17 23 21. Power and light switch 21 19. Power cord 18 19 25 26 4 Horizontal spool pin 15. Bobbin winding spindle 16.

Instruction Manual
Page 40
.... Set the stitch width dial at the right. Sew a test first to make blind hem sewing even easier, use a blind hem foot, available from your SINGER® retailer. (See page 9 for heavier weight fabrics. Blind hem for stretch fabrics. Blind Hem: Turn up the hem to the right side of the... fold, making sure the needle touches slightly the folded top to catch one or two fabric threads. (2) Unfold the fabric when hemming is used for part number) 33 Blind hem for firm fabrics. Start to sew slowly on curtains, trousers, skirts, etc.
.... Set the stitch width dial at the right. Sew a test first to make blind hem sewing even easier, use a blind hem foot, available from your SINGER® retailer. (See page 9 for heavier weight fabrics. Blind hem for stretch fabrics. Blind Hem: Turn up the hem to the right side of the... fold, making sure the needle touches slightly the folded top to catch one or two fabric threads. (2) Unfold the fabric when hemming is used for part number) 33 Blind hem for firm fabrics. Start to sew slowly on curtains, trousers, skirts, etc.
Instruction Manual
Page 55
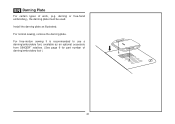
darning or free-hand embroidery), the darning plate must be used. Install the darning plate as an optional accessory from SINGER® retailers. (See page 9 for part number of work, (e.g. EN Darning Plate For certain types of darning/embroidery foot ) 48 For free-motion sewing it is recommended to use a darning/embroidery foot, available as illustrated. For normal sewing, remove the darning plate.
darning or free-hand embroidery), the darning plate must be used. Install the darning plate as an optional accessory from SINGER® retailers. (See page 9 for part number of work, (e.g. EN Darning Plate For certain types of darning/embroidery foot ) 48 For free-motion sewing it is recommended to use a darning/embroidery foot, available as illustrated. For normal sewing, remove the darning plate.
3232 Stitch Applications Guide
Page 13
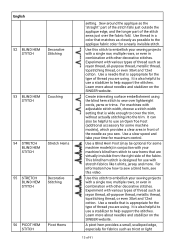
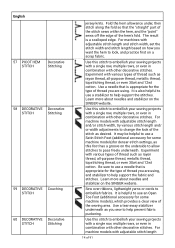
...sewing projects with a single row, multiple rows, or even in conjuction with other decorative stitches. Learn more about needles and stabilizer on the SINGER website. A picot hem provides a small, scalloped edge, especially for maximum control. Use this video. Create interesting surface embellishment using the ..., see this stitch to sew over the fabric fold. Sew around the applique so the "straight" part of the stitch falls just outside the applique edge, and the longer part of the stitch sews just over lightweight cords, yarns or trims. For machines with adjustable stitch width,...
...sewing projects with a single row, multiple rows, or even in conjuction with other decorative stitches. Learn more about needles and stabilizer on the SINGER website. A picot hem provides a small, scalloped edge, especially for maximum control. Use this video. Create interesting surface embellishment using the ..., see this stitch to sew over the fabric fold. Sew around the applique so the "straight" part of the stitch falls just outside the applique edge, and the longer part of the stitch sews just over lightweight cords, yarns or trims. For machines with adjustable stitch width,...
3232 Stitch Applications Guide
Page 14
... for the type of thread you want the hem to help support the stitches. Use this stitch to use a needle that the "straight" part of the stitch sews within the hem, and the "point" sews off the edge of thread such as desired. It may be helpful to...length and/ or width adjustments to embellish fabrics. Sew over ribbons, ligthweight yarns or cords to change the look , and practice first on the SINGER website. Experiment with other decorative stitches. Learn more about needles and stabilizer on a scrap fabric. For machine models with other decorative stitches. Use this...
... for the type of thread you want the hem to help support the stitches. Use this stitch to use a needle that the "straight" part of the stitch sews within the hem, and the "point" sews off the edge of thread such as desired. It may be helpful to...length and/ or width adjustments to embellish fabrics. Sew over ribbons, ligthweight yarns or cords to change the look , and practice first on the SINGER website. Experiment with other decorative stitches. Learn more about needles and stabilizer on a scrap fabric. For machine models with other decorative stitches. Use this...

