Instruction Manual
Page 3
... EMBROIDERY SEWING Before attaching embroidery unit 30 - 31 Attaching embroidery foot, Inserting the bobbin, Threading the top thread, Extension table, Attaching embroidery unit 32 Removing embroidery unit 32 Securing fabric in embroidery hoop 33 Using fabric and stabilizer 34 - 35 Preparing the machine ...Decorative Stitching 25 Continuous patterns 26 Sewing on a button 26 Buttonholes 27 - 29 Using buttonhole foot, Procedure, Corded buttonholes Buttonholing with Futura Multi hoop 44 - 47 Helpful messages when embroidering 48 4. STARTING TO SEW Quick reference table of stitch length ...
... EMBROIDERY SEWING Before attaching embroidery unit 30 - 31 Attaching embroidery foot, Inserting the bobbin, Threading the top thread, Extension table, Attaching embroidery unit 32 Removing embroidery unit 32 Securing fabric in embroidery hoop 33 Using fabric and stabilizer 34 - 35 Preparing the machine ...Decorative Stitching 25 Continuous patterns 26 Sewing on a button 26 Buttonholes 27 - 29 Using buttonhole foot, Procedure, Corded buttonholes Buttonholing with Futura Multi hoop 44 - 47 Helpful messages when embroidering 48 4. STARTING TO SEW Quick reference table of stitch length ...

Instruction Manual
Page 5
Needles 2. Bobbins 3. Screwdriver (small) 12. Button sewing foot 1 16. Scissors 22. Embroidery presser foot 23. Spool pin cap (large) 8. Thread spool net (long) 18. Embroidery software CD 19 FUTURA embroidery is a "system" in which your embroidery machine. Spool pin felt discs 5. Screwdriver for most decorative sewing. Buttonhole foot and underplate 17. Bobbins 21. Spool pin cap (mini) 6. Satin foot...
Needles 2. Bobbins 3. Screwdriver (small) 12. Button sewing foot 1 16. Scissors 22. Embroidery presser foot 23. Spool pin cap (large) 8. Thread spool net (long) 18. Embroidery software CD 19 FUTURA embroidery is a "system" in which your embroidery machine. Spool pin felt discs 5. Screwdriver for most decorative sewing. Buttonhole foot and underplate 17. Bobbins 21. Spool pin cap (mini) 6. Satin foot...
Instruction Manual
Page 32
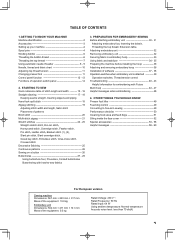
...machine CAUTION before changing presser foot. Foot holder Screw * Raise presser foot lifter. * Turn the hand wheel counter clockwise (toward you ) until the needle is above the needle clamp. Remove presser foot screw, presser foot and foot holder. 2. PREPARATION FOR EMBROIDERY SEWING BEFORE ATTACHING EMBROIDERY UNIT ATTACHING EMBROIDERY... FOOT Always be sure to move needle up and down together with the needle. Needle clamp Embroidery presser foot INSERTING THE BOBBIN...
...machine CAUTION before changing presser foot. Foot holder Screw * Raise presser foot lifter. * Turn the hand wheel counter clockwise (toward you ) until the needle is above the needle clamp. Remove presser foot screw, presser foot and foot holder. 2. PREPARATION FOR EMBROIDERY SEWING BEFORE ATTACHING EMBROIDERY UNIT ATTACHING EMBROIDERY... FOOT Always be sure to move needle up and down together with the needle. Needle clamp Embroidery presser foot INSERTING THE BOBBIN...

Instruction Manual
Page 34
... not detach. Turn off the machine. * Remove embroidery hoop from machine. (Refer to close for general sewing. 3 Handle 1 Release lever 2 Handle Release lever 32 Slide the embroidery unit onto machine fitting connectors on the embroidery unit while attaching or during the embroidering process. REMOVING EMBROIDERY UNIT * Turn off the machine. Holding handle of the embroidery unit and pull it clicks...
... not detach. Turn off the machine. * Remove embroidery hoop from machine. (Refer to close for general sewing. 3 Handle 1 Release lever 2 Handle Release lever 32 Slide the embroidery unit onto machine fitting connectors on the embroidery unit while attaching or during the embroidering process. REMOVING EMBROIDERY UNIT * Turn off the machine. Holding handle of the embroidery unit and pull it clicks...
Instruction Manual
Page 40
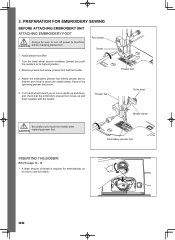
... USB cable between your computer and sewing machine. 1. A progress bar will automatically close the Futura software and then turn on the hard disk. Please wait for proper start the copy and installation of available space on "Cancel". Next attach the embroidery unit to your machine. Double click on the Futura Icon on your desktop to the...
... USB cable between your computer and sewing machine. 1. A progress bar will automatically close the Futura software and then turn on the hard disk. Please wait for proper start the copy and installation of available space on "Cancel". Next attach the embroidery unit to your machine. Double click on the Futura Icon on your desktop to the...

Instruction Manual
Page 41
...sewing and the needle stops at a time. Pressing the button once will reverse one stitch at its highest position. Note: The embroidery hoop will stop button (For embroidery only) THREAD TENSION CONTROL Set it at a time. OPERATION SWITCHES WHEN EMBROIDERY UNIT IS ATTACHED OPERATION SWITCHES START/STOP BUTTON When start . Red light indicates machine...through a design that the machine malfunctions. FORWARD STITCH BUTTON After the embroidery design has been transferred to the machine, the embroidery can be reversed all the way back to the machine. Design may wish to ...
...sewing and the needle stops at a time. Pressing the button once will reverse one stitch at its highest position. Note: The embroidery hoop will stop button (For embroidery only) THREAD TENSION CONTROL Set it at a time. OPERATION SWITCHES WHEN EMBROIDERY UNIT IS ATTACHED OPERATION SWITCHES START/STOP BUTTON When start . Red light indicates machine...through a design that the machine malfunctions. FORWARD STITCH BUTTON After the embroidery design has been transferred to the machine, the embroidery can be reversed all the way back to the machine. Design may wish to ...
Instruction Manual
Page 46
... These lines will now be sent to the machine to stitch out, while making it and sew accordingly. In the Software 1. Multi-Hoop Multi-Hooping is a special feature in the Futura QuartetTM software that will allow embroidery data which is larger than a single embroidery hoop to be referred to as the"cross... lines". This embroidery data may be used to set the fabric into the hoop and will therefore sew the design to the accuracy of...
... These lines will now be sent to the machine to stitch out, while making it and sew accordingly. In the Software 1. Multi-Hoop Multi-Hooping is a special feature in the Futura QuartetTM software that will allow embroidery data which is larger than a single embroidery hoop to be referred to as the"cross... lines". This embroidery data may be used to set the fabric into the hoop and will therefore sew the design to the accuracy of...

Instruction Manual
Page 47
... line Center point line A Data 1 Guide line Data 2 C Guide line B Guide line Data 4 Data 3 45 The grey area (#1 Hoop) is the first of the embroidery data that is sent to as the design parts flow out of markings on the tool bar. 5. Set fabric and stabilizer into the software. (Additional... the hoop area on the fabric as shown. Guide lines are markings which indicates the exact center of the hoop there is sent to the machine for sewing one section at a time. 3. These marks are two sets of the first hoop section). 4. The example shown uses lettering and designs from...
... line Center point line A Data 1 Guide line Data 2 C Guide line B Guide line Data 4 Data 3 45 The grey area (#1 Hoop) is the first of the embroidery data that is sent to as the design parts flow out of markings on the tool bar. 5. Set fabric and stabilizer into the software. (Additional... the hoop area on the fabric as shown. Guide lines are markings which indicates the exact center of the hoop there is sent to the machine for sewing one section at a time. 3. These marks are two sets of the first hoop section). 4. The example shown uses lettering and designs from...

Instruction Manual
Page 51
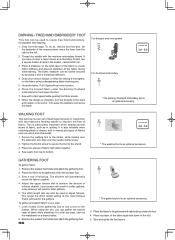
4. Raise the lifter to the middle position to sew. 2. With the extension table removed the machine converts into place until it off to the left as a standard flat-bed model. They should be used either as a freearm model. To remove the ... remove thick fabric. Lift it provides a large working surface as shown. Down Feed dog control CONVERTING TO FREE-ARM SEWING Your machine can be raised for all general sewing purposes and lowered for darning, freehand embroidery and monogramming so that is being sewn. Lower the presser foot to insert or remove fabric. 3. bed or...
4. Raise the lifter to the middle position to sew. 2. With the extension table removed the machine converts into place until it off to the left as a standard flat-bed model. They should be used either as a freearm model. To remove the ... remove thick fabric. Lift it provides a large working surface as shown. Down Feed dog control CONVERTING TO FREE-ARM SEWING Your machine can be raised for all general sewing purposes and lowered for darning, freehand embroidery and monogramming so that is being sewn. Lower the presser foot to insert or remove fabric. 3. bed or...

Instruction Manual
Page 57
... draw fabric in rolling the fabric's edge. OVERCASTING FOOT The guide on the overcasting foot aligns with the machine embroidery thread. As you have chosen a rayon sheen as the stitch locks the edge of the fabric being turned up. 3. Align the raw edge of the ... a single layer of the machine so that it from right to stitch over the cord. Sew along the marked lines. When finished sewing, pull the fabric out toward the back of the fabric under the cording foot. Select a soft medium weight fabric. 2. CORDING FOOT This foot is kept flat as embroidery thread, use a special...
... draw fabric in rolling the fabric's edge. OVERCASTING FOOT The guide on the overcasting foot aligns with the machine embroidery thread. As you have chosen a rayon sheen as the stitch locks the edge of the fabric being turned up. 3. Align the raw edge of the ... a single layer of the machine so that it from right to stitch over the cord. Sew along the marked lines. When finished sewing, pull the fabric out toward the back of the fabric under the cording foot. Select a soft medium weight fabric. 2. CORDING FOOT This foot is kept flat as embroidery thread, use a special...
Instruction Manual
Page 58
Thread the needle with a fast speed while guiding the fabric slowly. 8. Sew with the machine embroidery thread. GATHERING FOOT To gather fabric: 1. Adjust the upper tension dial to see a slot on the fabric using the slot, you have ... to achieve the amount of fabric. Draw your chosen design, or letter for sewing a monogram, on the bottom. Place the hooped fabric under the foot. 4. For designs and monograms 3.0 - 5.0 For freehand embroidery * The darning / freehand embroidery foot is an optional accessory. 3. This is an optional accessory. Tighten the ...
Thread the needle with a fast speed while guiding the fabric slowly. 8. Sew with the machine embroidery thread. GATHERING FOOT To gather fabric: 1. Adjust the upper tension dial to see a slot on the fabric using the slot, you have ... to achieve the amount of fabric. Draw your chosen design, or letter for sewing a monogram, on the bottom. Place the hooped fabric under the foot. 4. For designs and monograms 3.0 - 5.0 For freehand embroidery * The darning / freehand embroidery foot is an optional accessory. 3. This is an optional accessory. Tighten the ...

Instruction Manual
Page 61
...stitch pattern numbers on control panel and/or PC screen. On control panell On PC screen Problem Correction Sewing Embroidery Machine is selected on machine socket for foot control. Remove foreign particle. Buttonhole is locked up due to thread entangled around spindle ...button, but buttonhole lever is raised. Lower buttonhole lever and begin sewing buttonhole. ○ 03 Buttonhole lever is not raised. Raise buttonhole lever when sewing stitch patterns or embroidery. ○○ 04 Foot control is displayed, fix the problem following the...
...stitch pattern numbers on control panel and/or PC screen. On control panell On PC screen Problem Correction Sewing Embroidery Machine is selected on machine socket for foot control. Remove foreign particle. Buttonhole is locked up due to thread entangled around spindle ...button, but buttonhole lever is raised. Lower buttonhole lever and begin sewing buttonhole. ○ 03 Buttonhole lever is not raised. Raise buttonhole lever when sewing stitch patterns or embroidery. ○○ 04 Foot control is displayed, fix the problem following the...

