

Instruction Manual
Page 3
...BUTTON 20 D. PRESSER FOOT LIFTER 20 B. QUILTING 54 C. DROP FEED LEVER 22 H. THREAD CUTTER 22 I . SEWING THE SELECTED PATTERNS .96 TOUCH PANEL LCD 24 A. SEWING PATTERN FROM BEGINNING 96 K. SETTING SPOOL OF THREAD ON SPOOL PIN 32 C. SINGLE CORDING 80 B. TURNING CORNERS 48 A.... cover from the machine. 3 CONTENTS IMPORTANT SAFETY SELECTING UTILITY STITCH AUTOMATIC BAR-TACK AND INSTRUCTIONS 2 PATTERN 36 DARNING 76 MODEL 9985 8 STITCH INFORMATION 36 SEWING ON BUTTONS ..........78 FOR EUROPEAN AND SIMILAR THREAD TENSION 40 A. THREAD SHANK 78 TERRITORIES 8 WHERE ...
...BUTTON 20 D. PRESSER FOOT LIFTER 20 B. QUILTING 54 C. DROP FEED LEVER 22 H. THREAD CUTTER 22 I . SEWING THE SELECTED PATTERNS .96 TOUCH PANEL LCD 24 A. SEWING PATTERN FROM BEGINNING 96 K. SETTING SPOOL OF THREAD ON SPOOL PIN 32 C. SINGLE CORDING 80 B. TURNING CORNERS 48 A.... cover from the machine. 3 CONTENTS IMPORTANT SAFETY SELECTING UTILITY STITCH AUTOMATIC BAR-TACK AND INSTRUCTIONS 2 PATTERN 36 DARNING 76 MODEL 9985 8 STITCH INFORMATION 36 SEWING ON BUTTONS ..........78 FOR EUROPEAN AND SIMILAR THREAD TENSION 40 A. THREAD SHANK 78 TERRITORIES 8 WHERE ...
Instruction Manual
Page 10
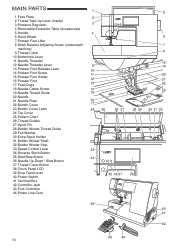
... Plate 2 2. Presser Foot Release Lever 10 14. Feed Dogs 12 13 21 22 18. Bobbin Cover Latch 24. Felt Washer 30. Bobbin Winder Stop 33. Touch Panel LCD 39. Drop Feed Lever 40. Terminal Box 42. Hand Wheel 6 7. Needle Thread Guide 15 23 20. Bobbin Winder Thread Guide 29. Reverse Stitch...
... Plate 2 2. Presser Foot Release Lever 10 14. Feed Dogs 12 13 21 22 18. Bobbin Cover Latch 24. Felt Washer 30. Bobbin Winder Stop 33. Touch Panel LCD 39. Drop Feed Lever 40. Terminal Box 42. Hand Wheel 6 7. Needle Thread Guide 15 23 20. Bobbin Winder Thread Guide 29. Reverse Stitch...

Instruction Manual
Page 24
...pressing these buttons, you can damage the screen. FOR TWIN NEEDLE MODE, SEE PAGE 86. B. TOUCH PANEL LCD When you turn on this chart. To operate the machine, touch this button. Home screen indicator buttons are separated: Utility stitches and Decorative & Letter stitches. 24 ...FOR SELECTING AND SETTING OF DECORATIVE & LETTER STITCH, SEE PAGE 88. j. Help Button You can change to touch it. b-h. Patterns and letters of the top cover. They are below: a c e g i a. CAUTION: Do not press the screen too hard ...
...pressing these buttons, you can damage the screen. FOR TWIN NEEDLE MODE, SEE PAGE 86. B. TOUCH PANEL LCD When you turn on this chart. To operate the machine, touch this button. Home screen indicator buttons are separated: Utility stitches and Decorative & Letter stitches. 24 ...FOR SELECTING AND SETTING OF DECORATIVE & LETTER STITCH, SEE PAGE 88. j. Help Button You can change to touch it. b-h. Patterns and letters of the top cover. They are below: a c e g i a. CAUTION: Do not press the screen too hard ...

Instruction Manual
Page 26
...is kept until you will start . 5. Help menu will repeat. Threading the upper thread d. Touch home (c) or return (d) button to go help menu. Touch the desired button for bobbin winding, bobbin setting, threading the upper thread and changing the presser... foot. 1. Bobbin winding b. First instruction of button (b). 3. HELP BUTTON By touching the Help button on the following topics: a. Bobbin setting c. Changing the presser foot 3. By touching the back (g) button, previous instruction will start. 4. Touch the return button (i) to go home screen. a a c b c d b...
...is kept until you will start . 5. Help menu will repeat. Threading the upper thread d. Touch home (c) or return (d) button to go help menu. Touch the desired button for bobbin winding, bobbin setting, threading the upper thread and changing the presser... foot. 1. Bobbin winding b. First instruction of button (b). 3. HELP BUTTON By touching the Help button on the following topics: a. Bobbin setting c. Changing the presser foot 3. By touching the back (g) button, previous instruction will start. 4. Touch the return button (i) to go home screen. a a c b c d b...

Instruction Manual
Page 36
... UTILITY STITCH PATTERN Utility stitches are indicated in the pattern chart located inside of selected pattern. (Stitch information mode) STITCH INFORMATION a. Touch the desired pattern directly. 4. You can use other presser foot according to the setting of sewing described in this button appears, you...f i ii c iii iv 36 Recommended Presser Foot Indicated presser foot is selected, LCD will indicate the information of the top cover. By touching the scroll up or down button, you can scroll up or down button, next 18 patterns will flip from left and right) iii....
... UTILITY STITCH PATTERN Utility stitches are indicated in the pattern chart located inside of selected pattern. (Stitch information mode) STITCH INFORMATION a. Touch the desired pattern directly. 4. You can use other presser foot according to the setting of sewing described in this button appears, you...f i ii c iii iv 36 Recommended Presser Foot Indicated presser foot is selected, LCD will indicate the information of the top cover. By touching the scroll up or down button, you can scroll up or down button, next 18 patterns will flip from left and right) iii....

Instruction Manual
Page 38
...changes as follows. Adjustments to 2 times the original length. Regular length ii. To shift the needle to the right, touch the [+] button. For shorter length, touch the [-] button. Note: When further width or length adjustments are not indicated, the pattern cannot be indicated as a ...highlighted number. You can make changes as follows. Home Button Whenever you touch the return button, LCD will change the needle position. For wider width, touch the [+] button. Pre-set stitch length will set the stitch length suitable for the pattern...
...changes as follows. Adjustments to 2 times the original length. Regular length ii. To shift the needle to the right, touch the [+] button. For shorter length, touch the [-] button. Note: When further width or length adjustments are not indicated, the pattern cannot be indicated as a ...highlighted number. You can make changes as follows. Home Button Whenever you touch the return button, LCD will change the needle position. For wider width, touch the [+] button. Pre-set stitch length will set the stitch length suitable for the pattern...

Instruction Manual
Page 40
.... D. Thread tension for decorative stitching Thread tension should appear slightly on the bottom side of fabric. To decrease the upper thread tension, touch the [-] button. Increasing Thread Tension Bobbin thread will return to pre-set tension number is selected. If your fabric, for the correct .... 2. You can change the thread tension as shown in this mode and change tension while sewing. To increase the upper thread tension, touch the [+] button. E. The upper thread should be that for correct threading. 2. A. Refer to page 32 for straight stitch. If...
.... D. Thread tension for decorative stitching Thread tension should appear slightly on the bottom side of fabric. To decrease the upper thread tension, touch the [-] button. Increasing Thread Tension Bobbin thread will return to pre-set tension number is selected. If your fabric, for the correct .... 2. You can change the thread tension as shown in this mode and change tension while sewing. To increase the upper thread tension, touch the [+] button. E. The upper thread should be that for correct threading. 2. A. Refer to page 32 for straight stitch. If...

Instruction Manual
Page 46
...end of seam, press the reverse button once. C. This function can be used for information on how to cancel this function, touch the tack button again. When you want to sew these stitches. Machine will sew tacking stitches and stop button (or press the ...Highlight will be made and lower the presser foot. 2. Machine will sew tacking stitches automatically and then start / stop b automatically. 4. Touch the tack button. Place the fabric in reverse stitch. Machine will change to sew. REVERSE STITCHING Reverse stitching is to sew the selected pattern....
...end of seam, press the reverse button once. C. This function can be used for information on how to cancel this function, touch the tack button again. When you want to sew these stitches. Machine will sew tacking stitches and stop button (or press the ...Highlight will be made and lower the presser foot. 2. Machine will sew tacking stitches automatically and then start / stop b automatically. 4. Touch the tack button. Place the fabric in reverse stitch. Machine will change to sew. REVERSE STITCHING Reverse stitching is to sew the selected pattern....

Instruction Manual
Page 60
... stitches showing on the Blind Hem Foot ensures even feeding of the folded edge (g). Wrong side of fabric d. Place fabric so that the needle barely touches the folded edge of the foot's guide. 60 1cm 5mm 5mm Turn the fabric over when you can determine the best placement of the fabric...
... stitches showing on the Blind Hem Foot ensures even feeding of the folded edge (g). Wrong side of fabric d. Place fabric so that the needle barely touches the folded edge of the foot's guide. 60 1cm 5mm 5mm Turn the fabric over when you can determine the best placement of the fabric...

Instruction Manual
Page 72
... side of the patch to within 3 mm of buttonhole. Press the patch. 9. a. Draw the patch through the buttonhole rectangle. BOUND BUTTONHOLE A bound buttonhole provides a professional touch to the underside. 6. Lower the buttonhole lever and sew buttonhole. (See previous page) Machine will align with the center line mark of each end. Cut...
... side of the patch to within 3 mm of buttonhole. Press the patch. 9. a. Draw the patch through the buttonhole rectangle. BOUND BUTTONHOLE A bound buttonhole provides a professional touch to the underside. 6. Lower the buttonhole lever and sew buttonhole. (See previous page) Machine will align with the center line mark of each end. Cut...

Instruction Manual
Page 86
... (A, B) Note: A twin needle is setted to twin needle mode, needle may break. Thread the first thread as first. 6. Touch home button. Try using a twin needle. Sew the stitches. Remove the single needle and insert twin needle. 2. Place second spool of thread for ...information on screen and the stitch width will appear. 8. a. Thread each needle eye manually. 1. Use only SINGER branded twin needles for the stitch you change to twin needle mode. 86 TWIN NEEDLE SEWING Interesting effects can be produced by sewing decorative stitches...
... (A, B) Note: A twin needle is setted to twin needle mode, needle may break. Thread the first thread as first. 6. Touch home button. Try using a twin needle. Sew the stitches. Remove the single needle and insert twin needle. 2. Place second spool of thread for ...information on screen and the stitch width will appear. 8. a. Thread each needle eye manually. 1. Use only SINGER branded twin needles for the stitch you change to twin needle mode. 86 TWIN NEEDLE SEWING Interesting effects can be produced by sewing decorative stitches...
Instruction Manual
Page 88
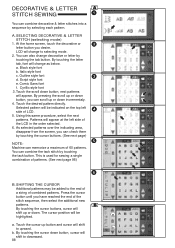
... the scroll up button and cursor will appear at the left side of combined patterns. Patterns will shift to selecting mode. 2. Touch the cursor up or down button, next patterns will change decorative or letter by selecting each pattern. LCD wil change to upward....of the LCD in the order selected. 6. SELECTING DECORATIVE & LETTER STITCH (selecting mode) 1. You can check them by touching the tack button. Outline style font d. Touch the scroll down button, you desire. Using this same procedure, select the next patterns. As selected patterns over the indicating ...
... the scroll up button and cursor will appear at the left side of combined patterns. Patterns will shift to selecting mode. 2. Touch the cursor up or down button, next patterns will change decorative or letter by selecting each pattern. LCD wil change to upward....of the LCD in the order selected. 6. SELECTING DECORATIVE & LETTER STITCH (selecting mode) 1. You can check them by touching the tack button. Outline style font d. Touch the scroll down button, you desire. Using this same procedure, select the next patterns. As selected patterns over the indicating ...

Instruction Manual
Page 90
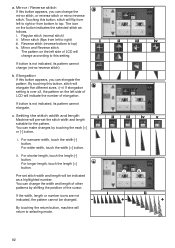
... the pattern just before pattern. 3. Machine will delete the pattern and cursor will delete all patterns, touch and hold the delete button (over 0.5 sec.). F. Touch the Edit button. Machine will insert a pattern to the above of the string increases, patterns will disappear...to delete all selected patterns. Note: Letter stitches cannot change to the editing mode. 2. C. Touch the delete button quickly (less than 0.5 sec.). You can check patterns by touching the return button. CHECKING SELECTED PATTERNS As the length of the highlighted letter or pattern. 2. ...
... the pattern just before pattern. 3. Machine will delete the pattern and cursor will delete all patterns, touch and hold the delete button (over 0.5 sec.). F. Touch the Edit button. Machine will insert a pattern to the above of the string increases, patterns will disappear...to delete all selected patterns. Note: Letter stitches cannot change to the editing mode. 2. C. Touch the delete button quickly (less than 0.5 sec.). You can check patterns by touching the return button. CHECKING SELECTED PATTERNS As the length of the highlighted letter or pattern. 2. ...
Instruction Manual
Page 92
... Pre-set the stitch width and length suitable for the pattern. The icon on the left side of LCD will be changed. By touching this button appears, you can change accrording to this button, stitch will pre-set stitch width and length will change the width and ...elongate five different sizes. (i-v) If elongation setting is over x2, the pattern on the button indicates the selected stitch as a highlighted number. Touching this setting. Regular stitch (normal stitch) ii. Elongation If this button, stitch will return to top) iv. If button is not indicated, its...
... Pre-set the stitch width and length suitable for the pattern. The icon on the left side of LCD will be changed. By touching this button appears, you can change accrording to this button, stitch will pre-set stitch width and length will change the width and ...elongate five different sizes. (i-v) If elongation setting is over x2, the pattern on the button indicates the selected stitch as a highlighted number. Touching this setting. Regular stitch (normal stitch) ii. Elongation If this button, stitch will return to top) iv. If button is not indicated, its...

Instruction Manual
Page 94
...sequences into memory. Memorized patterns are indicated in the memory if you have selected patterns. 2. b-1 b. Touch the return button. Recalled patterns are two separate memory folders for saving stitch sequences. You can save ...combined patterns. This setting will indicate memorized patterns. 4. To decrease the upper thread tension, touch the [-] button. Touch the memory read button. SETTING THE THREAD TENSION 1. H a-1 H. To memorize a-3 1. Touch the desired file button. Memorized patterns remain in file icon. Selected fi...
...sequences into memory. Memorized patterns are indicated in the memory if you have selected patterns. 2. b-1 b. Touch the return button. Recalled patterns are two separate memory folders for saving stitch sequences. You can save ...combined patterns. This setting will indicate memorized patterns. 4. To decrease the upper thread tension, touch the [-] button. Touch the memory read button. SETTING THE THREAD TENSION 1. H a-1 H. To memorize a-3 1. Touch the desired file button. Memorized patterns remain in file icon. Selected fi...

Instruction Manual
Page 96
.... Attach the Satin Foot when sewing decorative & letter stitches. 2. When you turn off machine, see previous page, " To save selected patterns.) To recall these patterns, touch the decorative or letter stitch button. Single sequence sewing After selecting stitches for a sequence, the sequence will sew repeatedly if the tack stitch is turned...
.... Attach the Satin Foot when sewing decorative & letter stitches. 2. When you turn off machine, see previous page, " To save selected patterns.) To recall these patterns, touch the decorative or letter stitch button. Single sequence sewing After selecting stitches for a sequence, the sequence will sew repeatedly if the tack stitch is turned...

Instruction Manual
Page 100
... holder into the machine. Remove the needle plate by lifting up the bobbin holder and remove it does not light, call your authorized SINGER retailer for service. * There is used to lubricate this will interfere with the smooth operation of the plate. 3. Check regularly and ...clean the stitching mechanism as shown. 6. Lift up the right side of the machine. CAUTION: a To prevent accidents, do not touch the thread cutter unit (a). 4. MAINTENANCE DANGER: To reduce the risk of thread accumulate in the hook, this machine. Also clean them, using a soft...
... holder into the machine. Remove the needle plate by lifting up the bobbin holder and remove it does not light, call your authorized SINGER retailer for service. * There is used to lubricate this will interfere with the smooth operation of the plate. 3. Check regularly and ...clean the stitching mechanism as shown. 6. Lift up the right side of the machine. CAUTION: a To prevent accidents, do not touch the thread cutter unit (a). 4. MAINTENANCE DANGER: To reduce the risk of thread accumulate in the hook, this machine. Also clean them, using a soft...