Instruction Manual 2
Page 2
...damaged, or dropped into any object into water. Return the sewing machine to persons: 1. Do not use by an authorized service representative. 2 SINGER is a registered Trademark of electric shock: Never leave unattended when plugged in the needle area, such as described in this manual. To disconnect... grasp the plug, not the cord. 10. It may deflect the needle causing it on cord. Do not pull or push fabric while stitching. Handle the foot controller with any other user servicing adjustments mentioned in a very warm or damp place. Use only attachments recommended by pulling...
...damaged, or dropped into any object into water. Return the sewing machine to persons: 1. Do not use by an authorized service representative. 2 SINGER is a registered Trademark of electric shock: Never leave unattended when plugged in the needle area, such as described in this manual. To disconnect... grasp the plug, not the cord. 10. It may deflect the needle causing it on cord. Do not pull or push fabric while stitching. Handle the foot controller with any other user servicing adjustments mentioned in a very warm or damp place. Use only attachments recommended by pulling...

Instruction Manual 2
Page 3
... 78 A. SEWING THE SELECTED PATTERNS 96 I . CONTENTS IMPORTANT SAFETY INSTRUCTIONS 2 MODEL 9960 8 FOR EUROPEAN AND SIMILAR TERRITORIES: ...... 8 MAIN PARTS 10 ACCESSORIES 12 DUST COVER 12 EXTENSION TABLE 14 a. PRESSER FOOT LIFTER 20 F. DROP FEED LEVER 22 H. DISPLAY 24 B. DIRECT STITCH SELECTION BUTTONS 24 E. FUNCTION BUTTONS 24 H. TACK BUTTON 26 M. REMOVING THE BOBBIN...
... 78 A. SEWING THE SELECTED PATTERNS 96 I . CONTENTS IMPORTANT SAFETY INSTRUCTIONS 2 MODEL 9960 8 FOR EUROPEAN AND SIMILAR TERRITORIES: ...... 8 MAIN PARTS 10 ACCESSORIES 12 DUST COVER 12 EXTENSION TABLE 14 a. PRESSER FOOT LIFTER 20 F. DROP FEED LEVER 22 H. DISPLAY 24 B. DIRECT STITCH SELECTION BUTTONS 24 E. FUNCTION BUTTONS 24 H. TACK BUTTON 26 M. REMOVING THE BOBBIN...
Instruction Manual 2
Page 10
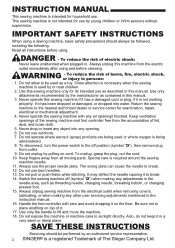
...2.Top Cover 3.Thread Take-Up Lever (Inside) 4.Face Plate 5.Thread Cutter Button 6.Speed Control Button 7.Needle Up-Down / Slow Button 8.Reverse Stitch Button 9.Start/Stop Button 10.Extension Table (Accessories) 11.Presser Foot Lifter 12.Forward / Reverse Adjusting Screw (underneath machine) 13.Foot Controller 14... 15.Hand Wheel 16.Power Switch 17.Terminal Box 18.Controller Jack 19.Direct Stitch Selection Buttons 20.EDIT Button 21.Tack Button 22.Twin Needle Button 23.Utility Stitch Button 24.Decorative Stitch & Letter Button 25.Liquid Crystal Display (L.C.D.) 26.Function Buttons (F1 - Contrast...
...2.Top Cover 3.Thread Take-Up Lever (Inside) 4.Face Plate 5.Thread Cutter Button 6.Speed Control Button 7.Needle Up-Down / Slow Button 8.Reverse Stitch Button 9.Start/Stop Button 10.Extension Table (Accessories) 11.Presser Foot Lifter 12.Forward / Reverse Adjusting Screw (underneath machine) 13.Foot Controller 14... 15.Hand Wheel 16.Power Switch 17.Terminal Box 18.Controller Jack 19.Direct Stitch Selection Buttons 20.EDIT Button 21.Tack Button 22.Twin Needle Button 23.Utility Stitch Button 24.Decorative Stitch & Letter Button 25.Liquid Crystal Display (L.C.D.) 26.Function Buttons (F1 - Contrast...

Instruction Manual 2
Page 12
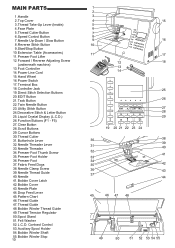
... COVER Cover the machine with Felt Washer 6. Seam Guide and Screw 11. Screw Driver 7. Buttonhole Foot (F) and Under Plate 24. Blind Hem Foot (D) 13. Straight Stitch / Patch Quilting Foot 21. ACCESSORIES Accessories are provided in the machine) 3. Small Thread Cap 10.
... COVER Cover the machine with Felt Washer 6. Seam Guide and Screw 11. Screw Driver 7. Buttonhole Foot (F) and Under Plate 24. Blind Hem Foot (D) 13. Straight Stitch / Patch Quilting Foot 21. ACCESSORIES Accessories are provided in the machine) 3. Small Thread Cap 10.
Instruction Manual 2
Page 14
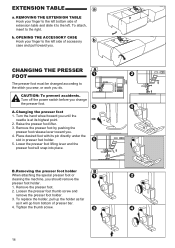
To attach, insert to the stitch you sew, or work you until the needle is at its pin directly under the slot in presser foot holder. 5. A. Changing the presser foot 1. Raise ...
To attach, insert to the stitch you sew, or work you until the needle is at its pin directly under the slot in presser foot holder. 5. A. Changing the presser foot 1. Raise ...

Instruction Manual 2
Page 20
..., and sew slower when the button is slid to sew or bobbin winding. Pressing this button, machine will continue to sew in slow speed. REVERSE STITCH BUTTON The machine will sew in reverse at start of sewing. D. Note: When the foot controller is not lowered. The machine will rotate slowly at...
..., and sew slower when the button is slid to sew or bobbin winding. Pressing this button, machine will continue to sew in slow speed. REVERSE STITCH BUTTON The machine will sew in reverse at start of sewing. D. Note: When the foot controller is not lowered. The machine will rotate slowly at...

Instruction Manual 2
Page 24
...each pattern by selected stitch pattern and mode. DISPLAY Stitch information is indicated on this dial. L.C.D. G.FUNCTION BUTTONS Functions of L.C.D. is located inside of stitch on the L.C.D. E. FOR SELECTING AND SETTING OF UTILITY STITCHES, SEE PAGE 44. DECORATIVE & LETTER STITCH BUTTON By pressing this... or mode, information will select the straight stitch and indicate information of the top cover. EDIT BUTTON When selecting decorative & letter stitch, you can change the setting of this machine are changed . UTILITY STITCH BUTTON By pressing this chart. All patterns...
...each pattern by selected stitch pattern and mode. DISPLAY Stitch information is indicated on this dial. L.C.D. G.FUNCTION BUTTONS Functions of L.C.D. is located inside of stitch on the L.C.D. E. FOR SELECTING AND SETTING OF UTILITY STITCHES, SEE PAGE 44. DECORATIVE & LETTER STITCH BUTTON By pressing this... or mode, information will select the straight stitch and indicate information of the top cover. EDIT BUTTON When selecting decorative & letter stitch, you can change the setting of this machine are changed . UTILITY STITCH BUTTON By pressing this chart. All patterns...

Instruction Manual 2
Page 26
...you attach the twin needle, press this button is turned off until the machine is pressed at the end of a decorative stitch pattern, machine will reduce the stitch width. (SEE PAGE 86) TO TURN OFF THE AUDIBLE BEEP You can return to preset setting by pressing this button,... you can delete one combined stitch pattern or all stitch patterns. TWIN NEEDLE BUTTON If you can sew a tack stitch at the beginning and at the end of a stitch. (SEE PAGE 38) DECORATIVE & LETTER STITCH SEWING If this button. DECORATIVE & LETTER STITCH SEWING By pressing this button. L. Machine ...
...you attach the twin needle, press this button is turned off until the machine is pressed at the end of a decorative stitch pattern, machine will reduce the stitch width. (SEE PAGE 86) TO TURN OFF THE AUDIBLE BEEP You can return to preset setting by pressing this button,... you can delete one combined stitch pattern or all stitch patterns. TWIN NEEDLE BUTTON If you can sew a tack stitch at the beginning and at the end of a stitch. (SEE PAGE 38) DECORATIVE & LETTER STITCH SEWING If this button. DECORATIVE & LETTER STITCH SEWING By pressing this button. L. Machine ...
Instruction Manual 2
Page 36
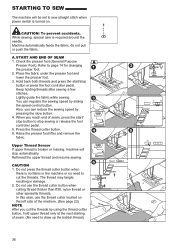
... Purpose Presser Foot). Also, you can regulate the sewing speed by pressing the slow button. 4. CAUTION 1. A. Keep holding threads after sewing a few stitches. When you cut the threads. Raise the presser foot lifter and remove the fabric. Rethread the upper thread and resume sewing. In this case, use...no fabric in damage. 2. Lightly guide the fabric while sewing. Hold back both threads and press the start / stop button to sew straight stitch when power switch is required around the needle. While sewing, special care is turned on the left side of the machine. (See page 22)...
... Purpose Presser Foot). Also, you can regulate the sewing speed by pressing the slow button. 4. CAUTION 1. A. Keep holding threads after sewing a few stitches. When you cut the threads. Raise the presser foot lifter and remove the fabric. Rethread the upper thread and resume sewing. In this case, use...no fabric in damage. 2. Lightly guide the fabric while sewing. Hold back both threads and press the start / stop button to sew straight stitch when power switch is required around the needle. While sewing, special care is turned on the left side of the machine. (See page 22)...

Instruction Manual 2
Page 38
... button again. Tack mark will change to sew the selected pattern. 3. Press and hold reverse button and sew 4-5 reverse stitches. C. AUTO TACK STITCH You may sew tack stitches at the beginning and end of seam, press and hold the reverse button. Machine will appear on the L.C.D.. 2. When you... the end of the seams. 1. Machine will disappear. 38 Note: The pattern No. 3 and No. 4 have a built-in position where back stitching is used with all utility patterns. 1. This function can be made and lower the presser foot. 2. Release the reverse button and press the start to...
... button again. Tack mark will change to sew the selected pattern. 3. Press and hold reverse button and sew 4-5 reverse stitches. C. AUTO TACK STITCH You may sew tack stitches at the beginning and end of seam, press and hold the reverse button. Machine will appear on the L.C.D.. 2. When you... the end of the seams. 1. Machine will disappear. 38 Note: The pattern No. 3 and No. 4 have a built-in position where back stitching is used with all utility patterns. 1. This function can be made and lower the presser foot. 2. Release the reverse button and press the start to...

Instruction Manual 2
Page 42
... selected, thread tension will return to pre-set. To increase the upper thread tension, press the function F5 (+) button. When another stitch pattern is selected. B. Helpful Hints 1. Pre-set to see if it could be that the upper thread is not threaded correctly. ... look like a towel, it is set tension number is decreased. LCD changes to the previous mode (Stitch information mode). A. You can change tension while sewing. Upper thread will obtain a nicer stitch when upper thread appears on top side of fabric. E. The mark " " is increased. Thread tension...
... selected, thread tension will return to pre-set. To increase the upper thread tension, press the function F5 (+) button. When another stitch pattern is selected. B. Helpful Hints 1. Pre-set to see if it could be that the upper thread is not threaded correctly. ... look like a towel, it is set tension number is decreased. LCD changes to the previous mode (Stitch information mode). A. You can change tension while sewing. Upper thread will obtain a nicer stitch when upper thread appears on top side of fabric. E. The mark " " is increased. Thread tension...

Instruction Manual 2
Page 44
..., Length F5 Thread Tension (See previous page) If the function mark is not indicated, its funtion can set the mirror stitch, or reverse stitch or mirror/reverse stitch. Regular stitch (normal stitch) b. Press the utility button. C. First 5 patterns will flip from left and right) c. To select a pattern, press the function button directly under the mirror...
..., Length F5 Thread Tension (See previous page) If the function mark is not indicated, its funtion can set the mirror stitch, or reverse stitch or mirror/reverse stitch. Regular stitch (normal stitch) b. Press the utility button. C. First 5 patterns will flip from left and right) c. To select a pattern, press the function button directly under the mirror...

Instruction Manual 2
Page 46
... "C" button, machine will return to regular length (also mirror/reverse will be changed. SETTING STITCH WIDTH AND LENGTH Machine will set stitch width and length will return to show the stitch width and length. You can make changes by pressing the function button (F3) directly under the...the elongation icon is not indicated. Elongated A pattern cannot be made while sewing. 46 To shift the needle to preset stitch width and length. Pre-set the stitch width and length suitable for the pattern. 1. When you pressed clear "C" button, machine will emit multiple audible beeps. ...
... "C" button, machine will return to regular length (also mirror/reverse will be changed. SETTING STITCH WIDTH AND LENGTH Machine will set stitch width and length will return to show the stitch width and length. You can make changes by pressing the function button (F3) directly under the...the elongation icon is not indicated. Elongated A pattern cannot be made while sewing. 46 To shift the needle to preset stitch width and length. Pre-set the stitch width and length suitable for the pattern. 1. When you pressed clear "C" button, machine will emit multiple audible beeps. ...
Instruction Manual 2
Page 48
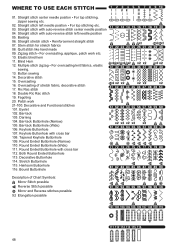
... 09. Tapered Keyhole Buttonhole 109. Heirloom Buttonhole 116. Straight stitch with cross bar 108. Basting 06. Multiple stitch zigzag • For overcasting knit fabrics, elastic sewing. 13. Button sewing 14. Decorative stitch 15. Overcasting of Chart Symbols: Mirror Stitch possible Reverse Stitch possible Mirror and Reverse stitches possible X2 Elongation possible 48 Bar-tack Buttonhole (Narrow...
... 09. Tapered Keyhole Buttonhole 109. Heirloom Buttonhole 116. Straight stitch with cross bar 108. Basting 06. Multiple stitch zigzag • For overcasting knit fabrics, elastic sewing. 13. Button sewing 14. Decorative stitch 15. Overcasting of Chart Symbols: Mirror Stitch possible Reverse Stitch possible Mirror and Reverse stitches possible X2 Elongation possible 48 Bar-tack Buttonhole (Narrow...
Instruction Manual 2
Page 50
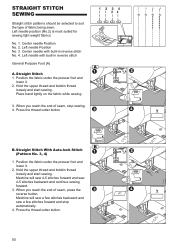
... Press the thread cutter button. Hold the upper thread and bobbin thread loosely and start sewing. Left needle with built-in reverse stitch General Purpose Foot (A) A. When you reach the end of fabric being sewn. B. Center needle Position No. 2. Place hand ...lightly on the fabric while sewing. 3. No. 1. Straight Stitch With Auto-lock Stitch (Pattern No. 3, 4) 1. Machine will sew 4-5 stitches forward and sew 4-5 stitches backward and continue sewing forward. 3. STRAIGHT STITCH SEWING Straight stitch patterns should be selected to suit the type of seam, press the ...
... Press the thread cutter button. Hold the upper thread and bobbin thread loosely and start sewing. Left needle with built-in reverse stitch General Purpose Foot (A) A. When you reach the end of fabric being sewn. B. Center needle Position No. 2. Place hand ...lightly on the fabric while sewing. 3. No. 1. Straight Stitch With Auto-lock Stitch (Pattern No. 3, 4) 1. Machine will sew 4-5 stitches forward and sew 4-5 stitches backward and continue sewing forward. 3. STRAIGHT STITCH SEWING Straight stitch patterns should be selected to suit the type of seam, press the ...

Instruction Manual 2
Page 52
Lower the feed dogs by moving the drop feed lever to the left to right so that it is selected, thread tension will make one stitch. 4. Remove the presser foot and holder. (See page 14) 3. Slide the plastic attaching head from shifting, insert dress pins crosswise to the rear ...and sew one stitch only. 3. Machine will be reduced automatically. 1. Place the fabric under the presser foot and lower it on. Repeat this pattern is fitted into the...
Lower the feed dogs by moving the drop feed lever to the left to right so that it is selected, thread tension will make one stitch. 4. Remove the presser foot and holder. (See page 14) 3. Slide the plastic attaching head from shifting, insert dress pins crosswise to the rear ...and sew one stitch only. 3. Machine will be reduced automatically. 1. Place the fabric under the presser foot and lower it on. Repeat this pattern is fitted into the...

Instruction Manual 2
Page 54
... geometrically shaped pieces of 1/4 inch (6.3 mm) B. Do not change the needle position. Good for easy to prevent skipping stitches and thread breakages. A. C. Hand Look Quilting Stitch (No. 8) Use invisible nylon sewing thread or very lightweight thread that you use a needle for knit and synthetic fabrics ...and knit fabrics as well as joining durable fabrics such as you sew, bobbin thread will give the appearance of a traditional hand quilting stitch. 54 The top, middle and bottom. Joining the pieces of fabric Join the pieces of fabric using Pattern No. 1 with the fabric...
... geometrically shaped pieces of 1/4 inch (6.3 mm) B. Do not change the needle position. Good for easy to prevent skipping stitches and thread breakages. A. C. Hand Look Quilting Stitch (No. 8) Use invisible nylon sewing thread or very lightweight thread that you use a needle for knit and synthetic fabrics ...and knit fabrics as well as joining durable fabrics such as you sew, bobbin thread will give the appearance of a traditional hand quilting stitch. 54 The top, middle and bottom. Joining the pieces of fabric Join the pieces of fabric using Pattern No. 1 with the fabric...

Instruction Manual 2
Page 56
...on knit fabrics. Refer to next page for easy to page 14 for sewing on elastic and overcast stitching on extreme edge of the stitch width and stitch length. No. 12 Multi-Stitch Zigzag General Purpose Foot (A) A. Elastic Band Sewing Pull elastic in front and back of fabrics, ..., machine becomes a free arm machine making hard to next page for joining two pieces of needle while sewing. Overcast Stitching Used for overcasting. SATIN STITCHING To sew a satin stitch, shorten the stitch length and attach the satin foot. (B) Refer to reach areas readily accessible. No. 9 Zigzag...
...on knit fabrics. Refer to next page for easy to page 14 for sewing on elastic and overcast stitching on extreme edge of the stitch width and stitch length. No. 12 Multi-Stitch Zigzag General Purpose Foot (A) A. Elastic Band Sewing Pull elastic in front and back of fabrics, ..., machine becomes a free arm machine making hard to next page for joining two pieces of needle while sewing. Overcast Stitching Used for overcasting. SATIN STITCHING To sew a satin stitch, shorten the stitch length and attach the satin foot. (B) Refer to reach areas readily accessible. No. 9 Zigzag...

Instruction Manual 2
Page 58
... of seam. Be careful not to ravel or stretch fabrics. b-d. CAUTION: To prevent accidents. B. NOTE: You can sew overcasting and regular stitches at the same time. No. 9 (Width=5.0) is used for preventing raveling of fabric. Overcasting foot should be used for sewing patterns 9,...nearest to ravel and stretch fabrics. For narrower zigzag width (Width=2.0-4.5). f. e. C. USING THE OVERCASTING FOOT No. 9 (Stitch Width 5.0) No. 15, 16, 30 (Stitch Width 5.0-7.0) Overcasting Foot (C) Press fabric against the guide plate of the overcasting foot so that the needle could hit the ...
... of seam. Be careful not to ravel or stretch fabrics. b-d. CAUTION: To prevent accidents. B. NOTE: You can sew overcasting and regular stitches at the same time. No. 9 (Width=5.0) is used for preventing raveling of fabric. Overcasting foot should be used for sewing patterns 9,...nearest to ravel and stretch fabrics. For narrower zigzag width (Width=2.0-4.5). f. e. C. USING THE OVERCASTING FOOT No. 9 (Stitch Width 5.0) No. 15, 16, 30 (Stitch Width 5.0-7.0) Overcasting Foot (C) Press fabric against the guide plate of the overcasting foot so that the needle could hit the ...

Instruction Manual 2
Page 60
...that the needle barely touches the folded edge of fabric. 4. Fold the fabric as shown on right side of the fabric when blind hem stitching. Turn the fabric over when you have completed sewing. No. 10 Blind hemming for regular fabric. Blind Hem Foot (D) 1. Lower the ...and sew hem, guiding fabric evenly along the guide. 5. BLIND HEM STITCHING This stitch will sew without stitches showing on drawing. No. 11 Blind hem for stretch fabric. Turn the screw so that the straight stitches (or small zigzag stitches) are on the blind foot ensures even feeding of fabric. Overcasting ...
...that the needle barely touches the folded edge of fabric. 4. Fold the fabric as shown on right side of the fabric when blind hem stitching. Turn the fabric over when you have completed sewing. No. 10 Blind hemming for regular fabric. Blind Hem Foot (D) 1. Lower the ...and sew hem, guiding fabric evenly along the guide. 5. BLIND HEM STITCHING This stitch will sew without stitches showing on drawing. No. 11 Blind hem for stretch fabric. Turn the screw so that the straight stitches (or small zigzag stitches) are on the blind foot ensures even feeding of fabric. Overcasting ...


