Instruction Manual
Page 48
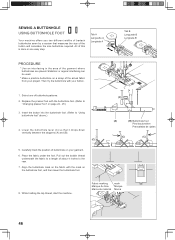
... the fabric to a length of about 4 inches to "Using buttonhole foot" above.) 4. Select one easy step. Lower the buttonhole lever (C) so that measures the size of the button and calculates the size buttonhole required. SEWING A BUTTONHOLE USING BUTTONHOLE FOOT Your machine offers you two different widths of bartack buttonholes sewn by a system that it drops down vertically between...
... the fabric to a length of about 4 inches to "Using buttonhole foot" above.) 4. Select one easy step. Lower the buttonhole lever (C) so that measures the size of the button and calculates the size buttonhole required. SEWING A BUTTONHOLE USING BUTTONHOLE FOOT Your machine offers you two different widths of bartack buttonholes sewn by a system that it drops down vertically between...
Instruction Manual 3
Page 5
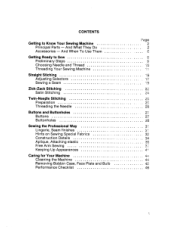
...And When To Use Them Page .. 2 2 Getting Ready to Know Your Sewing Machine Principal Parts - CONTENTS Getting to Sew Preliminary Steps Choosing Needle and Thread Threading Your Sewing Machine 9 • a 10 Straight Stiching l,e0" Adjusting Selectors 17 Sewing a Seam ... Satin Stitching 22' . . • 24 Twin-Needle Stitching 25 Preparation 25 Threading the Needle 26 Buttons and Buttonholes u 27 Buttons 27 Buttonholes 28 Sewing the Professional Way Lingerie, Seam finishes Hints on Sewing Special Fabrics Construction Details Aplique, Attaching elastic Free Arm...
...And When To Use Them Page .. 2 2 Getting Ready to Know Your Sewing Machine Principal Parts - CONTENTS Getting to Sew Preliminary Steps Choosing Needle and Thread Threading Your Sewing Machine 9 • a 10 Straight Stiching l,e0" Adjusting Selectors 17 Sewing a Seam ... Satin Stitching 22' . . • 24 Twin-Needle Stitching 25 Preparation 25 Threading the Needle 26 Buttons and Buttonholes u 27 Buttons 27 Buttonholes 28 Sewing the Professional Way Lingerie, Seam finishes Hints on Sewing Special Fabrics Construction Details Aplique, Attaching elastic Free Arm...
Instruction Manual 3
Page 39
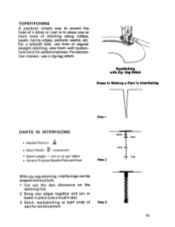
...the stitching line. 2. Bring raw edges together and pin or baste in Interfacing Step 1 DARTS IN INTERFACING • Needle Position: • Stitch Width: } (maximum) • Stitch Length: 1 mm or to place one or more rows of stitching along collars, lapels, facing edges, pockets, seams, ...coat is to suit fabric • General Purpose Needle Plate and Foot Step 2 With zig-zag stitching, interfacings can be shaped without bulk. 1. Step 3 35 sew them with gig-Zag Stitch Steps in Making a Dart in place over a muslin stay. 3. Topstitching with buttonhole twist for reinforcement.
...the stitching line. 2. Bring raw edges together and pin or baste in Interfacing Step 1 DARTS IN INTERFACING • Needle Position: • Stitch Width: } (maximum) • Stitch Length: 1 mm or to place one or more rows of stitching along collars, lapels, facing edges, pockets, seams, ...coat is to suit fabric • General Purpose Needle Plate and Foot Step 2 With zig-zag stitching, interfacings can be shaped without bulk. 1. Step 3 35 sew them with gig-Zag Stitch Steps in Making a Dart in place over a muslin stay. 3. Topstitching with buttonhole twist for reinforcement.
Instruction Manual 4
Page 9
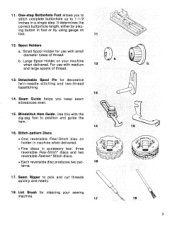
...spools of thread. Seam Guide helps you to stitch complete buttonhole up to 1-1/2 inches in foot or by plac- Stitch-pattern Discs • One reversible Flexi-Stitch disc on foot. 11 12. ing button in a single step. For use with the zig-zag foot to pick and...Use this with small diameter tubes of thread. Blindstitch Hem Guide. Lint Brush for decorative twin-needle stitching and two-thread topstitching. 13 14. One-step Buttonhole Foot allows you keep seam allowances even. 15. b. Spool Holders a. Seam Ripper to position and guide the hem. 14 15 16. 11....
...spools of thread. Seam Guide helps you to stitch complete buttonhole up to 1-1/2 inches in foot or by plac- Stitch-pattern Discs • One reversible Flexi-Stitch disc on foot. 11 12. ing button in a single step. For use with the zig-zag foot to pick and...Use this with small diameter tubes of thread. Blindstitch Hem Guide. Lint Brush for decorative twin-needle stitching and two-thread topstitching. 13 14. One-step Buttonhole Foot allows you keep seam allowances even. 15. b. Spool Holders a. Seam Ripper to position and guide the hem. 14 15 16. 11....
Instruction Manual 4
Page 41
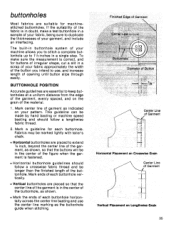
... garment is in doubt, make sure the measurement is in a single step. BUTTONHOLE POSITION Accurate guidelines are suitable for each buttonhole vertically. • Vertical buttonholes are placed to 11/2 inches in the center of the buttonhole, as shown. • Mark the ends of each buttonhole horizontally across the center line basting and use , and increase length...
... garment is in doubt, make sure the measurement is in a single step. BUTTONHOLE POSITION Accurate guidelines are suitable for each buttonhole vertically. • Vertical buttonholes are placed to 11/2 inches in the center of the buttonhole, as shown. • Mark the ends of each buttonhole horizontally across the center line basting and use , and increase length...
Instruction Manual 4
Page 42
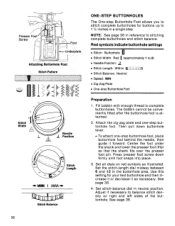
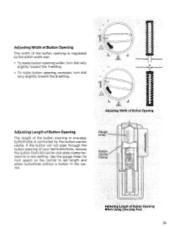
... Stitch , Length 4- WAM I tM Stitch Balance ONE-STEP BUTTONHOLES The One-step Buttonhole Foot allows you to stitch complete buttonholes for your test buttonhole and then increase it or decrease it forward. The bobbin cannot be conveniently filled after the buttonhole foot is attached. 2. Attach the zig-zag plate and one -step buttonhole foot, place buttonhole foot behind the needle, then guide it...
... Stitch , Length 4- WAM I tM Stitch Balance ONE-STEP BUTTONHOLES The One-step Buttonhole Foot allows you to stitch complete buttonholes for your test buttonhole and then increase it or decrease it forward. The bobbin cannot be conveniently filled after the buttonhole foot is attached. 2. Attach the zig-zag plate and one -step buttonhole foot, place buttonhole foot behind the needle, then guide it...
Instruction Manual 4
Page 43
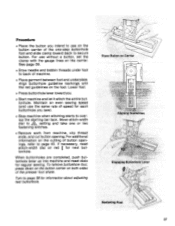
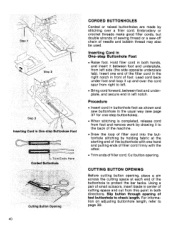
...to use on the button carrier of the one or two fastening stitches. • Remove work from machine, clip thread ends, and cut button opening. Align buttonhole guideline markings with the gauge lines on Carrier Aligning Guidelines Engaging Buttonhole Lever Removing Foot 37 If necessary, reset ... to secure button. Move stitch-width dial to page 38 for each buttonhole you . • Start machine and let it stitch the entire buttonhole. Place Button on the carrier. Turn to /\ setting and take one -step buttonhole foot and slide clamp toward you sew). • Stop machine when ...
...to use on the button carrier of the one or two fastening stitches. • Remove work from machine, clip thread ends, and cut button opening. Align buttonhole guideline markings with the gauge lines on Carrier Aligning Guidelines Engaging Buttonhole Lever Removing Foot 37 If necessary, reset ... to secure button. Move stitch-width dial to page 38 for each buttonhole you . • Start machine and let it stitch the entire buttonhole. Place Button on the carrier. Turn to /\ setting and take one -step buttonhole foot and slide clamp toward you sew). • Stop machine when ...
Instruction Manual 4
Page 45
...in the carrier. Gauge Lines Button Carrier Clamp Adjusting Length of your test buttonhole, remove the button from the carrier and slide clamp forward to set length and stitch buttonhole without a button in one-step buttonholes is regulated by the button-carrier clamp. If the button will not ...pass through the button opening of Button Opening When Using One-step Foot 39 Adjusting Width of Button Opening The width...
...in the carrier. Gauge Lines Button Carrier Clamp Adjusting Length of your test buttonhole, remove the button from the carrier and slide clamp forward to set length and stitch buttonhole without a button in one-step buttonholes is regulated by the button-carrier clamp. If the button will not ...pass through the button opening of Button Opening When Using One-step Foot 39 Adjusting Width of Button Opening The width...
Instruction Manual 4
Page 46
.... Slip button through opening of cutting space and cut from foot and remove work by drawing it between foot and underplate, and secure end in One-step Buttonhole Foot • Raise foot. Inserting Cord in left side (the side opposite underplate tab). Using a pair of small scissors, insert blade in front of filler...
.... Slip button through opening of cutting space and cut from foot and remove work by drawing it between foot and underplate, and secure end in One-step Buttonhole Foot • Raise foot. Inserting Cord in left side (the side opposite underplate tab). Using a pair of small scissors, insert blade in front of filler...
Instruction Manual 4
Page 76
...Thread Removing Bobbin Removing Thread Replacing an Empty Bobbin Replacing a Wound Bobbin Winding Built-in Stitches Buttonholes One-step Buttonholes Corded Buttonholes Buttons Caring for your Machine Chainstitching Checklist, Performance Choosing Needle and Thread Corded Seams Darning Darts ... 5 Straight-stitch Plate 2, 3 Zig-Zag Plate 2 Slide Plate 1 Power and Light Switch 1, 7 Presser Feet 2, 3, 4, 52 Button Foot 2 Buttonhole Foot 3 Changing Presser Feet 4 Even Feed Foot 2, 52 Special-purpose Foot 2 Straight-stitch Foot 2 Zig-Zag Foot 2 Zipper Foot 2, 41 Pressure ...
...Thread Removing Bobbin Removing Thread Replacing an Empty Bobbin Replacing a Wound Bobbin Winding Built-in Stitches Buttonholes One-step Buttonholes Corded Buttonholes Buttons Caring for your Machine Chainstitching Checklist, Performance Choosing Needle and Thread Corded Seams Darning Darts ... 5 Straight-stitch Plate 2, 3 Zig-Zag Plate 2 Slide Plate 1 Power and Light Switch 1, 7 Presser Feet 2, 3, 4, 52 Button Foot 2 Buttonhole Foot 3 Changing Presser Feet 4 Even Feed Foot 2, 52 Special-purpose Foot 2 Straight-stitch Foot 2 Zig-Zag Foot 2 Zipper Foot 2, 41 Pressure ...
Instruction Manual 5
Page 4
.../ lingerie stitch 21 Connecting machine to power source 6 Overlock stitches (for models A, B & C 22 Changing the bulb 7 Sewing on buttons 23 Two-step presser foot lifter/ Adjusting presser foot pressure .........8 Sew 4-step buttonholes 24 Attaching the presser foot holder 9 Zippers and piping 25 Winding the bobbin 10 Sewing with the optional hemmer foot 26...
.../ lingerie stitch 21 Connecting machine to power source 6 Overlock stitches (for models A, B & C 22 Changing the bulb 7 Sewing on buttons 23 Two-step presser foot lifter/ Adjusting presser foot pressure .........8 Sew 4-step buttonholes 24 Attaching the presser foot holder 9 Zippers and piping 25 Winding the bobbin 10 Sewing with the optional hemmer foot 26...
Instruction Manual 5
Page 27
... the stitch pattern selector dial. Use seam ripper and cut buttonhole open from one step to the fabric. The zig-zag should sew over the heavy thread or cord. Use a backing for stretch or knit fabrics. - Measure diameter and thickness of the buttonhole foot. Sew 4-step buttonholes Prepare 1. Lower the foot, so that marking on fabric...
... the stitch pattern selector dial. Use seam ripper and cut buttonhole open from one step to the fabric. The zig-zag should sew over the heavy thread or cord. Use a backing for stretch or knit fabrics. - Measure diameter and thickness of the buttonhole foot. Sew 4-step buttonholes Prepare 1. Lower the foot, so that marking on fabric...
Instruction Manual 11
Page 6
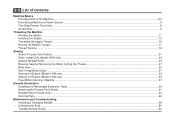
EN List of contents Machine Basics Principle Parts of the Machine...2/4 Connecting Machine to Power Source ...6 Two Step Presser Foot Lifter...8 Accessories ...9 Threading the Machine Winding the Bobbin ...11 Inserting the Bobbin ...13 Threading the Upper Thread ...15 Raising the...Length Dial (Model 1409 only) ...23 Sewing Straight Stitch ...25 Reverse Sewing/ Removing the Work/ Cutting the Thread 27 Blind Hem...29 Sew 4-step Buttonholes ...31 Sewing on Buttons (Model 1408 only)...33 Sewing on Buttons (Model 1409 only)...35 Free Motion Darning, Stippling...37 General Information Installing the ...
EN List of contents Machine Basics Principle Parts of the Machine...2/4 Connecting Machine to Power Source ...6 Two Step Presser Foot Lifter...8 Accessories ...9 Threading the Machine Winding the Bobbin ...11 Inserting the Bobbin ...13 Threading the Upper Thread ...15 Raising the...Length Dial (Model 1409 only) ...23 Sewing Straight Stitch ...25 Reverse Sewing/ Removing the Work/ Cutting the Thread 27 Blind Hem...29 Sew 4-step Buttonholes ...31 Sewing on Buttons (Model 1408 only)...33 Sewing on Buttons (Model 1409 only)...35 Free Motion Darning, Stippling...37 General Information Installing the ...

Instruction Manual 11
Page 38
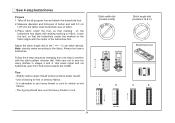
... care not to sew too many stitches in the " " range to obtain correct buttonhole length; Measure diameter and thickness of the buttonhole foot (b). EN Sew 4-step Buttonholes Prepare 1. Follow the 4-step sequence changing from one step to the next step. It is raised before turning the Pattern Selector Dial to another with starting marking on the fabric aligns...
... care not to sew too many stitches in the " " range to obtain correct buttonhole length; Measure diameter and thickness of the buttonhole foot (b). EN Sew 4-step Buttonholes Prepare 1. Follow the 4-step sequence changing from one step to the next step. It is raised before turning the Pattern Selector Dial to another with starting marking on the fabric aligns...


