Instruction Manual
Page 1
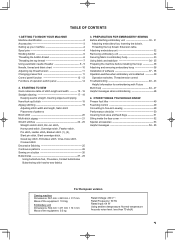
... Stitching 25 Continuous patterns 26 Sewing on a button 26 Buttonholes 27 - 29 Using buttonhole foot, Procedure, Corded buttonholes Buttonholing with Futura Multi hoop 44 - 47 Helpful messages when embroidering 48 4. OTHER THINGS YOU SHOULD KNOW Presser foot lifter 49 Feed dog control...Securing fabric in embroidery hoop 33 Using fabric and stabilizer 34 - 35 Preparing the machine before installing the hoop 36 Attaching and removing embroidery hoop 36 Installation of software 37 - 38 Operation switches when embroidery unit is attached 39 Operation switches, Thread tension control ...
... Stitching 25 Continuous patterns 26 Sewing on a button 26 Buttonholes 27 - 29 Using buttonhole foot, Procedure, Corded buttonholes Buttonholing with Futura Multi hoop 44 - 47 Helpful messages when embroidering 48 4. OTHER THINGS YOU SHOULD KNOW Presser foot lifter 49 Feed dog control...Securing fabric in embroidery hoop 33 Using fabric and stabilizer 34 - 35 Preparing the machine before installing the hoop 36 Attaching and removing embroidery hoop 36 Installation of software 37 - 38 Operation switches when embroidery unit is attached 39 Operation switches, Thread tension control ...
Instruction Manual
Page 3
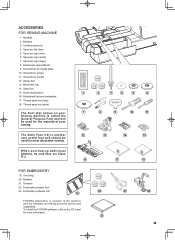
... (short) The Foot that comes on your 7 Sewing machine is "system" of your sewing. To install the FUTURA software, refer to the CD insert for needle plate 10. Auxiliary spool pin 4. Spool pin felt discs 5. Embroidery software CD 19 FUTURA embroidery is called the General Purpose Foot and will be sure they are Class I5...
... (short) The Foot that comes on your 7 Sewing machine is "system" of your sewing. To install the FUTURA software, refer to the CD insert for needle plate 10. Auxiliary spool pin 4. Spool pin felt discs 5. Embroidery software CD 19 FUTURA embroidery is called the General Purpose Foot and will be sure they are Class I5...
Instruction Manual
Page 37
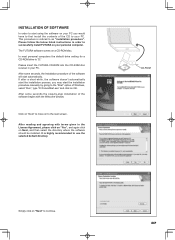
... the License Agreement, please click on "Yes", and again click on Next, and then select the directory where the software should be installed. After reading and agreeing with the Welcome window. The FUTURA software comes on to the next screen. In most personal computers the default drive setting for a CD-ROM drive is "D:" Please...
... the License Agreement, please click on "Yes", and again click on Next, and then select the directory where the software should be installed. After reading and agreeing with the Welcome window. The FUTURA software comes on to the next screen. In most personal computers the default drive setting for a CD-ROM drive is "D:" Please...

Instruction Manual
Page 38
..., close after finish. Simply click on your machine. It will finally start -up your desktop to open the Futura software. Wait for proper start the copy and installation of available space on your computer, but do not open up . Finally you are requested to confirm all required... prompt you to the given directory on "Cancel". Attach the hoop that you plan to work with the installation. If the installation utility identifies a lack of the FUTURA software files to free some hard disk space before proceeding with to your hard disk, an error message will be followed ...
..., close after finish. Simply click on your machine. It will finally start -up your desktop to open the Futura software. Wait for proper start the copy and installation of available space on your computer, but do not open up . Finally you are requested to confirm all required... prompt you to the given directory on "Cancel". Attach the hoop that you plan to work with the installation. If the installation utility identifies a lack of the FUTURA software files to free some hard disk space before proceeding with to your hard disk, an error message will be followed ...


