Instruction Manual
Page 3
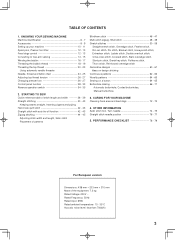
... needle position 76 - 77 5. TABLE OF CONTENTS 1. KNOWING YOUR SEWING MACHINE Machine identification 6 - 7 Accessories 8 - 9 Setting up your machine 10 - 11 Spool pins, Presser foot lifter 12 - 13 Feed dogs control 12 - 13 Converting to free-arm sewing 14 - 15 Winding the bobbin 16 - 17 Threading the bobbin... buttonhole 3. CARING FOR YOUR MACHINE Cleaning hook area and feed dogs 72 - 73 4. STARTING TO SEW Quick reference table of stitch length and width 36 - 39 Straight stitching 40 - 43 Keeping seams straight, Inserting zippers and piping Hand-look quilt stitch 42 - 43 Straight...
... needle position 76 - 77 5. TABLE OF CONTENTS 1. KNOWING YOUR SEWING MACHINE Machine identification 6 - 7 Accessories 8 - 9 Setting up your machine 10 - 11 Spool pins, Presser foot lifter 12 - 13 Feed dogs control 12 - 13 Converting to free-arm sewing 14 - 15 Winding the bobbin 16 - 17 Threading the bobbin... buttonhole 3. CARING FOR YOUR MACHINE Cleaning hook area and feed dogs 72 - 73 4. STARTING TO SEW Quick reference table of stitch length and width 36 - 39 Straight stitching 40 - 43 Keeping seams straight, Inserting zippers and piping Hand-look quilt stitch 42 - 43 Straight...
Instruction Manual
Page 40
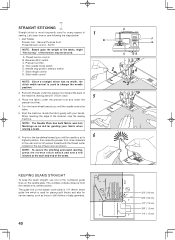
... To keep the seam straight, use one of the numbered guide lines on the top of 1 sewing. The guide line on the bobbin cover plate is 1/4" (6mm) seam guide line which is used for piecing quilt blocks and also for every aspect of face cover as shown. Turn the hand wheel toward... you until the needle enters the fabric. 5. Start the machine. NOTE: To secure the stitching and avoid raveling, press the reverse stitch switch and sew a few stitches at its center...
... To keep the seam straight, use one of the numbered guide lines on the top of 1 sewing. The guide line on the bobbin cover plate is 1/4" (6mm) seam guide line which is used for piecing quilt blocks and also for every aspect of face cover as shown. Turn the hand wheel toward... you until the needle enters the fabric. 5. Start the machine. NOTE: To secure the stitching and avoid raveling, press the reverse stitch switch and sew a few stitches at its center...
Instruction Manual
Page 42
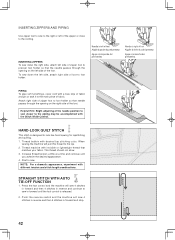
... the zipper or close to look like hand sewing for topstitching and quilting. 1. Increase thread tension a little at a time and continue until the foot control is designed to the cording. Press the foot control and the machine will sew 4 stitches in forward and then 4 stitches in... adjusting of the foot. Push the reverse switch and the machine will pull this thread to sew in reverse and continue to the top. 2. HAND-LOOK QUILT STITCH This stitch is released. 2. Attach right side of zipper foot to sew. NOTE: For a dramatic appearance, experiment with desired top ...
... the zipper or close to look like hand sewing for topstitching and quilting. 1. Increase thread tension a little at a time and continue until the foot control is designed to the cording. Press the foot control and the machine will sew 4 stitches in forward and then 4 stitches in... adjusting of the foot. Push the reverse switch and the machine will pull this thread to sew in reverse and continue to the top. 2. HAND-LOOK QUILT STITCH This stitch is released. 2. Attach right side of zipper foot to sew. NOTE: For a dramatic appearance, experiment with desired top ...


