
Instruction Manual
Page 3
... Machine identification 6 - 7 Accessories 8 - 9 Setting up your machine 10 - 11 Spool pins, Presser foot lifter 12 - 13 Feed dog control 12 - 13 Converting to -sew fabrics Manual buttonhole 68 - 69 Letter Sewing and Decorative Patterns 70 - 79 Decorative patterns 3. PERFORMANCE CHECKLIST 86 - 87 6. TABLE OF CONTENTS 1. STARTING TO SEW Utility and Continuous...
... Machine identification 6 - 7 Accessories 8 - 9 Setting up your machine 10 - 11 Spool pins, Presser foot lifter 12 - 13 Feed dog control 12 - 13 Converting to -sew fabrics Manual buttonhole 68 - 69 Letter Sewing and Decorative Patterns 70 - 79 Decorative patterns 3. PERFORMANCE CHECKLIST 86 - 87 6. TABLE OF CONTENTS 1. STARTING TO SEW Utility and Continuous...

Instruction Manual
Page 6
.... Power line cord 34. Thread tension control 4. Power/light switch 15. Presser foot lifter 18. Needle 24. Bobbin cover plate 25. Feed dogs 31. Instruction manual 2 3 4 5 6 7 12 13 14 15 20 21 22 23 24 1 8 9 10 11 16 17 19 18 25 26 27 28 29 30 31 32 33 34...
.... Power line cord 34. Thread tension control 4. Power/light switch 15. Presser foot lifter 18. Needle 24. Bobbin cover plate 25. Feed dogs 31. Instruction manual 2 3 4 5 6 7 12 13 14 15 20 21 22 23 24 1 8 9 10 11 16 17 19 18 25 26 27 28 29 30 31 32 33 34...
Instruction Manual
Page 44
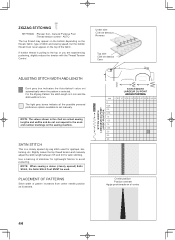
... widths and do not correspond to set automatically when the pattern is a closely spaced zig zag stitch used . Slightly loosen the top thread tension and manually adjust the stitch length between 0.5 and 2.0 for appliqué, bartacking, etc. STITCH LENGTH LONGUEUR DU POINT LARGO PUNTADA STITCH WIDTH LARGEUR DU POINT ANCHO PUNTADA...
... widths and do not correspond to set automatically when the pattern is a closely spaced zig zag stitch used . Slightly loosen the top thread tension and manually adjust the stitch length between 0.5 and 2.0 for appliqué, bartacking, etc. STITCH LENGTH LONGUEUR DU POINT LARGO PUNTADA STITCH WIDTH LARGEUR DU POINT ANCHO PUNTADA...

Instruction Manual
Page 46
... hand until the needle swings fully to heavyweight fabric Material de peso medio a pesado Tissus moyens et lourds - NOTE: For a narrower or wider blindhem, first manually adjust the length and width controls to sew blind hems. Always make a sewing test first. 4 Top side Cara Endroit 46 Blind Stitch Foot : Thread Tension...
... hand until the needle swings fully to heavyweight fabric Material de peso medio a pesado Tissus moyens et lourds - NOTE: For a narrower or wider blindhem, first manually adjust the length and width controls to sew blind hems. Always make a sewing test first. 4 Top side Cara Endroit 46 Blind Stitch Foot : Thread Tension...

Instruction Manual
Page 48
..., it is a popular decorative stitch (used in appearance experiment with about 1/8" (0.3 cm) space between . Stitch over the folded edge, pulling the fabric in illustration requires manual adjustment of fabrics. To prepare the fabric: Fold under the raw edge and press. Place the fabric right side up so that the zigzag part...
..., it is a popular decorative stitch (used in appearance experiment with about 1/8" (0.3 cm) space between . Stitch over the folded edge, pulling the fabric in illustration requires manual adjustment of fabrics. To prepare the fabric: Fold under the raw edge and press. Place the fabric right side up so that the zigzag part...

Instruction Manual
Page 50
... of strain. It's very effective for use on knit, or stretchable fabrics, but can be used for edging neck-bands, armholes, sleeves and hems. When manually adjusted to a very narrow width, it sews and finishes the seam in making sportswear - General Purpose Foot or Satin Stitch Foot :Thread tension control - It...
... of strain. It's very effective for use on knit, or stretchable fabrics, but can be used for edging neck-bands, armholes, sleeves and hems. When manually adjusted to a very narrow width, it sews and finishes the seam in making sportswear - General Purpose Foot or Satin Stitch Foot :Thread tension control - It...

Instruction Manual
Page 68
...* Carefully mark the buttonhole length on your garment. Place the fabric with the buttonhole marked under the buttonhole foot. NOTE: If stitch length is manually set at 0.8 (mm) for 2 step 1, set the stitch length at the beginning of buttonhole mark to complete buttonhole. 4. Start the machine... to the end of the buttonhole. Stitch forward to form first bartack and left side of buttonhole. 3. MANUAL BUTTONHOLE * Use the automatic buttonhole foot up to 1 3/4 "(45 mm) in length, but don't lower the buttonhole lever or a beep will ...
...* Carefully mark the buttonhole length on your garment. Place the fabric with the buttonhole marked under the buttonhole foot. NOTE: If stitch length is manually set at 0.8 (mm) for 2 step 1, set the stitch length at the beginning of buttonhole mark to complete buttonhole. 4. Start the machine... to the end of the buttonhole. Stitch forward to form first bartack and left side of buttonhole. 3. MANUAL BUTTONHOLE * Use the automatic buttonhole foot up to 1 3/4 "(45 mm) in length, but don't lower the buttonhole lever or a beep will ...
Instruction Manual
Page 95
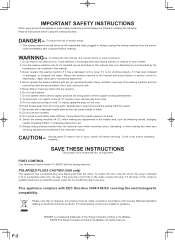
...registered trademark of electric shock: 1. To reduce the risk of The Singer Company Limited or its affiliates. ©2008 The Singer Company Limited or its intended use , or equivalent. Never operate this manual. 3. Switch the sewing machine off before operating machine. Never operate... the sewing machine with this manual. Close cover before servicing. Use only ...
...registered trademark of electric shock: 1. To reduce the risk of The Singer Company Limited or its affiliates. ©2008 The Singer Company Limited or its intended use , or equivalent. Never operate this manual. 3. Switch the sewing machine off before operating machine. Never operate... the sewing machine with this manual. Close cover before servicing. Use only ...


