
Instruction Manual
Page 3
KNOWING YOUR SEWING MACHINE Machine identification 6 - 7 Accessories 8 - 9 Setting up your machine 10 - 11 Spool pins, Presser foot lifter 12 - 13 Feed dog control 12 - 13 Converting to -sew fabrics Manual buttonhole 68 - 69 Letter Sewing and Decorative Patterns 70 - 79 Decorative patterns 3. OTHER INFORMATION Satin stitch foot, ...× 229 mm × 318 mm Mass of control panel 28 - 31 Reverse operation button 32 - 33 2. STARTING TO SEW Utility and Continuous Stitches 34 - 39 Straight stitching 40 - 43 Keeping seams straight, Inserting zippers and piping Hand-look quilt stitch...
KNOWING YOUR SEWING MACHINE Machine identification 6 - 7 Accessories 8 - 9 Setting up your machine 10 - 11 Spool pins, Presser foot lifter 12 - 13 Feed dog control 12 - 13 Converting to -sew fabrics Manual buttonhole 68 - 69 Letter Sewing and Decorative Patterns 70 - 79 Decorative patterns 3. OTHER INFORMATION Satin stitch foot, ...× 229 mm × 318 mm Mass of control panel 28 - 31 Reverse operation button 32 - 33 2. STARTING TO SEW Utility and Continuous Stitches 34 - 39 Straight stitching 40 - 43 Keeping seams straight, Inserting zippers and piping Hand-look quilt stitch...

Instruction Manual
Page 6
... thread guide 21. Bobbin cover plate 25. Foot release button 28. Needle clamp screw 29. Needle plate 32. Bobbin cover release button 33. KNOWING YOUR SEWING MACHINE MACHINE IDENTIFICATION 1. Horizontal spool pin 12. Needle bar 26. Power line cord 34. Extension table (Accessory box) 8. Handle 13. Threading lever 5. Presser foot 30. Thread tension...
... thread guide 21. Bobbin cover plate 25. Foot release button 28. Needle clamp screw 29. Needle plate 32. Bobbin cover release button 33. KNOWING YOUR SEWING MACHINE MACHINE IDENTIFICATION 1. Horizontal spool pin 12. Needle bar 26. Power line cord 34. Extension table (Accessory box) 8. Handle 13. Threading lever 5. Presser foot 30. Thread tension...

Instruction Manual
Page 8
... additional bobbins, be used for the majority of your sewing. ACCESSORIES 1. Spool pin felt discs (2) 5. Buttonhole foot The Foot that comes on your Sewing machine is another very useful foot and should be used for most decorative sewing - Screwdriver for needle plate 10. Bobbins (4 total - 1 in machine) 3. especially No.17 , No. 18 , No.36 , No...
... additional bobbins, be used for the majority of your sewing. ACCESSORIES 1. Spool pin felt discs (2) 5. Buttonhole foot The Foot that comes on your Sewing machine is another very useful foot and should be used for most decorative sewing - Screwdriver for needle plate 10. Bobbins (4 total - 1 in machine) 3. especially No.17 , No. 18 , No.36 , No...

Instruction Manual
Page 14
To replace, slide the extension table back into a slim free-arm model for sewing children's clothes, cuffs, trouser legs, and other difficult to the left as a standard flat-bed model. With the extension table in position, it provides a large working surface as shown. With the extension table removed the machine converts into place until it off to reach places. 14 To remove the extension table, hold it firmly with both hands and pull it clicks. CONVERTING TO FREE-ARM SEWING Your machine can be used either as a flat-bed or as a freearm model.
To replace, slide the extension table back into a slim free-arm model for sewing children's clothes, cuffs, trouser legs, and other difficult to the left as a standard flat-bed model. With the extension table in position, it provides a large working surface as shown. With the extension table removed the machine converts into place until it off to reach places. 14 To remove the extension table, hold it firmly with both hands and pull it clicks. CONVERTING TO FREE-ARM SEWING Your machine can be used either as a flat-bed or as a freearm model.

Instruction Manual
Page 24
...90 blue band 16/100 purple band * Do not use on stretch fabrics. * For best sewing results, always use the same size and type of a needle and thread. Push the needle ...Batiste Chiffon Crepe Medium- Insert the new needle into the needle plate slot. 24 Always disconnect the machine from power supply by turning the hand wheel counter clockwise. 2. Helpful Hint: Placing a scrap of ...position by removing the plug from the wall-outlet. The following table is a practical guide to use a Singer Branded Needle. They are listed as examples of any fiber: cotton, linen, silk, wool, synthetic, ...
...90 blue band 16/100 purple band * Do not use on stretch fabrics. * For best sewing results, always use the same size and type of a needle and thread. Push the needle ...Batiste Chiffon Crepe Medium- Insert the new needle into the needle plate slot. 24 Always disconnect the machine from power supply by turning the hand wheel counter clockwise. 2. Helpful Hint: Placing a scrap of ...position by removing the plug from the wall-outlet. The following table is a practical guide to use a Singer Branded Needle. They are listed as examples of any fiber: cotton, linen, silk, wool, synthetic, ...
Instruction Manual
Page 26
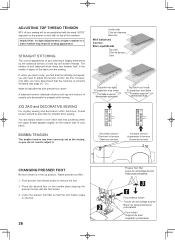
... the presser foot pin with presser foot 'down'. Lower the presser foot lifter so that the stitching is usually only desireable for straight stitch sewing. ADJUSTING TOP THREAD TENSION 90% of your fabric. STRAIGHT STITCHING The correct appearance of your stitching is correctly threaded (see page 20 - 21... two threads 'lock' in the up position. BOBBIN TENSION The bobbin tension has been correctly set at the factory, so you are sewing. The tension is in the middle of layers of the machine. Push presser foot release button to a higher number or a lower number may improve...
... the presser foot pin with presser foot 'down'. Lower the presser foot lifter so that the stitching is usually only desireable for straight stitch sewing. ADJUSTING TOP THREAD TENSION 90% of your fabric. STRAIGHT STITCHING The correct appearance of your stitching is correctly threaded (see page 20 - 21... two threads 'lock' in the up position. BOBBIN TENSION The bobbin tension has been correctly set at the factory, so you are sewing. The tension is in the middle of layers of the machine. Push presser foot release button to a higher number or a lower number may improve...
Instruction Manual
Page 28
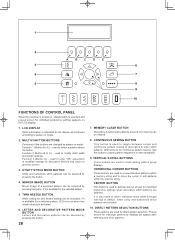
...A BC DE 3 6 4 7 5 8 9 10 FUNCTIONS OF CONTROL PANEL When the machine is turned on, straight stitch is selected and pop-up screen for individual preference settings appears on when twin needle sewing is activated. 6. LCD DISPLAY Stitch information is available for the selected pattern. 5. used for... used to scroll among pattern group displays. Function 3 (Button A) - used to activate pop-up screen for twin needle sewing can be selected by pattern or mode. DIRECT PATTERN SELECTION BUTTONS These buttons are selected. MULTI-FUNCTION BUTTONS Functions of six patterns...
...A BC DE 3 6 4 7 5 8 9 10 FUNCTIONS OF CONTROL PANEL When the machine is turned on, straight stitch is selected and pop-up screen for individual preference settings appears on when twin needle sewing is activated. 6. LCD DISPLAY Stitch information is available for the selected pattern. 5. used for... used to scroll among pattern group displays. Function 3 (Button A) - used to activate pop-up screen for twin needle sewing can be selected by pattern or mode. DIRECT PATTERN SELECTION BUTTONS These buttons are selected. MULTI-FUNCTION BUTTONS Functions of six patterns...

Instruction Manual
Page 30
... and LED lamp will be adjusted by turning the knob. When an error message is raised. Lower buttonhole lever. 4. Bobbin winder is made, the sewing machine will not operate with beep sound and an error message will stop at down position whenever you stop needle at up position. 12. When buttonholing... and move it again to left. 3. If foot control is depressed, while no pattern is lowered. Raise buttonhole lever. 30 Push it to stop sewing. When sewing patterns, buttonhole lever is selected. Select a pattern. 2. 11 12 11.
... and LED lamp will be adjusted by turning the knob. When an error message is raised. Lower buttonhole lever. 4. Bobbin winder is made, the sewing machine will not operate with beep sound and an error message will stop at down position whenever you stop needle at up position. 12. When buttonholing... and move it again to left. 3. If foot control is depressed, while no pattern is lowered. Raise buttonhole lever. 30 Push it to stop sewing. When sewing patterns, buttonhole lever is selected. Select a pattern. 2. 11 12 11.

Instruction Manual
Page 32
... button is pushed. NOTE: This function is very useful for tie-off the sewing on all patterns except straight and zigzag stitches. The machine will be at the start and end of other stitches ( ) The sewing machine makes 4 tiny tacking stitches to avoid raveling at the exact spot in reverse ...as long as the reverse button is pressed. * Tacking stitch function for tying off the sewing pattern to tie off...
... button is pushed. NOTE: This function is very useful for tie-off the sewing on all patterns except straight and zigzag stitches. The machine will be at the start and end of other stitches ( ) The sewing machine makes 4 tiny tacking stitches to avoid raveling at the exact spot in reverse ...as long as the reverse button is pressed. * Tacking stitch function for tying off the sewing pattern to tie off...

Instruction Manual
Page 34
...the pattern and pop-up screen for individual preference settings will sound. UTILITY AND CONTINUOUS STITCHES These stitches will sew continuously. When the machine is turned on, straight stitch is selected automatically and a pop-up screen for individual preference settings appears on...The only exceptions are the Buttonholes, which are basic sewing stitches as well as highlighted numbers. In addition, you choose to create stitch sequences. These stitches sew in the machine until the machine is selected, it will sew continuously when chosen. You can be combined together ...
...the pattern and pop-up screen for individual preference settings will sound. UTILITY AND CONTINUOUS STITCHES These stitches will sew continuously. When the machine is turned on, straight stitch is selected automatically and a pop-up screen for individual preference settings appears on...The only exceptions are the Buttonholes, which are basic sewing stitches as well as highlighted numbers. In addition, you choose to create stitch sequences. These stitches sew in the machine until the machine is selected, it will sew continuously when chosen. You can be combined together ...

Instruction Manual
Page 36
Note: Turning off the machine returns the machine to your machine. MIRROR IMAGE SETTING Mirror image of a selected pattern can be selected by pressing the twin needle button, if the twin needle icon appears on the display. Doing so will reduce the stitch width automatically and save broken needles and possible damage to normal sewing mode. 36 TWIN NEEDLE SETTING Twin needle mode can be selected by pressing the mirror image button, if the mirror image icon appears on the display.
Note: Turning off the machine returns the machine to your machine. MIRROR IMAGE SETTING Mirror image of a selected pattern can be selected by pressing the twin needle button, if the twin needle icon appears on the display. Doing so will reduce the stitch width automatically and save broken needles and possible damage to normal sewing mode. 36 TWIN NEEDLE SETTING Twin needle mode can be selected by pressing the mirror image button, if the mirror image icon appears on the display.

Instruction Manual
Page 40
... needle position. 2. SETTINGS D Presser foot - AUTO NOTE: Based upon the weight of the fabric, slight "fine tuning" of the fabric, stop the sewing machine. Presser foot lifter D. Turn the hand wheel counter clockwise until the needle is used to the rear and cut off excess threads with your fabric... used for piecing quilt blocks and also for all types of face cover as shown. Start the machine. Guide the fabric gently with the thread cutter located on the top of sewing. Reverse stitch button C. The numbers indicate distance from the needle at the start and end of ...
... needle position. 2. SETTINGS D Presser foot - AUTO NOTE: Based upon the weight of the fabric, slight "fine tuning" of the fabric, stop the sewing machine. Presser foot lifter D. Turn the hand wheel counter clockwise until the needle is used to the rear and cut off excess threads with your fabric... used for piecing quilt blocks and also for all types of face cover as shown. Start the machine. Guide the fabric gently with the thread cutter located on the top of sewing. Reverse stitch button C. The numbers indicate distance from the needle at the start and end of ...

Instruction Manual
Page 42
... released. 2. This thread should not show. 3. Press the foot control and the machine will sew 4 stitches forward and then 4 stitches in forward and stop. 42 INSERTING ZIPPERS To sew down the left of fabric. Thread machine with different tension and stitch length combinations. Push the reverse button and the...right side of foot to foot holder. Needle to left side of the foot. When sewing the machine will sew 4 stitches in reverse and then 4 stitches in reverse and continue to the cording. To sew down the right side, attach left side of zipper foot to presser foot holder so ...
... released. 2. This thread should not show. 3. Press the foot control and the machine will sew 4 stitches forward and then 4 stitches in forward and stop. 42 INSERTING ZIPPERS To sew down the left of fabric. Thread machine with different tension and stitch length combinations. Push the reverse button and the...right side of foot to foot holder. Needle to left side of the foot. When sewing the machine will sew 4 stitches in reverse and then 4 stitches in reverse and continue to the cording. To sew down the right side, attach left side of zipper foot to presser foot holder so ...
Instruction Manual
Page 44
...the possible personal preference options available to the scale and number markings on the top of stitch and sewing speed, but the bobbin thread must never appear on the sewing machine. Slightly loosen the top thread tension and manually adjust the stitch length between 0.5 and 2.0 for ...lightweight fabrics to the top or you are actual sewing lengths and widths and do not correspond to set automatically when the ...
...the possible personal preference options available to the scale and number markings on the top of stitch and sewing speed, but the bobbin thread must never appear on the sewing machine. Slightly loosen the top thread tension and manually adjust the stitch length between 0.5 and 2.0 for ...lightweight fabrics to the top or you are actual sewing lengths and widths and do not correspond to set automatically when the ...

Instruction Manual
Page 62
... by a system that it drops down vertically between the stoppers (A) and (B). (C) 62 (C) (A) (B) Buttonhole foot Pied boutonnière Prensatelas de ojales (C) (C) Select one easy step. SEWING A BUTTONHOLE USING BUTTONHOLE FOOT Your machine offers you are placed.
... by a system that it drops down vertically between the stoppers (A) and (B). (C) 62 (C) (A) (B) Buttonhole foot Pied boutonnière Prensatelas de ojales (C) (C) Select one easy step. SEWING A BUTTONHOLE USING BUTTONHOLE FOOT Your machine offers you are placed.
Instruction Manual
Page 64
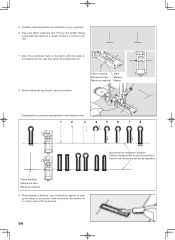
... mark the position of buttonhole on the buttonhole foot, and then lower the buttonhole foot. 8. While holding the top thread, start the machine. Be careful not to the rear. 7. 5. Place the fabric under the foot. Align the buttonhole mark on the fabric with the ... of the buttonhole. 64 Buttonhole foot alignment position Position d'alignement du pied boutonnière Posición de alineación del pie de ojaladora When sewing is finished, use a buttonhole opener to open up the fabric in the following order. 1 2 3 4 5 6 7 8 Fabric marking Marque du tissu Marca ...
... mark the position of buttonhole on the buttonhole foot, and then lower the buttonhole foot. 8. While holding the top thread, start the machine. Be careful not to the rear. 7. 5. Place the fabric under the foot. Align the buttonhole mark on the fabric with the ... of the buttonhole. 64 Buttonhole foot alignment position Position d'alignement du pied boutonnière Posición de alineación del pie de ojaladora When sewing is finished, use a buttonhole opener to open up the fabric in the following order. 1 2 3 4 5 6 7 8 Fabric marking Marque du tissu Marca ...

Instruction Manual
Page 68
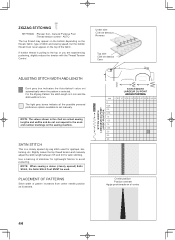
... fabric with the buttonhole marked under the buttonhole foot. Buttonhole foot Pied boutonnière Prensatelas de ojales PROCEDURE 1. Sew second bartack and stitch backward until needle 1 reaches beginning of buttonhole. 2. Start the machine to the end of the buttonhole. Stitch forward to form first bartack and left side of buttonhole. 3. Slide...
... fabric with the buttonhole marked under the buttonhole foot. Buttonhole foot Pied boutonnière Prensatelas de ojales PROCEDURE 1. Sew second bartack and stitch backward until needle 1 reaches beginning of buttonhole. 2. Start the machine to the end of the buttonhole. Stitch forward to form first bartack and left side of buttonhole. 3. Slide...

Instruction Manual
Page 74
... by pressing the twin needle button, if the twin needle icon appears on the display. Doing so will be sewn continuously until you stop the machine. (1) A BC DE (4) (2) (3) (1) (2) 74 The pattern string will reduce the stitch width automatically and ... settings of pattern string and stops. (2) Press the continuous button and LED will sound. SINGLE CYCLE OR CONTINUOUS SEWING (1) The machine sews automatically one complete cycle of stitch length and width. INDIVIDUAL PREFERENCE SETTINGS OF DECORATIVE STITCH PATTERNS Settings of stitch length...
... by pressing the twin needle button, if the twin needle icon appears on the display. Doing so will be sewn continuously until you stop the machine. (1) A BC DE (4) (2) (3) (1) (2) 74 The pattern string will reduce the stitch width automatically and ... settings of pattern string and stops. (2) Press the continuous button and LED will sound. SINGLE CYCLE OR CONTINUOUS SEWING (1) The machine sews automatically one complete cycle of stitch length and width. INDIVIDUAL PREFERENCE SETTINGS OF DECORATIVE STITCH PATTERNS Settings of stitch length...

Instruction Manual
Page 80
... into position as illustrated for sewing machine lubrication. (2) (A) (B) 5. Replace the bobbin case with the lint brush. 4 Put one drop of your machine, it is suggested. 3. To ensure the best possible operation of sewing machine oil on the needle plate ...(1) and slide the needle plate toward you as illustrated. (3) (4) 80 Remove the bobbin case (2). 3 4. CARING FOR YOUR MACHINE CLEANING HOOK AREA AND FEED DOGS 1 Always disconnect the machine from power CAUTION supply by the arrows. (A, B) NOTE: Singer Brand Sewing Machine...
... into position as illustrated for sewing machine lubrication. (2) (A) (B) 5. Replace the bobbin case with the lint brush. 4 Put one drop of your machine, it is suggested. 3. To ensure the best possible operation of sewing machine oil on the needle plate ...(1) and slide the needle plate toward you as illustrated. (3) (4) 80 Remove the bobbin case (2). 3 4. CARING FOR YOUR MACHINE CLEANING HOOK AREA AND FEED DOGS 1 Always disconnect the machine from power CAUTION supply by the arrows. (A, B) NOTE: Singer Brand Sewing Machine...
Instruction Manual
Page 95
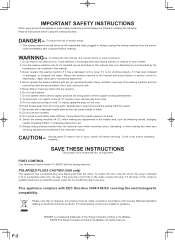
... unattended when plugged in. Read all moving parts. To reduce the risk of The Singer Company Limited or its affiliates. ©2008 The Singer Company Limited or its intended use , or equivalent. Keep ventilation openings of the sewing machine and foot control free from the electric outlet immediately after using and before servicing. Never...
... unattended when plugged in. Read all moving parts. To reduce the risk of The Singer Company Limited or its affiliates. ©2008 The Singer Company Limited or its intended use , or equivalent. Keep ventilation openings of the sewing machine and foot control free from the electric outlet immediately after using and before servicing. Never...


