

Instruction Manual
Page 3
... 12 - 13 Converting to free-arm sewing 12 - 13 Winding the bobbin 14 - 15 Threading the bobbin thread 16 - 17 Threading the top thread 18 - 19 Using automatic needle threader 20 - 21 Needle, thread and fabric chart 22 - 23 Adjusting top thread tension 24 - 25 Changing presser foot 24 - 25 Control panel functions 26 - 27 Reverse...
... 12 - 13 Converting to free-arm sewing 12 - 13 Winding the bobbin 14 - 15 Threading the bobbin thread 16 - 17 Threading the top thread 18 - 19 Using automatic needle threader 20 - 21 Needle, thread and fabric chart 22 - 23 Adjusting top thread tension 24 - 25 Changing presser foot 24 - 25 Control panel functions 26 - 27 Reverse...
Instruction Manual
Page 6
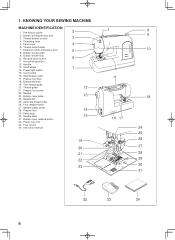
... 19 20 21 22 23 1 8 9 10 11 18 16 17 24 25 26 27 28 29 30 31 32 33 34 6 1. Thread tension control 4. Threading lever 5. Extension table (Accessory box) 8. Horizontal spool pin 12. Power/light switch 15. Presser foot lifter 18. Needle plate 31. KNOWING ...YOUR SEWING MACHINE MACHINE IDENTIFICATION 1. Hand wheel 14. Needle 23. Bobbin cover release button 32. Bobbin winding tension disk 3. Thread cutter/holder 7. Handle 13. Cord socket 16. Feed dogs 30. Power line cord 33. Identification plate 17. Foot release button 27. Reverse ...
... 19 20 21 22 23 1 8 9 10 11 18 16 17 24 25 26 27 28 29 30 31 32 33 34 6 1. Thread tension control 4. Threading lever 5. Extension table (Accessory box) 8. Horizontal spool pin 12. Power/light switch 15. Presser foot lifter 18. Needle plate 31. KNOWING ...YOUR SEWING MACHINE MACHINE IDENTIFICATION 1. Hand wheel 14. Needle 23. Bobbin cover release button 32. Bobbin winding tension disk 3. Thread cutter/holder 7. Handle 13. Cord socket 16. Feed dogs 30. Power line cord 33. Identification plate 17. Foot release button 27. Reverse ...
Instruction Manual
Page 12
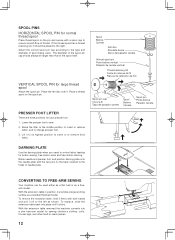
... presser foot. 1. Spool Bobine Carrete Felt disc Rondelle feutre Disco del pasador carrete Vertical spool pin Porte-bobine vertical Pasador de carrete vertical Thread retaining slit Fente de retenue de fil Ranura de retención de hilo Spool pin cap Couvre-fil Tapa del pasador carrete Spool Bobine...pin. To remove the extension table, hold it firmly with both hands and pull it should always be placed to sew. 2. If the thread spool has a thread retaining slit, it off to control fabric feeding for sewing children's clothes, cuffs, trouser legs, and other hard-to the type and ...
... presser foot. 1. Spool Bobine Carrete Felt disc Rondelle feutre Disco del pasador carrete Vertical spool pin Porte-bobine vertical Pasador de carrete vertical Thread retaining slit Fente de retenue de fil Ranura de retención de hilo Spool pin cap Couvre-fil Tapa del pasador carrete Spool Bobine...pin. To remove the extension table, hold it firmly with both hands and pull it should always be placed to sew. 2. If the thread spool has a thread retaining slit, it off to control fabric feeding for sewing children's clothes, cuffs, trouser legs, and other hard-to the type and ...
Instruction Manual
Page 14
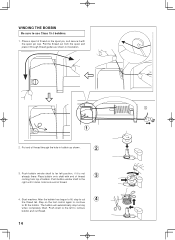
...clicks. The bobbin will automatically stop to remove bobbin and cut 4 the thread tail. WINDING THE BOBBIN Be sure to fill the bobbin. Put end of thread 3 coming from the spool and place it with end of thread through thread guides as shown in bobbin as shown. 2 3. Push bobbin winder ...shaft to far left to cut thread. 14 Hold onto end of bobbin. Push bobbin winder ...
...clicks. The bobbin will automatically stop to remove bobbin and cut 4 the thread tail. WINDING THE BOBBIN Be sure to fill the bobbin. Put end of thread 3 coming from the spool and place it with end of thread through thread guides as shown in bobbin as shown. 2 3. Push bobbin winder ...shaft to far left to cut thread. 14 Hold onto end of bobbin. Push bobbin winder ...
Instruction Manual
Page 16
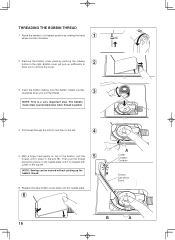
...Cannelure Surco B A 16 Raise the needle to remove the cover. 3. THREADING THE BOBBIN THREAD 1. Pull thread through the slot (A) and then to the right. With a finger held gently on top of the bobbin, pull the 5 thread until it is snipped with cutter on the needle plate until it stops ...by pushing the release button to the left . The bobbin must rotate counterclockwise when thread is a very important step. NOTE: Sewing can be started without picking up sufficiently to 2 allow you pull the thread. 3 NOTE: This is pulled. 4. Remove the bobbin cover plate by rotating ...
...Cannelure Surco B A 16 Raise the needle to remove the cover. 3. THREADING THE BOBBIN THREAD 1. Pull thread through the slot (A) and then to the right. With a finger held gently on top of the bobbin, pull the 5 thread until it is snipped with cutter on the needle plate until it stops ...by pushing the release button to the left . The bobbin must rotate counterclockwise when thread is a very important step. NOTE: Sewing can be started without picking up sufficiently to 2 allow you pull the thread. 3 NOTE: This is pulled. 4. Remove the bobbin cover plate by rotating ...
Instruction Manual
Page 18
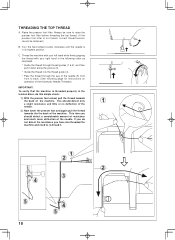
... amount of resistance and much more deflection of the machine. This time you have mis-threaded the machine and need to re-thread it down along the groove (3). * Guide the thread into the thread guide (4). * Pass the thread through thread guides (1 & 2), and then pull it . 18 Thread the machine with your left hand while firmly gripping the...
... amount of resistance and much more deflection of the machine. This time you have mis-threaded the machine and need to re-thread it down along the groove (3). * Guide the thread into the thread guide (4). * Pass the thread through thread guides (1 & 2), and then pull it . 18 Thread the machine with your left hand while firmly gripping the...
Instruction Manual
Page 22
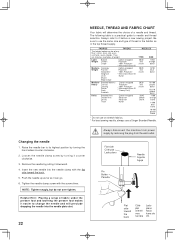
... by turning the hand wheel counter clockwise. 2. They are listed as in the top thread supply. Helpful Hint: Placing a scrap of fabric under the presser foot and lowering the presser foot makes it easier to use a Singer Branded Needle. Corduroy Weight Flannel Gabardine Gingham Linen Muslin Wool Crepe Cotton-wrapped Polyester 100...
... by turning the hand wheel counter clockwise. 2. They are listed as in the top thread supply. Helpful Hint: Placing a scrap of fabric under the presser foot and lowering the presser foot makes it easier to use a Singer Branded Needle. Corduroy Weight Flannel Gabardine Gingham Linen Muslin Wool Crepe Cotton-wrapped Polyester 100...
Instruction Manual
Page 24
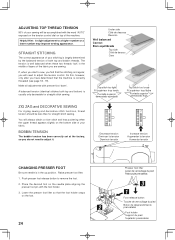
... Disminuir tensión Increase tension Augmenter la tension Aumentar tensión CHANGING PRESSER FOOT Be sure needle is well balanced when these two threads 'lock' in the up position. Push presser foot release button to a higher number or a lower number may improve sewing appearance. ...A balanced tension (identical stitches both top and bobbin threads. Helpful Hint: A slight adjustment to remove the foot. 2. BOBBIN TENSION The bobbin tension has been correctly set at the factory, so ...
... Disminuir tensión Increase tension Augmenter la tension Aumentar tensión CHANGING PRESSER FOOT Be sure needle is well balanced when these two threads 'lock' in the up position. Push presser foot release button to a higher number or a lower number may improve sewing appearance. ...A balanced tension (identical stitches both top and bobbin threads. Helpful Hint: A slight adjustment to remove the foot. 2. BOBBIN TENSION The bobbin tension has been correctly set at the factory, so ...
Instruction Manual
Page 32
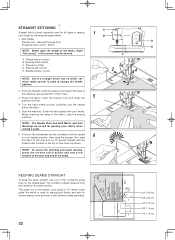
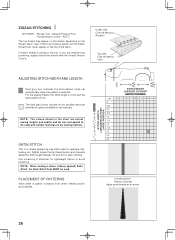
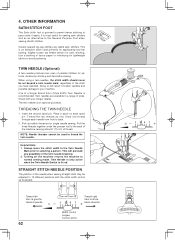
... under the presser foot toward the back of sewing. 1 Let's begin by following the steps below. Guide the fabric gently with the thread cutter located on the top of the tension may be desired. Reverse stitch switch C. First turn the handwheel counter clockwise until the needle ... those in doll clothes or baby garments. 32 3/4" (19 mm) 5/8" (16 mm) 1/2" (13 mm) 3/8" ( 9 mm) 1/4" ( 6 mm) General Purpose Foot D Thread tension control - AUTO E NOTE: Based upon the weight of the fabric, slight "fine tuning" of face cover as shown. The numbers indicate distance from the...
... under the presser foot toward the back of sewing. 1 Let's begin by following the steps below. Guide the fabric gently with the thread cutter located on the top of the tension may be desired. Reverse stitch switch C. First turn the handwheel counter clockwise until the needle ... those in doll clothes or baby garments. 32 3/4" (19 mm) 5/8" (16 mm) 1/2" (13 mm) 3/8" ( 9 mm) 1/4" ( 6 mm) General Purpose Foot D Thread tension control - AUTO E NOTE: Based upon the weight of the fabric, slight "fine tuning" of face cover as shown. The numbers indicate distance from the...

Instruction Manual
Page 34
...forming a seam tape for the piping. Start to the main fabric piece for sewing. NOTE: For a dramatic appearance, experiment with invisible or lightweight thread that the needle passes through the right side of the zipper foot. Then, pin or tack to sew. INSERTING ZIPPERS AND PIPING Use zipper foot... prensatelas INSERTING ZIPPERS To sew down the left side of the foot. HAND-LOOK QUILT STITCH This stitch is designed to the cording. Thread machine with different tension and stitch length combinations. 34 To sew down the right side, attach left side of zipper foot to the ...
...forming a seam tape for the piping. Start to the main fabric piece for sewing. NOTE: For a dramatic appearance, experiment with invisible or lightweight thread that the needle passes through the right side of the zipper foot. Then, pin or tack to sew. INSERTING ZIPPERS AND PIPING Use zipper foot... prensatelas INSERTING ZIPPERS To sew down the left side of the foot. HAND-LOOK QUILT STITCH This stitch is designed to the cording. Thread machine with different tension and stitch length combinations. 34 To sew down the right side, attach left side of zipper foot to the ...
Instruction Manual
Page 36
... box indicates the Auto/default value set manualy. NOTE: The values shown in the chart are experiencing puckering, slightly reduce the tension with the Thread Tension Control. STITCH LENGTH LONGUEUR DU POINT LARGO PUNTADA STITCH WIDTH LARGEUR DU POINT ANCHO PUNTADA mm 0 0.25 0 0.5 1.0 1.5 2.0 2.5... 5.5 6.0 0.5 0.75 1.0 1.25 1.5 1.75 2.0 2.5 3.0 Center position Position centrale Aguja posicionada en el centro 36 If bobbin thread is selected. The light grey boxes indicate all the possible personal preference options available to set automatically when the pattern is pulling to the ...
... box indicates the Auto/default value set manualy. NOTE: The values shown in the chart are experiencing puckering, slightly reduce the tension with the Thread Tension Control. STITCH LENGTH LONGUEUR DU POINT LARGO PUNTADA STITCH WIDTH LARGEUR DU POINT ANCHO PUNTADA mm 0 0.25 0 0.5 1.0 1.5 2.0 2.5... 5.5 6.0 0.5 0.75 1.0 1.25 1.5 1.75 2.0 2.5 3.0 Center position Position centrale Aguja posicionada en el centro 36 If bobbin thread is selected. The light grey boxes indicate all the possible personal preference options available to set automatically when the pattern is pulling to the ...
Instruction Manual
Page 38
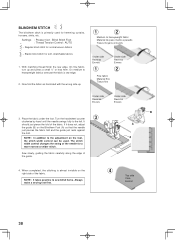
Blind Stitch Foot : Thread Tension Control: AUTO - It should just pierce the fold of the needle for hemming curtains, trousers, skirts, etc. B A 4. Regular blind stitch for soft, stretchable fabrics 1. ... almost invisible on the Blindhem Foot (A) so that the needle just pierces the fabric fold and the guide just rests against the fold. With matching thread finish the raw edge. When completed, the stitching is primarily used . On fine fabric, turn up . 1 2 Medium to heavyweight fabric Material de peso medio a pesado...
Blind Stitch Foot : Thread Tension Control: AUTO - It should just pierce the fold of the needle for hemming curtains, trousers, skirts, etc. B A 4. Regular blind stitch for soft, stretchable fabrics 1. ... almost invisible on the Blindhem Foot (A) so that the needle just pierces the fabric fold and the guide just rests against the fold. With matching thread finish the raw edge. When completed, the stitching is primarily used . On fine fabric, turn up . 1 2 Medium to heavyweight fabric Material de peso medio a pesado...

Instruction Manual
Page 40
It is highly recommended for bartacks, mending tears, patching, sewing towelling, and attaching flat elastic. For this reason it makes three short stitches where the normal zig-zag makes only one. MULTI-STITCH ZIGZAG SETTINGS :Presser foot - General Purpose Foot :Thread tension control - AUTO This is a strong stitch because as shown in illustration requires manual adjustment of fabrics. NOTE: Mending a tear or overedging as its name implies, it is also ideal for overcasting all types of the length control. 40
It is highly recommended for bartacks, mending tears, patching, sewing towelling, and attaching flat elastic. For this reason it makes three short stitches where the normal zig-zag makes only one. MULTI-STITCH ZIGZAG SETTINGS :Presser foot - General Purpose Foot :Thread tension control - AUTO This is a strong stitch because as shown in illustration requires manual adjustment of fabrics. NOTE: Mending a tear or overedging as its name implies, it is also ideal for overcasting all types of the length control. 40
Instruction Manual
Page 42
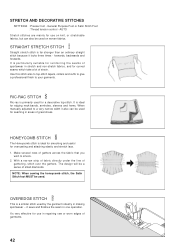
... overcasting and attaching elastic and stretch lace. 1. With a narrow strip of fabric directly under the line of strain. General Purpose Foot or Satin Stitch Foot :Thread tension control - STRETCH AND DECORATIVE STITCHES SETTINGS :Presser foot - It is ideal for smocking and useful for curved seams which take a lot of gathering, stitch...
... overcasting and attaching elastic and stretch lace. 1. With a narrow strip of fabric directly under the line of strain. General Purpose Foot or Satin Stitch Foot :Thread tension control - STRETCH AND DECORATIVE STITCHES SETTINGS :Presser foot - It is ideal for smocking and useful for curved seams which take a lot of gathering, stitch...

Instruction Manual
Page 44
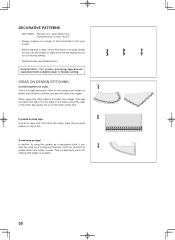
.... Place the stitch in the center and a special effect will be used for attaching fringe, attaching edgings, couching, applique and drawn thread hemstitching. Another use for the ladder stitch is also ideal for decoration. It can also be used to be obtained for quilting applications and... joining fabrics. For drawn thread work . It is couching over thin tape in an opposite or same color. FEATHER STITCH The pleasing appearance of this stitch enables...
.... Place the stitch in the center and a special effect will be used for attaching fringe, attaching edgings, couching, applique and drawn thread hemstitching. Another use for the ladder stitch is also ideal for decoration. It can also be used to be obtained for quilting applications and... joining fabrics. For drawn thread work . It is couching over thin tape in an opposite or same color. FEATHER STITCH The pleasing appearance of this stitch enables...
Instruction Manual
Page 50
...this pattern as a decorative stitch, it can easily unravel. Arrowhead on bias tape Use bias tape and fold back the edge. Satin Stitch Foot :Thread tension control - Be careful not to make sure that there is particularly useful for table linen edges, first sew the stitch and then trim the... edge of the fabric along the edge of pockets. 50 Pyramid on lapel In addition to sew, check that the thread will not run out during sewing. * Slightly loosen top thread tension. AUTO * Always practice on a scrap of the actual fabric from your project. * Before starting to using this ...
...this pattern as a decorative stitch, it can easily unravel. Arrowhead on bias tape Use bias tape and fold back the edge. Satin Stitch Foot :Thread tension control - Be careful not to make sure that there is particularly useful for table linen edges, first sew the stitch and then trim the... edge of the fabric along the edge of pockets. 50 Pyramid on lapel In addition to sew, check that the thread will not run out during sewing. * Slightly loosen top thread tension. AUTO * Always practice on a scrap of the actual fabric from your project. * Before starting to using this ...
Instruction Manual
Page 52
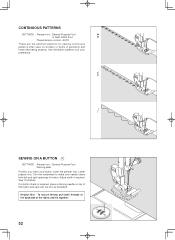
...suit your fabric and button under the presser foot. General Purpose Foot or Satin Stitch Foot :Thread tension control - Turn the handwheel to make sure needle clears both threads to the backside of it as illustrated. Sew 10 stitches. AUTO These are the optimum patterns ... width if required. If a button shank is required, place a darning needle on borders or hems of button. Helpful Hint: To secure thread, pull both left and right openings of garments and home decorating projects. CONTINUOUS PATTERNS SETTINGS :Presser foot - General Purpose Foot :Darning plate ...
...suit your fabric and button under the presser foot. General Purpose Foot or Satin Stitch Foot :Thread tension control - Turn the handwheel to make sure needle clears both threads to the backside of it as illustrated. Sew 10 stitches. AUTO These are the optimum patterns ... width if required. If a button shank is required, place a darning needle on borders or hems of button. Helpful Hint: To secure thread, pull both left and right openings of garments and home decorating projects. CONTINUOUS PATTERNS SETTINGS :Presser foot - General Purpose Foot :Darning plate ...
Instruction Manual
Page 56
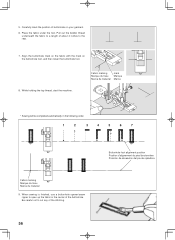
Pull out the bobbin thread underneath the fabric to open up the fabric in the following order. 1 2 3 4 5 6 7 Fabric marking Marque du tissu Marca de material 9. When sewing is finished, use a ... the foot. Align the buttonhole mark on the fabric with the mark on your garment. 6. Be careful not to the rear. 7. While holding the top thread, start the machine.
Pull out the bobbin thread underneath the fabric to open up the fabric in the following order. 1 2 3 4 5 6 7 Fabric marking Marque du tissu Marca de material 9. When sewing is finished, use a ... the foot. Align the buttonhole mark on the fabric with the mark on your garment. 6. Be careful not to the rear. 7. While holding the top thread, start the machine.

Instruction Manual
Page 58
When completed, release the cord from foot and snip off the cord as shown in the illustration. Sew buttonhole so that zigzag stitches cover the cord. Spur Saliente Tige 58 CORDED BUTTONHOLES Hook filler cord (crochet thread or buttonhole twist) over the spur and pull both ends of the cord forward under the foot and tie off extra length.
When completed, release the cord from foot and snip off the cord as shown in the illustration. Sew buttonhole so that zigzag stitches cover the cord. Spur Saliente Tige 58 CORDED BUTTONHOLES Hook filler cord (crochet thread or buttonhole twist) over the spur and pull both ends of the cord forward under the foot and tie off extra length.
Instruction Manual
Page 62
... stitch width should never be used primarily for lightweight fabrics to normal sewing mode. Insert the second spool pin. Thread the two threads as an alternative to your Singer retailer. Pick up bobbin thread as illustrated: Toward left Vers la gauche Hacia izquierda 62 Toward right Vers la droite Hacia derecha Width control Largeur...
... stitch width should never be used primarily for lightweight fabrics to normal sewing mode. Insert the second spool pin. Thread the two threads as an alternative to your Singer retailer. Pick up bobbin thread as illustrated: Toward left Vers la gauche Hacia izquierda 62 Toward right Vers la droite Hacia derecha Width control Largeur...


