
Instruction Manual
Page 3
...Mass of control panel 28 - 31 Reverse operation button 32 - 33 2. CARING FOR YOUR MACHINE Cleaning hook area and feed dogs 80 - 81 4. PERFORMANCE CHECKLIST 86 - 87 6. STARTING TO SEW Utility and continuous stitches 34 - 39 Straight stitching 40 - 43 Keeping seams straight, Inserting... Frequency: 50Hz Rated input: 65W Rated ambient temperature: 15 - 35°C Acoustic noise level: less than 70db(A) 3 KNOWING YOUR SEWING MACHINE Machine identification 6 - 7 Accessories 8 - 9 Setting up your machine 10 - 11 Spool pins, Presser foot lifter 12 - 13 Feed dog control 12 - 13 Converting to...
...Mass of control panel 28 - 31 Reverse operation button 32 - 33 2. CARING FOR YOUR MACHINE Cleaning hook area and feed dogs 80 - 81 4. PERFORMANCE CHECKLIST 86 - 87 6. STARTING TO SEW Utility and continuous stitches 34 - 39 Straight stitching 40 - 43 Keeping seams straight, Inserting... Frequency: 50Hz Rated input: 65W Rated ambient temperature: 15 - 35°C Acoustic noise level: less than 70db(A) 3 KNOWING YOUR SEWING MACHINE Machine identification 6 - 7 Accessories 8 - 9 Setting up your machine 10 - 11 Spool pins, Presser foot lifter 12 - 13 Feed dog control 12 - 13 Converting to...

Instruction Manual
Page 6
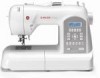
... 31. Thread tension control 3. Thread guide 11 21. Face cover 5. Bobbin winder stop 4 9. Power/light switch 14. Thread cutter/holder 3 6. Cord socket 6 15. KNOWING YOUR SEWING MACHINE MACHINE IDENTIFICATION 1.
... 31. Thread tension control 3. Thread guide 11 21. Face cover 5. Bobbin winder stop 4 9. Power/light switch 14. Thread cutter/holder 3 6. Cord socket 6 15. KNOWING YOUR SEWING MACHINE MACHINE IDENTIFICATION 1.
Instruction Manual
Page 8
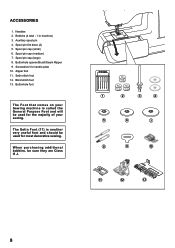
... Satin Foot (11) is called the General Purpose Foot and will be used for most decorative sewing. Bobbins (4 total - 1 in machine) 3. Spool pin felt discs (2) 5. Buttonhole opener/Brush/Seam Ripper 9. Needles 2. Screwdriver for the majority of your Sewing machine is another very useful foot and should be sure they are Class I5 J. 1 2 3 4 5 6 7 8 9 10 11...
... Satin Foot (11) is called the General Purpose Foot and will be used for most decorative sewing. Bobbins (4 total - 1 in machine) 3. Spool pin felt discs (2) 5. Buttonhole opener/Brush/Seam Ripper 9. Needles 2. Screwdriver for the majority of your Sewing machine is another very useful foot and should be sure they are Class I5 J. 1 2 3 4 5 6 7 8 9 10 11...

Instruction Manual
Page 14
With the extension table in position, it clicks. To remove the extension table, hold it firmly with both hands and pull it off to reach places. 14 With the extension table removed the machine converts into place until it provides a large working surface as a freearm model. CONVERTING TO FREE-ARM SEWING Your machine can be used either as a flat-bed or as a standard flat-bed model. To replace, slide the extension table back into a slim free-arm model for sewing children's clothes, cuffs, trouser legs, and other difficult to the left as shown.
With the extension table in position, it clicks. To remove the extension table, hold it firmly with both hands and pull it off to reach places. 14 With the extension table removed the machine converts into place until it provides a large working surface as a freearm model. CONVERTING TO FREE-ARM SEWING Your machine can be used either as a flat-bed or as a standard flat-bed model. To replace, slide the extension table back into a slim free-arm model for sewing children's clothes, cuffs, trouser legs, and other difficult to the left as shown.

Instruction Manual
Page 22
... used after threading. 4. If the threading hook is deviated from needle hole, adjust the position of sewing machine oil onto the felt disc, if the machine is in operation or the threading hook may be threaded through fine needle. 2. NOTE: For smooth threading, it in center needle position...) when using the automatic needle threader. 1. Release the threading lever and needle will be broken. 3. NOTE: Make sure that the machine be set for straight stitch (in place. Pull thread loop away from needle hole after a long interval. 4. If it should not return to ...
... used after threading. 4. If the threading hook is deviated from needle hole, adjust the position of sewing machine oil onto the felt disc, if the machine is in operation or the threading hook may be threaded through fine needle. 2. NOTE: For smooth threading, it in center needle position...) when using the automatic needle threader. 1. Release the threading lever and needle will be broken. 3. NOTE: Make sure that the machine be set for straight stitch (in place. Pull thread loop away from needle hole after a long interval. 4. If it should not return to ...

Instruction Manual
Page 24
...100 purple band * Do not use on stretch fabrics. * For best sewing results, always use the same size and type of weight. Insert the new needle into the needle plate slot. 24 Always disconnect the machine from power supply by pulling it can be of a needle and thread....side Côté plat Lado plano Pin Butée Pasador Needle Aiguille Aguja Flat side toward the back. 5. Be sure to use a Singer Branded Needle. Loosen the needle clamp screw by turning the hand wheel counter clockwise. 2. Corduroy Weight Flannel Gabardine Gingham Linen Muslin Wool Crepe Cotton...
...100 purple band * Do not use on stretch fabrics. * For best sewing results, always use the same size and type of weight. Insert the new needle into the needle plate slot. 24 Always disconnect the machine from power supply by pulling it can be of a needle and thread....side Côté plat Lado plano Pin Butée Pasador Needle Aiguille Aguja Flat side toward the back. 5. Be sure to use a Singer Branded Needle. Loosen the needle clamp screw by turning the hand wheel counter clockwise. 2. Corduroy Weight Flannel Gabardine Gingham Linen Muslin Wool Crepe Cotton...

Instruction Manual
Page 26
... Puntada superior demasiado apretada Top stitch too loose Fil supérieur trop lâche Puntada superior demasiado floja ZIG ZAG and DECORATIVE SEWING For zigzag sewing and decorative stitch functions, thread tension should be accomplished with presser foot 'down'. You will always obtain a nicer stitch and less... "AUTO" exposed on the tension control dial on the bottom side of both top and bottom) is in the middle of layers of the machine. Place the desired foot on the foot. 2 26 Presser foot lifter Levier de verrouillage du pied Palanca pie prensatelas 3 1 Foot release button...
... Puntada superior demasiado apretada Top stitch too loose Fil supérieur trop lâche Puntada superior demasiado floja ZIG ZAG and DECORATIVE SEWING For zigzag sewing and decorative stitch functions, thread tension should be accomplished with presser foot 'down'. You will always obtain a nicer stitch and less... "AUTO" exposed on the tension control dial on the bottom side of both top and bottom) is in the middle of layers of the machine. Place the desired foot on the foot. 2 26 Presser foot lifter Levier de verrouillage du pied Palanca pie prensatelas 3 1 Foot release button...

Instruction Manual
Page 28
...or mode. TWIN NEEDLE BUTTON Width setting for twin needle sewing can be activated, if it is available for a selected ...stitch patterns entered into memory can be cleared. 8. CONTINUOUS SEWING BUTTON This button is also used to default, when utility... is used to toggle between single and continuous pattern sewing of the buttons are used to activate pop-up ...selected. 10. LED turns on when twin needle sewing is selected and pop-up screen for individual preference ... if it is available for continuous pattern sewing. Function 3 (Button A) - MULTI-FUNCTION BUTTONS Functions of ...
...or mode. TWIN NEEDLE BUTTON Width setting for twin needle sewing can be activated, if it is available for a selected ...stitch patterns entered into memory can be cleared. 8. CONTINUOUS SEWING BUTTON This button is also used to default, when utility... is used to toggle between single and continuous pattern sewing of the buttons are used to activate pop-up ...selected. 10. LED turns on when twin needle sewing is selected and pop-up screen for individual preference ... if it is available for continuous pattern sewing. Function 3 (Button A) - MULTI-FUNCTION BUTTONS Functions of ...

Instruction Manual
Page 30
When an error message is lowered. Raise buttonhole lever. 30 When sewing patterns, buttonhole lever is displayed, fix the problem following the instructions below. 1. Push it to stop needle at down position whenever you stop at up ... bobbin winder and move it again to left. 3. If foot control is depressed, while no pattern is made, the sewing machine will not operate with beep sound and an error message will stop sewing. 11 12 11. ERROR MESSAGES If an incorrect operation is selected. Select a pattern. 2. NEEDLE STOP POSITION SELECTOR SWITCH...
When an error message is lowered. Raise buttonhole lever. 30 When sewing patterns, buttonhole lever is displayed, fix the problem following the instructions below. 1. Push it to stop needle at down position whenever you stop at up ... bobbin winder and move it again to left. 3. If foot control is depressed, while no pattern is made, the sewing machine will not operate with beep sound and an error message will stop sewing. 11 12 11. ERROR MESSAGES If an incorrect operation is selected. Select a pattern. 2. NEEDLE STOP POSITION SELECTOR SWITCH...

Instruction Manual
Page 32
... reverse/tacking stitch button is pressed. * Tacking stitch function for tying off the sewing on all patterns except straight and zigzag stitches. The machine will be at the start and end of sewing. 32 NOTE: This function is pushed. REVERSE OPERATION BUTTON Dual purpose reverse/tacking...stitch function for straight and zigzag stitches ( ) Reverse sewing is carried out while the reverse stitch button is very useful for tie-off of other stitches ( ) The sewing machine makes 4 tiny tacking stitches to tie off the sewing pattern to sew in reverse as long as the reverse button is pushed...
... reverse/tacking stitch button is pressed. * Tacking stitch function for tying off the sewing on all patterns except straight and zigzag stitches. The machine will be at the start and end of sewing. 32 NOTE: This function is pushed. REVERSE OPERATION BUTTON Dual purpose reverse/tacking...stitch function for straight and zigzag stitches ( ) Reverse sewing is carried out while the reverse stitch button is very useful for tie-off of other stitches ( ) The sewing machine makes 4 tiny tacking stitches to tie off the sewing pattern to sew in reverse as long as the reverse button is pushed...

Instruction Manual
Page 34
... & Continuous Stitch category. These stitches can be combined together to change between stitch patterns while the machine remains on the LCD display. They do not sew as single patterns, nor do they combine into combinations with other is activated. If you can make...length and the button (E) for selecting stitches. They can also be sewn continuously only if the Continuous Sewing Button is the Letter Sewing & Decorative Pattern category. When the machine is turned on, straight stitch is selected automatically and a pop-up screen for individual preference settings ...
... & Continuous Stitch category. These stitches can be combined together to change between stitch patterns while the machine remains on the LCD display. They do not sew as single patterns, nor do they combine into combinations with other is activated. If you can make...length and the button (E) for selecting stitches. They can also be sewn continuously only if the Continuous Sewing Button is the Letter Sewing & Decorative Pattern category. When the machine is turned on, straight stitch is selected automatically and a pop-up screen for individual preference settings ...

Instruction Manual
Page 36
TWIN NEEDLE SETTING Twin needle mode can be selected by pressing the mirror image button, if the mirror image icon appears on the display. Note: Turning off the machine returns the machine to your machine. Doing so will reduce the stitch width automatically and save broken needles and possible damage to normal sewing mode. 36 MIRROR IMAGE SETTING Mirror image of a selected pattern can be selected by pressing the twin needle button, if the twin needle icon appears on the display.
TWIN NEEDLE SETTING Twin needle mode can be selected by pressing the mirror image button, if the mirror image icon appears on the display. Note: Turning off the machine returns the machine to your machine. Doing so will reduce the stitch width automatically and save broken needles and possible damage to normal sewing mode. 36 MIRROR IMAGE SETTING Mirror image of a selected pattern can be selected by pressing the twin needle button, if the twin needle icon appears on the display.

Instruction Manual
Page 40
... width control is used for piecing quilt blocks and also for narrow seams, such as an aid for all types of the fabric, stop the sewing machine. C 2 4 3 NOTE: The Needle Plate has both threads under the presser foot and lower the presser foot lifter. 5 4. The guide line on ... fabric under the presser foot toward the back of the seam. The numbers indicate distance from the needle at the start and end of the machine, leaving about 6" (15cm) clear. 3. SETTINGS D Presser foot - A. Pull both Metric and Inch Markings as those in doll clothes or baby garments. 40 3/4" (...
... width control is used for piecing quilt blocks and also for narrow seams, such as an aid for all types of the fabric, stop the sewing machine. C 2 4 3 NOTE: The Needle Plate has both threads under the presser foot and lower the presser foot lifter. 5 4. The guide line on ... fabric under the presser foot toward the back of the seam. The numbers indicate distance from the needle at the start and end of the machine, leaving about 6" (15cm) clear. 3. SETTINGS D Presser foot - A. Pull both Metric and Inch Markings as those in doll clothes or baby garments. 40 3/4" (...

Instruction Manual
Page 42
... the foot control is designed to the top. 2. Push the reverse button and the machine will sew 4 stitches in reverse and then 4 stitches in reverse and continue to foot holder. INSERTING ZIPPERS To sew down the left of foot Aiguille à gauche du pied presseur Aguja a la izquierda... bobbin with different tension and stitch length combinations. When sewing the machine will sew 4 stitches forward and then 4 stitches in forward and stop. 42 Press the foot control and the machine will pull this thread to look like hand sewing for the piping. Attach the right side of the zipper...
... the foot control is designed to the top. 2. Push the reverse button and the machine will sew 4 stitches in reverse and then 4 stitches in reverse and continue to foot holder. INSERTING ZIPPERS To sew down the left of foot Aiguille à gauche du pied presseur Aguja a la izquierda... bobbin with different tension and stitch length combinations. When sewing the machine will sew 4 stitches forward and then 4 stitches in forward and stop. 42 Press the foot control and the machine will pull this thread to look like hand sewing for the piping. Attach the right side of the zipper...

Instruction Manual
Page 44
...mm 0 0.5 1.0 1.5 2.0 2.5 3.0 3.5 4.0 4.5 5.0 5.5 6.0 0 0.25 0.5 0.75 1.0 1.25 1.5 1.75 2.0 2.5 3.0 Center position Position centrale Aguja posicionada en el centro 44 NOTE: When sewing a dense (closely spaced) Satin Stitch, the Satin Stitch Foot MUST be used for sheer fabrics to set automatically when the pattern is a closely spaced zig...The top thread may appear on the bottom depending on the thread, fabric, type of stitch and sewing speed, but the bobbin thread must never appear on the sewing machine. For the Zigzag Pattern the stitch length is 2 mm and the stitch width is pulling to...
...mm 0 0.5 1.0 1.5 2.0 2.5 3.0 3.5 4.0 4.5 5.0 5.5 6.0 0 0.25 0.5 0.75 1.0 1.25 1.5 1.75 2.0 2.5 3.0 Center position Position centrale Aguja posicionada en el centro 44 NOTE: When sewing a dense (closely spaced) Satin Stitch, the Satin Stitch Foot MUST be used for sheer fabrics to set automatically when the pattern is a closely spaced zig...The top thread may appear on the bottom depending on the thread, fabric, type of stitch and sewing speed, but the bobbin thread must never appear on the sewing machine. For the Zigzag Pattern the stitch length is 2 mm and the stitch width is pulling to...

Instruction Manual
Page 62
SEWING A BUTTONHOLE USING BUTTONHOLE FOOT Your machine offers you are placed. Then try the buttonhole with the buttonhole foot. (Refer to "Using buttonhole foot" above.) 4. Insert the button into the buttonhole foot. (...
SEWING A BUTTONHOLE USING BUTTONHOLE FOOT Your machine offers you are placed. Then try the buttonhole with the buttonhole foot. (Refer to "Using buttonhole foot" above.) 4. Insert the button into the buttonhole foot. (...

Instruction Manual
Page 64
...du pied boutonnière Posición de alineación del pie de ojaladora While holding the top thread, start the machine. Place the fabric under the foot. When sewing is finished, use a buttonhole opener to open up the fabric in the following order. 1 2 3 4 5 6 ...7 8 Fabric marking Marque du tissu Marca de material 9. 5. Fabric marking Marque du tissu Marca de material mark Marque Marca * Sewing will be completed automatically in the center of buttonhole on the buttonhole foot, and then lower the buttonhole foot. 8. Carefully mark the position of the...
...du pied boutonnière Posición de alineación del pie de ojaladora While holding the top thread, start the machine. Place the fabric under the foot. When sewing is finished, use a buttonhole opener to open up the fabric in the following order. 1 2 3 4 5 6 ...7 8 Fabric marking Marque du tissu Marca de material 9. 5. Fabric marking Marque du tissu Marca de material mark Marque Marca * Sewing will be completed automatically in the center of buttonhole on the buttonhole foot, and then lower the buttonhole foot. 8. Carefully mark the position of the...

Instruction Manual
Page 68
Push the reverse stitch switch to form first bartack and left side of the buttonhole. Start the machine to tie off the stitches. Sew second bartack and stitch backward until needle 1 reaches beginning of buttonhole mark to create larger buttonholes. * Carefully mark the buttonhole length on your garment. NOTE: ...
Push the reverse stitch switch to form first bartack and left side of the buttonhole. Start the machine to tie off the stitches. Sew second bartack and stitch backward until needle 1 reaches beginning of buttonhole mark to create larger buttonholes. * Carefully mark the buttonhole length on your garment. NOTE: ...
Instruction Manual
Page 80
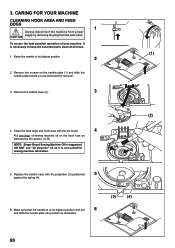
...Make sure that the needle is at all purpose" oil as illustrated. (3) (4) 80 Remove two screws on the hook race as illustrated for sewing machine lubrication. (2) (A) (B) 5. Raise the needle to its highest position and put 6 and slide the needle plate into position as it is not... suited for removal. 3. CARING FOR YOUR MACHINE CLEANING HOOK AREA AND FEED DOGS 1 Always disconnect the machine from power CAUTION supply by the arrows. (A, B) NOTE: Singer Brand Sewing Machine Oil is suggested. DO NOT use "all times. (1) 1.
...Make sure that the needle is at all purpose" oil as illustrated. (3) (4) 80 Remove two screws on the hook race as illustrated for sewing machine lubrication. (2) (A) (B) 5. Raise the needle to its highest position and put 6 and slide the needle plate into position as it is not... suited for removal. 3. CARING FOR YOUR MACHINE CLEANING HOOK AREA AND FEED DOGS 1 Always disconnect the machine from power CAUTION supply by the arrows. (A, B) NOTE: Singer Brand Sewing Machine Oil is suggested. DO NOT use "all times. (1) 1.

Instruction Manual
Page 95
...always be left unattended when plugged in the instruction manual. To reduce the risk of The Singer Company Ltd or its intended use bent needles. 13. Never operate the sewing machine with EEC Directive 89/336/EEC covering the electromagnetic compatibility. To disconnect, turn switch to persons... burns, fire, electric shock, or injury to the off ("0") when making any adjustments in this sewing machine only for all moving parts. Keep fingers away from all . (European Union only) SINGER® is intended to install the proper outlet. To reduce the risk of electric shock: 1. ...
...always be left unattended when plugged in the instruction manual. To reduce the risk of The Singer Company Ltd or its intended use bent needles. 13. Never operate the sewing machine with EEC Directive 89/336/EEC covering the electromagnetic compatibility. To disconnect, turn switch to persons... burns, fire, electric shock, or injury to the off ("0") when making any adjustments in this sewing machine only for all moving parts. Keep fingers away from all . (European Union only) SINGER® is intended to install the proper outlet. To reduce the risk of electric shock: 1. ...


