Instruction Manual
Page 3
... mm Mass of control panel 28 - 31 Reverse operation button 32 - 33 2. KNOWING YOUR SEWING MACHINE Machine identification 6 - 7 Accessories 8 - 9 Setting up your machine 10 - 11 Spool pins, Presser foot lifter 12 - 13 Feed dog control 12 - 13 Converting to -sew fabrics Manual buttonhole 68 - 69 Letter sewing and decorative patterns 70 - 79 Decorative designs 3. CARING FOR YOUR...
... mm Mass of control panel 28 - 31 Reverse operation button 32 - 33 2. KNOWING YOUR SEWING MACHINE Machine identification 6 - 7 Accessories 8 - 9 Setting up your machine 10 - 11 Spool pins, Presser foot lifter 12 - 13 Feed dog control 12 - 13 Converting to -sew fabrics Manual buttonhole 68 - 69 Letter sewing and decorative patterns 70 - 79 Decorative designs 3. CARING FOR YOUR...

Instruction Manual
Page 6
... Thread guide 22. 1. Presser foot lifter 17. Buttonhole lever 19. Presser foot screw 23. Feed dogs 31. Needle plate 32. KNOWING YOUR SEWING MACHINE MACHINE IDENTIFICATION 1. Thread cutter 6. Extension table (Accessory box) 7. Horizontal spool pin 11. Hand wheel 13. Power/light switch 14. Cord socket 15.... guide 2. Thread take-up 3. Reverse stitch button 10. Needle threader thread guide 21. Bobbin cover plate 25. Needle bar 26. Face cover 5. Instruction manual 1 2 3 4 5 6 11 12 13 14 19 20 21 22 23 24 7 8 9 10 15 16 18 17 25 26 27 28 29...
... Thread guide 22. 1. Presser foot lifter 17. Buttonhole lever 19. Presser foot screw 23. Feed dogs 31. Needle plate 32. KNOWING YOUR SEWING MACHINE MACHINE IDENTIFICATION 1. Thread cutter 6. Extension table (Accessory box) 7. Horizontal spool pin 11. Hand wheel 13. Power/light switch 14. Cord socket 15.... guide 2. Thread take-up 3. Reverse stitch button 10. Needle threader thread guide 21. Bobbin cover plate 25. Needle bar 26. Face cover 5. Instruction manual 1 2 3 4 5 6 11 12 13 14 19 20 21 22 23 24 7 8 9 10 15 16 18 17 25 26 27 28 29...

Instruction Manual
Page 44
...the scale and number markings on the top of pattern increases from center needle position as illustrated. Slightly loosen the top thread tension and manually adjust the stitch length between 0.5 and 2.0 for appliqué, bar-tacking, etc. PLACEMENT OF PATTERNS Stitch width of the fabric. NOTE... - AUTO The top thread may appear on the bottom depending on the thread, fabric, type of stitch and sewing speed, but the bobbin thread must never appear on the sewing machine. Use a backing of stabilizer or interfacing to set automatically when the pattern is a closely spaced stitch used ....
...the scale and number markings on the top of pattern increases from center needle position as illustrated. Slightly loosen the top thread tension and manually adjust the stitch length between 0.5 and 2.0 for appliqué, bar-tacking, etc. PLACEMENT OF PATTERNS Stitch width of the fabric. NOTE... - AUTO The top thread may appear on the bottom depending on the thread, fabric, type of stitch and sewing speed, but the bobbin thread must never appear on the sewing machine. Use a backing of stabilizer or interfacing to set automatically when the pattern is a closely spaced stitch used ....
Instruction Manual
Page 68
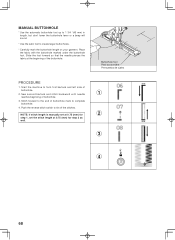
... PROCEDURE 1. Stitch forward to the end of buttonhole mark to form first bartack and left side of buttonhole. 2. NOTE: If stitch length is manually set at 0.75 (mm) for step 3 as well. 3 4 68 Slide the foot forward so that the needle pierces the fabric at ... (mm) for 2 step 1, set the stitch length at the beginning of buttonhole. 3. Start the machine to complete buttonhole. 4. Sew second bartack and stitch backward until needle 1 reaches beginning of the buttonhole. MANUAL BUTTONHOLE * Use the automatic buttonhole foot up to 1 3/4 "(45 mm) in length, but don't...
... PROCEDURE 1. Stitch forward to the end of buttonhole mark to form first bartack and left side of buttonhole. 2. NOTE: If stitch length is manually set at 0.75 (mm) for step 3 as well. 3 4 68 Slide the foot forward so that the needle pierces the fabric at ... (mm) for 2 step 1, set the stitch length at the beginning of buttonhole. 3. Start the machine to complete buttonhole. 4. Sew second bartack and stitch backward until needle 1 reaches beginning of the buttonhole. MANUAL BUTTONHOLE * Use the automatic buttonhole foot up to 1 3/4 "(45 mm) in length, but don't...

Instruction Manual
Page 94
...damaged, or dropped into any adjustments in the instruction manual. If the plug does not fit fully in this sewing machine. This appliance complies with a damaged needle plate as this sewing machine only for all. (European Union only) ® SINGER is marked with the recycling symbol. DANGER- WARNING...Yamamoto Electric Model YC-485EC with any way. Do not modify the plug in this sewing machine is being used or where oxygen is used as a toy. Never operate the sewing machine with this manual. 3. Keep fingers away from all instructions before cleaning. Do not pull or push...
...damaged, or dropped into any adjustments in the instruction manual. If the plug does not fit fully in this sewing machine. This appliance complies with a damaged needle plate as this sewing machine only for all. (European Union only) ® SINGER is marked with the recycling symbol. DANGER- WARNING...Yamamoto Electric Model YC-485EC with any way. Do not modify the plug in this sewing machine is being used or where oxygen is used as a toy. Never operate the sewing machine with this manual. 3. Keep fingers away from all instructions before cleaning. Do not pull or push...


