
Instruction Manual
Page 2
... a hazard. • If the supply cord connected with double insulation. Keep the instructions in . Keep ventilation openings of the sewing machine and foot control free from all moving parts. The wrong plate can cause the needle to the nearest authorized dealer or service center...the accumulation of Double-Insulated Appliances. Avoid placing other user servicing adjustments mentioned in order to avoid a hazard. • This sewing machine is required around the sewing machine needle. • Always use the proper needle plate. To unplug, grasp the plug, not the cord. • The...
... a hazard. • If the supply cord connected with double insulation. Keep the instructions in . Keep ventilation openings of the sewing machine and foot control free from all moving parts. The wrong plate can cause the needle to the nearest authorized dealer or service center...the accumulation of Double-Insulated Appliances. Avoid placing other user servicing adjustments mentioned in order to avoid a hazard. • This sewing machine is required around the sewing machine needle. • Always use the proper needle plate. To unplug, grasp the plug, not the cord. • The...
Instruction Manual
Page 3
... When replacing old appliances with the sewing machine. The noise level under normal operating conditions is the exclusive trademark of experience and knowledge, unless they do not play with the words 'DOUBLE INSULATION' or 'DOUBLE INSULATED'. SINGER is less than 75dB(A). A double...legislation relating to the product. Contact your local government for their safety. For outside Europe: This sewing machine is marked with the appliance. The machine must only be supervised to those parts in landfills or dumps, hazardous substances can be used with ...
... When replacing old appliances with the sewing machine. The noise level under normal operating conditions is the exclusive trademark of experience and knowledge, unless they do not play with the words 'DOUBLE INSULATION' or 'DOUBLE INSULATED'. SINGER is less than 75dB(A). A double...legislation relating to the product. Contact your local government for their safety. For outside Europe: This sewing machine is marked with the appliance. The machine must only be supervised to those parts in landfills or dumps, hazardous substances can be used with ...
Instruction Manual
Page 9
... 50 - 51 Ideas on design stitching Continuous patterns 52 - 53 Sewing on a button 52 - 53 Sewing a buttonhole 54 - 59 Using buttonhole foot, Procedure, Corded buttonholes 3. CARING FOR YOUR MACHINE Cleaning hook area and feed dogs 60 - 61 4. KNOWING YOUR SEWING MACHINE Machine identification 6 - 7 Accessories 8 - 9 Setting up your machine 10 - 11 Spool pins 12 - 13 Presser foot lifter...
... 50 - 51 Ideas on design stitching Continuous patterns 52 - 53 Sewing on a button 52 - 53 Sewing a buttonhole 54 - 59 Using buttonhole foot, Procedure, Corded buttonholes 3. CARING FOR YOUR MACHINE Cleaning hook area and feed dogs 60 - 61 4. KNOWING YOUR SEWING MACHINE Machine identification 6 - 7 Accessories 8 - 9 Setting up your machine 10 - 11 Spool pins 12 - 13 Presser foot lifter...
Instruction Manual
Page 12
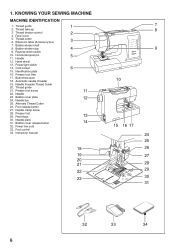
... 24. Bobbin cover release button 32. Thread guide 2. Reverse stitch switch 10. Presser foot lifter 17. Automatic needle threader 19. Needle plate 31. KNOWING YOUR SEWING MACHINE MACHINE IDENTIFICATION 1. Thread cutter 6. Alternate Thread Cutter 26. Presser foot 29. Thread take-up 3. Thread tension control 4. Bobbin winder shaft 8. Hand wheel 13. Needle clamp screw...
... 24. Bobbin cover release button 32. Thread guide 2. Reverse stitch switch 10. Presser foot lifter 17. Automatic needle threader 19. Needle plate 31. KNOWING YOUR SEWING MACHINE MACHINE IDENTIFICATION 1. Thread cutter 6. Alternate Thread Cutter 26. Presser foot 29. Thread take-up 3. Thread tension control 4. Bobbin winder shaft 8. Hand wheel 13. Needle clamp screw...
Instruction Manual
Page 14
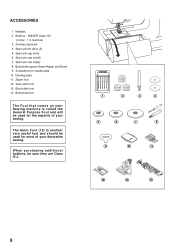
.../Seam Ripper and Brush 9. Auxiliary spool pin 4. Buttonhole foot The Foot that comes on your Sewing machine is another very useful foot and should be used for the majority of your sewing. Zipper foot 12. Needles 2. The Satin Foot (12) is called the General Purpose Foot ...and will be sure they are Class I5 J. 1 2 3 4 5 6 7 8 9 10 11 12 13 14 8 Darning plate 11. Satin stitch foot 13. SINGER Class 15J (4 total - 1 in machine) 3. Spool pin...
.../Seam Ripper and Brush 9. Auxiliary spool pin 4. Buttonhole foot The Foot that comes on your Sewing machine is another very useful foot and should be used for the majority of your sewing. Zipper foot 12. Needles 2. The Satin Foot (12) is called the General Purpose Foot ...and will be sure they are Class I5 J. 1 2 3 4 5 6 7 8 9 10 11 12 13 14 8 Darning plate 11. Satin stitch foot 13. SINGER Class 15J (4 total - 1 in machine) 3. Spool pin...
Instruction Manual
Page 18
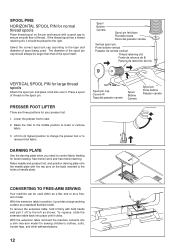
..., and position darning plate onto the needle plate with both hands and pull it off to the left as a flat- CONVERTING TO FREE-ARM SEWING Your machine can be placed to ensure smooth flow of needle plate. If the thread spool has a thread retaining slit, it . The diameter of the... it clicks. To remove the extension table, hold it provides a large working surface as a freearm model. SPOOL PINS HORIZONTAL SPOOL PIN for button sewing, free motion work and free motion darning. Select the correct spool pin cap according to control fabric feeding for normal thread spools Place thread spool...
..., and position darning plate onto the needle plate with both hands and pull it off to the left as a flat- CONVERTING TO FREE-ARM SEWING Your machine can be placed to ensure smooth flow of needle plate. If the thread spool has a thread retaining slit, it . The diameter of the... it clicks. To remove the extension table, hold it provides a large working surface as a freearm model. SPOOL PINS HORIZONTAL SPOOL PIN for button sewing, free motion work and free motion darning. Select the correct spool pin cap according to control fabric feeding for normal thread spools Place thread spool...

Instruction Manual
Page 28
.../90 blue band 16/100 purple band * Do not use on stretch fabrics. * For best sewing results, always use the same size and type of fabric under the presser foot and lowering the... presser foot makes it can be sure to its highest position by turning it before a new sewing project. Loosen the needle clamp screw by turning the hand wheel toward you . 2. NEEDLE, THREAD ... plano hacia fuera de Vd. FABRICS The fabrics below can go. 6. Raise the needle bar to use a Singer Branded Needle. Always refer to needle and thread selection. Push the needle up as far as examples of a ...
.../90 blue band 16/100 purple band * Do not use on stretch fabrics. * For best sewing results, always use the same size and type of fabric under the presser foot and lowering the... presser foot makes it can be sure to its highest position by turning it before a new sewing project. Loosen the needle clamp screw by turning the hand wheel toward you . 2. NEEDLE, THREAD ... plano hacia fuera de Vd. FABRICS The fabrics below can go. 6. Raise the needle bar to use a Singer Branded Needle. Always refer to needle and thread selection. Push the needle up as far as examples of a ...
Instruction Manual
Page 30
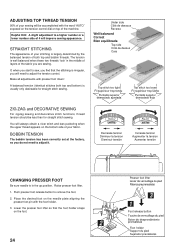
...to sew, you are sewing. Raise... that the stitching is usually only desireable for straight stitch sewing. You will need to remove the foot. 2. STRAIGHT STITCHING...lower number side of 4 will be less than for straight stitch sewing. BOBBIN TENSION The bobbin tension has been correctly set at the ...che Puntada superior demasiado floja ZIG ZAG and DECORATIVE SEWING For zigzag sewing and decorative stitch functions, thread tension should be ... 'down'. ADJUSTING TOP THREAD TENSION 90% of your sewing will improve sewing appearance. Helpful Hint: A slight adjustment to adjust the...
...to sew, you are sewing. Raise... that the stitching is usually only desireable for straight stitch sewing. You will need to remove the foot. 2. STRAIGHT STITCHING...lower number side of 4 will be less than for straight stitch sewing. BOBBIN TENSION The bobbin tension has been correctly set at the ...che Puntada superior demasiado floja ZIG ZAG and DECORATIVE SEWING For zigzag sewing and decorative stitch functions, thread tension should be ... 'down'. ADJUSTING TOP THREAD TENSION 90% of your sewing will improve sewing appearance. Helpful Hint: A slight adjustment to adjust the...
Instruction Manual
Page 32
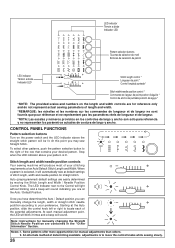
...Stitch Length and Width / Needle Position Control Knob. Auto (preprogrammed) default settings are for reference only and do not represent actual sewing parameters of stitch length, width and needle position for straight stitch. An alternate method of the potential adjustments. Stop when the LED... selected, it will be lit. Note: Instructions for manual adjustments than others. 2. Stitch length and width/needle position controls Your sewing machine will sound. At this point you can manually change the length, width or straight stitch needle postition according to the Control will ...
...Stitch Length and Width / Needle Position Control Knob. Auto (preprogrammed) default settings are for reference only and do not represent actual sewing parameters of stitch length, width and needle position for straight stitch. An alternate method of the potential adjustments. Stop when the LED... selected, it will be lit. Note: Instructions for manual adjustments than others. 2. Stitch length and width/needle position controls Your sewing machine will sound. At this point you can manually change the length, width or straight stitch needle postition according to the Control will ...
Instruction Manual
Page 34
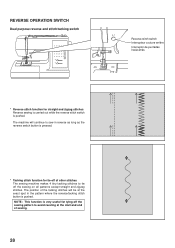
... is pressed. * Tacking stitch function for tying off the sewing on all patterns except straight and zigzag stitches. The machine will continue to sew in reverse as long as the reverse switch button is very useful for tie-off of other stitches The sewing machine makes 4 tiny tacking stitches to tie off the... sewing pattern to avoid raveling at the start and end of the tacking stitches will be at the exact spot in the pattern...
... is pressed. * Tacking stitch function for tying off the sewing on all patterns except straight and zigzag stitches. The machine will continue to sew in reverse as long as the reverse switch button is very useful for tie-off of other stitches The sewing machine makes 4 tiny tacking stitches to tie off the... sewing pattern to avoid raveling at the start and end of the tacking stitches will be at the exact spot in the pattern...
Instruction Manual
Page 38
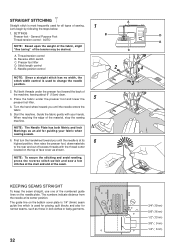
...Straight stitch is used to the rear and cut off excess threads with your fabric when sewing a seam. 6. AUTO E NOTE: Based upon the weight of the fabric, slight "fine tuning" of the material, stop the sewing machine. Thread tension control B. Place the fabric under the presser foot toward you until the ... the seam straight, use one of the numbered guide lines on the top of sewing. The guide line on the bobbin cover plate is 1/4" (6mm) seam guide line which is at the start and end of the machine, leaving about 6" (15cm) clear. 3. Guide the fabric gently with the thread...
...Straight stitch is used to the rear and cut off excess threads with your fabric when sewing a seam. 6. AUTO E NOTE: Based upon the weight of the fabric, slight "fine tuning" of the material, stop the sewing machine. Thread tension control B. Place the fabric under the presser foot toward you until the ... the seam straight, use one of the numbered guide lines on the top of sewing. The guide line on the bobbin cover plate is 1/4" (6mm) seam guide line which is at the start and end of the machine, leaving about 6" (15cm) clear. 3. Guide the fabric gently with the thread...
Instruction Manual
Page 40
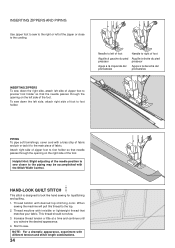
... AND PIPING Use zipper foot to sew to the right or left of the zipper or close to the top. 2. Attach right side of zipper foot to presser foot holder so that the needle passes through the opening on the right side of the foot. Thread machine with invisible or lightweight thread... that needle passes through the opening on the left side of zipper foot to foot holder so that matches your fabric. To sew down the right side, attach left side, attach right side of...
... AND PIPING Use zipper foot to sew to the right or left of the zipper or close to the top. 2. Attach right side of zipper foot to presser foot holder so that the needle passes through the opening on the right side of the foot. Thread machine with invisible or lightweight thread... that needle passes through the opening on the left side of zipper foot to foot holder so that matches your fabric. To sew down the right side, attach left side, attach right side of...
Instruction Manual
Page 42
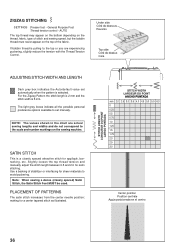
... needle position; AUTO The top thread may appear on the bottom depending on the thread, fabric, type of stitch and sewing speed, but the bobbin thread must never appear on the sewing machine. STITCH LENGTH LONGUEUR DU POINT LARGO PUNTADA STITCH WIDTH LARGEUR DU POINT ANCHO PUNTADA mm 2.0 2.5 3.0 3.5 4.0 4.5 5.0 5.5 6.0 0 0.25 0.5 0.75 1.0 1.25 1.5 1.75 2.0 2.5 3.0 Center...
... needle position; AUTO The top thread may appear on the bottom depending on the thread, fabric, type of stitch and sewing speed, but the bobbin thread must never appear on the sewing machine. STITCH LENGTH LONGUEUR DU POINT LARGO PUNTADA STITCH WIDTH LARGEUR DU POINT ANCHO PUNTADA mm 2.0 2.5 3.0 3.5 4.0 4.5 5.0 5.5 6.0 0 0.25 0.5 0.75 1.0 1.25 1.5 1.75 2.0 2.5 3.0 Center...
Instruction Manual
Page 60
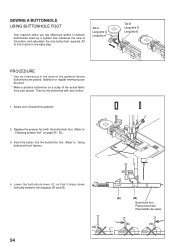
... to "Using buttonhole foot" above.) 4. Lower the buttonhole lever (C) so that measures the size of the button and calculates the size buttonhole required. SEWING A BUTTONHOLE USING BUTTONHOLE FOOT Your machine offers you two difference widths of bartack buttonholes sewn by a system that it drops down vertically between the stoppers (A) and (B). (C) 54 (C) (A) (B) Buttonhole...
... to "Using buttonhole foot" above.) 4. Lower the buttonhole lever (C) so that measures the size of the button and calculates the size buttonhole required. SEWING A BUTTONHOLE USING BUTTONHOLE FOOT Your machine offers you two difference widths of bartack buttonholes sewn by a system that it drops down vertically between the stoppers (A) and (B). (C) 54 (C) (A) (B) Buttonhole...
Instruction Manual
Page 62
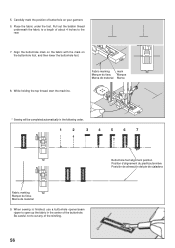
... on the fabric with the mark on your garment. 6. 5. Fabric marking Marque du tissu Marca de material mark Marque Marca * Sewing will be completed automatically in the center of about 4 inches to open up the fabric in the following order. 1 2 3 ...4 5 6 7 Fabric marking Marque du tissu Marca de material 9. When sewing is finished, use a buttonhole opener/seam ripper to the rear. 7. Pull out the bobbin thread underneath the fabric to a length of ...ón del pie de ojaladora While holding the top thread, start the machine.
... on the fabric with the mark on your garment. 6. 5. Fabric marking Marque du tissu Marca de material mark Marque Marca * Sewing will be completed automatically in the center of about 4 inches to open up the fabric in the following order. 1 2 3 ...4 5 6 7 Fabric marking Marque du tissu Marca de material 9. When sewing is finished, use a buttonhole opener/seam ripper to the rear. 7. Pull out the bobbin thread underneath the fabric to a length of ...ón del pie de ojaladora While holding the top thread, start the machine.
Instruction Manual
Page 66
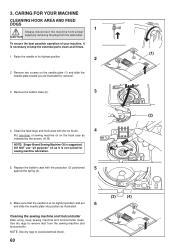
... Remove two screws on the hook race as illustrated for sewing machine lubrication. 5. CARING FOR YOUR MACHINE CLEANING HOOK AREA AND FEED DOGS 1 Always disconnect the machine from power supply by the arrows. (A, B) NOTE: Singer Brand Sewing Machine Oil is at all purpose" oil as illustrated. DO ...NOT use "all times. (1) 1. Use dry rags to keep sewing machine and footcontroller clean. Replace the bobbin case...
... Remove two screws on the hook race as illustrated for sewing machine lubrication. 5. CARING FOR YOUR MACHINE CLEANING HOOK AREA AND FEED DOGS 1 Always disconnect the machine from power supply by the arrows. (A, B) NOTE: Singer Brand Sewing Machine Oil is at all purpose" oil as illustrated. DO ...NOT use "all times. (1) 1. Use dry rags to keep sewing machine and footcontroller clean. Replace the bobbin case...
Instruction Manual
Page 68
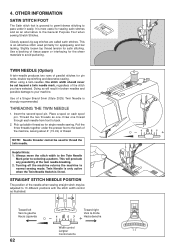
... loosen top thread tension for pin tucks, double top stitching and decorative sewing. Always move the stitch width to the Twin Needle Mark prior to pass under the presser foot to your machine. OTHER INFORMATION SATIN STITCH FOOT The Satin stitch foot is grooved to permit...STRAIGHT STITCH NEEDLE POSITION The position of tissue paper or interfacing for sewing satin stitches and as one thread through each spool pin. This is strongly recommended. Doing so will preclude any possibility of a Singer Brand 3mm (Style 2025) Twin Needle is an attractive stitch used ...
... loosen top thread tension for pin tucks, double top stitching and decorative sewing. Always move the stitch width to the Twin Needle Mark prior to pass under the presser foot to your machine. OTHER INFORMATION SATIN STITCH FOOT The Satin stitch foot is grooved to permit...STRAIGHT STITCH NEEDLE POSITION The position of tissue paper or interfacing for sewing satin stitches and as one thread through each spool pin. This is strongly recommended. Doing so will preclude any possibility of a Singer Brand 3mm (Style 2025) Twin Needle is an attractive stitch used ...

Instruction Manual
Page 70
... on the switch. * Buttonhole lever is not all the way up into the needle clamp. - STITCHING PROBLEMS Machine skips stitches. * Needle is not raised when sewing stitch patterns. - See page 22 - 23. * Machine is too short - See page 24 - 25. * Fabric is being pulled or pushed against... page 60 - 61). Raise buttonhole lever. * Buttonhole lever is bent or blunt. - Machine jams/knocks. * Thread is not correct for thread and fabric. - See page 22 - 23. * Needle is not lowered when sewing buttonhole. - Guide it gently. * Bobbin has not been wound evenly. - Stitches are ...
... on the switch. * Buttonhole lever is not all the way up into the needle clamp. - STITCHING PROBLEMS Machine skips stitches. * Needle is not raised when sewing stitch patterns. - See page 22 - 23. * Machine is too short - See page 24 - 25. * Fabric is being pulled or pushed against... page 60 - 61). Raise buttonhole lever. * Buttonhole lever is bent or blunt. - Machine jams/knocks. * Thread is not correct for thread and fabric. - See page 22 - 23. * Needle is not lowered when sewing buttonhole. - Guide it gently. * Bobbin has not been wound evenly. - Stitches are ...


