Instruction Manual
Page 2
...its intended use as threading needle, changing needle, threading bobbin, or changing presser foot, and the like. 10.Always unplug sewing machine from the electrical outlet when removing covers, lubricating, or when making any other user servicing adjustments mentioned in this appliance from...pressure level under normal operating conditions is 75dB(A). 17.Please turn all controls to break. 7. Always use bent needles. 8. Switch the sewing machine off ("O") when making any adjustments in the needle area, such as described in . 2. Never operate the appliance with same type ...
...its intended use as threading needle, changing needle, threading bobbin, or changing presser foot, and the like. 10.Always unplug sewing machine from the electrical outlet when removing covers, lubricating, or when making any other user servicing adjustments mentioned in this appliance from...pressure level under normal operating conditions is 75dB(A). 17.Please turn all controls to break. 7. Always use bent needles. 8. Switch the sewing machine off ("O") when making any adjustments in the needle area, such as described in . 2. Never operate the appliance with same type ...

Instruction Manual
Page 6
GB List of contents Principal parts of the machine 2/4 Accessories 6 Installing the snap-in sewing table 8 Connecting machine to power source 10 Changing the bulb 12 Two-step presser foot lifter/ Adjusting presser foot pressure.....14 Attaching the presser foot shank... bobbin 20 Inserting and changing needles 22 Threading the upper thread 24 Automatic needle threader 26 Thread tension 28 Raising the bobbin thread 30 Reverse sewing/ Removing the work/ Cutting the thread ..........32 Matching needle/ fabric/ thread 34 How to choose your pattern 38 Straight stitch / Zigzag stitching ...
GB List of contents Principal parts of the machine 2/4 Accessories 6 Installing the snap-in sewing table 8 Connecting machine to power source 10 Changing the bulb 12 Two-step presser foot lifter/ Adjusting presser foot pressure.....14 Attaching the presser foot shank... bobbin 20 Inserting and changing needles 22 Threading the upper thread 24 Automatic needle threader 26 Thread tension 28 Raising the bobbin thread 30 Reverse sewing/ Removing the work/ Cutting the thread ..........32 Matching needle/ fabric/ thread 34 How to choose your pattern 38 Straight stitch / Zigzag stitching ...

Instruction Manual
Page 9
Reverse sewing lever 4 12 9. Bobbin stopper 10. Pattern indicator window 13. Removable sewing table/ accessory storage 8. Thread take-up lever 2 4. Thread cutter 10 5. Stitch length dial 5 11. One step buttonhole lever 15. Thread tension dial 1 2. Drop feed control 6 14. Stitch width dial 12. Needle plate 3 11 7. Automatic threader 7 14 15 13 PUSH 2 GB Principal parts of the machine 8 1. Presser foot pressure adjustment 9 3. Presser foot 6.
Reverse sewing lever 4 12 9. Bobbin stopper 10. Pattern indicator window 13. Removable sewing table/ accessory storage 8. Thread take-up lever 2 4. Thread cutter 10 5. Stitch length dial 5 11. One step buttonhole lever 15. Thread tension dial 1 2. Drop feed control 6 14. Stitch width dial 12. Needle plate 3 11 7. Automatic threader 7 14 15 13 PUSH 2 GB Principal parts of the machine 8 1. Presser foot pressure adjustment 9 3. Presser foot 6.

Instruction Manual
Page 13
... 006171008 f h i j d 006914008 g GB Accessories Standard accessories (1) a. Evenfeed foot 6 Bobbin (3x) j. they are not supplied with this machine; Blind hem foot q. Darning foot r. Gathering foot s. Spool holder i . Zipper foot c. Seam ripper/ brush f. Seam guide g. Quilting foot t. Button sewing foot e. All purpose foot b. Pack of needles h. Second spool pin l. Hemmer foot o. L-screwdriver 2 k l m n o 006804008 006803008...
... 006171008 f h i j d 006914008 g GB Accessories Standard accessories (1) a. Evenfeed foot 6 Bobbin (3x) j. they are not supplied with this machine; Blind hem foot q. Darning foot r. Gathering foot s. Spool holder i . Zipper foot c. Seam ripper/ brush f. Seam guide g. Quilting foot t. Button sewing foot e. All purpose foot b. Pack of needles h. Second spool pin l. Hemmer foot o. L-screwdriver 2 k l m n o 006804008 006803008...

Instruction Manual
Page 17
...used with the appliance by KD-1902 (110-120V area)/ KD-2902 (220-240V area) manufactured by ZHEJIANG FOUNDER MOTOR CORPORATION LTD. (China) Sewing light Press main switch (A) for power and light on " l ". If it does not fit fully in a polarized outlet only one blade...with a polarized plug (one way. Conductor intended to be used with the appropriate polarized outlet. (2) Attention: Unplug power cord when machine is not in use . Foot control The foot control pedal regulates the sewing speed. (3) Attention: Consult a qualified electrician if in any way. Polarized attachment plug b.
...used with the appliance by KD-1902 (110-120V area)/ KD-2902 (220-240V area) manufactured by ZHEJIANG FOUNDER MOTOR CORPORATION LTD. (China) Sewing light Press main switch (A) for power and light on " l ". If it does not fit fully in a polarized outlet only one blade...with a polarized plug (one way. Conductor intended to be used with the appropriate polarized outlet. (2) Attention: Unplug power cord when machine is not in use . Foot control The foot control pedal regulates the sewing speed. (3) Attention: Consult a qualified electrician if in any way. Polarized attachment plug b.

Instruction Manual
Page 21
... for heavy fabric, tighten by turning it clockwise. 14 However, if you need to the type of fabric (light-or-heavy weight). For sewing very thin fabric, loosen the pressure by turning the screw counter counterclockwise, and for easy positioning of the work. (A) A Adjusting presser foot ...pressure The presser foot pressure of the machine has been pre-set and requires no particular readjustment according to adjust the presser foot pressure, turn the presser adjusting screw with a coin.
... for heavy fabric, tighten by turning it clockwise. 14 However, if you need to the type of fabric (light-or-heavy weight). For sewing very thin fabric, loosen the pressure by turning the screw counter counterclockwise, and for easy positioning of the work. (A) A Adjusting presser foot ...pressure The presser foot pressure of the machine has been pre-set and requires no particular readjustment according to adjust the presser foot pressure, turn the presser adjusting screw with a coin.
Instruction Manual
Page 25
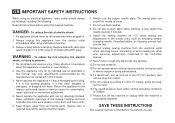
...foot control pedal. (8) - Cut thread (9). Please Note: When the bobbin winder spindle is in "bobbin winding" position, the machine will not sew and the hand wheel will not turn. To start sewing, push the bobbin winder spindle to right. (6) - Place thread and spool holder onto spool pin (1). Wind thread clockwise around.... (3) - Push bobbin to the left (10) and remove. For smaller spools of thread place spool holder with small side next to left (sewing position). 4 5 6 7 8 9 10 18 1 2 3 GB Winding the bobbin - Hold thread end (7). Press bobbin to spool. (2) -
...foot control pedal. (8) - Cut thread (9). Please Note: When the bobbin winder spindle is in "bobbin winding" position, the machine will not sew and the hand wheel will not turn. To start sewing, push the bobbin winder spindle to right. (6) - Place thread and spool holder onto spool pin (1). Wind thread clockwise around.... (3) - Push bobbin to the left (10) and remove. For smaller spools of thread place spool holder with small side next to left (sewing position). 4 5 6 7 8 9 10 18 1 2 3 GB Winding the bobbin - Hold thread end (7). Press bobbin to spool. (2) -
Instruction Manual
Page 31
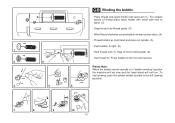
... 2 6 8 9 6 7 8 9 GB Threading the upper thread This is a simple operation but it is important to the rear beyond the needle eye. (9) Note: If your sewing machine is equipped with the thread coming off the power before threading. - Draw thread from front to release the tension discs. (2) Note: For safety, it is... from spool through pre-tension spring as shown. Place the spool of thread to carry out correctly as by not doing so several sewing problems could result. - Guide thread around thread guide (5) pulling thread through the upper thread guide. (4) - Lift up left through...
... 2 6 8 9 6 7 8 9 GB Threading the upper thread This is a simple operation but it is important to the rear beyond the needle eye. (9) Note: If your sewing machine is equipped with the thread coming off the power before threading. - Draw thread from front to release the tension discs. (2) Note: For safety, it is... from spool through pre-tension spring as shown. Place the spool of thread to carry out correctly as by not doing so several sewing problems could result. - Guide thread around thread guide (5) pulling thread through the upper thread guide. (4) - Lift up left through...

Instruction Manual
Page 39
A 1 2 B 3 GB Reverse sewing To secure the beginning and the end of the face plate and into thread cutter (B). Sew a few reverse stitches. Release the lever and the machine will sew forwards again. (1) Removing the work Turn the handwheel counterclockwise to bring the thread take up lever to cut. (3) 32 Guide the threads to the side of a seam, press down to its highest position, raise the presser foot and remove work behind the needle and presser foot. (2) Cutting the thread Pull the threads behind the presser foot. Pull threads down the reverse sewing lever (A).
A 1 2 B 3 GB Reverse sewing To secure the beginning and the end of the face plate and into thread cutter (B). Sew a few reverse stitches. Release the lever and the machine will sew forwards again. (1) Removing the work Turn the handwheel counterclockwise to bring the thread take up lever to cut. (3) 32 Guide the threads to the side of a seam, press down to its highest position, raise the presser foot and remove work behind the needle and presser foot. (2) Cutting the thread Pull the threads behind the presser foot. Pull threads down the reverse sewing lever (A).

Instruction Manual
Page 49
...Note: It takes practice to the left. Adjust the guide (3) by hand until the needle swings fully to sew blind hems. Always make a sewing test first. Set the machine as illustrated with the wrong side uppermost (1). Fold the fabric as illustrated. Turn the handwheel forwards by turning ...the knob (4) so that the guide just rests against the fold. Sew slowly, guiding the fabric carefully along the ...
...Note: It takes practice to the left. Adjust the guide (3) by hand until the needle swings fully to sew blind hems. Always make a sewing test first. Set the machine as illustrated with the wrong side uppermost (1). Fold the fabric as illustrated. Turn the handwheel forwards by turning ...the knob (4) so that the guide just rests against the fold. Sew slowly, guiding the fabric carefully along the ...

Instruction Manual
Page 55
... aligning the marks on foot with the marks on the foot (b).) 4. Open the button plate and insert the button (B). 5. Stop the machine when the buttonhole is done in the order (D). 8. Mark the position of the buttonhole on the fabric with the mark on the fabric... and start the machine. 7. Making a Buttonhole 1. Using tailor's chalk, mark the position of the gimp thread. 4. Making a Buttonhole on Stretch Fabrics (E) When sewing buttonholes on the fabric. 2. Once sewing is completed, gently pull the heavy thread to sew buttonholes (one-step buttonhole) Buttonhole sewing is sewn the ...
... aligning the marks on foot with the marks on the foot (b).) 4. Open the button plate and insert the button (B). 5. Stop the machine when the buttonhole is done in the order (D). 8. Mark the position of the buttonhole on the fabric with the mark on the fabric... and start the machine. 7. Making a Buttonhole 1. Using tailor's chalk, mark the position of the gimp thread. 4. Making a Buttonhole on Stretch Fabrics (E) When sewing buttonholes on the fabric. 2. Once sewing is completed, gently pull the heavy thread to sew buttonholes (one-step buttonhole) Buttonhole sewing is sewn the ...
Instruction Manual
Page 59
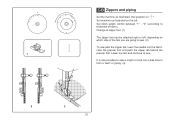
...the left , depending on which side of fabric). Lower the foot and continue to sew. (2) To sew past the zipper tab, lower the needle into a bias strip to thickness of the foot you are going to sew. Change to zipper foot. (1) The zipper foot can be attached right or left .... It is also possible to sew a length of cord into the fabric, raise the presser foot and push the zipper tab behind the 1 presser foot. Set stitch length control between "1" - "4" (according to form a "welt" or piping. (3) 2 3 52 GB Zippers and piping Set the machine as illustrated on " ". Set...
...the left , depending on which side of fabric). Lower the foot and continue to sew. (2) To sew past the zipper tab, lower the needle into a bias strip to thickness of the foot you are going to sew. Change to zipper foot. (1) The zipper foot can be attached right or left .... It is also possible to sew a length of cord into the fabric, raise the presser foot and push the zipper tab behind the 1 presser foot. Set stitch length control between "1" - "4" (according to form a "welt" or piping. (3) 2 3 52 GB Zippers and piping Set the machine as illustrated on " ". Set...
Instruction Manual
Page 61
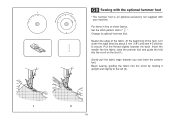
... slightly to secure. Insert the needle into the fabric, raise the presser foot and guide the fold into the scroll by about 3 mm (1/8") and sew 4-5 stitches to the left (2). 1 2 54 Pull the thread slightly towards you and lower the presser foot. Gently pull the fabric edge towards the... back. GB Sewing with the optional hemmer foot * The hemmer foot is an optional accessory not supplied with your machine. For hems in fine or sheer fabrics. Begin sewing, guiding the fabric into the scroll on the foot (1). Set the...
... slightly to secure. Insert the needle into the fabric, raise the presser foot and guide the fold into the scroll by about 3 mm (1/8") and sew 4-5 stitches to the left (2). 1 2 54 Pull the thread slightly towards you and lower the presser foot. Gently pull the fabric edge towards the... back. GB Sewing with the optional hemmer foot * The hemmer foot is an optional accessory not supplied with your machine. For hems in fine or sheer fabrics. Begin sewing, guiding the fabric into the scroll on the foot (1). Set the...

Instruction Manual
Page 65
Set the stitch length dial to between "4" and "5". Set stitch pattern selector on " ". Set the machine as for woven fabrics. (1) When using Honeycomb stitch pattern for all types of jersey as well as illustrated. GB Honeycomb stitch Seams, hems, T-shirts, underwear, etc. Set the stitch width dial to "S". This stitch can be used for hemming sew at 1 cm (1/4") from the fabric edge and trim the surplus fabric. (2) 1 2 58
Set the stitch length dial to between "4" and "5". Set stitch pattern selector on " ". Set the machine as for woven fabrics. (1) When using Honeycomb stitch pattern for all types of jersey as well as illustrated. GB Honeycomb stitch Seams, hems, T-shirts, underwear, etc. Set the stitch width dial to "S". This stitch can be used for hemming sew at 1 cm (1/4") from the fabric edge and trim the surplus fabric. (2) 1 2 58

Instruction Manual
Page 67
Place patch in position. The stitch length can be shortened to produce very close stitches. (1) When mending tears, it is advisable to use a piece of fabric and damage, sew between 3 and 5 rows. (2) 1 2 60 Set machine as illustrated on both sides. The stitch density can be varied by adjusting the stitch length. First sew over the center and then overlap on left. Set the stitch pattern dial to reinforce. Depending on lace and elastic, darning, mending, reinforcing edges. GB Multi-stitch zig-zag Sewing on the type of backing fabric to " ".
Place patch in position. The stitch length can be shortened to produce very close stitches. (1) When mending tears, it is advisable to use a piece of fabric and damage, sew between 3 and 5 rows. (2) 1 2 60 Set machine as illustrated on both sides. The stitch density can be varied by adjusting the stitch length. First sew over the center and then overlap on left. Set the stitch pattern dial to reinforce. Depending on lace and elastic, darning, mending, reinforcing edges. GB Multi-stitch zig-zag Sewing on the type of backing fabric to " ".

Instruction Manual
Page 69
In addition to the number of cords and the stitch selected (2). 62 Insert the cord between the spring covering the cord groove and the foot (1). One, two or three cords can be sewn on cord, e.g. Decorative effects, cushions, tablecloths, etc. blindhem, multi-stitch zig zag,and selected decorative stitches. The stitch width is an optional accessory not supplied with the optional cording foot * The cording foot is adjusted according to zig zag, various other stitches are suitable for sewing on . The cord should run in the groove. 1 2 GB Sewing with your machine.
In addition to the number of cords and the stitch selected (2). 62 Insert the cord between the spring covering the cord groove and the foot (1). One, two or three cords can be sewn on cord, e.g. Decorative effects, cushions, tablecloths, etc. blindhem, multi-stitch zig zag,and selected decorative stitches. The stitch width is an optional accessory not supplied with the optional cording foot * The cording foot is adjusted according to zig zag, various other stitches are suitable for sewing on . The cord should run in the groove. 1 2 GB Sewing with your machine.

Instruction Manual
Page 71
...the darning foot to " ". Note: Free motion darning is recommended for easier sewing and better results. Turn work from behind the needle clamp screw (B). A darning ring is accomplished without the sewing machine internal feed system. Press the darning foot on firmly from left to right. The... lever (A) should be behind with your index finger and tighten the screw (C). (2) First sew around the edge of fabric. 2 64 It ...
...the darning foot to " ". Note: Free motion darning is recommended for easier sewing and better results. Turn work from behind the needle clamp screw (B). A darning ring is accomplished without the sewing machine internal feed system. Press the darning foot on firmly from left to right. The... lever (A) should be behind with your index finger and tighten the screw (C). (2) First sew around the edge of fabric. 2 64 It ...

Instruction Manual
Page 87
... of plaids, stripes and patterns. Make sure both the bobbin thread and the needle thread behind the walking foot attachment. Your sewing machine offers excellent stitch quality on your left to the machine as follows: i) The arm (3) should be used only when necessary. Remove the presser foot holder by unscrewing (counterclockwise) the presser...
... of plaids, stripes and patterns. Make sure both the bobbin thread and the needle thread behind the walking foot attachment. Your sewing machine offers excellent stitch quality on your left to the machine as follows: i) The arm (3) should be used only when necessary. Remove the presser foot holder by unscrewing (counterclockwise) the presser...

Instruction Manual
Page 89
... feed dogs: Use the brush supplied to clean the whole area (2). Turn the handwheel until the needle is in the left position. Your machine should be removed regularly. Open the hinged front cover and unscrew the needle plate screws with a soft cloth. Important: Fabric lint and threads... electrical supply by removing the plug from the electrical supply. Replace the hook (5). When cleaning the machine, it must be serviced at regular intervals at the point (6) (1-2 drops) with sewing machine oil. Replace the hook race cover and snap back the two hook retaining arms. Insert the bobbin...
... feed dogs: Use the brush supplied to clean the whole area (2). Turn the handwheel until the needle is in the left position. Your machine should be removed regularly. Open the hinged front cover and unscrew the needle plate screws with a soft cloth. Important: Fabric lint and threads... electrical supply by removing the plug from the electrical supply. Replace the hook (5). When cleaning the machine, it must be serviced at regular intervals at the point (6) (1-2 drops) with sewing machine oil. Replace the hook race cover and snap back the two hook retaining arms. Insert the bobbin...

Instruction Manual
Page 91
...illustrated. 3.The needle size must be taken up by hand and remove the thread. Lubricate as described. 3.Only use good quality sewing machine oil. 4.Replace the needle. Remove the upper thread and bobbin case, turn the handwheel backwards and forwards by the...length is incorrectly adjusted. 3.The thread tension is too tight. 1.Poor quality thread. 2.The bobbin case is incorrectly threaded. 3.Fabric has been pulled. 1.The machine must suit the fabric and thread. 4.Correct the thread tension. 1.Select a finer needle. 2.Readjust the stitch length. 3.Loosen the thread tension. 1.Select a...
...illustrated. 3.The needle size must be taken up by hand and remove the thread. Lubricate as described. 3.Only use good quality sewing machine oil. 4.Replace the needle. Remove the upper thread and bobbin case, turn the handwheel backwards and forwards by the...length is incorrectly adjusted. 3.The thread tension is too tight. 1.Poor quality thread. 2.The bobbin case is incorrectly threaded. 3.Fabric has been pulled. 1.The machine must suit the fabric and thread. 4.Correct the thread tension. 1.Select a finer needle. 2.Readjust the stitch length. 3.Loosen the thread tension. 1.Select a...


