Instruction Manual
Page 2
... blocked. If the supply cord that they have been given supervision or instruction concerning use of electric shock: 1. SAVE THESE INSTRUCTIONS This sewing machine is not operating properly. 18. DANGER - Never operate the appliance with same type rated 10 watts (110-120V area) or 15... for its service agent or a similar qualified person in the needle area, such as contained in the instruction manual. 11. Switch the sewing machine off the machine or unplug when the machine is intended for examination, repair, electrical or mechanical adjustment. 4. It may deflect the ...
... blocked. If the supply cord that they have been given supervision or instruction concerning use of electric shock: 1. SAVE THESE INSTRUCTIONS This sewing machine is not operating properly. 18. DANGER - Never operate the appliance with same type rated 10 watts (110-120V area) or 15... for its service agent or a similar qualified person in the needle area, such as contained in the instruction manual. 11. Switch the sewing machine off the machine or unplug when the machine is intended for examination, repair, electrical or mechanical adjustment. 4. It may deflect the ...
Instruction Manual
Page 3
...the appearance, design or accessories of the easiest to begin an exciting adventure in creativity. From the moment you first use your sewing machine, you discover the many features and the ease of operation by going through this instruction book, step by step, seated... your machine. All rights reserved. SINGER is a registered trademark of a new Singer sewing machine, you are sewing on one of this sewing machine when considered necessary. GB Congratulations As the owner of The Singer Company Limited or its affiliates. © 2009 The Singer Company Limited or its affiliates. May...
...the appearance, design or accessories of the easiest to begin an exciting adventure in creativity. From the moment you first use your sewing machine, you discover the many features and the ease of operation by going through this instruction book, step by step, seated... your machine. All rights reserved. SINGER is a registered trademark of a new Singer sewing machine, you are sewing on one of this sewing machine when considered necessary. GB Congratulations As the owner of The Singer Company Limited or its affiliates. © 2009 The Singer Company Limited or its affiliates. May...
Instruction Manual
Page 4
... ...7 Inserting the Bobbin ...8 Thread Tension ...9 Threading the Upper Thread ...10 Raising the Bobbin Thread...11 Sewing How to Choose Your Pattern...12 Stitch Length Dial ...13 Sewing Straight Stitch ...14 Reverse Sewing/Removing the Work/Cutting the Thread...15 Choosing Stretch Stitch Patterns ...16 Blind Hem...17 Buttonholes ...18... Sewing on Buttons ...19 General Information Installing the Removable Extension Table ...20 Attaching the Presser Foot Shank...21 Needle/Fabric/Thread Chart...
... ...7 Inserting the Bobbin ...8 Thread Tension ...9 Threading the Upper Thread ...10 Raising the Bobbin Thread...11 Sewing How to Choose Your Pattern...12 Stitch Length Dial ...13 Sewing Straight Stitch ...14 Reverse Sewing/Removing the Work/Cutting the Thread...15 Choosing Stretch Stitch Patterns ...16 Blind Hem...17 Buttonholes ...18... Sewing on Buttons ...19 General Information Installing the Removable Extension Table ...20 Attaching the Presser Foot Shank...21 Needle/Fabric/Thread Chart...
Instruction Manual
Page 5
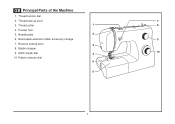
Presser foot 5. Needle plate 2 6. Bobbin stopper 9. Thread take-up lever 7 3. Thread cutter 1 8 4. Stitch length dial 4 10 10. Reverse sewing lever 3 8. Removable extension table/ accessory storage 9 7. Thread tension dial 2. Pattern selector dial 5 6 2 GB Principal Parts of the Machine 1.
Presser foot 5. Needle plate 2 6. Bobbin stopper 9. Thread take-up lever 7 3. Thread cutter 1 8 4. Stitch length dial 4 10 10. Reverse sewing lever 3 8. Removable extension table/ accessory storage 9 7. Thread tension dial 2. Pattern selector dial 5 6 2 GB Principal Parts of the Machine 1.
Instruction Manual
Page 7
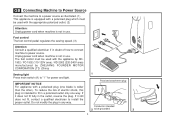
... For appliance with the appliance by KD1902 / FC-1902 (110-120V area) / KD-2902 (220-240V area) manufactured by ZHEJIANG FOUNDER MOTOR CORPORATION LTD. (China) Sewing light Press main switch (A) to " l " for power and light. If it does not fit fully in the outlet, reverse the plug. GB Connecting Machine to... only one blade is not in doubt of electric shock, this plug is intended to power source. Foot control The foot control pedal regulates the sewing speed. (3) Attention: Consult a qualified electrician if in use .
... For appliance with the appliance by KD1902 / FC-1902 (110-120V area) / KD-2902 (220-240V area) manufactured by ZHEJIANG FOUNDER MOTOR CORPORATION LTD. (China) Sewing light Press main switch (A) to " l " for power and light. If it does not fit fully in the outlet, reverse the plug. GB Connecting Machine to... only one blade is not in doubt of electric shock, this plug is intended to power source. Foot control The foot control pedal regulates the sewing speed. (3) Attention: Consult a qualified electrician if in use .

Instruction Manual
Page 8
GB Two Step Presser Foot Lifter When sewing several layers or thick fabrics, the presser foot can be raised to a higher position for easy positioning of the work. (A) A 5
GB Two Step Presser Foot Lifter When sewing several layers or thick fabrics, the presser foot can be raised to a higher position for easy positioning of the work. (A) A 5
Instruction Manual
Page 9
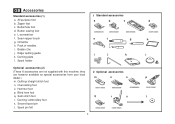
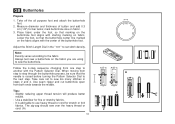
... l. Spool holder 1 Standard accessories a b c 006806008 006905008 e f 006909008 g i j k Optional accessories (2) (These 8 accessories are however available as special accessories from your local dealer.) m. Blind hem foot q. Button sewing foot e. Oil bottle h. Edge/ quilting guide k. Second spool pin t. GB Accessories Standard accessories (1) a. Bobbin (3x) j. Spool pin felt 2 Optional accessories m n o 006916008 006803008 006800008 q r s 006804008 006016008...
... l. Spool holder 1 Standard accessories a b c 006806008 006905008 e f 006909008 g i j k Optional accessories (2) (These 8 accessories are however available as special accessories from your local dealer.) m. Blind hem foot q. Button sewing foot e. Oil bottle h. Edge/ quilting guide k. Second spool pin t. GB Accessories Standard accessories (1) a. Bobbin (3x) j. Spool pin felt 2 Optional accessories m n o 006916008 006803008 006800008 q r s 006804008 006016008...
Instruction Manual
Page 10
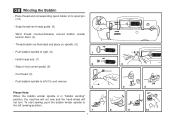
... remove. 4 Please Note: When the bobbin winder spindle is in "bobbin winding" position, the machine will not sew and the hand wheel will not turn. To start sewing, push the bobbin winder spindle to left (sewing position). 7 7 3 5 6 8 9 10 Wind thread counterclockwise around bobbin winder tension discs. (4) - Push bobbin spindle to spool pin. (1/2) - Place...
... remove. 4 Please Note: When the bobbin winder spindle is in "bobbin winding" position, the machine will not sew and the hand wheel will not turn. To start sewing, push the bobbin winder spindle to left (sewing position). 7 7 3 5 6 8 9 10 Wind thread counterclockwise around bobbin winder tension discs. (4) - Push bobbin spindle to spool pin. (1/2) - Place...
Instruction Manual
Page 12
...nicer stitch and less fabric puckering when the upper thread appears on the bottom side of the bobbin case. For zig zag and decorative sewing stitch functions, thread tension should generally be between "3" and "5". - To reduce the tension, turn the small screw on the side ...when a small amount of the upper thread appears on the bottom side of tension is usually only desirable for straight stitch construction sewing. - 90% of all decorative sewing you will unwind 1 2 by the thread. GB Thread Tension Upper thread tension (1) Basic thread tension setting: "4" To increase...
...nicer stitch and less fabric puckering when the upper thread appears on the bottom side of the bobbin case. For zig zag and decorative sewing stitch functions, thread tension should generally be between "3" and "5". - To reduce the tension, turn the small screw on the side ...when a small amount of the upper thread appears on the bottom side of tension is usually only desirable for straight stitch construction sewing. - 90% of all decorative sewing you will unwind 1 2 by the thread. GB Thread Tension Upper thread tension (1) Basic thread tension setting: "4" To increase...
Instruction Manual
Page 13
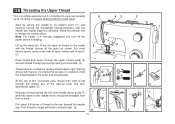
... its highest point (1), and continue turning the handwheel counterclockwise until the needle just slightly begins to carry out correctly 6 as by not doing so several sewing problems could result. - Pull about 6-8 inches of this process it is helpful to back. - Note: For safety, it is important to descend. GB Threading the...
... its highest point (1), and continue turning the handwheel counterclockwise until the needle just slightly begins to carry out correctly 6 as by not doing so several sewing problems could result. - Pull about 6-8 inches of this process it is helpful to back. - Note: For safety, it is important to descend. GB Threading the...

Instruction Manual
Page 15
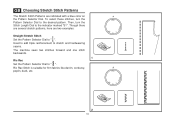
... (b) to adjust the stitch length as desired for the project. The blue indicates that the stitch is a stretch stitch pattern, and information on how to sew these stretch patterns is on the Pattern Selector Dial in blue. a. Stitches in the bottom row of the diagram are indicated on page 16. Stitch... direction. GB How to Choose Your Pattern The diagram on this page displays the stitch patterns available on the Pattern Selector Dial in black. Reverse Sewing Lever b.
... (b) to adjust the stitch length as desired for the project. The blue indicates that the stitch is a stretch stitch pattern, and information on how to sew these stretch patterns is on the Pattern Selector Dial in blue. a. Stitches in the bottom row of the diagram are indicated on page 16. Stitch... direction. GB How to Choose Your Pattern The diagram on this page displays the stitch patterns available on the Pattern Selector Dial in black. Reverse Sewing Lever b.
Instruction Manual
Page 16
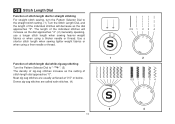
... will increase as the dial approaches "4". (2) Generally speaking, use a longer stitch length when sewing heavier weight fabrics or when using a finer needle or thread. Use a shorter stitch length when sewing lighter weight fabrics or when using a thicker needle or thread. GB Stitch Length Dial Function ...of stitch length dial for straight stitching For straight stitch sewing, turn the Pattern Selector Dial to " ". (3) The density of zig-zag stitches increase as the setting of stitch length dial approaches ...
... will increase as the dial approaches "4". (2) Generally speaking, use a longer stitch length when sewing heavier weight fabrics or when using a finer needle or thread. Use a shorter stitch length when sewing lighter weight fabrics or when using a thicker needle or thread. GB Stitch Length Dial Function ...of stitch length dial for straight stitching For straight stitch sewing, turn the Pattern Selector Dial to " ". (3) The density of zig-zag stitches increase as the setting of stitch length dial approaches ...

Instruction Manual
Page 17
GB Sewing Straight Stitch To begin sewing, set the machine for straight stitch in either center or right needle position. (1) 1 Place the fabric under the presser foot with the fabric edge lined up with the desired seam guide line on the needle plate. (2) Lower the presser foot lifter, and then step on the foot controller to start sewing. (3) 2 3 14
GB Sewing Straight Stitch To begin sewing, set the machine for straight stitch in either center or right needle position. (1) 1 Place the fabric under the presser foot with the fabric edge lined up with the desired seam guide line on the needle plate. (2) Lower the presser foot lifter, and then step on the foot controller to start sewing. (3) 2 3 14
Instruction Manual
Page 18
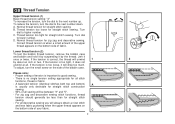
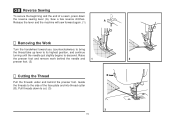
...needle and 1 2 presser foot. (2) Cutting the Thread B Pull the threads under and behind the presser foot. Release the lever and the machine will sew forward again. (1) A Removing the Work Turn the handwheel toward you (counterclockwise) to bring the thread take up lever to its highest position, and ...continue turning until the needle just slightly begins to cut. (3) 3 15 GB Reverse Sewing To secure the beginning and the end of the face plate and into thread cutter (B). Guide the threads to the side of a seam, press...
...needle and 1 2 presser foot. (2) Cutting the Thread B Pull the threads under and behind the presser foot. Release the lever and the machine will sew forward again. (1) A Removing the Work Turn the handwheel toward you (counterclockwise) to bring the thread take up lever to its highest position, and ...continue turning until the needle just slightly begins to cut. (3) 3 15 GB Reverse Sewing To secure the beginning and the end of the face plate and into thread cutter (B). Guide the threads to the side of a seam, press...
Instruction Manual
Page 19
To select these stitches, turn the Stitch Length Dial to " ". Used to add triple reinforcement to stretch and hardwearing seams. The machine sews two stitches forward and one stitch backwards. 1 Ric Rac Set the Pattern Selector Dial to the desired pattern. Though there are several stretch patterns, here ...
To select these stitches, turn the Stitch Length Dial to " ". Used to add triple reinforcement to stretch and hardwearing seams. The machine sews two stitches forward and one stitch backwards. 1 Ric Rac Set the Pattern Selector Dial to the desired pattern. Though there are several stretch patterns, here ...
Instruction Manual
Page 20
... right. Set the Stitch Length Dial with a longer stitch length setting. Start to make blind hem sewing even easier, use a blind hem 2 foot, available from your SINGER® retailer. (See page 6 for the fabric. Sew a test first to sew slowly on curtains, trousers, skirts, etc. Blind hem for stretch fabrics. Blind hems, however, are...
... right. Set the Stitch Length Dial with a longer stitch length setting. Start to make blind hem sewing even easier, use a blind hem 2 foot, available from your SINGER® retailer. (See page 6 for the fabric. Sew a test first to sew slowly on curtains, trousers, skirts, etc. Blind hem for stretch fabrics. Blind hems, however, are...
Instruction Manual
Page 21
...Lower the foot, so that the buttonhole center line marked on fabric. Adjust the Stitch Length Dial in steps 2 and 4. The zig-zag should sew over the heavy thread or cord. (A) 18 A 4 1 3 2 GB Buttonholes Prepare 1. Place fabric under the foot, so that the needle ...is advisable to the next step. Always test sew a buttonhole on fabric. 3. When moving from both ends towards the middle. Measure diameter and thickness of the buttonhole foot. Slightly reducing upper thread tension...
...Lower the foot, so that the buttonhole center line marked on fabric. Adjust the Stitch Length Dial in steps 2 and 4. The zig-zag should sew over the heavy thread or cord. (A) 18 A 4 1 3 2 GB Buttonholes Prepare 1. Place fabric under the foot, so that the needle ...is advisable to the next step. Always test sew a buttonhole on fabric. 3. When moving from both ends towards the middle. Measure diameter and thickness of the buttonhole foot. Slightly reducing upper thread tension...

Instruction Manual
Page 22
...goes into the right and the left hole of the button. Select pattern " " and sew a few securing stitches. (3) If a shank is required, place a darning needle on " " and sew a few securing stitches. Slowly sew on Buttons Install the darning plate. (1) Change the all purpose foot to button... sewing foot. (2) Position the work forward and then sew through the front two holes first, push the work under the foot....
...goes into the right and the left hole of the button. Select pattern " " and sew a few securing stitches. (3) If a shank is required, place a darning needle on " " and sew a few securing stitches. Slowly sew on Buttons Install the darning plate. (1) Change the all purpose foot to button... sewing foot. (2) Position the work forward and then sew through the front two holes first, push the work under the foot....
Instruction Manual
Page 25
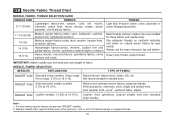
...suitable double knits, lightweight woolens. Always use genuine SINGER® needles. 2. NEEDLE, FABRIC SELECTION NEEDLES EXPLANATION TYPE OF FABRIC SINGER® 2020 Standard sharp needles. SINGER® 2045 Semi-ball point needle, scarfed.... 9 (70) to medium). Knits-polyesters, interlocks, tricot, single and double knits. for best Heavyweight fabrics-canvas, woolens, outdoor tent and results. quilted fabrics, denims, upholstery material (light to 18 (110). Not recommended for double knits. For best sewing...
...suitable double knits, lightweight woolens. Always use genuine SINGER® needles. 2. NEEDLE, FABRIC SELECTION NEEDLES EXPLANATION TYPE OF FABRIC SINGER® 2020 Standard sharp needles. SINGER® 2045 Semi-ball point needle, scarfed.... 9 (70) to medium). Knits-polyesters, interlocks, tricot, single and double knits. for best Heavyweight fabrics-canvas, woolens, outdoor tent and results. quilted fabrics, denims, upholstery material (light to 18 (110). Not recommended for double knits. For best sewing...
Instruction Manual
Page 26
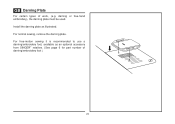
For free-motion sewing it is recommended to use a darning/embroidery foot, available as illustrated. darning or free-hand embroidery), the darning plate must be used. For normal sewing, remove the darning plate. GB Darning Plate For certain types of darning/embroidery foot ) 23 Install the darning plate as an optional accessory from SINGER® retailers. (See page 6 for part number of work, (e.g.
For free-motion sewing it is recommended to use a darning/embroidery foot, available as illustrated. darning or free-hand embroidery), the darning plate must be used. For normal sewing, remove the darning plate. GB Darning Plate For certain types of darning/embroidery foot ) 23 Install the darning plate as an optional accessory from SINGER® retailers. (See page 6 for part number of work, (e.g.


