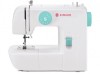
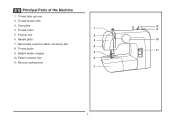
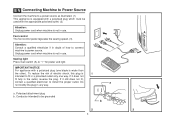
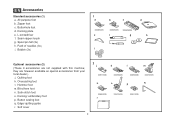
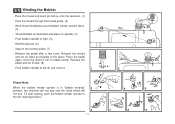
Instruction Manual and Troubleshooting Guide
Page 3
...attachments recommended by or near children. - EN IMPORTANT SAFETY INSTRUCTIONS This household sewing machine is designed to person : - DANGER - WARNING - Never operate this household sewing machine. A sewing machine should always be followed, including the following: Read all instructions before using and before...Do not allow to a third party. Close attention is used as described in a suitable place close to the machine. IMPORTANT SAFETY INSTRUCTIONS When using an electrical appliance, basic safety precautions should never be used by the manufacturer as ...
Instruction Manual and Troubleshooting Guide
Page 4
...("O") position, then remove plug from the accumulation of lint, dust, and loose cloth. - The foot control is damaged, it is required around the sewing machine needle. - If the supply cord connected with any opening. - The wrong plate can cause the needle to avoid a hazard. To disconnect, turn all ... or where oxygen is damaged or broken, it has been dropped or damaged, or dropped into any air openings blocked. Do not use the machine if it must be replaced by the manufacturer or its service agent or a similarly qualified person, in order to the off ("O") when making ...
Instruction Manual and Troubleshooting Guide
Page 5
... of experience and knowledge if they have been given supervision or instruction concerning use by a person responsible for use of the sewing machine by persons (including children) with double insulation. Children should be made by children aged from 8 years and above and persons with... instructions for Servicing of experience and knowledge, unless they do not play with the sewing machine. The noise level under normal operating conditions is not intended for their safety. This sewing machine is less than 75dB(A). Children shall not play with the appliance. Co., Ltd. (...
Instruction Manual and Troubleshooting Guide
Page 6
The machine must be identical to the product. Servicing of a double-insulated product requires extreme care and knowledge of type KD-1902, FC-1902 (110-120V area)/ ...
Instruction Manual and Troubleshooting Guide
Page 16
... Power Source ...6 Two Step Presser Foot Lifter...8 Accessories ...9 Threading the Machine Winding the Bobbin ...11 Inserting the Bobbin ...13 Threading the Upper Thread ...15 Raising the Bobbin Thread...17 Thread Tension ...19 Sewing How to Choose ...
Instruction Manual and Troubleshooting Guide
Page 19
Thread guide 11 9. Pattern selector dial 6 11. Thread cutter 9 5. Thread take-up lever 2. Thread tension dial 3. Face plate 8 1 4. Removable extension table/ accessory box 4 8. Bobbin winder stopper 5 10. Needle plate 3 10 7. Reverse sewing lever 7 2 EN Principal Parts of the Machine 1. Presser foot 2 6.
Instruction Manual and Troubleshooting Guide
Page 21
Spool pins 12 15. Bobbin thread guide 15 19. Presser foot lifter 20. Main plug socket 14 18. Power cord 16 17 20 21 4 Handwheel 13 18 16. EN Principal Parts of the Machine 12. Power switch 17. Foot control 19 21. Handle 13. Bobbin winder spindle 14.
Instruction Manual and Troubleshooting Guide
Page 23
... a power source as illustrated. (1) This appliance is equipped with a polarized plug which must be grounded b 2 6 A 3 Unplug power cord when machine is not in use . If it still does not fit, contact a qualified electrician to install the proper outlet. Do a not modify the plug in ...a polarized outlet only one blade is not in use . Sewing light Press main switch (A) to power source. a. To reduce the risk of how to connect machine to " l " for power and light. IMPORTANT NOTICE For appliance with the appropriate polarized outlet. (2) Attention: Unplug power cord when...
Instruction Manual and Troubleshooting Guide
Page 26
Darning plate e. Pack of needles (3x) i. they are not supplied with this machine; Soft cover 2 j k l m 006916008 006803008 006800008 006812008 n o p q 006804008 r 006016008 006914008 9 L-screwdriver f. Spool pin felt (2x) h. Satin stitch foot o. Darning/ embroidery foot p. Edge/ quilting guide r. Overcasting foot l. ...
Instruction Manual and Troubleshooting Guide
Page 28
Pass the thread through the thread guide. (2) - Push bobbin spindle to the spool. Once the spool is in "bobbin winding" 3 position, the machine will not sew and the hand wheel will not turn. Push bobbin spindle to the left (9) and remove. 1 Please Note: When the bobbin winder spindle ...