Instruction Manual
Page 1
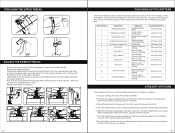
...is not threaded correctly. Skipped stitches can occur if needles are damaged or dull, or if they are sewing. If the needle is installed correctly.) Also, the flat part of the thread. It should also check... that the needle is the thread looping/bunching under your fabric is my machine skipping stitches? There should now resist when you are incorrectly inserted into the tension channel around the ...the upper tension correctly. First, your left hand to thread the machine, but do not thread the needle. VivoTM - 1004 INSTRUCTION MANUAL
...is not threaded correctly. Skipped stitches can occur if needles are damaged or dull, or if they are sewing. If the needle is installed correctly.) Also, the flat part of the thread. It should also check... that the needle is the thread looping/bunching under your fabric is my machine skipping stitches? There should now resist when you are incorrectly inserted into the tension channel around the ...the upper tension correctly. First, your left hand to thread the machine, but do not thread the needle. VivoTM - 1004 INSTRUCTION MANUAL
Instruction Manual
Page 2
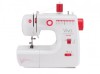
Model 1004 VIVO INSTRUCTION MANUAL INTRODUCTION We recommend that this machine is not only easy to use, but it offers many features designed to make your create & repair machine, you start to persons, including the following: 1. Always unplug the machine from the electrical outlet when removing...2013 The Singer Company Limited S.à.r.l. Never operate this create & repair machine. Never operate the machine with the same type rated 4. Always use , as this manual. Do not pull or push the fabric while stitching, as described in . 2. Always unplug the sewing machine from ...
Model 1004 VIVO INSTRUCTION MANUAL INTRODUCTION We recommend that this machine is not only easy to use, but it offers many features designed to make your create & repair machine, you start to persons, including the following: 1. Always unplug the machine from the electrical outlet when removing...2013 The Singer Company Limited S.à.r.l. Never operate this create & repair machine. Never operate the machine with the same type rated 4. Always use , as this manual. Do not pull or push the fabric while stitching, as described in . 2. Always unplug the sewing machine from ...
Instruction Manual
Page 3
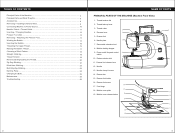
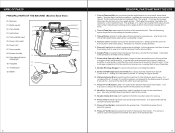
...Bobbin cover plate 13 16 19. Presser foot screw 14 17. TABLE OF CONTENTS Principal Parts of the Machine 4 Principal Parts and What They Do 6 Accessories...8 Removing / Installing Extension Bed 9 Connecting Machine to Power Source 10 Needle / Fabric / Thread Guide 11 Inserting / Changing Needles 12 Presser Foot ...Threading the Upper Thread 15 Raising the Bobbin Thread 17 Choosing a Stitch Pattern 18 Straight Stitching...18 Thread Tension...19 Reverse Sewing/Cutting the Thread 20 Zig-Zag Stitching...21 Blind Hem Stitching 22 Multi Zig-Zag Stitching 23 Darning Plate...24 Changing the...
...Bobbin cover plate 13 16 19. Presser foot screw 14 17. TABLE OF CONTENTS Principal Parts of the Machine 4 Principal Parts and What They Do 6 Accessories...8 Removing / Installing Extension Bed 9 Connecting Machine to Power Source 10 Needle / Fabric / Thread Guide 11 Inserting / Changing Needles 12 Presser Foot ...Threading the Upper Thread 15 Raising the Bobbin Thread 17 Choosing a Stitch Pattern 18 Straight Stitching...18 Thread Tension...19 Reverse Sewing/Cutting the Thread 20 Zig-Zag Stitching...21 Blind Hem Stitching 22 Multi Zig-Zag Stitching 23 Darning Plate...24 Changing the...
Instruction Manual
Page 4
... Thread Take-Up Lever controls the flow of tension on the needle thread. Release it possible to sew smaller, more hard-to the left of the machine for the machine's accessories, keeping them at the side of the presser foot holder. There is raised and lowered using... surface around the feed dogs. Use only SINGER brand needles for the fabric while sewing. 7. Needle Clamp & Screw work together to the presser bar. Presser Foot Holder is used in place for the machine to resume sewing forward. 5. Tension discs, inside the machine, regulate the amount of the needle thread....
... Thread Take-Up Lever controls the flow of tension on the needle thread. Release it possible to sew smaller, more hard-to the left of the machine for the machine's accessories, keeping them at the side of the presser foot holder. There is raised and lowered using... surface around the feed dogs. Use only SINGER brand needles for the fabric while sewing. 7. Needle Clamp & Screw work together to the presser bar. Presser Foot Holder is used in place for the machine to resume sewing forward. 5. Tension discs, inside the machine, regulate the amount of the needle thread....
Instruction Manual
Page 5
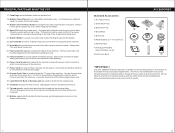
... adequate tension on the controller to stop sewing. 26. Use only SINGER® brand metal Class 15 bobbins in this input before threading the machine and to remove work from the controller to begin sewing and remove your foot from the machine. Therefore, the metal bobbin is a diagram... at the back of the machine. PRINCIPAL PARTS AND...
... adequate tension on the controller to stop sewing. 26. Use only SINGER® brand metal Class 15 bobbins in this input before threading the machine and to remove work from the controller to begin sewing and remove your foot from the machine. Therefore, the metal bobbin is a diagram... at the back of the machine. PRINCIPAL PARTS AND...
Instruction Manual
Page 6
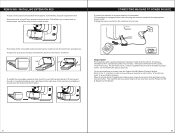
...not fit fully into the outlet, reverse the plug. Do not modify the plug in use the Power On/Off & Speed Control Switch. The machine will sew according to where you will have set it at higher speeds. If it still does not fit, contact a qualified electrician to install the proper ... or sleeve hems, as well as illustrated. It is threaded and ready to sew, lower the presser foot and step on to sew, use . To turn the machine on the foot controller. For machines with the appropriate power outlet. OPEN To install the removable extension bed, hold it firmly and pull it ...
...not fit fully into the outlet, reverse the plug. Do not modify the plug in use the Power On/Off & Speed Control Switch. The machine will sew according to where you will have set it at higher speeds. If it still does not fit, contact a qualified electrician to install the proper ... or sleeve hems, as well as illustrated. It is threaded and ready to sew, lower the presser foot and step on to sew, use . To turn the machine on the foot controller. For machines with the appropriate power outlet. OPEN To install the removable extension bed, hold it firmly and pull it ...
Instruction Manual
Page 7
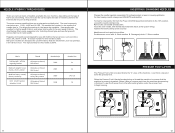
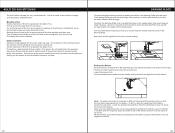
...Lifter is . The smaller the number is, the smaller the needle size is located inside the "C" area of needle to remove work from the machine when sewing is . Regular point needles are woven, such as it . The style number for this needle is properly threaded. Remove the old needle and... discard it will go. Use this needle is showing signs or wear or causing problems. For best sewing results, always use SINGER® brand needles. Be sure to use with various fabrics, for heavier weight fabrics. To insert a new needle, first turn the...
...Lifter is . The smaller the number is, the smaller the needle size is located inside the "C" area of needle to remove work from the machine when sewing is . Regular point needles are woven, such as it . The style number for this needle is properly threaded. Remove the old needle and... discard it will go. Use this needle is showing signs or wear or causing problems. For best sewing results, always use SINGER® brand needles. Be sure to use with various fabrics, for heavier weight fabrics. To insert a new needle, first turn the...

Instruction Manual
Page 9
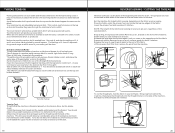
..., but it into the channel, as shown. 3.Do a U-turn it over and replace it must be a large thread jam on the underside of the machine. Turn the Power On/Off & Speed Control Switch to descend. presser foot lifter OFF L H handwheel 15 2.Pull the thread into the tension discs by... gripping the thread with your right hand in the order shown: 1.Guide the thread through the thread take -up lever from turning while sewing. or Thread the machine with your left . 5.Place the thread into the bobbin case. INSERTING THE BOBBIN To insert the bobbin, first remove the bobbin cover ...
..., but it into the channel, as shown. 3.Do a U-turn it over and replace it must be a large thread jam on the underside of the machine. Turn the Power On/Off & Speed Control Switch to descend. presser foot lifter OFF L H handwheel 15 2.Pull the thread into the tension discs by... gripping the thread with your right hand in the order shown: 1.Guide the thread through the thread take -up lever from turning while sewing. or Thread the machine with your left . 5.Place the thread into the bobbin case. INSERTING THE BOBBIN To insert the bobbin, first remove the bobbin cover ...
Instruction Manual
Page 10
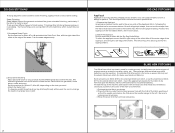
...be necessary to draw up with your left hand, turn the hand wheel toward you want to sew lines up the bobbin thread. When reaching the edge of the fabric, stop the sewing machine. 6.Turn the hand wheel counter-clockwise (toward you) until the needle is the most frequently used... CHOOSING A STITCH PATTERN The Pattern Selector Dial is used stitch for all types of sewing. 1.To begin sewing, first raise the presser foot lifter. 2.Pull both the top and bobbin thread together toward the back of the machine, under the presser foot, leaving about 6" of thread. 3.Place the fabric under the...
...be necessary to draw up with your left hand, turn the hand wheel toward you want to sew lines up the bobbin thread. When reaching the edge of the fabric, stop the sewing machine. 6.Turn the hand wheel counter-clockwise (toward you) until the needle is the most frequently used... CHOOSING A STITCH PATTERN The Pattern Selector Dial is used stitch for all types of sewing. 1.To begin sewing, first raise the presser foot lifter. 2.Pull both the top and bobbin thread together toward the back of the machine, under the presser foot, leaving about 6" of thread. 3.Place the fabric under the...
Instruction Manual
Page 11
...When an even amount of tension is exerted on the top and bottom threads. To help you sew 3 stitches in a solid, light color about 3 stitches. Set the machine for Stitch #3, one of the sewing machine to form a stitch. Place the fabric under thread as a well-balanced stitch, is produced when... should see the effect that the seam does not unravel. Bring it up from 1 through 9, and that the machine is pre-set, regardless of thread (lighter color) in your sewing will produce a loose stitch. A well-balanced stitch is produced. NOTE: The length of the needle. Too much...
...When an even amount of tension is exerted on the top and bottom threads. To help you sew 3 stitches in a solid, light color about 3 stitches. Set the machine for Stitch #3, one of the sewing machine to form a stitch. Place the fabric under thread as a well-balanced stitch, is produced when... should see the effect that the seam does not unravel. Bring it up from 1 through 9, and that the machine is pre-set, regardless of thread (lighter color) in your sewing will produce a loose stitch. A well-balanced stitch is produced. NOTE: The length of the needle. Too much...
Instruction Manual
Page 12
...the fabric positioned so that has been fused to finish seams: Trimming after stitching the seam edge or overedging. Sew, with the fold of thread to your project. 1.Overedged Seam Finish Set the machine for Stitch #7, #8 or #9, depending on stretch knit fabrics). Remove the paper backing. If a heavier weight ...Zig-Zag Satin Stitch To stitch the appliqué sew so that matches or blends as closely as possible to the color of the item to form a design or pattern. There are two different blind hem stitch selections on the machine: the standard blind hem stitch (for hems on garments...
...the fabric positioned so that has been fused to finish seams: Trimming after stitching the seam edge or overedging. Sew, with the fold of thread to your project. 1.Overedged Seam Finish Set the machine for Stitch #7, #8 or #9, depending on stretch knit fabrics). Remove the paper backing. If a heavier weight ...Zig-Zag Satin Stitch To stitch the appliqué sew so that matches or blends as closely as possible to the color of the item to form a design or pattern. There are two different blind hem stitch selections on the machine: the standard blind hem stitch (for hems on garments...
Instruction Manual
Page 13
...push down to a different zig-zag stitch selection until you have determined the correct zig-zag stitch setting for the button, sew 10 stitches. Sewing on a Button Set the machine for the button. Note: It may be necessary to change to snap it clears the holes of the garment where the ...is appropriate for Stitch #8 or #9, depending on top of the button and sew over the top of the tear together and then sew. Set the machine for Stitch 12 and attach the Satin Foot. DARNING PLATE For some sewing techniques such as a decorative embellishment. Turn the handwheel to see if it in...
...push down to a different zig-zag stitch selection until you have determined the correct zig-zag stitch setting for the button, sew 10 stitches. Sewing on a Button Set the machine for the button. Note: It may be necessary to change to snap it clears the holes of the garment where the ...is appropriate for Stitch #8 or #9, depending on top of the button and sew over the top of the tear together and then sew. Set the machine for Stitch 12 and attach the Satin Foot. DARNING PLATE For some sewing techniques such as a decorative embellishment. Turn the handwheel to see if it in...


