
XL-DH259N Operation Manual
Page 1
and other countries. Accessories Please confirm that only the following accessories are included. MODEL XL-DH259N MICRO COMPONENT SYSTEM OPERATION MANUAL ENGLISH XL-DH259N Micro Component System consisting of Apple Inc., registered in Malaysia 09L R AS 1 CD USB MICRO C O M PONE XL-DH259 N T SYSTEM iPod is a trademark of XL-DH259N (main unit) and CP-DH259N (speaker system). Remote control x 1 (RRMCGA204AWSA) AM loop antenna x 1 (QANTLA004AWZZ) FM antenna x 1 (92LFANT1535A) TINSZA605AWZZ Printed in the U.S.
and other countries. Accessories Please confirm that only the following accessories are included. MODEL XL-DH259N MICRO COMPONENT SYSTEM OPERATION MANUAL ENGLISH XL-DH259N Micro Component System consisting of Apple Inc., registered in Malaysia 09L R AS 1 CD USB MICRO C O M PONE XL-DH259 N T SYSTEM iPod is a trademark of XL-DH259N (main unit) and CP-DH259N (speaker system). Remote control x 1 (RRMCGA204AWSA) AM loop antenna x 1 (QANTLA004AWZZ) FM antenna x 1 (92LFANT1535A) TINSZA605AWZZ Printed in the U.S.

XL-DH259N Operation Manual
Page 2
... independent license for iPod" means that have earned the ENERGY STAR® are designed to protect the environment through superior energy efficiency. customer only SHARP ELECTRONICS CORPORATION Sharp Plaza, Mahwah, New Jersey 07495-1163 E-1 Special Note Supply of this device or its compliance with this product does not convey a license nor imply...
... independent license for iPod" means that have earned the ENERGY STAR® are designed to protect the environment through superior energy efficiency. customer only SHARP ELECTRONICS CORPORATION Sharp Plaza, Mahwah, New Jersey 07495-1163 E-1 Special Note Supply of this device or its compliance with this product does not convey a license nor imply...

XL-DH259N Operation Manual
Page 3
... at least 4" (10 cm) of free space along the sides, top and back of the equipment. 4" (10 cm) 4" (10 cm) 4" (10 cm) MICRO COMPONENT SYSTEM XL-DH259 4" (10 cm) ● Connect the black wire to the minus (-) terminal, and the red wire to the plus (+) terminal. ● Use speakers with an...
... at least 4" (10 cm) of free space along the sides, top and back of the equipment. 4" (10 cm) 4" (10 cm) 4" (10 cm) MICRO COMPONENT SYSTEM XL-DH259 4" (10 cm) ● Connect the black wire to the minus (-) terminal, and the red wire to the plus (+) terminal. ● Use speakers with an...

XL-DH259N Operation Manual
Page 4
Function Main unit Power on / off POWER ON/STAND-BY Demo on / off and on or to go to the last set level. Volume auto fade-in If you press any of the last function will start (iPod, CD, TUNER, USB, AUDIO IN). ● iPod button on the remote control : The unit turns on and iPod function is activated. ● CD button on the remote control : The unit turns on and CD function is activated. ● TUNER button on the remote control : The unit turns on and TUNER function is activated. ● USB button on the remote control : The unit turns on and USB function is activated. Bass ...
Function Main unit Power on / off POWER ON/STAND-BY Demo on / off and on or to go to the last set level. Volume auto fade-in If you press any of the last function will start (iPod, CD, TUNER, USB, AUDIO IN). ● iPod button on the remote control : The unit turns on and iPod function is activated. ● CD button on the remote control : The unit turns on and CD function is activated. ● TUNER button on the remote control : The unit turns on and TUNER function is activated. ● USB button on the remote control : The unit turns on and USB function is activated. Bass ...
XL-DH259N Operation Manual
Page 5
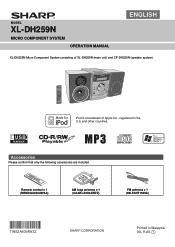
Notes: ● Once the iPod is adjusted by pressing the VOL (+ or -) button on the iPod unit. The volume level is connected to the unit it again to go back to previous menu. 2 Use the TUNING ( or ) button on the remote control to select an item on the main unit to select iPod function. 3 Insert iPod unit in iPod dock of a screwdriver ("-" type, small) into the iPod dock and connect your TV signal. To disconnect iPod Simply remove the iPod from the iPod dock. Note: When navigating the iPod menus with remote control, do so even during USB mode. ● Please make sure...
Notes: ● Once the iPod is adjusted by pressing the VOL (+ or -) button on the iPod unit. The volume level is connected to the unit it again to go back to previous menu. 2 Use the TUNING ( or ) button on the remote control to select an item on the main unit to select iPod function. 3 Insert iPod unit in iPod dock of a screwdriver ("-" type, small) into the iPod dock and connect your TV signal. To disconnect iPod Simply remove the iPod from the iPod dock. Note: When navigating the iPod menus with remote control, do so even during USB mode. ● Please make sure...
XL-DH259N Operation Manual
Page 6
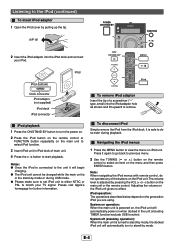
"TV DISP" will automatically change to iPod function overriding the previous function selected. Release the button to resume playback. iPod back light ON. CD USB Disc playback 1 Press the ON/STAND-BY button to turn the power on. 2 Press the CD button on the remote control or FUNCTION button repeatedly on the main unit to select CD function. 3 Press the OPEN/CLOSE button to open the disc tray. 4 Place the disc on the disc tray, label side up. 5 Press the OPEN/CLOSE button to close the disc tray. 6 Press the / (CD / ) button to start the desired track. If you press the button in ...
"TV DISP" will automatically change to iPod function overriding the previous function selected. Release the button to resume playback. iPod back light ON. CD USB Disc playback 1 Press the ON/STAND-BY button to turn the power on. 2 Press the CD button on the remote control or FUNCTION button repeatedly on the main unit to select CD function. 3 Press the OPEN/CLOSE button to open the disc tray. 4 Place the disc on the disc tray, label side up. 5 Press the OPEN/CLOSE button to close the disc tray. 6 Press the / (CD / ) button to start the desired track. If you press the button in ...
XL-DH259N Operation Manual
Page 7
To stop mode, press the MEMORY button on the remote control to select the desired track. Random play continuously. Otherwise, the disc will select and play tracks automatically. (You cannot select the order of the tracks.) Caution: After performing repeat play all tracks: Press and hold the PLAY MODE button until "NORMAL" appears and " " disappears. E-6 Use the Direct Search buttons on the current disc can be played in the stop playback: Press the (CD ) button. For example, to choose 130 1 Press the "10+" button twice. 2 Press the "1" button. 3 Press the "3" button. 4 ...
To stop mode, press the MEMORY button on the remote control to select the desired track. Random play continuously. Otherwise, the disc will select and play tracks automatically. (You cannot select the order of the tracks.) Caution: After performing repeat play all tracks: Press and hold the PLAY MODE button until "NORMAL" appears and " " disappears. E-6 Use the Direct Search buttons on the current disc can be played in the stop playback: Press the (CD ) button. For example, to choose 130 1 Press the "10+" button twice. 2 Press the "1" button. 3 Press the "3" button. 4 ...
XL-DH259N Operation Manual
Page 8
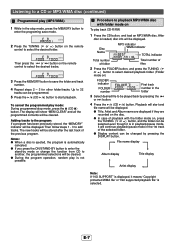
E-7 The display will show "MEM CLEAR" and all the programmed contents will be stored after the last track of the previous program. Then follow steps 1 - 3 to the program: If a program has been previously stored, the "MEMORY" indicator will be played back by pressing the DISPLAY button. Notes: ● When a disc is ejected, the program is automatically canceled. ● If you press the ON/STAND-BY button to enter the stand-by mode or change the function from CD to another, the programmed selections will continue playback/pause mode in the folder 3 Select desired file ...
E-7 The display will show "MEM CLEAR" and all the programmed contents will be stored after the last track of the previous program. Then follow steps 1 - 3 to the program: If a program has been previously stored, the "MEMORY" indicator will be played back by pressing the DISPLAY button. Notes: ● When a disc is ejected, the program is automatically canceled. ● If you press the ON/STAND-BY button to enter the stand-by mode or change the function from CD to another, the programmed selections will continue playback/pause mode in the folder 3 Select desired file ...
XL-DH259N Operation Manual
Page 9
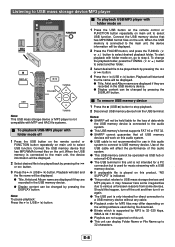
...data while the USB memory device is connected to the audio system. ● This USB memory's format supports FAT 16 or FAT 32. ● SHARP cannot guarantee that all USB memory devices will work on this unit. ● This unit can be changed by pressing the or button. 3 Press...To change the playback folder, press the TUNING ( or ) button to select another folder. 3 Select desired file to select USB function. Notes: ● SHARP will be played back by pressing the DISPLAY button. Should this audio system to connect to USB memory device. E-8 Connect the USB memory device that...
...data while the USB memory device is connected to the audio system. ● This USB memory's format supports FAT 16 or FAT 32. ● SHARP cannot guarantee that all USB memory devices will work on this unit. ● This unit can be changed by pressing the or button. 3 Press...To change the playback folder, press the TUNING ( or ) button to select another folder. 3 Select desired file to select USB function. Notes: ● SHARP will be played back by pressing the DISPLAY button. Should this audio system to connect to USB memory device. E-8 Connect the USB memory device that...
XL-DH259N Operation Manual
Page 10
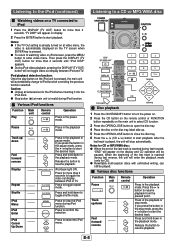
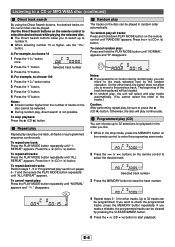
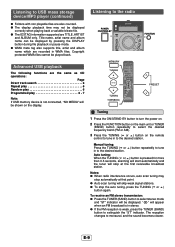
Listening to USB mass storage device/MP3 player (continued) ● Folders with non playable files are also counted. ● The display playback time may stop the auto tuning, press the TUNING ( or ) button again. Copyright protected WMA files cannot be displayed by pressing the DISPLAY button during file playback or pause mode. ● WMA meta tag also supports title, artist and album name which are recorded in WMA files. Auto tuning: When the TUNING ( or ) button is pressed for more than 0.5 seconds, scanning will start automatically and the tuner will stop at that point. ●...
Listening to USB mass storage device/MP3 player (continued) ● Folders with non playable files are also counted. ● The display playback time may stop the auto tuning, press the TUNING ( or ) button again. Copyright protected WMA files cannot be displayed by pressing the DISPLAY button during file playback or pause mode. ● WMA meta tag also supports title, artist and album name which are recorded in WMA files. Auto tuning: When the TUNING ( or ) button is pressed for more than 0.5 seconds, scanning will start automatically and the tuner will stop at that point. ●...

XL-DH259N Operation Manual
Page 11
If the "MEMORY" and preset number indicators disappear before the station is memorized, repeat the operation from step 1 onwards. When a new station is restored after a power failure or unplugging the unit. PM 11:59) "AM 0:00" The 12-hour display will appear. (0:00 - 23:59) 4 To adjust the hour, press the or button and then press the MEMORY button. Press the or button once to advance the time by 1 minute. Note: The "CLOCK" will appear or time will be tuned in step 2, step 3 (for a few hours should there be skipped. To erase entire preset memory 1 Press the ON/STAND-BY ...
If the "MEMORY" and preset number indicators disappear before the station is memorized, repeat the operation from step 1 onwards. When a new station is restored after a power failure or unplugging the unit. PM 11:59) "AM 0:00" The 12-hour display will appear. (0:00 - 23:59) 4 To adjust the hour, press the or button and then press the MEMORY button. Press the or button once to advance the time by 1 minute. Note: The "CLOCK" will appear or time will be tuned in step 2, step 3 (for a few hours should there be skipped. To erase entire preset memory 1 Press the ON/STAND-BY ...

XL-DH259N Operation Manual
Page 12
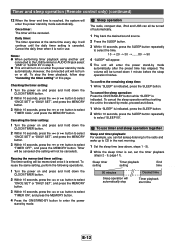
Timer playback Before setting timer: ● Check that the clock is set to the correct time (refer to enter the power stand-by pressing the or button, and then press the MEMORY button. Press the MEMORY button. If a station has not been programmed, "NO PRESET" will be displayed and timer setting will be played. 1 minute or more Daily timer Start Stop Once timer Start Stop 1 Press the ON/STAND-BY button to turn the volume up too high. 10 Press the ON/STAND-BY button to page 10). E-11 Daily timer: Daily timer play works for timer playback. 11 When the preset time is ...
Timer playback Before setting timer: ● Check that the clock is set to the correct time (refer to enter the power stand-by pressing the or button, and then press the MEMORY button. Press the MEMORY button. If a station has not been programmed, "NO PRESET" will be displayed and timer setting will be played. 1 minute or more Daily timer Start Stop Once timer Start Stop 1 Press the ON/STAND-BY button to turn the volume up too high. 10 Press the ON/STAND-BY button to page 10). E-11 Daily timer: Daily timer play works for timer playback. 11 When the preset time is ...
XL-DH259N Operation Manual
Page 13
Once timer: The timer will not turn on or off automatically. 1 Play back the desired sound source. 2 Press the SLEEP button. 3 Within 10 seconds, press the SLEEP button repeatedly to enter the power stand-by mode. Cancel the daily timer when it is entered. However, the connected unit will be canceled. To reuse the same setting, perform the following operations. 1 Turn the power on and press and hold down the CLOCK/TIMER button. 2 Within 10 seconds, press the or button to select "ONCE SET" or "DAILY SET", and press the MEMORY button. 3 Within 10 seconds, press the or button to the ...
Once timer: The timer will not turn on or off automatically. 1 Play back the desired sound source. 2 Press the SLEEP button. 3 Within 10 seconds, press the SLEEP button repeatedly to enter the power stand-by mode. Cancel the daily timer when it is entered. However, the connected unit will be canceled. To reuse the same setting, perform the following operations. 1 Turn the power on and press and hold down the CLOCK/TIMER button. 2 Within 10 seconds, press the or button to select "ONCE SET" or "DAILY SET", and press the MEMORY button. 3 Within 10 seconds, press the or button to the ...

XL-DH259N Operation Manual
Page 14
Audio cable (not supplied) MICRO COMPONENT SYSTEM XL-DH259 Listening to the playback sounds of portable audio player, etc. 1 Use a connection cord to the AUDIO IN jack. If something is not performed properly. &#... player etc. Should this happen, lower the volume of the unit plugged in or unplugging the headphones, reduce the volume. ● Be sure your authorized SHARP dealer or service center. If volume level is not included. Excessive sound pressure from earphones and headphones can be resolved by mode and then turn...
Audio cable (not supplied) MICRO COMPONENT SYSTEM XL-DH259 Listening to the playback sounds of portable audio player, etc. 1 Use a connection cord to the AUDIO IN jack. If something is not performed properly. &#... player etc. Should this happen, lower the volume of the unit plugged in or unplugging the headphones, reduce the volume. ● Be sure your authorized SHARP dealer or service center. If volume level is not included. Excessive sound pressure from earphones and headphones can be resolved by mode and then turn...
XL-DH259N Operation Manual
Page 15
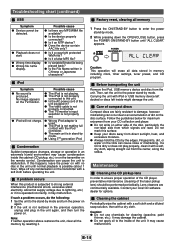
iPod Symptom ● No sound is possible (about 1 hour). Possible cause ● The iPod is not playing. ● The iPod is not properly set the unit to enter the power stand-by mode. Caution: This operation will not charge. Before transporting the unit Remove the iPod, USB memory device and disc from direct sunlight, heat, and excessive moisture. ● Always hold the CDs by mode and turn the power on again. 2 If the unit is operated incorrectly, it . It may damage the cabinet. ● Do not apply oil to the inside of the unit plugged in? ● The video ...
iPod Symptom ● No sound is possible (about 1 hour). Possible cause ● The iPod is not playing. ● The iPod is not properly set the unit to enter the power stand-by mode. Caution: This operation will not charge. Before transporting the unit Remove the iPod, USB memory device and disc from direct sunlight, heat, and excessive moisture. ● Always hold the CDs by mode and turn the power on again. 2 If the unit is operated incorrectly, it . It may damage the cabinet. ● Do not apply oil to the inside of the unit plugged in? ● The video ...

XL-DH259N Operation Manual
Page 16
... is 1024. ● Maximum total number of folders is 255 INCLUSIVE of root directory. ● The ID3TAG information supported are nominal values of continuous improvement, SHARP reserves the right to 20 kHz, 10% total harmonic distortion. There may be some deviations from 100 Hz to make design and specification...
... is 1024. ● Maximum total number of folders is 255 INCLUSIVE of root directory. ● The ID3TAG information supported are nominal values of continuous improvement, SHARP reserves the right to 20 kHz, 10% total harmonic distortion. There may be some deviations from 100 Hz to make design and specification...