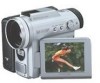
Operation Manual
Page 8
... the Lens Hood 17 Using the Viewfinder 17 Using the LCD Monitor 19 Tips on Recording Positions 20 Basic Operations Camera Recording Selecting the Camcorder Mode 21 Easy Camera Recording on Tape in Full Auto Mode .. 22 Zooming 23 Power Standby Mode 24 Turning on/off the Backlight ...24 Auto Focus 25 Macro Shots 25 Remaining Recording Time Display 26 Remaining Battery Power Display 26 Playback Tape Playback 27 Volume Control 28 Still 28 Video...
... the Lens Hood 17 Using the Viewfinder 17 Using the LCD Monitor 19 Tips on Recording Positions 20 Basic Operations Camera Recording Selecting the Camcorder Mode 21 Easy Camera Recording on Tape in Full Auto Mode .. 22 Zooming 23 Power Standby Mode 24 Turning on/off the Backlight ...24 Auto Focus 25 Macro Shots 25 Remaining Recording Time Display 26 Remaining Battery Power Display 26 Playback Tape Playback 27 Volume Control 28 Still 28 Video...
Operation Manual
Page 35
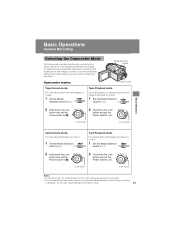
... to OFF without pressing the Lock button. • Do not change the camcorder mode by operating the Media Selection switch during recording or playback, as a digital still camera for recording and playing back images on tapes and as this may cause damage...operation. Media Selection switch Camcorder modes Power switch Tape Camera mode For recording motion and still images on a tape. 1 Set the Media Selection switch to w. Basic Operations Camera Recording Selecting the Camcorder Mode This camcorder includes functions for use as both a video camera for recording and playing back...
... to OFF without pressing the Lock button. • Do not change the camcorder mode by operating the Media Selection switch during recording or playback, as a digital still camera for recording and playing back images on tapes and as this may cause damage...operation. Media Selection switch Camcorder modes Power switch Tape Camera mode For recording motion and still images on a tape. 1 Set the Media Selection switch to w. Basic Operations Camera Recording Selecting the Camcorder Mode This camcorder includes functions for use as both a video camera for recording and playing back...

Operation Manual
Page 36
...and other functions or turning the power on Tape in Full Auto Mode Available mode: Tape Camera 4 Press the Start/Stop button to begin recording. If noise occurs, use a commercially ... Before recording an important scene, please perform the recording test, then playback to prepare your camcorder for recording. REC • Before you start recording, perform the operations described on pages ... Maximum continuous recording and actual recording times in the actual recording time compared to clean the video heads (see page 58). Power switch Start/Stop button 1 Remove the lens cap. 2...
...and other functions or turning the power on Tape in Full Auto Mode Available mode: Tape Camera 4 Press the Start/Stop button to begin recording. If noise occurs, use a commercially ... Before recording an important scene, please perform the recording test, then playback to prepare your camcorder for recording. REC • Before you start recording, perform the operations described on pages ... Maximum continuous recording and actual recording times in the actual recording time compared to clean the video heads (see page 58). Power switch Start/Stop button 1 Remove the lens cap. 2...

Operation Manual
Page 39
... in the situations described on most types of a subject which is set for your videos. Instead, zoom out all the way by pushing the Power Zoom control to the W side, and then move the camcorder closer to the subject until you are recording a macro shot, be sure that the... desired angle of the scene. Basic Operations Auto Focus Macro Shots Available modes: Tape Camera, Card Camera Available modes: Tape Camera, Card Camera The camcorder is preset to Auto Focus mode, which is dirty or fogged, the camcorder may not be able to focus correctly. Always keep the subject in the center of...
... in the situations described on most types of a subject which is set for your videos. Instead, zoom out all the way by pushing the Power Zoom control to the W side, and then move the camcorder closer to the subject until you are recording a macro shot, be sure that the... desired angle of the scene. Basic Operations Auto Focus Macro Shots Available modes: Tape Camera, Card Camera Available modes: Tape Camera, Card Camera The camcorder is preset to Auto Focus mode, which is dirty or fogged, the camcorder may not be able to focus correctly. Always keep the subject in the center of...

Operation Manual
Page 115
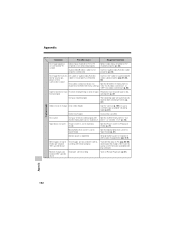
...pack and turn on power (pp. 6, 7). Manual Focus mode is in effect. Zoom used on video cas- Zoom out from subject (p. 23). Set the DEMO MODE menu item to Camera mode. Charge battery pack sufficiently (p. 8). Safety function is engaged. Erasure-protect tab on close subject.... remove battery pack. Power Symptom Possible cause Suggested solution No power. Close tab or use a new cassette sette is in Tape Camera mode. Display automatically Camcorder is open. (p. 96). Dew in bright- Set Power switch to Auto Focus mode (p. 54). Auto focus does not work ...
...pack and turn on power (pp. 6, 7). Manual Focus mode is in effect. Zoom used on video cas- Zoom out from subject (p. 23). Set the DEMO MODE menu item to Camera mode. Charge battery pack sufficiently (p. 8). Safety function is engaged. Erasure-protect tab on close subject.... remove battery pack. Power Symptom Possible cause Suggested solution No power. Close tab or use a new cassette sette is in Tape Camera mode. Display automatically Camcorder is open. (p. 96). Dew in bright- Set Power switch to Auto Focus mode (p. 54). Auto focus does not work ...
Operation Manual
Page 116
... switch is depleted. The images are recorded in self recording with a fully charged one (pp. 6-8). Select video input channel or TV channel properly (p. 30). ternal source ap- camcorder screen. Rewind or fast forward tape to Playback mode (p. 21). Set the Power switch to de- Set ...the Media Selection switch to match the S-VIDEO IN menu setting. Battery pack is set to Camera mode. Charge battery pack or replace...
... switch is depleted. The images are recorded in self recording with a fully charged one (pp. 6-8). Select video input channel or TV channel properly (p. 30). ternal source ap- camcorder screen. Rewind or fast forward tape to Playback mode (p. 21). Set the Power switch to de- Set ...the Media Selection switch to match the S-VIDEO IN menu setting. Battery pack is set to Camera mode. Charge battery pack or replace...

Operation Manual
Page 119
... customer assistance, please call 1-800-BE SHARP (1-800-2374277) or visit SHARP's website (http://www.sharpusa.com). 105 Appendix Specifications Camcorder Signal System: NTSC standard Recording System: 2 rotary heads, helical scanning system Cassette: Digital VCR Mini DV video cassette Recording/Playback Time: 90 minutes (... 4.5 mm) CCD image sensor (with approx. 1,330,000 pixels including optical black, effective pixels: 690,000 pixels in Tape Camera mode, 1,250,000 pixels in Card Camera mode) Lens: 10K optical zoom lens (F1.8, f=3.8-38.0 mm) Lens Filter Diameter: 30 mm Monitor: 2.5" (6.4 cm) ...
... customer assistance, please call 1-800-BE SHARP (1-800-2374277) or visit SHARP's website (http://www.sharpusa.com). 105 Appendix Specifications Camcorder Signal System: NTSC standard Recording System: 2 rotary heads, helical scanning system Cassette: Digital VCR Mini DV video cassette Recording/Playback Time: 90 minutes (... 4.5 mm) CCD image sensor (with approx. 1,330,000 pixels including optical black, effective pixels: 690,000 pixels in Tape Camera mode, 1,250,000 pixels in Card Camera mode) Lens: 10K optical zoom lens (F1.8, f=3.8-38.0 mm) Lens Filter Diameter: 30 mm Monitor: 2.5" (6.4 cm) ...


