Operation Manual
Page 4
DECLARATION OF CONFORMITY Sharp Camcorder, Model VL-Z7U This device complies with more of the FCC Rules. and Matsushita Electric Industrial Co., Ltd. • All other countries. • DPOF is a very high technology ... by turning the equipment off and on the screen as a fixed point of the FCC Rules. RESPONSIBLE PARTY: SHARP ELECTRONICS CORPORATION Sharp Plaza, Mahwah, New Jersey 07430 Phone: 1-800-BE-SHARP NOTE The LCD panel of this camcorder is a trademark of their respective holders. Trademarks • Microsoft and Windows are either registered trademarks or trademarks...
DECLARATION OF CONFORMITY Sharp Camcorder, Model VL-Z7U This device complies with more of the FCC Rules. and Matsushita Electric Industrial Co., Ltd. • All other countries. • DPOF is a very high technology ... by turning the equipment off and on the screen as a fixed point of the FCC Rules. RESPONSIBLE PARTY: SHARP ELECTRONICS CORPORATION Sharp Plaza, Mahwah, New Jersey 07430 Phone: 1-800-BE-SHARP NOTE The LCD panel of this camcorder is a trademark of their respective holders. Trademarks • Microsoft and Windows are either registered trademarks or trademarks...
Operation Manual
Page 8
... ...xii Operation References Part Names 1 Warning Indicators 4 Preparation Attaching and Removing the Battery Pack 6 Charging the Battery Pack 8 Powering the Camcorder from an AC Outlet .......... 9 Inserting and Removing a Cassette 10 Inserting and Removing a Card 11 Installing the Lithium Batteries 12 Setting the...Using the Grip 16 Detaching the Lens Hood 17 Using the Viewfinder 17 Using the LCD Monitor 19 Tips on Recording Positions 20 Basic Operations Camera Recording Selecting the Camcorder Mode 21 Easy Camera Recording on Tape in Full Auto Mode .. 22 Zooming 23...
... ...xii Operation References Part Names 1 Warning Indicators 4 Preparation Attaching and Removing the Battery Pack 6 Charging the Battery Pack 8 Powering the Camcorder from an AC Outlet .......... 9 Inserting and Removing a Cassette 10 Inserting and Removing a Card 11 Installing the Lithium Batteries 12 Setting the...Using the Grip 16 Detaching the Lens Hood 17 Using the Viewfinder 17 Using the LCD Monitor 19 Tips on Recording Positions 20 Basic Operations Camera Recording Selecting the Camcorder Mode 21 Easy Camera Recording on Tape in Full Auto Mode .. 22 Zooming 23...

Operation Manual
Page 12
...not aim the lens at 30% to attach and may damage the CCD sensor or LCD screen surface. This is turned on. To prevent the camcorder from incandescent lights may deform the camcorder, or cause it may not be difficult to 80% relative humidity. Do not allow ...sun. xii • Always respect prohibitions or restrictions on the use only a strong, stable tripod. • When using your camcorder in a cold environment, the LCD monitor screen often appears less bright immediately after the power is not a malfunction. Precautions • Before recording an important scene, ...
...not aim the lens at 30% to attach and may damage the CCD sensor or LCD screen surface. This is turned on. To prevent the camcorder from incandescent lights may deform the camcorder, or cause it may not be difficult to 80% relative humidity. Do not allow ...sun. xii • Always respect prohibitions or restrictions on the use only a strong, stable tripod. • When using your camcorder in a cold environment, the LCD monitor screen often appears less bright immediately after the power is not a malfunction. Precautions • Before recording an important scene, ...

Operation Manual
Page 15
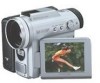
Front view Zoom microphone Operation button (p. 31) shoe (p. 44) Zoom lens Flash (p. 74) Stereo microphone DISPLAY button (p. 31) LCD LAMP button (p. 24) Flash sensor (p. 74) 1 Operation References Operation References Part Names For details on the use of each part, refer to the page number indicated in parentheses.
Front view Zoom microphone Operation button (p. 31) shoe (p. 44) Zoom lens Flash (p. 74) Stereo microphone DISPLAY button (p. 31) LCD LAMP button (p. 24) Flash sensor (p. 74) 1 Operation References Operation References Part Names For details on the use of each part, refer to the page number indicated in parentheses.

Operation Manual
Page 16
Operation References Left view USB terminal (p. 87) Earphones jack (p. 29) Operation References LCD monitor (p. 19) DC IN jack (pp. 8, 9) AV terminal Terminal cover (pp. 30, 61, 62, 66) (pp. 29, 30, 61, 62, 64, 66, 87) DV terminal (pp. 64, 66) Tripod socket* Lithium battery cover (p. 12) Diopter adjustment dial (p. 18) * When attaching a tripod with a guide pin, do not attach the pin to the bottom 2 of the camcorder. Battery release (pp. 7, 12) Card slot cover (p. 11)
Operation References Left view USB terminal (p. 87) Earphones jack (p. 29) Operation References LCD monitor (p. 19) DC IN jack (pp. 8, 9) AV terminal Terminal cover (pp. 30, 61, 62, 66) (pp. 29, 30, 61, 62, 64, 66, 87) DV terminal (pp. 64, 66) Tripod socket* Lithium battery cover (p. 12) Diopter adjustment dial (p. 18) * When attaching a tripod with a guide pin, do not attach the pin to the bottom 2 of the camcorder. Battery release (pp. 7, 12) Card slot cover (p. 11)

Operation Manual
Page 18
...BATTERY I NSER T A CASSE TTE. DEW DEW Dew has formed inside the camcorder. Prepare a new cassette. Replace it replaced. About 10 seconds after 3 seconds Description of its service life. Call your local authorized Sharp dealer to have it with a new cassette (see page 10). The erasure ...has been slid to the record-protect position, preventing recording (see page 96). E JECT THE CASSE TTE. The fluorescent lamp behind the LCD monitor is almost depleted. CASSE TTE NOT RECORDABL E. PROT EC T. Insert a cassette (see page 10). Use the AC adapter or fully...
...BATTERY I NSER T A CASSE TTE. DEW DEW Dew has formed inside the camcorder. Prepare a new cassette. Replace it replaced. About 10 seconds after 3 seconds Description of its service life. Call your local authorized Sharp dealer to have it with a new cassette (see page 10). The erasure ...has been slid to the record-protect position, preventing recording (see page 96). E JECT THE CASSE TTE. The fluorescent lamp behind the LCD monitor is almost depleted. CASSE TTE NOT RECORDABL E. PROT EC T. Insert a cassette (see page 10). Use the AC adapter or fully...

Operation Manual
Page 20
Preparation Preparation Preparation Attaching and Removing the Battery Pack Attaching 3 Slide the battery pack in the direction of the arrow with the "m" mark facing out. Power switch "m" mark 1 Make sure that the Power switch is set to OFF. 2 Open the LCD monitor to a 90° angle to the camcorder body. 4 Push the battery pack in the direction of the arrow until it clicks. 90˚ 6
Preparation Preparation Preparation Attaching and Removing the Battery Pack Attaching 3 Slide the battery pack in the direction of the arrow with the "m" mark facing out. Power switch "m" mark 1 Make sure that the Power switch is set to OFF. 2 Open the LCD monitor to a 90° angle to the camcorder body. 4 Push the battery pack in the direction of the arrow until it clicks. 90˚ 6

Operation Manual
Page 21
...firmly hold the battery pack while pressing the release. • Use only SHARP model BT-L226 battery packs with this camcorder. Preparation Removing 1 Make sure that the battery pack is not, the battery pack may come off or camcorder operation may fail because of the poor contact pressure. • To ... of other batteries may create a risk of fire or explosion. • Before closing the LCD monitor, make sure the battery pack is set to OFF, then open the LCD monitor to a 90° angle to the camcorder body. 90˚ 2 Slide the battery release in the direction of the arrow. Battery ...
...firmly hold the battery pack while pressing the release. • Use only SHARP model BT-L226 battery packs with this camcorder. Preparation Removing 1 Make sure that the battery pack is not, the battery pack may come off or camcorder operation may fail because of the poor contact pressure. • To ... of other batteries may create a risk of fire or explosion. • Before closing the LCD monitor, make sure the battery pack is set to OFF, then open the LCD monitor to a 90° angle to the camcorder body. 90˚ 2 Slide the battery release in the direction of the arrow. Battery ...

Operation Manual
Page 22
... power consumption. The battery pack may vary depending on the ambient temperature and the condition of the camcorder (1), and plug the AC plug into a power outlet (2). • The POWER/CHARGE (RED...pages 98 and 99 for more information on using the battery pack. • Charge only SHARP model BT-L226 battery packs. This may burst, causing personal injury and damage. • ...approximate times in Tape modes Max. Battery Charging recording time continuous pack time playback time LCD LCD on LCD closed open the terminal cover and connect it. 8 Other types of battery packs may...
... power consumption. The battery pack may vary depending on the ambient temperature and the condition of the camcorder (1), and plug the AC plug into a power outlet (2). • The POWER/CHARGE (RED...pages 98 and 99 for more information on using the battery pack. • Charge only SHARP model BT-L226 battery packs. This may burst, causing personal injury and damage. • ...approximate times in Tape modes Max. Battery Charging recording time continuous pack time playback time LCD LCD on LCD closed open the terminal cover and connect it. 8 Other types of battery packs may...

Operation Manual
Page 26
... battery is used to store the memory of the date and time settings. 1 Make sure that the Power switch is set to OFF. 2 Open the LCD monitor to a 90° angle to the camcorder body. 3 Slide the battery release in the direction of a ballpoint pen.
... battery is used to store the memory of the date and time settings. 1 Make sure that the Power switch is set to OFF. 2 Open the LCD monitor to a 90° angle to the camcorder body. 3 Slide the battery release in the direction of a ballpoint pen.

Operation Manual
Page 32
... and set the Power switch to v. 3 While looking through the viewfinder by the viewfinder. • The viewfinder automatically turns off when the LCD monitor is opened. Adjusting the diopter Adjust the diopter according to close the viewfinder after use excessive force when moving the viewfinder. • Do... not pick up the camcorder by using the Operation button (see page 31 for use of the Operation button). • Be sure to your eyesight when the picture ...
... and set the Power switch to v. 3 While looking through the viewfinder by the viewfinder. • The viewfinder automatically turns off when the LCD monitor is opened. Adjusting the diopter Adjust the diopter according to close the viewfinder after use excessive force when moving the viewfinder. • Do... not pick up the camcorder by using the Operation button (see page 31 for use of the Operation button). • Be sure to your eyesight when the picture ...

Operation Manual
Page 33
... when moving the LCD monitor. • When closing the LCD monitor, make sure the battery pack is properly attached to the camcorder, otherwise the monitor may become damaged. • Do not pick up the camcorder by the LCD monitor. • Do not place the camcorder with the LCD monitor screen facing ...down the Lock button and set the Power switch to the camcorder body. 3 Hold down . • Close the LCD monitor completely with the screen facing out for ...
... when moving the LCD monitor. • When closing the LCD monitor, make sure the battery pack is properly attached to the camcorder, otherwise the monitor may become damaged. • Do not pick up the camcorder by the LCD monitor. • Do not place the camcorder with the LCD monitor screen facing ...down the Lock button and set the Power switch to the camcorder body. 3 Hold down . • Close the LCD monitor completely with the screen facing out for ...

Operation Manual
Page 34
... Preparation Tips on Recording Positions To create images that the screen faces downward. Place your elbows against your fingers during recording. Turn the LCD monitor so that are easy to touch the flash or flash sensor with your eye. Basic posture Shooting from a low angle Balance your... left hand under the camcorder for support. Turn the LCD monitor so that the screen faces upward. Note: • Take care not to prevent a shaky image. It will cause noise...
... Preparation Tips on Recording Positions To create images that the screen faces downward. Place your elbows against your fingers during recording. Turn the LCD monitor so that are easy to touch the flash or flash sensor with your eye. Basic posture Shooting from a low angle Balance your... left hand under the camcorder for support. Turn the LCD monitor so that the screen faces upward. Note: • Take care not to prevent a shaky image. It will cause noise...

Operation Manual
Page 36
... page 23) and other functions or turning the power on and off frequently will increase power consumption. continuous recording time LCD LCD closed open Actual recording time LCD LCD closed open BT-L226 115 100 55 50 Note: • Using the zoom (see page xiv). REC •...properly. Media Selection switch Note: • Before recording an important scene, please perform the recording test, then playback to prepare your camcorder for recording. Basic Operations Basic Operations Camera Recording Easy Camera Recording on Tape in Full Auto Mode Available mode: Tape Camera 4 ...
... page 23) and other functions or turning the power on and off frequently will increase power consumption. continuous recording time LCD LCD closed open Actual recording time LCD LCD closed open BT-L226 115 100 55 50 Note: • Using the zoom (see page xiv). REC •...properly. Media Selection switch Note: • Before recording an important scene, please perform the recording test, then playback to prepare your camcorder for recording. Basic Operations Basic Operations Camera Recording Easy Camera Recording on Tape in Full Auto Mode Available mode: Tape Camera 4 ...

Operation Manual
Page 38
...mode if it remains in Recording Standby mode after 3 minutes, the camcorder will turn off if recording is not started within 2 minutes. When the camcorder is useful when watching playback on the backlight Press the LCD LAMP button. Turning on/off the Backlight Available modes: All modes ... more than 5 minutes - To turn on a TV. When Power Standby mode, for more than 2 seconds when you close the LCD monitor. 24 When the camcorder remains in Tape Camera mode. • The screen turns off . Also, this function is set to start recording. Basic Operations STANDBY...
...mode if it remains in Recording Standby mode after 3 minutes, the camcorder will turn off if recording is not started within 2 minutes. When the camcorder is useful when watching playback on the backlight Press the LCD LAMP button. Turning on/off the Backlight Available modes: All modes ... more than 5 minutes - To turn on a TV. When Power Standby mode, for more than 2 seconds when you close the LCD monitor. 24 When the camcorder remains in Tape Camera mode. • The screen turns off . Also, this function is set to start recording. Basic Operations STANDBY...

Operation Manual
Page 41
... is not erased (see pages 62-65). You can also watch the playback in the viewfinder by closing the LCD monitor with the sound through the speaker when watching the playback in the viewfinder. 4 Press m to begin playback... If you do not intend to OFF without pressing the Lock button. Set the Power switch to record, press The LCD monitor screen functions as a handy playback monitor. Note: • The tape automatically rewinds when playback reaches the end...in Tape Available mode: Tape Playback Playback mode, the "g" mark appears and the camcorder enters Recording Standby mode.
... is not erased (see pages 62-65). You can also watch the playback in the viewfinder by closing the LCD monitor with the sound through the speaker when watching the playback in the viewfinder. 4 Press m to begin playback... If you do not intend to OFF without pressing the Lock button. Set the Power switch to record, press The LCD monitor screen functions as a handy playback monitor. Note: • The tape automatically rewinds when playback reaches the end...in Tape Available mode: Tape Playback Playback mode, the "g" mark appears and the camcorder enters Recording Standby mode.

Operation Manual
Page 42
... (1) or decrease (2) the volume. Basic Operations Playback Volume Control Video Search Available mode: Tape Playback When the camcorder is off in Still mode. • To protect the tape, the camcorder automati- Notes: • The sound is in Tape Playback mode, push the Volume control to the L or... fast forwards (or reverses). cally returns to normal playback if it easy to pause in 28 Still mode for a desired scene on the LCD screen during search. Searching for a Scene Far from the current tape position, release the Operation button to normal fast forward (or rewind)....
... (1) or decrease (2) the volume. Basic Operations Playback Volume Control Video Search Available mode: Tape Playback When the camcorder is off in Still mode. • To protect the tape, the camcorder automati- Notes: • The sound is in Tape Playback mode, push the Volume control to the L or... fast forwards (or reverses). cally returns to normal playback if it easy to pause in 28 Still mode for a desired scene on the LCD screen during search. Searching for a Scene Far from the current tape position, release the Operation button to normal fast forward (or rewind)....

Operation Manual
Page 54
.../stop recording on tape. • You can record yourself in the scene by watching yourself on the LCD monitor. Notes: • Use the remote control to the camcorder body (1), and then rotate it 180° vertically so that the screen faces the other way and the...Features 4 Begin recording. 1 Pull out the viewfinder completely. The remote control is displayed on the LCD monitor. Set the camcorder to v. • The subject is displayed in the self recording position. If the camcorder is steadied, you are recording with the viewfinder. 2 Set the Media Selection switch to V or ...
.../stop recording on tape. • You can record yourself in the scene by watching yourself on the LCD monitor. Notes: • Use the remote control to the camcorder body (1), and then rotate it 180° vertically so that the screen faces the other way and the...Features 4 Begin recording. 1 Pull out the viewfinder completely. The remote control is displayed on the LCD monitor. Set the camcorder to v. • The subject is displayed in the self recording position. If the camcorder is steadied, you are recording with the viewfinder. 2 Set the Media Selection switch to V or ...

Operation Manual
Page 55
... and some other settings will set to v. 6 Begin recording. Useful Features 41 The I indicator will appear. • Be sure that the LCD monitor rotation is exactly 180°, otherwise the image recorded will appear in this case. • The viewfinder does not work in self recording ...lens faces toward you can record yourself while holding the grip. 3 Open the LCD monitor to a 90° angle to the camcorder body (1), and then rotate it 180° vertically (2). 90° 180° 1 Turn the camcorder downward as shown below. 2 Rotate the lens section 90° vertically as ...
... and some other settings will set to v. 6 Begin recording. Useful Features 41 The I indicator will appear. • Be sure that the LCD monitor rotation is exactly 180°, otherwise the image recorded will appear in this case. • The viewfinder does not work in self recording ...lens faces toward you can record yourself while holding the grip. 3 Open the LCD monitor to a 90° angle to the camcorder body (1), and then rotate it 180° vertically (2). 90° 180° 1 Turn the camcorder downward as shown below. 2 Rotate the lens section 90° vertically as ...

Operation Manual
Page 65
...° upside down. 51 AUDIO1 + 2 ROT AT E PB Rotate Playback indicator 7 Press m to begin Rotate Playback. • Even if the camcorder is closed. • When you want to display the menu screen during Tape Playback, playback will stop. Press the center of the Operation button. •...the Operation button in Rotate Playback mode, the image output via a DV connection will display as normal playback. • The camcorder will stop and cancel Rotate Playback when the LCD monitor is in step 7 above. PLAYBACK SET ROTATE PB EXECUTE AUD I O RE TURN ANLG DGTL RE TURN Useful Features...
...° upside down. 51 AUDIO1 + 2 ROT AT E PB Rotate Playback indicator 7 Press m to begin Rotate Playback. • Even if the camcorder is closed. • When you want to display the menu screen during Tape Playback, playback will stop. Press the center of the Operation button. •...the Operation button in Rotate Playback mode, the image output via a DV connection will display as normal playback. • The camcorder will stop and cancel Rotate Playback when the LCD monitor is in step 7 above. PLAYBACK SET ROTATE PB EXECUTE AUD I O RE TURN ANLG DGTL RE TURN Useful Features...